Oil Lines and Check Valves - by 12dot
(Obviously this post is only going
to apply to the oil lines which have the removable crankcase banjo fitting - the
ones that can be "serviced" or disassembled.)
Having just gone through a few sets of oil lines for a Board member to see if
they can be resurrected - I thought it might be good to post some "ideas/hints"
on these in case anyone else wants to try to test or put back into use some oil
lines that have been purchased or that have sat unused for a few years.
The very first thing I
do with each oil line is attach it to my simple tester and submerge the entire
line in water to check for any cracks in the oil line itself or leaks where the
2 end fittings are attached to the lines. It doesn't take putting much pressure
(3-4 lbs. to show you if the line is cracked) If you don't test the entire line
for leaks, you're going to be wasting your time trying anything else with them.
If there are no leaks at the fittings (AND - the usual area for leaks to show up
is the pump end, as that end gets jostled around more than the crankcase end),
then I unscrew and remove the crankcase banjo fitting. The banjo fitting just
unscrews CCW. As the fitting separates - be careful to not lose any of the parts
inside - there is the small spring, which looks like a ball point pen spring
(except it has much finer wire), a stainless washer AND the little ball bearing.
If these parts are all "loose" for you, that's a good thing. Don't be surprised
IF the spring is stuck in the banjo fitting - if it is - don't pull too hard to
try to remove it, or it will break. The little ball will usually just fall out
of the line, but sometimes it also will be stuck on the end of the line inside
the fitting. A toothpick (or something else "soft") will usually get it to
unstick. I then put all of these parts in carb cleaner to eat away any junk on
them.
I then take my air compressor and blow through the line and clear it completely
- with the other items already removed, the higher air pressure is not going to
hurt anything at this point. I usually blow throgh the crankcase end fitting, as
it is a "straight" shot.
Once the items are done soaking (usually overnight) in the carb cleaner, I then
rinse them in gas and then dry them and re-assemble the oil line and fittings
and put the line back on the tester.
I use a Mity-Vac to apply the pressure and at this time I submerge only the
banjo fitting end in water. If there are ANY leaks at all, the water will show
them. I gently pump it up - with the target of 4.5-4.6 psi as the goal.
If the line won't make it there, i.e. - you have air bubbles coming up - then
it's time to disassemble the crankcase end fitting again. I have found there can
be 2 possible reasons why you can't get the desired pressure -
1) the spring is weak OR
2) the seat for the little ball is corrroded and the ball won't seal against the
incoming line.
The first thing to try is to GENTLY stretch that little spring - you will see
that the spring has one end that is smaller than the other end - that end is
ALWAYS the end that goes toward the oil line (where the little ball sits). To
stretch the spring - do NOT touch that small end at all, try to hold it just
beyond the small end and then grab the other bigger end and pull it SLIGHTLY
apart - it should not take much stretching - try to gain about 1/16th inch in
length to start with. Obviously each spring is going to be different due to what
its history is (sitting dry or in oil seems to make a difference).
Then reassemble the fitting again and retest. If you still can't achieve the
desired pressure OR you didn't gain ANY pressure - then you may have a bad seat
for that little ball inside the fitting. I have had SOME success "cleaning" that
seat up by using my AWL and some very fine sand paper on the end of it to smooth
out the seat. Again, you need a "gentle" touch, but the object is to create a
smooth place for that little ball to seal. It seems this problem exists more on
the lines that have sat dry rather the ones that had some oil in that fitting.
And that brings up a suggestion - IF you have any lines that are not being used
and you are storing them - I would store them so that there is oil inside that
fitting at all times - I think it helps that spring keep pliable - if it sits
dry - it has more of a tendency to break.
Alternate Test Setup - by Rotortech
While awaiting some other bits and pieces I
decided to verify the function of the check valves on the oil injection lines.
For reference the bike is a 1974 S3 and the lines appear to be originals.
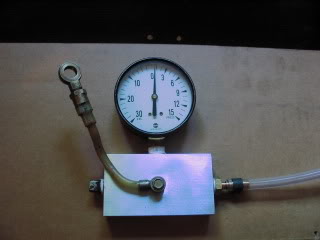
I saw the beautiful pressure checking block in the How To section on Check
Valves. I don't have enough of a machine shop here to whip one of those out so I
used some hose and a vacuum pump with a gauge to do the trick.
Here is the set up. I used one of the banjo bolts, two "o" rings, a piece of
5/16 hose and a clamp.
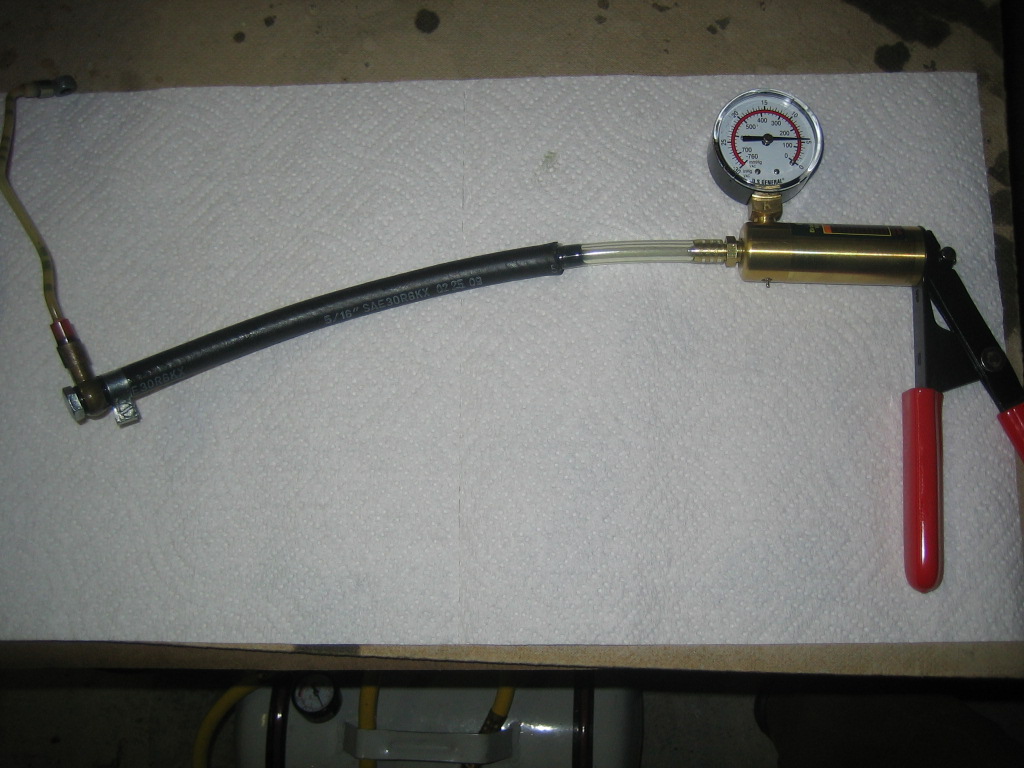
Here is a close up of the way I attached the hose to the banjo bolt. Crude, yes?
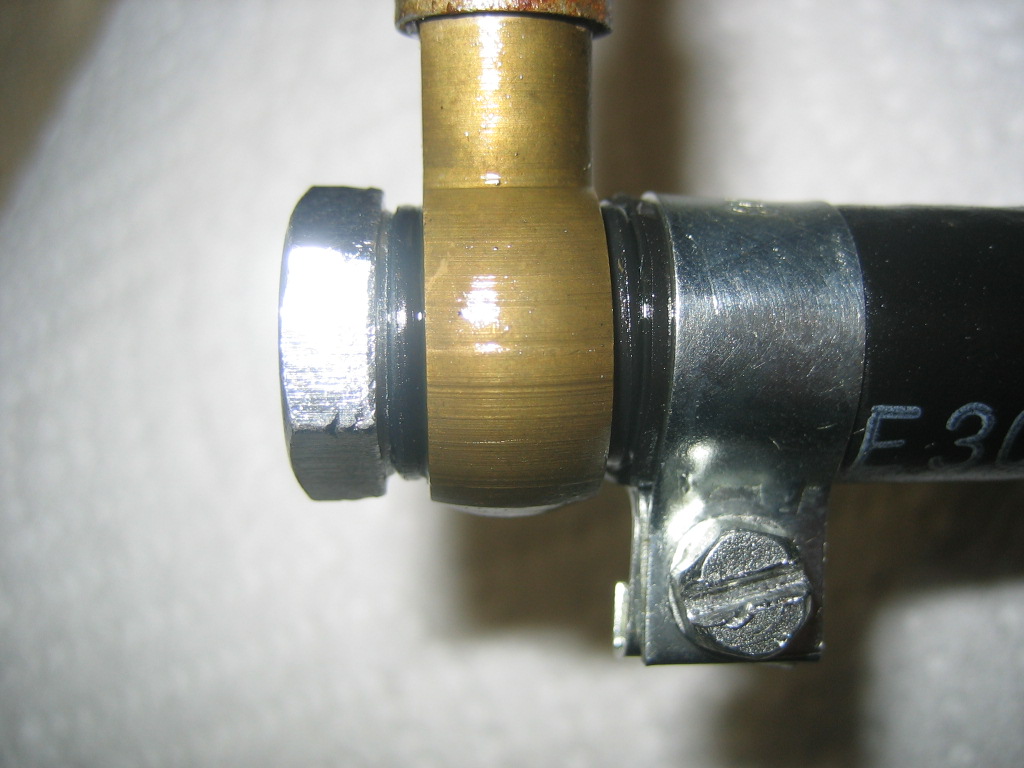
When I attached the hose I grabbed the hose
in my fist and pushed down on the bolt with my thumb while tightening the clamp.
Then I pumped the vacuum pump a little. I heard some air gasping and held the
banjo bolt to my ear to verify that it was leaking there. On the second try - no
air leak. The gauge showed 5 inHg and it was steady with no leakdown. So I
tested the other two check valves and they are all the same - 5 inHg. That is
equivalent to 2.5 psig. I feel confident with that number and will go ahead and
use them as is. I was paranoid about oil control and did not want to risk taking
these apart.
I wanted to share this with others who might be wondering about their check
valves. Even though my bike is the S3 you could use this set up for any model to
test cracking pressure and leakdown on check valves.