 |
|
|
|
|
|
|
|
|
|
|
|
|
|
|
|
|
|
|
|
|
 |
|
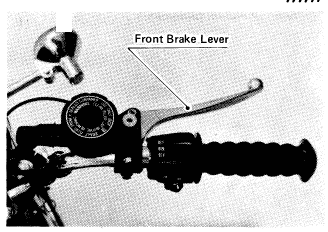
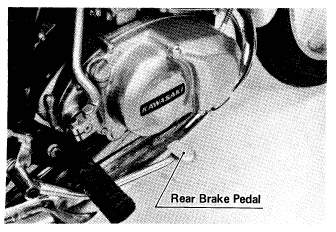
| Brake Lever and Pedal |
|
|
|
|
| The lever on the right side of the handlebar operates the front brake, and the foot pedal on the right side operates the rear brake. |
|
|
| When stopping, always apply both brakes at the same time if stopping quickly; normally the front brake should be applied a little more than the rear. Should braking become necessary when turning a corner, apply only the rear brake in order to minimize the danger of skidding. |
|
|
|
|
 |
|
| The front brake is a hydraulic disc brake. The reservoir for it must be kept filled with disc brake fluid or the brake will not operate. |
|
|
| See the list of recommended brake fluids and other important brake information. |
|
|
| When either the front or rear brake is applied, the tail brake light goes on. The front brake employs a pressure switch, which requires no adjustment (S3A), but the rear brake light switch may need adjustment from time to time. |
|
|
|
|
 |
|
|
 |
|
|
|
|
|
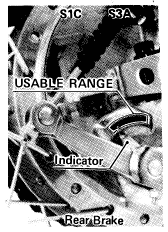
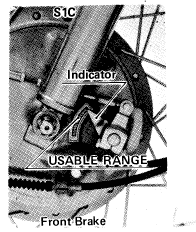
| On both the front and rear brake panels (S1C) or on the rear brake panel (S3A) is a brake lining wear indicator. If the indicator does not point within the USABLE RANGE when the brake is fully applied, the brake shoe linings have worn past the service limit. When this happens, the brake shoes must be replaced and the drum and other brake parts examined. Note: So that it remains in its proper position, do not remove the brake lining wear indicator. |
|
|
|
|
|
|
|
|
|
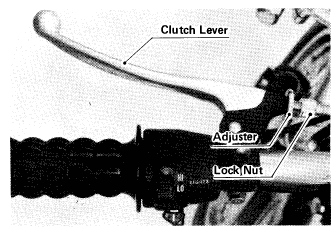
| Clutch Lever |
|
|
 |
|
| The clutch lever on the left side of the handlebar disengages the clutch when pulled in. |
|
|
| The clutch must be left engaged, that is, don't pull in the lever when starting the engine. |
|
|
| If the clutch lever develops too much travel before it will disengage the clutch, take up the excess play by loosening the lock nut, backing out the adjuster, and then re-tightening the lock nut. When this adjustment will no longer take up lever play, readjust the clutch completely. |
|
|
|
| Throttle Grip |
|
|
 |
|
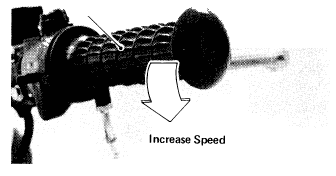
| The right handlebar grip controls the throttle. Viewed from the right grip end, twisting it counterclockwise opens the throttle, which raises engine speed; twisting it clockwise closes the throttle, which lowers engine speed. Releasing it allows spring tension to return it to the closed position. The throttle grip should be adjusted to give it a sufficient but not excessive amount of play. |
|
|
|
|
| Kick Starter Pedal |
|
 |
|
| The kick starter pedal is located at the right side of the engine. |
|
|
| Fold up the right rear footrest, and with your instep on the kick starter pedal and kick starter pedal play taken up, throw your weight down sharply on the pedal to start the engine. |
|
|
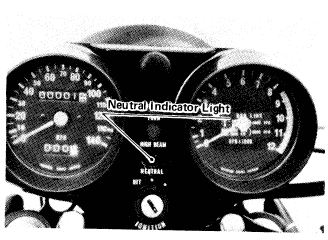
| CAUTION: Before starting the engine, check the neutral indicator light to make sure the transmission is in neutral. |
|
|
| Be sure that the kick starter pedal is up before moving off. |
|
|
|
|
|
|
 |
|
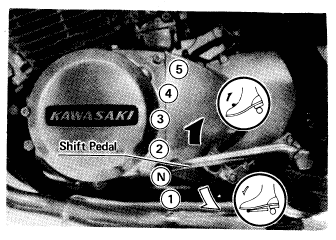
| Shift Pedal |
|
|
| The transmission is a 5-speed, return-shift type with neutral halfway between 1st and 2nd gears. |
|
|
| A "return shift" means that to go back to 1st gear from a higher gear, you must return the way you came, shifting back through the gears one by one. |
|
|
| To shift to the next higher gear, disengage the clutch (i.e., pull the clutch lever in), lift the shift pedal up as far as it will go, and release the clutch lever and shift pedal. To shift to the next lower gear, disengage the clutch, push the shift pedal down as far as it will go, and then release the clutch lever and shift pedal. If the engine is stopped, releasing the clutch lever and rolling the motorcycle slightly while shifting will help shifting back to neutral. |
|
|
|
|
 |
|
| When the transmission is in neutral, the green indicator light will be lit. |
|
|
| Note: Make it a point when shifting to lift up or push down the shift pedal fully. If shifting is done carelessly, the transmission may jump out of gear, causing over-rev damage to the engine. |
|
|
|
|