 |
|
|
|
|
|
|
|
|
|
|
|
|
|
|
|
|
|
|
|
|
|
|
|
|
|
|
|
|
|
|
|
|
|
|
|
|
|
|
|
| Brakes |
|
|
|
Front Brake Adjustment (S3A) |
|
|
|
 |
|
|
|
|
 |
|
|
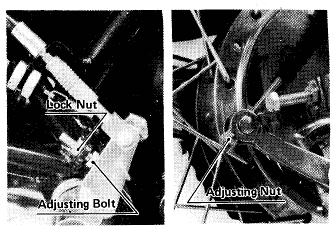
| The disc brake used on the front wheel is self-adjusting except for hand lever play, which does not affect brake operation. To adjust lever play loosen the lock nut, turn the adjusting bolt slightly to set lever play to less than 5 mm (3/16 in), and tighten the lock nut. |
|
|
|
|
|
|
| Disc Brake Fluid |
|
|
|
|
|
|
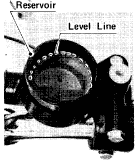
| The disc brake fluid reservoir must be kept filled up to the line inside the reservoir, with one of the recommended types of disc brake fluid. If none of the recommended brake fluids are available, use extra heavy-duty brake fluid only from a container marked D.O.T. 3. |
|
|
|
|
|
|
|
 |
|
|
 |
|
|
|
|
|
| The fluid should be completely changed after one year or 10,000 km (6,000 mi), whichever comes first. It should also be changed if it becomes contaminated with dirt or water. |
|
|
|
|
|
|
| Brake Pad Replacement |
|
|
|
|
|
|
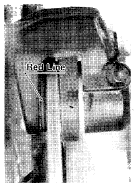
| The brake pads must be replaced when they are worn down through the red line. |
|
|
|
|
|
|
|
|
|
| Note: |
|
| Except for adding fluid and adjusting hand lever play, disc brake maintenance should be performed only by a Kawasaki Dealer. If the brake lever comes close to the handlebar when it is applied, or if it feels mushy, there might be air in the brake lines or the brake may be defective. Since it is dangerous to operate the motorcycle under such conditions, have the brake checked immediately. |
|
|
| CAUTION: |
|
| Do not spill brake fluid onto any painted surface. |
|
| Do not use ordinary brake fluid. |
|
| Do not mix two brands of fluid. |
|
| Do not use fluid from a container that has been left open or that has been unsealed for a long time. |
|
| Check for fluid leakage around the fittings. |
|
| Check for brake hose and brake pipe damage. |
|
|
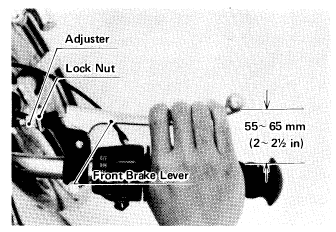
| Front Brake Adjustment (S1C) |
|
|
| Using the adjusting nut on the brake cable, adjust the brake so that when it is fully applied, there is 55~65 mm (2~2˝ in) of space left between the throttle grip and the brake lever, measured near the end of the lever. |
|
|
 |
|
|
|
| Note: When the brake is fully applied, the brake cam lever should come to an 80~90ş angle with the brake cable. If it does not, cam lever angle adjustment should be made by a Kawasaki Dealer. |
|
|
| For minor correction while riding, use the adjuster at the front brake lever. |
|
|
|
|
|
 |
|
| Rear Brake Adjustment |
|
|
|
|
| Rear brake adjustment consists of two separate adjustments: brake pedal position and brake pedal travel. |
|
|
|
|
|
|
 |
|
| Brake Pedal Position |
|
|
|
|
| Check that the top of the brake pedal in its rest position is slightly (about 2 mm or 1/16 in) lower than the footrest. To adjust pedal position, loosen the lock nut, turn the adjusting bolt, and tighten the lock nut. |
|
|
|
|
|
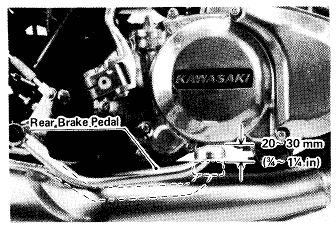
| Brake Pedal Travel |
|
|
 |
|
|
|
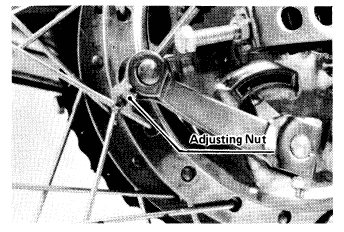
| The brake pedal should have 20~30 mm (Ľ ~1Ľ in) of travel from the rest position to the fully applied position when the pedal is pushed down lightly by hand. Adjustment is made by turning the adjusting nut at the end of the brake cable. |
|
|
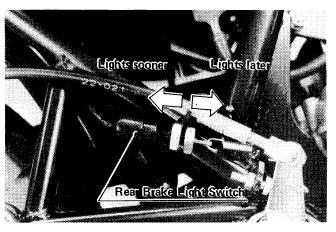
| Checkthe rear brake light switch adjustment. |
|
|
| Checkfor brake drag. |
|
|
| Check braking effectiveness. |
|
|
|
|
| CAUTION: If the brake lining wear indicator does not point within the USABLE RANGE when the brakes are fully applied, the brake shoe linings have worn past the service limit. In this case, the brake shoes must be replaced and the drum and other brake parts examined by an authorized Kawasaki Dealer. |
|