 |
 |
 |
 |
 |
 |
 |
 |
 |
 |
 |
 |
 |
 |
 |
 |
 |
 |
 |
 |
 |
 |
 |
 |
 |
 |
|
|
 |
|
| Battery Maintenance |
|
|
|
|
| Battery Electrolyte Level Inspection |
|
|
|
|
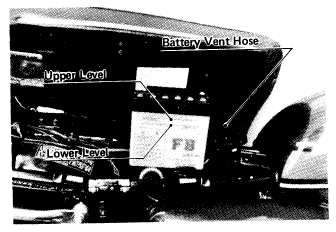
| Keep the electrolyte level between the upper and lower level marks. When it gets low, remove the battery filler caps and add only distilled water until the electrolyte level in each cell reaches the upper level mark. |
|
|
|
|
|
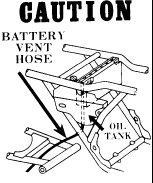
| CAUTION: Route the battery vent hose as shown on the caution label. |
|
|
 |
|
| Make sure the battery vent hose end is kept away from the chain, as electrolyte from the battery vent hose will corrode and dangerously weaken the chain. |
|
|
| Do not let the battery vent hose get folded or pinched, and route it away from the exhaust system. |
|
|
|
|
| Keep the battery terminals clean, and put a light coat of grease on them to prevent corrosion. |
|
|
|
|
| Spark Plug Maintenance |
|
|
|
 |
|
| The standard spark plug is a NGK B9HCS (S1C), B8HCS (S3A). It should have a 0.6~0.7 mm (0.024~0.028 in) gap, and be tightened with 2.5 ~3.0 kg-m (18.5~ 21.5 ft-lbs) of torque. |
|
|
|
|
| Maintenance |
|
|
|
|
| The spark plugs should be taken out periodically for cleaning and to reset the gap. If any plug is oily or has carbon built up on it, clean it (preferably in a sandblasting device) and then clean off any abrasive particles. |
|
|
|
|
| The plug may also be cleaned using solvent and a wire brush or other suitable tool. Measure the gap with a thickness gauge, and adjust the gap if incorrect by bending the outer electrode. |
|
|
| Heat Range |
|
|
| To find out whether the right temperature plugs are being used, pull them out and examine the ceramic insulator around the center electrode. If the ceramic is a light brown color, the spark plugs are correctly matched to engine temperature. If the ceramic is burned white, the plugs should be replaced with the next colder type, NGK B10H (SIC), B9HCS (S3A). If the ceramic is black, the plugs should be replaced with the next hotter type, NGK B8HCS (S1C), B7HCS (S3A). Be sure that the spark plug has the proper amount of gap whenever it was replaced. |
|
|
| Air Cleaner Maintenance |
|
|
| A clogged air cleaner restricts the engine?s air intake, increasing gas consumption, reducing engine power, and causing spark plug fouling. |
|
|
 |
|
|
|
| Air Cleaner Cleaning |
|
|
|
|
| The air cleaner element must be cleaned at least every 3,000 km (2,000 mi). In dusty areas, the element should be cleaned every 800 km (500 mi) or less. After riding through rain or on muddy roads, the element should be cleaned immediately. |
|
|
|
|
|
|
 |
|
| To remove the element for inspection and cleaning: |
|
|
| Unlock and raise up the seat, and loosen the wing bolt on the air cleaner. |
|
|
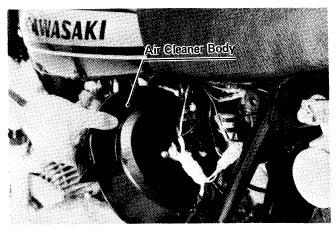
| Pull off the left side cover, rotate the air cleaner 1/3 turn clockwise, and pull the air cleaner out. |
|
|
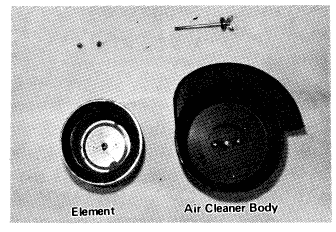
| Remove the two screws on the air cleaner body face, and take out the element. |
|
|
| Clean the element by swishing it around in a bath of some kind of solvent having a high flash point. After the element is clean dry it with compressed air or by shaking it. |
|
|
|
|
| Element Replacement |
|
| Replace the element after 10,000 km (6,000 mi), after cleaning it 5 times, or if it is damaged. |
|
| Note: When replacing the element, be sure that the UP mark is facing up. Also, check to see that the element foam gasket is not damaged and that the edge of the air cleaner body fits snug against the mounting plate so that no unfiltered air will be drawn in. |
|
| CAUTION: Clean the element in a well-ventilated area, and take ample care that there are no sparks or flame anywhere near the working area. |
|
| Because of the danger of highly flammable liquids, do not use gasoline or some kind of solvent having a low flash point to clean the element. |
|
| A break in the element material or damage to the sponge gasket will allow dirt and dust to pass through into the carburetors and eventually damage the engine. If any part of the element is damaged, the element must be replaced. |
|


