The latest in the STARFIRE lineup now includes a direct replacement CDI unit for the above and perhaps similar models. The unit is of one piece construction replacing both original CDI boxes.
Fitting instructions.
1) Locate a position on the bike and
mount the CDI unit using either a custom bracket or double sided tape.
DO NOT attempt to drill into the unit.
2) Identify the left and right ignition coil primary leads, these
terminate in a 3 pin plug.
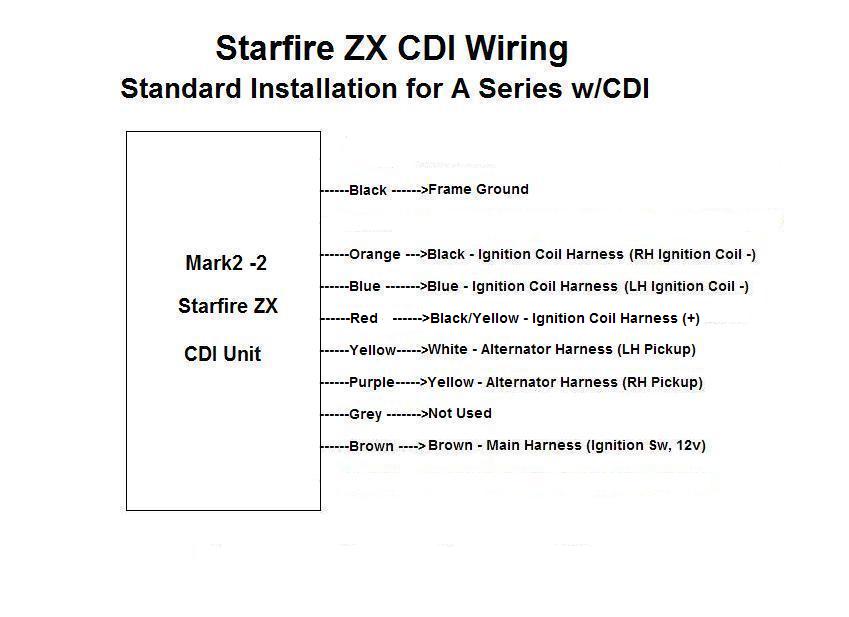
3) Attach suitable connector to the RED wire from the CDI unit and connect to the BLACK/YELLOW striped wire on this connector (IGNITION COIL COMMON).
4) Connect the BLUE wire from the CDI to the LEFT coil primary BLUE wire.
5) Connect the ORANGE wire from the CDI to the RIGHT coil primary BLACK wire.
6) Double check these connections, and that the wires are correct to the coils.
7) Identify the 2 wires coming up from
the 2 signal generator coils in the alternator cover.
8) Connect the YELLOW wire from the CDI to the WHITE wire in the 4 pin
plug. PULSE COIL LEFT
9) Connect the PURPLE wire from the CDI to the
YELLOW wire in the 4 pin plug. PULSE COIL RIGHT
10) Connect the BLACK wire from the CDI to a firm ground.
11) Connect the BROWN wire from the CDI to the BROWN wire in the harness. This is the 12 volt ignition feed.
The bike will now run. Recheck timing with a strobe light and set to factory specs.