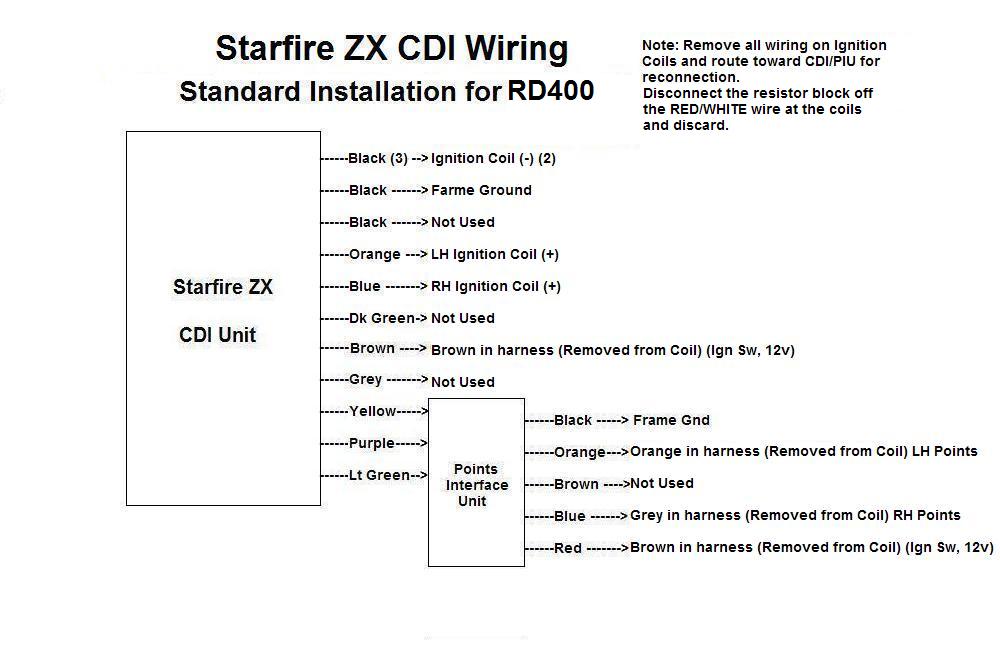
ZX CDI fitting instructions for Yamaha RD400
CDI conversion for YAMAHA RD400 using the existing points. The POINTS
INTERFACE UNIT must be used with this conversion
1) mount CDI to bike and disconnect battery.
2) Disconnect the resistor block and discard. (3 RED/WHITE wires)
3) Disconnect the ORANGE and GREY wires from the 2 ignition coils, and
route the main harness end toward the CDI
4) Connect the CDI ORANGE and BLUE wires to the ignition coils
RED/WHITE positive terminals, one on each coil.
(two ignition coil actives, left, and right)
5) Connect two CDI BLACK wires to the two ORANGE negative terminals on
the
coils (common ground)
6) Connect the BROWN CDI wire to the RED/WHITE kill switch wire removed
in step 2 ( 12 volt ignition)
7) Connect one BLACK CDI wire to a firm ground.
8) mount the Points Interface Unit in a suitable place where the three
timing lights can be easily seen when setting up the timing.
9) Connect the CDI YELLOW, and PURPLE and LIGHT GREEN wires to the
Points Interface Unit YELLOW, PURPLE and LIGHT GREEN .
10) Connect the PIU BLACK wire to a firm ground
11) Connect the PIU ORANGE and BLUE wires to the ORANGE and GREY wires
in the harness removed in step 3 (left and right contact breakers)
12) Connect the RED PIU wire to any BROWN wire in harness ( ignition 12
volt supply)
13) Cut short the CDI unused wires and seal ends with nail varnish.
These are BLACK x 2, DARK GREEN x 1, LIGHT GREEN x 1 GREY x 1
14) Cut the BROWN unused wire on the PIU and seal as above.
The bike will now run.
CLICK HERE FOR PICTORIAL WIRING DIAGRAM
The CDI will draw only 12 watts (1 amp) from the battery as opposed
to the 32 watts of the original system, allowing a more powerful headlight to be
used.. The points will last almost indefinitely and ignition timing will stay
set for
very much longer. The inbuilt timing lights make initial setup a breeze. A
"hidden" antitheft switch can be installed to prevent the bike starting by
grounding the GREY CDI wire.