
Setting Timing on an H2
Manuals will tell you how to set static timing by aligning pickups with trigger points on rotor. This is a complete waste of time for accurately setting timing. The only accuate way to set timing is with a timing light. Be aware that all timing lights are not the same. Most are designed for 4 stroke applications and won't be accurate at higher rpms when used on 2 strokes. If fitted with a dwell adjustment it should always be set at "0".
Below is a writeup by Jim Hobbs about an inexpensive light that works well:
Innova Equus 3551 timing light
I started out looking at Snap-On timing lights, which are rated for 10,000 rpm
(5,000 for a 2-stroke). Those are the better part of $200. Then I found that
Innova sells one that looks the same and has the same features, as far as I can
tell (maybe same manufacturer). It's model 5568, and can be had for a little
over $100 delivered. Then I discovered their whole line of timing lights,
including three less expensive models. I finally got down to the basic version,
the 3551, which is just a timing light, still rated for 10,000 rpm, for $26.54
and free shipping from Amazon. [note that price is slowly rising since this
post] The more expensive ones have things like digital rpm display, advance
setting, and dwell measurement.
I tried the 3551 on the bench, up to about 7,000 rpm and it worked great. Unlike
my old light, this one doesn't start doing odd things at high rpm to make it
appear that there's timing jitter where there isn't. It behaved perfectly to
7,000, which is equivalent to 14,000 for a 4-stroke. It seems to handle the
higher speeds by skipping sparks. For example, at idle it sparks every time,
then when you speed up, it lights every 2nd spark, then every 3rd or 4th, etc.,
so it never has to actually flash at ridiculous speeds. Note that setting the
timing at 4,000 rpm as the manual specifies requires a timing light rated for
8,000 rpm, and most aren't.
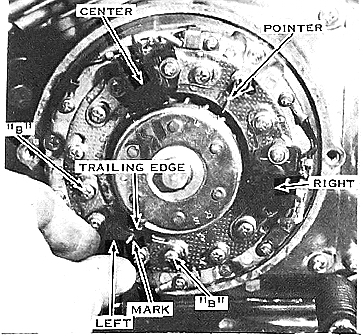
- Setting the Pointer
The pointer is a tab at 1 o'clock position on the stator assembly.
Use a dial gauge to set piston position at 23 degrees
BTDC. That is 0.123" or 3.13mm BTDC. Be aware that crank rotation is CCW so
rotate the crank CCW until top dead center then move it back CW 0.123" from TDC.
Set the pointer to align perfectly with the projection on the ignition rotor.
Remove all sparkplugs to may it easy to find correct position.
Be aware that sometimes the crank may be assembled with misalighnment. In theory
eash piston will be exactly 120 degrees apart so setting one cylinder with
alignment pointer is all that is needed, however, if crank segments are
misalighned that may not happen. It is wise to check each cylinder with dial
gauge to insure all are 120 degrees apart. If not, timing for misalighned
cylinder(s) must be accounted for.
Timinig that is too far advanced, i.e. 25 degrees, can result in "pinging" or
burning a hole in piston top. Timing that is too far retarded, i.e. 20 degrees,
will result in poor performance. Note that modified engines may need retarded
timing to minimize "pinging". A chart at the bottom of
http://kawatriple.com/tuneup.html
can be used to find various timing positions in inches or mm's.
-Using the Timing Light
Attach the timing light using manufacturer's
recommendation.
Start the engine and look for perfect alighnment of rotor tab with pointer at
4000 rpm. Repeat the procedure on each cylinder.
Note: There may be some variation of timing below 4000 rpm... ignore this.
Any cylinder that does not match perfectly with pointer must have the pickup
adjusted until it does match. Loosen that cylinder's pickup just enough to move
it and adjust it's position CW or CCW until it matches at 4000 rpm.
Recheck and set pickup air gap (0.020-0.030" or 0.5-0.8mm).