Motometal's
Transmission Manual
(supplemented by jhenise)
Kawasaki has specifications for many
items, such as shift fork clearance etc., keep this in mind as you go. This is
intended to be a supplement to the Kaw book, in layman's terms.
Reasons for rebuilding your transmission:
I know it takes some work, but I would highly recommend disassembly, inspection
and rebuilding/reshimming your transmission for the following reasons:
1. metal flakes in oil
2. jumping out of gear
3. whining in one gear worse than others (5th is most likely)
4. wintertime/off season boredom
5. Preventative maintenance: If you have the confidence and mechanical aptitude
to set up your transmission properly now, it will help to avoid future problems
and repairs. Also consider that you may (or may have already) modify your
engine, putting additional stress on an assembly which is a weak spot on even a
stock bike.
The following focuses on the H2 transmission, although many of the basics would
also apply to many other models.
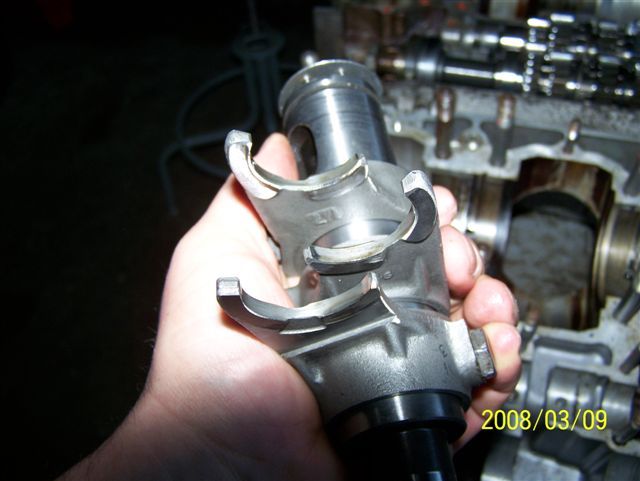
How it works: the sliding gears are all
splined on the ID, so they spin with the shaft. They engage into a gear with a
smooth ID, locking that gear onto the shaft and transferring power from the
input to the output shaft. The output shaft has the slider for 1st, and another
for 2nd and 3rd. The input shaft has a slider for 4th and 5th. Three sliders,
three shift forks. 1st has recessed windows and 2nd has rounded, recessed
windows. 2nd through 5th have standard protruding dogs with flat faces.
Tools:
Snap ring pliers: Get a good set! I cussed and fought the circlips with my
existing arsenal of tools, I don't really like the type with changeable tips,
went and bought one with permanent tips made just for that size circlip, best
$15 I've ever spent. Easy on, easy off. If yours is the reversible type, it may
have a bit of a knob sticking out one side, use it with that side away from the
shaft. Use your old circlips to "practice" and set the trans up, if they are
distorted at all you will want to double check clearances again after your final
assembly with new, flat clips.
Feeler gages: it will be helpful to have a set of the "shim" type feeler gages,
if you don't already.
Digital calipers: these can be used for many purposes, not just on the trans but
in general working on a bike. If you don't have them, buy a set...you'll be glad
that you did.
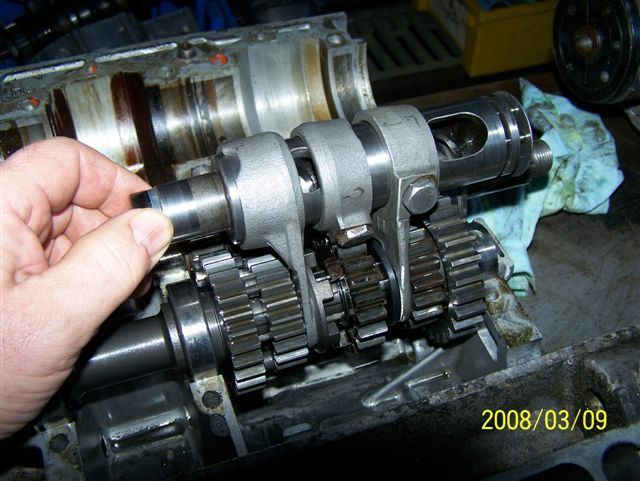
Layout: Hold the shaft so that the small
needle bearing is on top. Remove each part one at a time. Lay them in a row on
the work bench as they came off the shaft (see pic), you may want to
measure/count teeth/etc and document. Keep an eye out for the shims sticking to
the gears, top and bottom. Especially parts are oily, it's very easy to overlook
a shim stuck to a gear, only to have it fall off later and be lost, or create
confusion. If you clean the oil off of the parts with brake cleaner or solvent,
you can use a Sharpie marker to write notes on the gears.
Shims: there are two main thicknesses of
shim, 0.5 and 1.0 mm. Most of the shims are hardened steel, but a few are brass.
The brass shims act as thrust bearings, as they are against the last gear on the
end of each shaft near the small bearing. There are several types of steel shim,
smaller I.D.s for the ends of the shafts and larger I.D.s for the remainder of
the shaft. Of the larger I.D. shims, most are 32mm O.D. but two places in the
trans require a 30mm O.D., in between 4thO and 2ndO, and on the clutch side of
4thI. 30mm shims can be made out of 32mm shims with careful grinding on a belt
sander etc., go slow and don't get the shim too hot, dip in water as you go. Use
Yamaha part #168-17428-01-03 for a .010" shim.
Upgrade to toothed washers: Many
transmissions had a problem with the shims/washers spinning with the gear,
against the circlip and overheating/cupping the circlip. The remedy is to
install a washer with teeth on the I.D., against the circlips wherever possible.
Stock, the H2 trans only has this in one place. The ones I have seen are all 1.0
mm, so if there isn't room for that you must just use a standard washer. Also
see above regarding 30 vs. 32 mm O.D...you can grind down the O.D. of the
toothed washer if needed.
Directionality of shims and clips: if
your circlips have a sharp side and a more rounded side to them, put them in so
that the force is on the sharp side of the I.D., which usually means sharp side
of I.D. away from the neighboring gear. The toothed washers also have a sharp
and rounded side, go sharp side towards circlip to maximize contact area.
Shift forks: The forks are heat treated
and are very hard. Some also have a silver, slippery coating (not a hard
coating). If you smooth out a rough spot, you will remove the coating, still
best to smooth out any galling though, just remove as little material as
possible. I used 120 grit and worked my way to 400 grit, wrapped around a file
or on my finger for small areas. If you carefully scrape a the corner of a file
along the surface near a "burnt" area, if the fork has overheated enough to
become softer there (tempered back) the file will dig in the burnt area, even
after you have smoothed it out. If it is a small localized area, it will
probably be ok since it will ride on the surrounding harder surface, especially
if you are fixing the problem that caused the burning. It's not uncommon to have
some burning on shift forks even on a low mile/low stress transmission. Stock
thickness is about 0.195".
Needle bearings: although the shafts
appear to have a groove for a circlip on both ends, there is only a circlip
required on the very end of each shaft. The outer race is directional, there is
the locating hole which must match up with the pin in the case. If you can't get
it to line up and settle in, something is wrong...possibly too many shims on
this end. A common mistake is to ignore this locating pin, and when the cases
are pulled together it is forced down into the case. If your locating pins
aren't protruding from the cases, this is what happened and it needs to be fixed
prior to continuing assembly. There are also small cutouts on one end of each
race, these go inward. The races are not symmetrical so if you put these cutouts
outward, there will be alignment problems.
First gear on the output shaft is probably the "first" gear that you want to
look at and set up. Depending on how the brass bushing was pressed/glued in, the
end of the spine may actually ride against this brass bushing. If you need more
neutral clearance, the grooved bearing can be shimmed out, moving the whole
shaft over. Conversely, if there is room to tighten things up for more
engagement, it can be shimmed inboard. When done, make sure there is still
clearance to avoid unwanted clashing with the kickstart gear.
Neutral clearance: I set mine up by
gently squeezing the gears together and asking myself if there is any way they
could clash. Opinions vary on specifically how much neutral clearance is
allowable. Spin it and work your way around, different dogs might have a bit
different clearance. Use the feeler gages. Keep in mind that with a non undercut
trans, there is a very real possibility that you could have a mis-shift cause a
bent shift fork in the future, which could turn "a little" clearance into
clashing gears. This doesn't apply to 1st gear, since it's on it's own fork.
When you have the neutral clearance set where you like it, check out the
clearance through the 3-4 shift transition, making sure there is no way it could
catch in 3rd and 4th at once.
Shortening dogs: Some people grind or
machine down the ends of the dogs for clearance, or if the corners of the dogs
are rounded off, to make them shorter. This must be done very precisely, or you
will have one dog engaging before the others. The ends need to have a little bit
of a radius when finished. Keep in mind that gears are case hardened, so any
time you remove material you are removing some of this hard case. As you
approach about .025" or so you are into substantially softer material.
Regrinding dogs is not ideal, but probably still a worthwhile alternative to a
set of badly worn/rounded dogs. If you are shortening dogs on gears to be
backcut, the shortening should be done first, assuming the gears aren't going to
be re-carburized. Shortening dogs changes the clearances and requires reshimming.
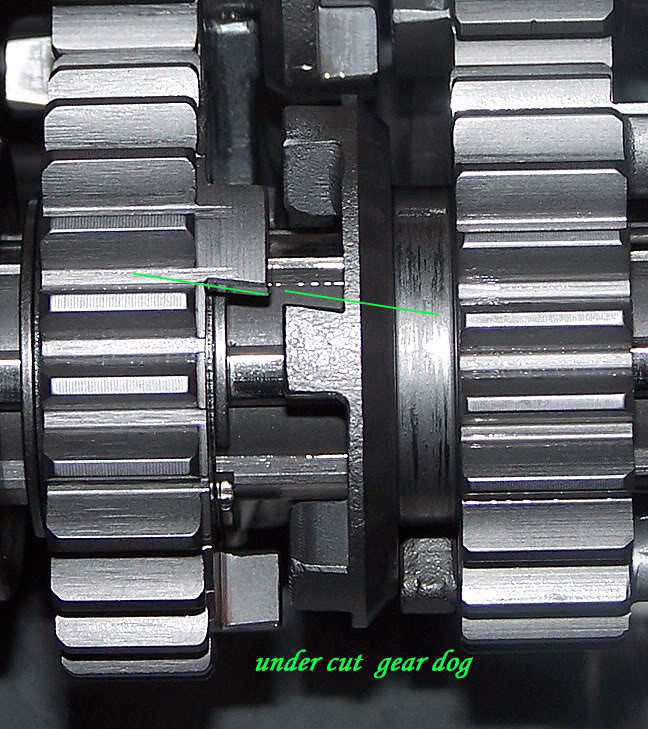
Back cutting the dogs
Back cutting the dogs is a popular modification, not just on our triples but on
all types of transmissions. Here's why:
On a stock, new condition setup, the flat faces of the dogs are carrying all of
the load which propels your motorcycle. If you release the clutch and give it
gas before the dogs have fully engaged, the powerful forces from your Kawasaki
Triple are being supported by tiny areas on tips of the dogs, and under the
right conditions the dogs can slip. This may round off the tips of the dogs, and
put a huge side load on the shift forks and the shift drum. This can burn/gall
the shift forks and slider gear grooves, bend shift forks, or even break the
shift drum. There are all degrees of this, but once the dogs become rounded, it
takes more engagement to support the load. Unfortunately, due to poor shimming
many bikes have shallow engagement. Re shimming and careful shifting techniques
will help, but back cutting is even better insurance.
Back cutting involves milling an angle on the dogs, so that once they engage,
even if not fully, the torque will pull the gears together, assuring that the
trans will not slip out of gear. This is a precision process requiring special
tooling. Some of the case hardening is removed, but if done properly material
removal is minimal on the ends of the dogs where it counts the most. First gear
is the most difficult to back cut, and since 1st isn't notorious for problems as
much as the other gears, many times only the other gears are cut.
Side clearance
Assuming you are using standard shims, the gears should have about .003"-.023"
side clearance. Again, here's where you get out your feeler gages. Any less than
.003" could cause unwanted friction, heat, and power drain. More than .023" may
not really hurt anything, but you are giving away dog engagement, or neutral
clearance. Add a .5 mm (.020") shim, or replace two of them with a 1 mm. You may
find that if you push downwards on the needle bearing end, it tightens side
clearance up a few thousandths...this is simulating what you will have when the
engine is assembled.
Any change that you make may affect some other clearance that you thought you
had already set perfectly. When you think you are done, check all clearances one
more time to be sure.
Whey you are all done with setup and ready to finish assembly, you may want to
GENTLY run a flat file over the cases where you have been repeatedly inserting
and removing the trans shafts, just in case a corner was dinged or a burr
created. I like to lubricate the file with oil or WD40 to keep it from digging
in and to help hold any small filings.
As the supply of triple trans parts dwindles, we will be challenged to work
towards coming up with creative ways to re-use damaged parts (for example
re-machining and re-heat treating). Along those lines, if you have bent or worn
parts, unless you are absolutely sure they cannot be used, I suggest keeping
them for potential future re-work.
![]()
jhenise supplement:
I just thought some nice pictures would compliment Motometal's tips...
![]()
![]()
![]()
![]()
![]()
![]()
![]()
![]()
![]()
Transmission Installation Video
Kick Starter Installation Video