How to build a new set of VM34's and then UFO's on an H2
I suggested to Niche Cycle, somebody should build a VM kit, I see they have one
as of yesterday with UFO’s on Ebay………..these will need to be-re-jetted.
I bought NOS H2 manifolds (from Mid Atlantic $150) as they angle down and match
the ports properly, mine were cracked and old, your stock ones should work but
may stiff and cracked………….
NOTE: I had manifold leak issues after warming up, I
got rid of the Phenolic Spacers and Gaskets, three bonded the manifolds right to
the cylinders, no leaks anymore…….kind of permanent though.
I had good results with the UFO’s, they were a bit finicky to get tuned, once
set, then forget………..They give a good strong signal at lower RPMs and flow more
up high, real crisp throttle response………..there is a chart that shows them
flowing better than a flat slide, whether true or not, who knows………..I do know
the bike always felt “In the Zone”, better low end, lot more range, 33.6 MPG too
Building and getting the Parts
I would find a set of (3) soft springs for VM 34’s, I saw them at something like
Mikes Cycle or Mikes something but I already had them, Niche has
them………some have used the VM30 springs, but they are a smaller diameter.

Order 3 of all items below from Niche Cycle about $580
VM34-275 Mikunis, (3)
-come with 2.5 slides, these have a
vent on the bottom of the float and a second one used for vent tube in the top
left by the slide. (They have a flipped carb VM34-168, I did not use one, no
need to)
-they also
have a “Boss” area that could be tapped for a banjo bolt to drop oil into the
float bowl on a B\C 4-line pump………this would have to be machined and
tapped………….or, one could use an inline “checkvalve” from the pump……..and feed
into the tube on the other side just fine………..I actually ran with no-check valve
for a year………..no problem for me, but the correct way is to use a carb check
valve………..
-I have heard many guys say “I can get a set for $300 ready to
go”……….my thought is………you can buy 3 new ones for $99 each…………and you probably
have to buy jets anyway
NOTE: the VM34-275 have the Big 58mm Bell mouth
and will not fit a stock 3 into 1 snorkel, use Ram-Air or UNI filters………..VM34
older sled carbs will fit 3 into 1 (they probably need new float needle’s and
seats, bigger 3.5mm or something like that)
Cable operated choke kits (3)
-they may be the same as VM30,
something tells they are not
-I am using the VM34 cable chokes on my TMX38’s fine……….not
positive on that though, best to get the kits
UFO’s (3)
-Thunderproducts…………Jim Hobbs is making them
also, and in different cutaways
-I think the reason they have a 3.5 cutaway
(on purpose) is due to how they flow and have a high signal strength
-I have never used anything less
cutaway than the standard 3.5 UFO’s (1/8 to 3/8 throttle), who knows, maybe
somebody has tried the lesser cutaway with success
Jetting
The jetting below has worked well on a few guys H2’s with chambers and should be
close, jetting is up to you though to dial in, a hot rod motor may be a bit
different, mine was warmed up a bit………this is what I experienced…………..so don’t
assume this is perfect for your bike
-230 (3 of each) main HEX jets (carbs have 260’s in them, 220 was on the edge of
lean on my bike, 240 was rich………..always good to have a set of each)
-6DH4 needles, they come with the carbs, 2nd clip down……….. (I ran a 6DH3 but had
some Mod’s, Zeeltronic)………this is probably fine for your bike
-P2 needle jets (3), (they come with P-6…….too rich and sluggish) turn the carb
upside down; tap out with a drift easily towards the slide area above…………..P-6
was fair without squish heads, P-2 was much better, and with squish heads (made
it rich at 3/Cool……..P-2 was a must I (I even went to a P-0 with zeeltronic)
-17.5 pilot jets (3 of each) perfect, get 15’s (lean and peaky on takeoff), get
20’s fat and sluggish
-Airscrews are 1 3/8 turns on my bike………..the idle procedure is different than
the book, just try it
(You may want 240 and 250 main jet‘s just in case you have a hopped up motor,
always good to have some pilots and mains, they are cheap, needle jets are not)
These carbs have a big mouth and my stock UNI’s would not fit, I ordered a set
of 15 degree angle, part number 234185 (don’t remember the Uni model) from
Exceptional Motorsports , these fit $40……..but now I prefer the Ram-Air from the
UK as they look good and work well, expensive though.
Go to the local Auto Zone, they have fuel proof yellow/transparent weed eater
Tygon fuel line about 7’ for oil lines, they also have a small box of 10 small
round clamps………this is what I used on the B\C………..as mentioned, a check valve
should be used………..not needed on an H2\H2A
I have a Pingel Petcock 5/16” ID again, I used Tygon, 4’ worked for me as the
carbs have a bigger 5/16” fuel inlet………...you may need to adapt these to a stock
¼” fuel petcock
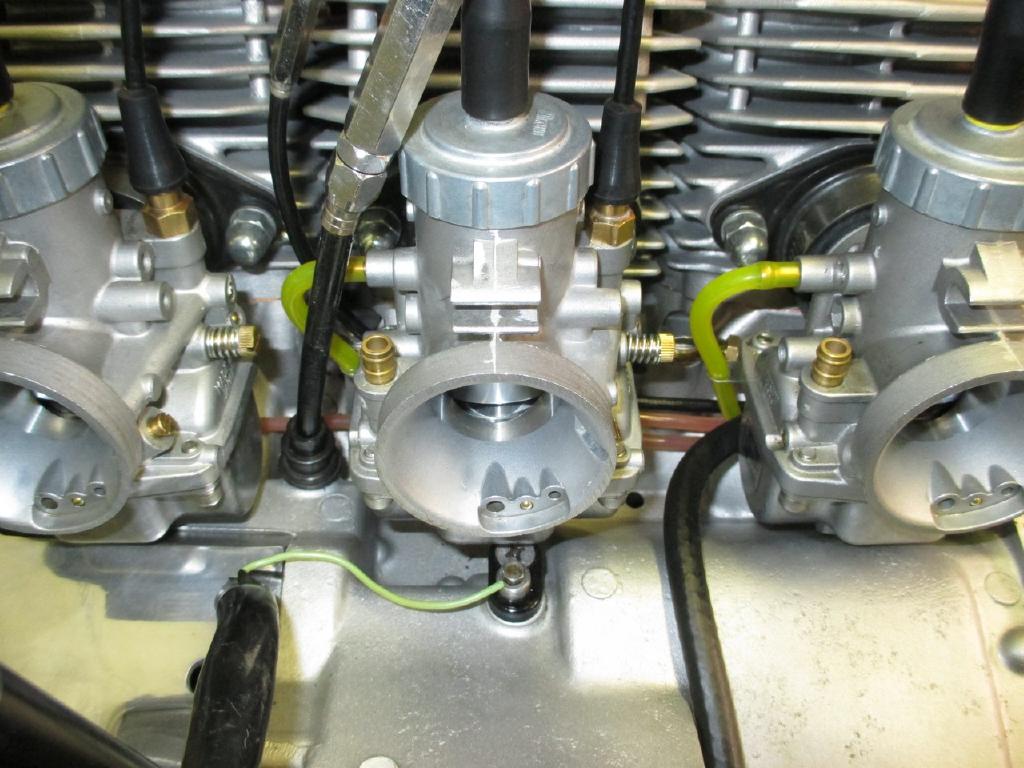
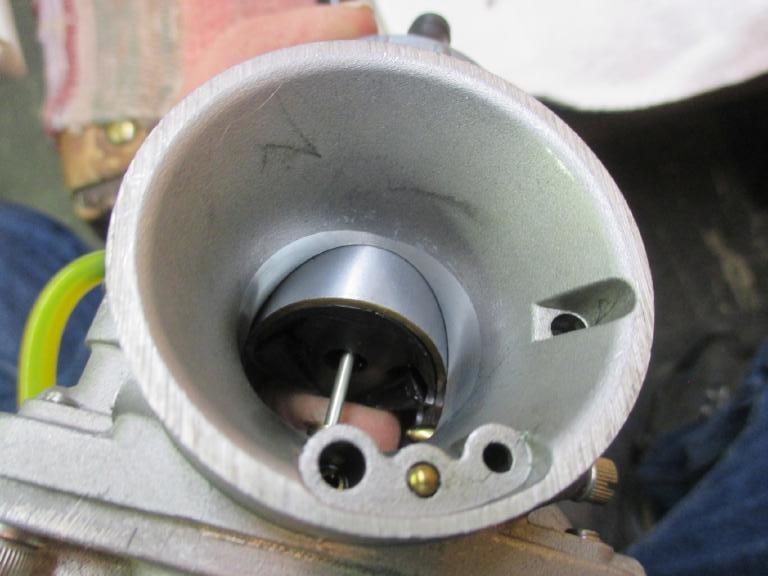
Carb Mounting
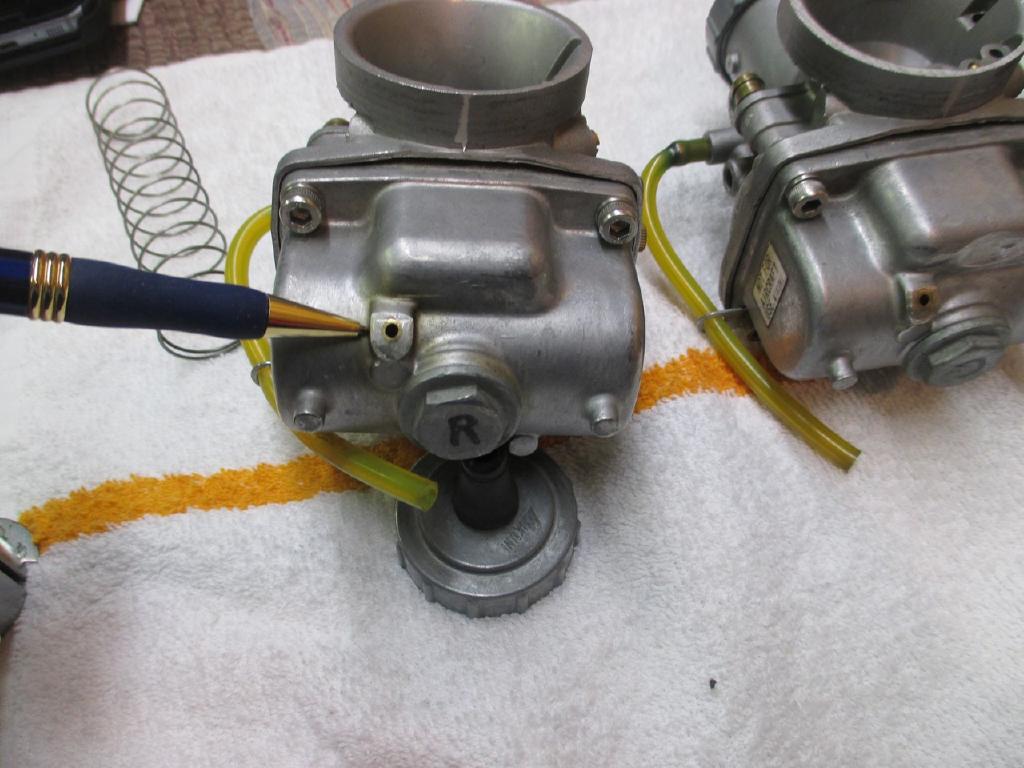
The VM 34’s will not fit on the bike, they hit the brass tube in the new carbs
bottom float bowl on the left and right cylinders, the center carb hits the
Neutral switch barely. I got a fine hack saw and cut all three tubes off of the
float bowls flush, then get a dremel with a round sanding drum (or file even).
Radius where you cut the tubes off about 3/8 of an inch and check them, remove
enough so they don’t hit the cases L and R. On the middle carb, grind a small
relief where the Neutral switch hit’s on the float bowl itself.

Mount the carbs, make new oil lines from the H2B or H2C pump (I did one at a
time so the pump port match’s the proper cylinder), I filled mine with oil and
put a stick in each end so they would be bleed till connected, go into the left
side of each carb (and an inline check valve), use the small clamps on each end.
On a 72 or 73 just leave these tubes for a second float vent. You may want to
mix a bit of premix in the gas tank till the oil gets passing through the carbs
and you are done jetting.
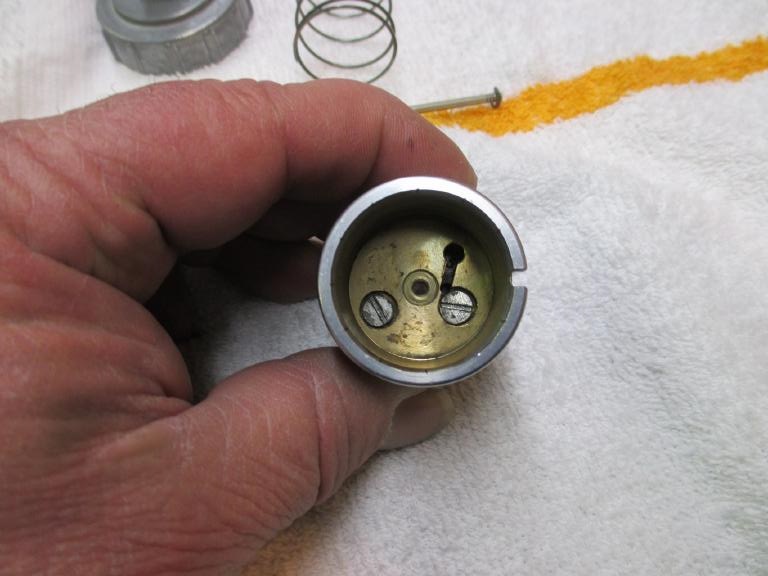
I set my idle screws with the slide low looking at the back of each carb before
I put them on the bike and got them the same, and then I could do each the same
exact amount of screw turns later to set the idle. Hook up the Choke and
Throttle cables (mark them with masking tape when taking apart L, C, R,. I had
some issues with not enough slack and for now had to remove the nut off of the L
and R slide adjuster’s, will fix soon (Fixed !), and using black tape
temporarily and the boots cover that. I did the pencil trick where you put 3
sharpened pencils in each carb, as soon as they start to lift, you will see them
move, get them to all move at exactly the same time. Then use a UniSyn to get
them perfect, both idle and a 2500 RPM. Adjust the oil pump cable to the scribe
on the pump (I do a little less to cut back on oiling)…………….
NOTE: an H-1
throttle cable is 2mm longer at the carb end than an H2………….works well with VM34
and TMX 38’s (you must tap the side cover for the H-1 oil pump adjuster)…………or,
I pulled the 4 way junction apart on the H2 cable, pulled each carb cable out,
used a dremel with a saw blade and took two turns off each winding, or you may
want to dremel a bit off of the carb caps where the adjuster sits, I did this on
my TMX 38……….you want a little slack when at idle
UFO Installation
-I installed the UFO’s which use a 3.5 cutaway slide, I ground my slides to match
the UFO’s.
-UFO kit comes with a plastic drill guide and instructions, I
recommend using “2” screws, not “1”.
-You will need a 9/64 and a 9/32 drill bit,
a dremel with a 60 grit sanding drum, and 6 of 6X32 longer screws.
-Wrap 2”
masking tape a few times around each slide and put them in a vise gently when
needed.
-Be very careful with the UFO drill guide as you can have it incorrect
and drill the hole in the wrong spot, triple check it, drill the 9/64 thru the
slide.
-Counter sink with the 9/32 bit, note that the new bit is very sharp, best
to drill some holes in a piece of aluminum first to dull the bit, or it will
grab on the soft brass slide, get it so the screw head is flush or slightly
below the slide needle area.
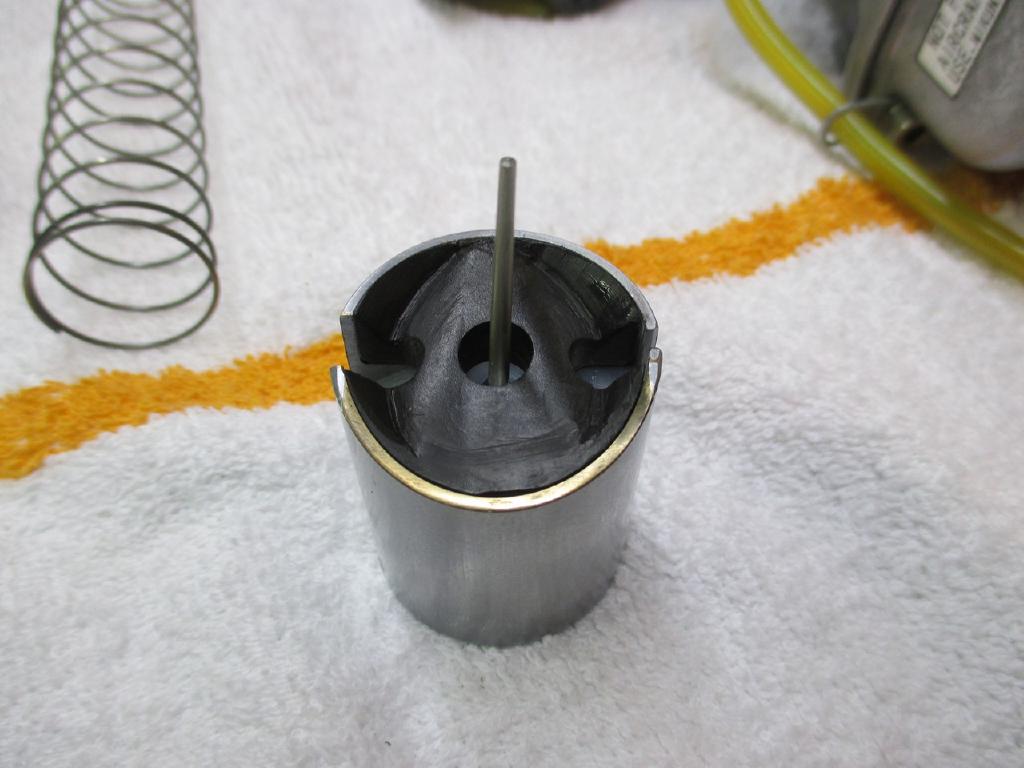
-Mount the UFO with the self-tapping screw’s in each
slide. Make sure no black plastic is visible in the engine side of the slide or
they are not seated all the way.
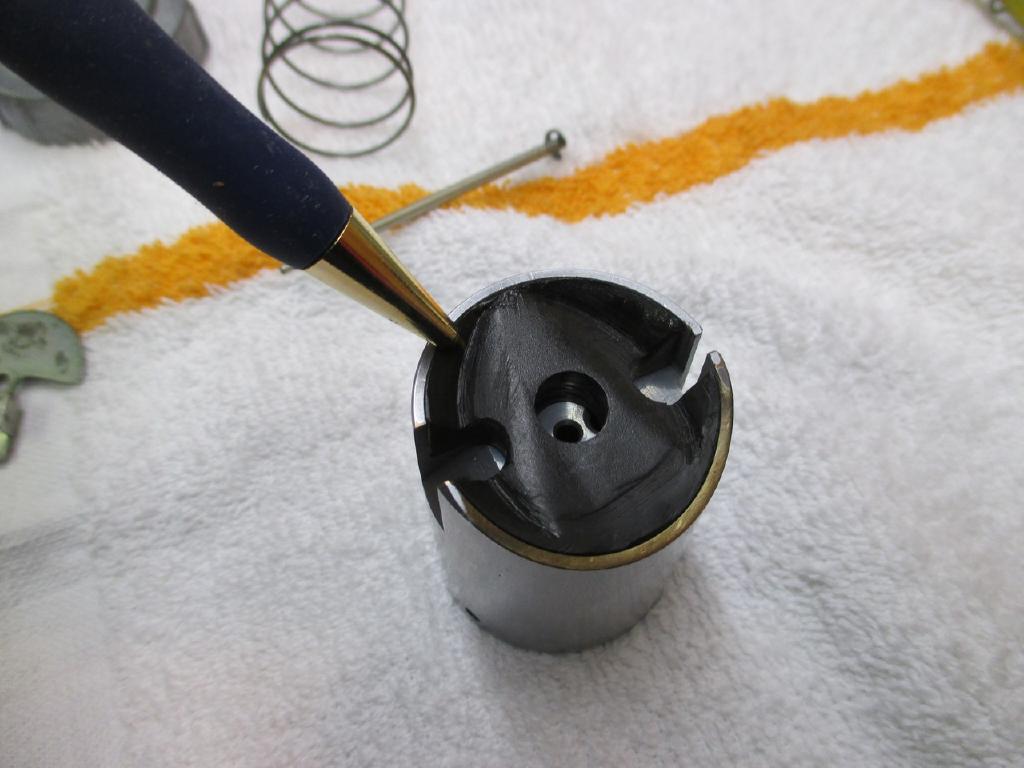
-Put the slide in the vise with the cutaway away
from you and with the dremel and sanding drum carefully remove and match the
slide exactly to the UFO, this is very easy to do, don’t hurry.
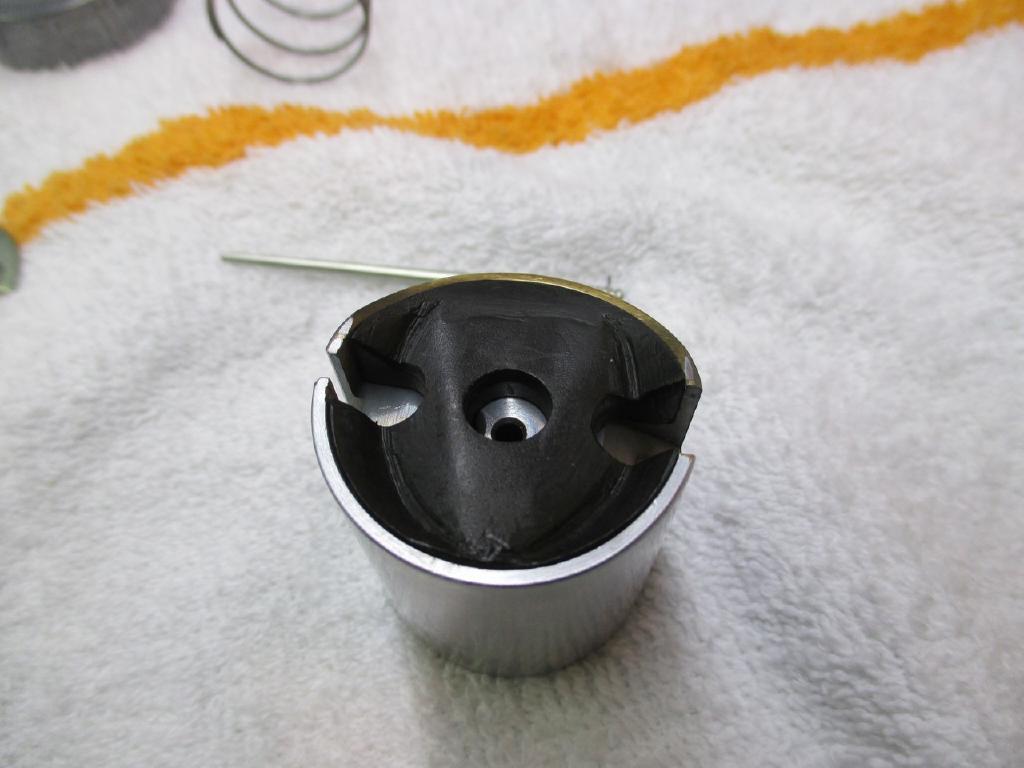

-Clean up the
sanded area of the new 3.5 cutaway with some 220 sandpaper by hand and bevel or
radius slightly.

I, by mistake, had taken the UFO’s apart a few times and noticed
the screws were not long enough (pulled one down when the engine was running, it
can get digested in the motor). I got some 6X32 screws, these are the same
screws used to mount an electrical box or light switch in your house. IDEAL
makes a tool that you put the screw in the cutter and cut to length a “very”
small bit longer than the UFO screw’s. Later I am going to use some adhesive on
the UFO’s.
NOTE: You need to take them apart from the slide, when ready to put
them on the bike, install the throttle cable under the slide, then install the
Two UFO screws and UFO until gently till snug……..I did use a little glue on the
thread on one…………you do not need to remove them once installed to change needles
or clips, only when replacing\removing the cable
Also, make sure you hear the “Thud” when closing the throttle, hitting the idle
screw………if not, I had to use some grease and close the UFO onto the base of the
carb (idle)……….and remove a tiny bit off of the “V” in the UFO to come down all
the way for low idle……..I have talked to other people, nobody else had this
issue…………I scraped it with a pair of phone man’s scissors
Stainless Allens and lock washers are a nice touch from ACE hardware (12) for
the float bowls
ENJOY…………THX…………Phil Mosher (BBP)