Clutch Assembly Tips
This is probably not new to most of you, but might help the newer group of
riders who work on their own bikes. This is aimed more toward the beginner
track-day/racer wondering why h/er clutch doesn't last as long as h/er
competition?
This is pretty much universal as far as multi-clutch pack assembly goes. This
post is a generic clutch/friction assembly procedure, and does no entail all
aspects of troubleshooting clutch drag, failures, lubrication assembly, torque
specs, hard part inspections, etc.
Basically, this article points out "two special steps" for proper clutch
assembly, and one pre-inspect before assembly.
Steel Plates:
When the manufacturer makes a steel plate from a raw sheet of metal, they stamp
out thousands of these parts. You will notice a round edge, and a flat cut edge
viewing the steel plate. One side you can easily cut yourself with. This is the
part (cut edge) you want to look for. Some steel plates will have the special
riveted (chatter) plate placed somewhere in the middle, or a "hop" plate
assembly placed somewhere in the clutch pack. Remember to note the cut edge of
this plate assembly as well.
The steels have what's known as "Memory". Because of the stamping, the curve of
the metal will be in one direction. To illustrate this, place your palms against
each other and touch your fingers as if you were praying to your chosen Deity.
Now press your fingers against each other. Notice how each finger fights the
other. Now place the palm of your hand over the back of your hand. Press you
fingers over your other fingers. Notice how they move in the same direction and
not fight each other? This is the same principal for the steel frictions. PLACE
ALL STEELS IN ONE DIRECTION. This is the "first" of two keys to watch out for
when working with the clutch assembly.
If you place the steel's cut-edge all in the same direction, they will not fight
each other. In other words, one cut edge will not be facing the other against a
friction, and the steel plate on the other side (of the friction) will not have
to cause extra drag on the fiber plates as the pack is released. This is one of
the reasons it is hard to find neutral. You have an ever so slight clutch drag
of the whole clutch assembly. The touching load is (trying to) move the bike
forward when you have the clutch lever pulled in all the way. It is somewhat of
an exaggeration, but please understand the point...this is dragging the clutch
pack in a subtle way.
Indiscriminately installing the clutches 'in any ol' direction', will give poor
performance to the whole clutch pack assembly.
This is not the main reason, but a contributing reason why clutches do not last
long if installed incorrectly. There is a percentage loss to compress the clutch
assembly when a steel or friction is facing in the opposite direction... and not
lined up in it's "Memory" facing order of assembly. The loss is slight, but
insufficient clamping, or holding is still compromised. The steel in the wrong
direction is forming a gap against the friction side of the other steel in the
correct direction. To illustrate this...touch your finger tips again, and look
at the gap between your palms. This is somewhat of a poor illustration on my
part, but it is theory none the less... to show you how a steel plate (gap)
reacts when placed opposite each other, as opposed to both in the same
direction.
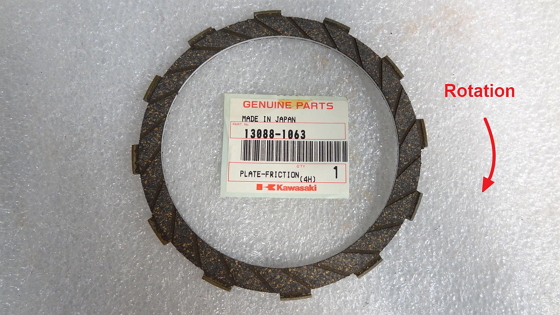
Friction Plates:
The single style spiral friction plate (when used) will be obvious as to their
direction of assembly. This is the centrifugal pad cut direction, to fling off
the oil between steel and frictions. Follow the friction "spiral pad cuts" for
correct direction. Other frictions will have to be inspected for their stampings
if the pad material is in the "square type design cuts". The aluminum plates
(direction) might be harder to recognize. There are a few visuals to look for.
Note the directional spiral plate and match the (metal) stamping this way. Match
all other frictions with the spiral cut plate. Some aluminum plates will have a
printed ink stamping on one side of it. Use this (sometimes) as your guide. Some
aluminum frictions will have a cut edge to them (obvious direction....correct?).
As long as the uniformity is consistent and in one direction, you have a better
chance that the frictions will act in a consistent manor, than just throwing the
friction in the (clutch outer) housing in any direction. Just look for
consistency with each friction, and place them all in the same direction with
the steels.
Steel/Friction Plate Pre-Inspection Assembly:
If you feel that all the steels and frictions are lined up together and you
still find there is drag or it's hard to find neutral, then most likely there is
one or two warped steels or frictions causing the problem. Of course you can go
by the book, place each steel on a flat surface and check warpage with a feeler
gage. This is one way of making sure you find a faulty steel plate. For this
inspection, line up all the steels in it's memory direction (cuts all facing in
one direction) and hold them all (on top of each other) in your hand in a
stacked (static) formation. You simply turn the steels (all at once) and inspect
for a gap between each other. If you find one, remove it. Then rotate the stack
again to look for all the steels to lay flat on each other without any gaps
between them. You will shuffle the stack repeatedly and make sure that a steel
that was on the bottom, is now somewhere in the middle, as well as the top steel
placed at a different levels.... and again, rotate the whole pack, looking for
gaps. Once you have done this (card shuffle) to just about every steel/friction
plate being placed at all location levels, you can then determine if they will
be reusable. Discard those that cause a gap. Finally, check for the steel and
friction (thickness) "serviceable limit" measurements, and are within specs.
Clutch Assembly Placement:
It is critical that the frictions & steels directions are facing the Pressure
Plate. Let's say you have another Metric bike that has the pressure plate being
the last installed part into the clutch outer cage. Then if that is the case,
all (cut) friction and steel plates... "FACE THE PRESSURE PLATE." This is the
"second" key point to proper clutch assembly.
If the pressure plate is the first part (say for example a Honda CBX) to be
installed inside the clutch outer, then all cut edges face the pressure plate.
So no matter what design you have, always face the... "steel/friction cut edges
toward the pressure plate." As stated above, spiral style pads are placed in
clutch assembly rotation. In other words, if the clutch spins counter-clockwise,
then the spiral pads facing you is in the forward slash (/) position. Note how
the spiral friction would rotate to fling the oil outside of it's groove. If the
clutch pack rotates clockwise, then reverse the spiral pointing is in the
back-slash (\) position.
Conclusion:
Anyone who installed their clutch pack recently, and indiscriminately installed
the steels without this basic installation process, my want to reevaluate the
assembly. You may find you still have a hard time finding neutral after you
install all new parts.
The way to install the steels (and frictions) described above, will help the
longevity to the clutch pack, plus give you some of the smoothest shifts, as if
the bike was as new as the day you bought it. Finding neutral will also be one
of the chief benefits to this.
Remember to inspect the steels/frictions for warpage. No matter how well you
followed directions and execution, one warped steel/friction will not "cut' it.