Kick Starter Mechanism Installation - John Aylor
There are two ways of installing this mechanism, some like to install with the
spring pre tensioned. I don't, it's just one more thing to worry about when
assembling the cases. And this is the factory method. I have left out the
transmission for clarification, it should already be installed when you are
ready to actually install the kicker mechanism. And it never hurts to do a dry
run on the kicker mechanism to make sure everything is properly aligned.
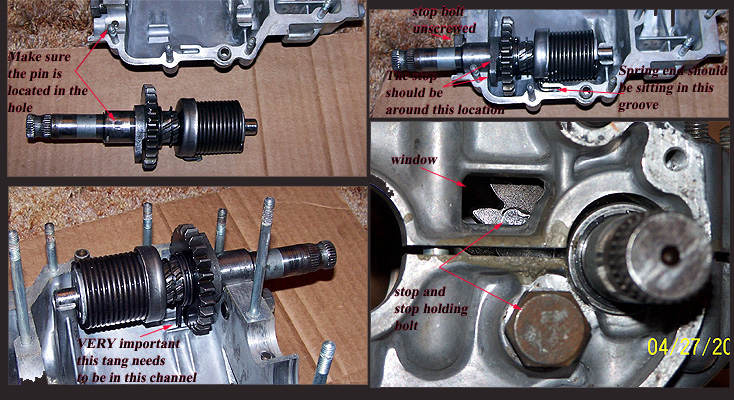
Depending on how the cases were split, the straight tang on the gear (that goes
in the channel) can be in the incorrect location for reassembly.
First make sure the holding bolt is unscrewed until the end is about flush with
the case. Place the assembly in the top case making sure the straight tang is in
the channel and the pin is in the hole in the bushing. If the "L" tang of the
spring is not sitting in the groove in the case, remove the assembly, hold the
gear and rotate the straight tang on the gear until the "L" tang sits flush when
the assembly is sitting correctly in the top case.
Note the location of the stop. If it is not in the area shown in the picture,
then you probably assembled the spring on the shaft incorrectly, (if you
disassembled the assembly) remove it, rotate it 180 degrees and reinstall on the
shaft.
Once everything is in the correct location, assemble the cases as per the
manual. Slide the kickstarter lever on the shaft. Look in the small window, you
will see the gear and a bit of the stop. Rotate the shaft approximately 180
degrees counterclockwise (same direction as you would be kicking it) while
looking in the window. You will see the extension of the stop in the window, (in
the "window" picture I moved the stop so you can see the extension, it will not
look like that when properly assembled) keep rotating until the extension is
past the stop bolt. Hold the lever there and screw in the bolt till it bottoms
out. slowly turn the kicker in a clockwise direction. It should stop in a few
degrees of rotation. It should now be tensioned. Move the lever counter
clockwise to check for free movement and that it returns freely. Tighten the
bolt tight, and you are done!