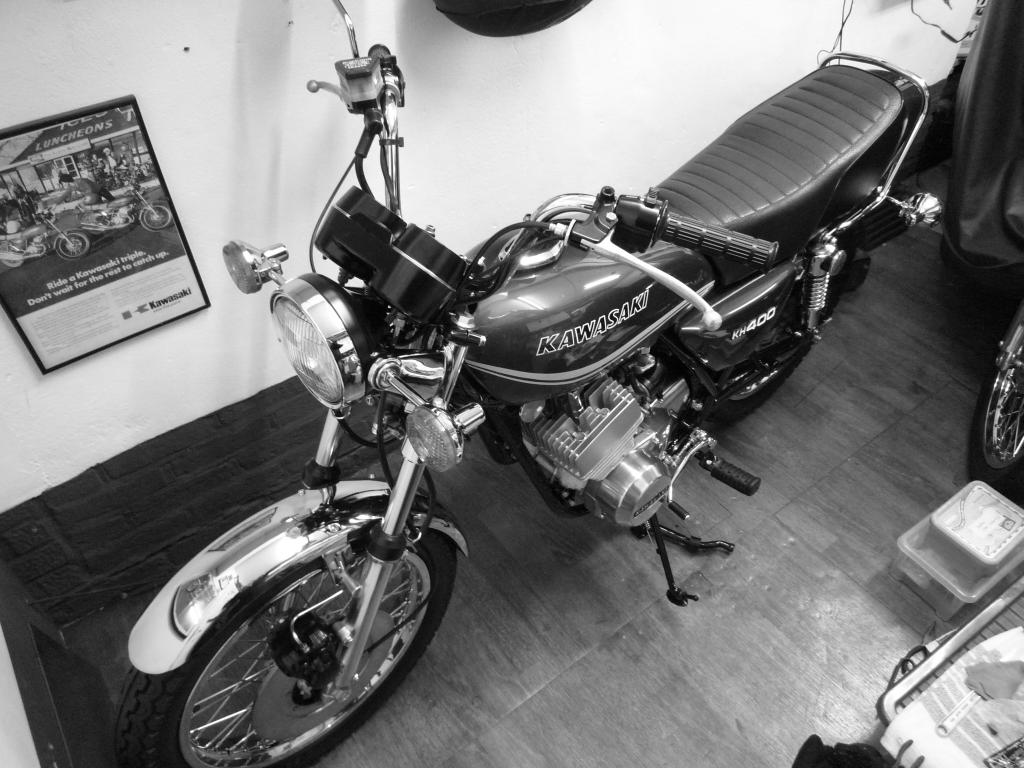
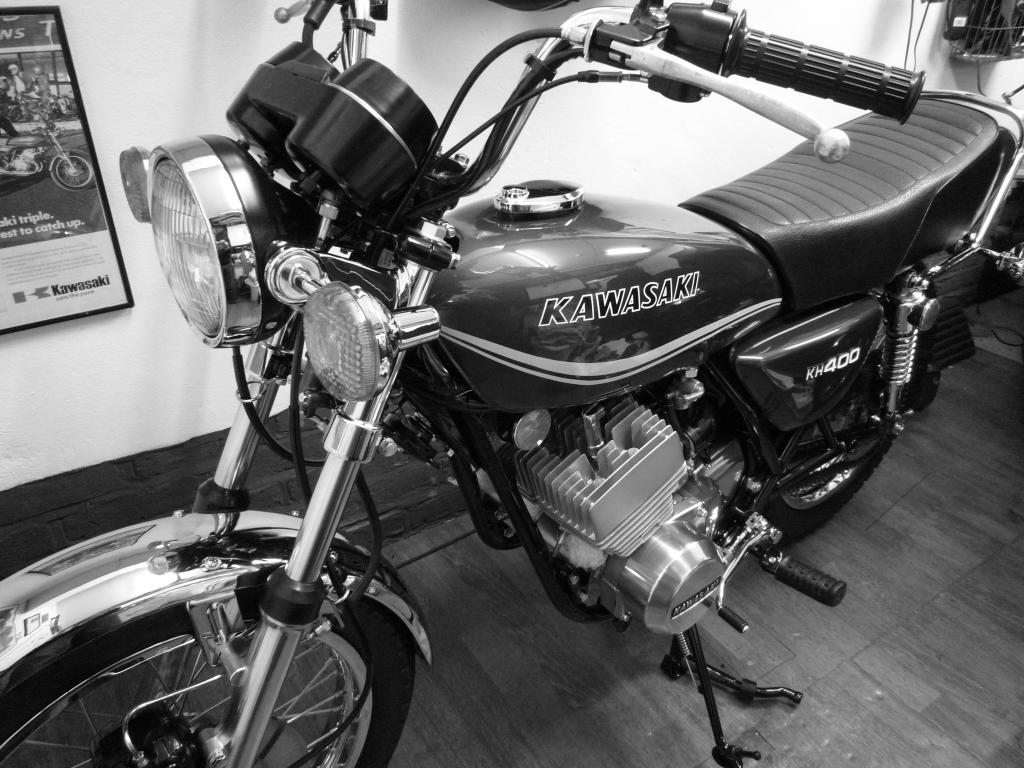
KH400A5 Restoration
(Part 2)
click here for Part 1
Schurminator, on the UK KH & S message board, has chronicled his restoration
with great detail. There are several hundred excellent pictures included.
Although this is a KH400 restoration, there are great similarities to all late
model Triples for reference.
The flow of this restoration is duplicated as it was done and published. While
it is a good read from start to finish, a table of contents is included for easy
reference to specific areas. Specifications and part numbers are not included
and appropriate manuals should be used in conjunction with this document. Full
size photos may be seen by clicking on any picture.
Contents
(use browser back button to return)
So a couple of minor mishaps to mention this week from the
garage........,firstly when having scaffolding put up around your house always
check you can open the garage door before they leave

 (no1, now I have to finish painting the house before I can go riding again,
guess I had better get the brushes out
(no1, now I have to finish painting the house before I can go riding again,
guess I had better get the brushes out
 ........had
to get some repairs done as a leak over Christmas saw water coming in right
where I plan to rebuild the 400 so a priority fix was called for now all done
but painting to do.
........had
to get some repairs done as a leak over Christmas saw water coming in right
where I plan to rebuild the 400 so a priority fix was called for now all done
but painting to do.
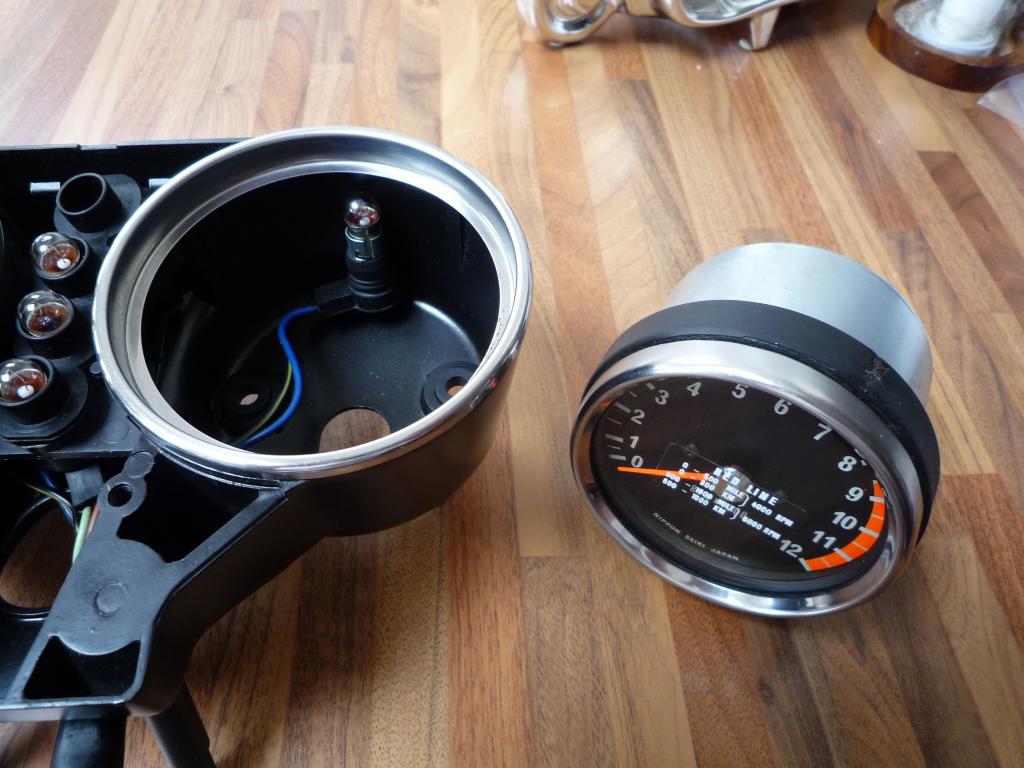
Oops No2,......was the Clock panel  why it wouldn't go right god only knows but when I finally got the finish right
the lettering (Ignition) didn't look right. Problem was it ended up with too
much paint on it and the definition was going around a couple of the letters. I
could/should have left it but it wasn't right and I made the unfortunate
decision to strip it.
why it wouldn't go right god only knows but when I finally got the finish right
the lettering (Ignition) didn't look right. Problem was it ended up with too
much paint on it and the definition was going around a couple of the letters. I
could/should have left it but it wasn't right and I made the unfortunate
decision to strip it.
All ended badly with the stripper getting on to one of the jewels and on
knocking it out it shattered....Oh Bu**er and not a happy bunny

Oh well onwards and upwards all part of the story and lessons learnt
 we continue...................
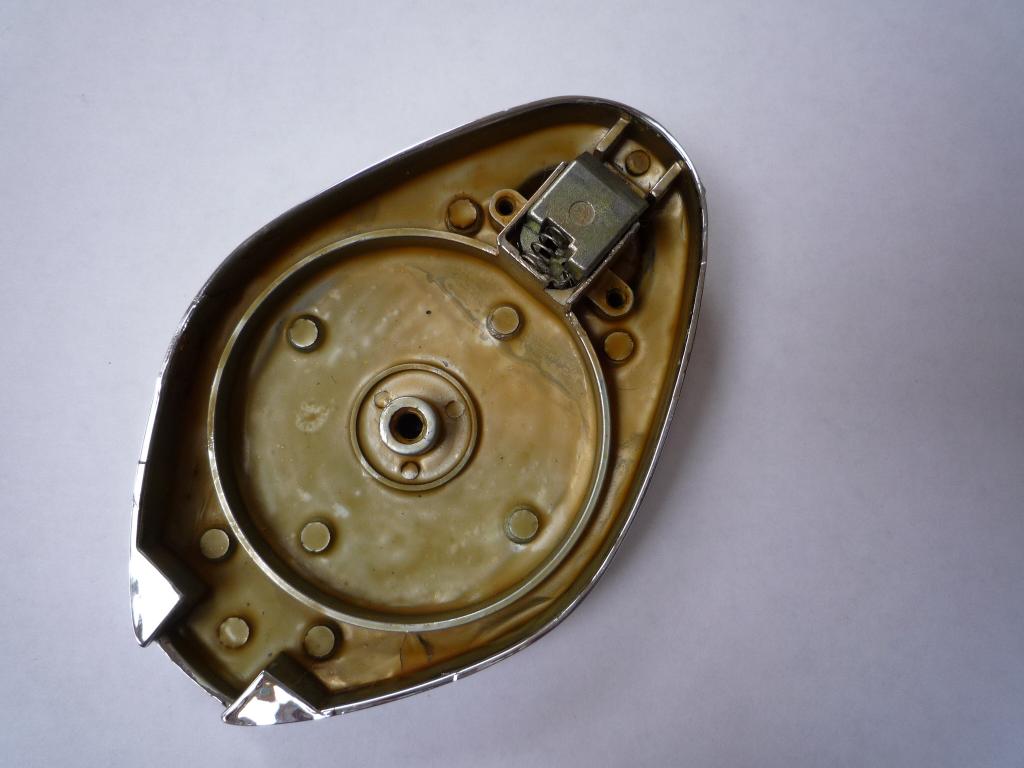
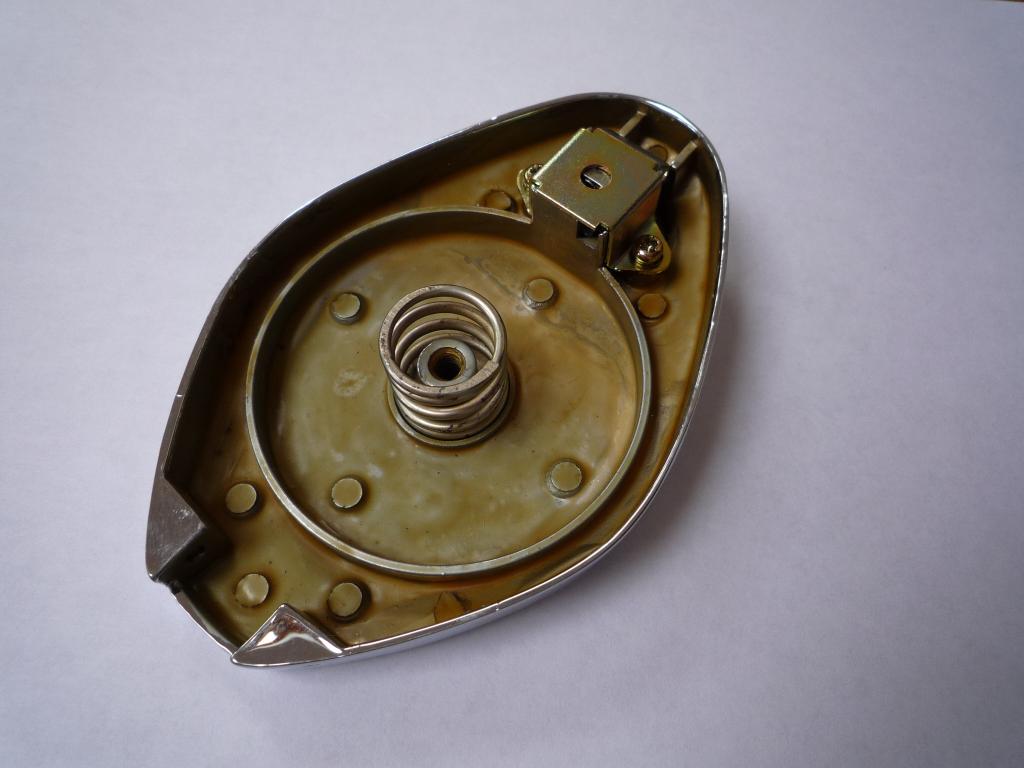
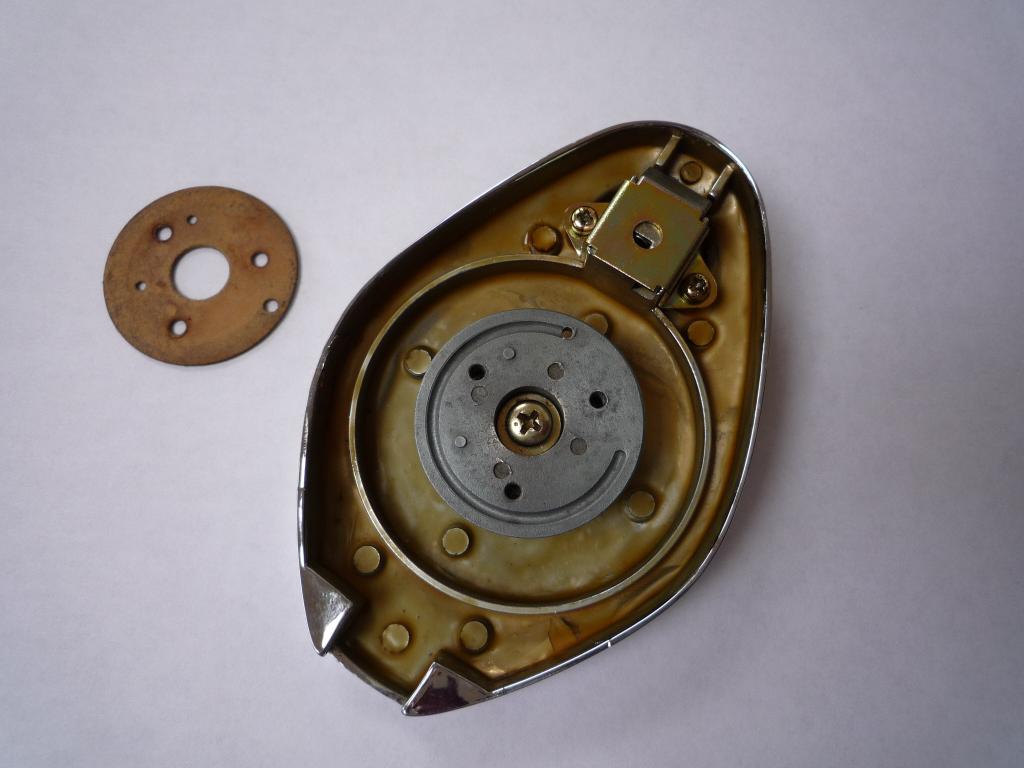
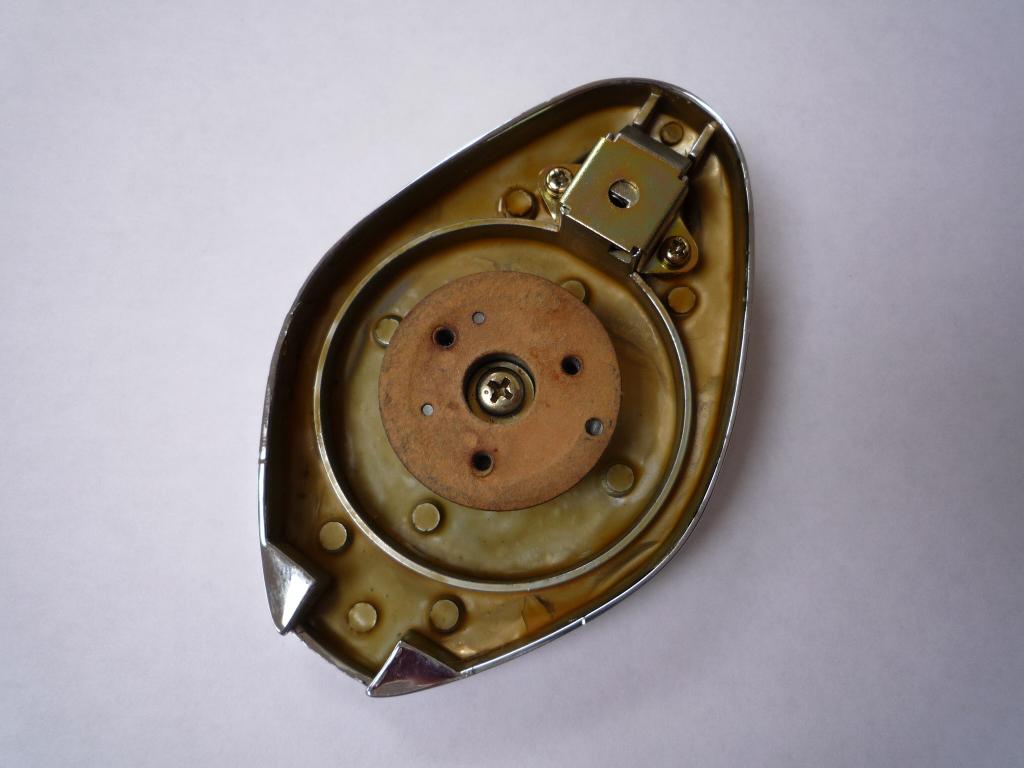
On the plus side the seat lock all went well and is now back together and
finished
The clock panel has been replaced with a NOS item (no beer for
me for a couple of weeks) and just to rub salt into my wounds I got stung by
customs for it too.
So no chocolate biscuits either

And the polishing continues, I found another couple of deep
scores in the pump cover but was able to remove them. Oil pump just needed a
wipe over.
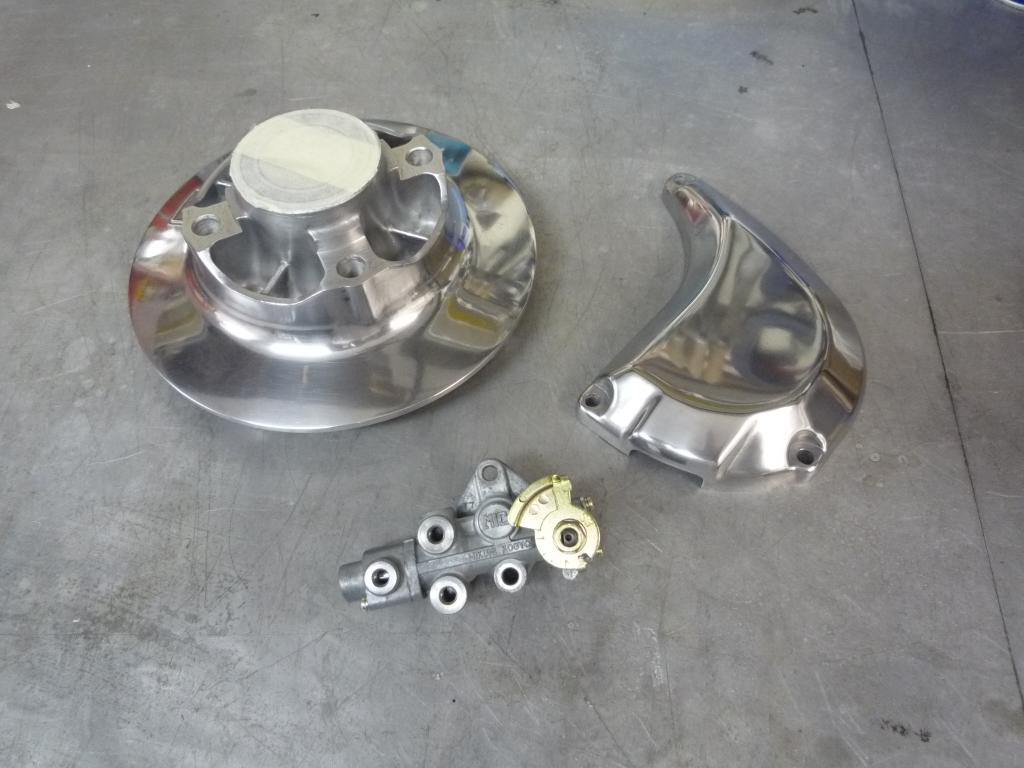
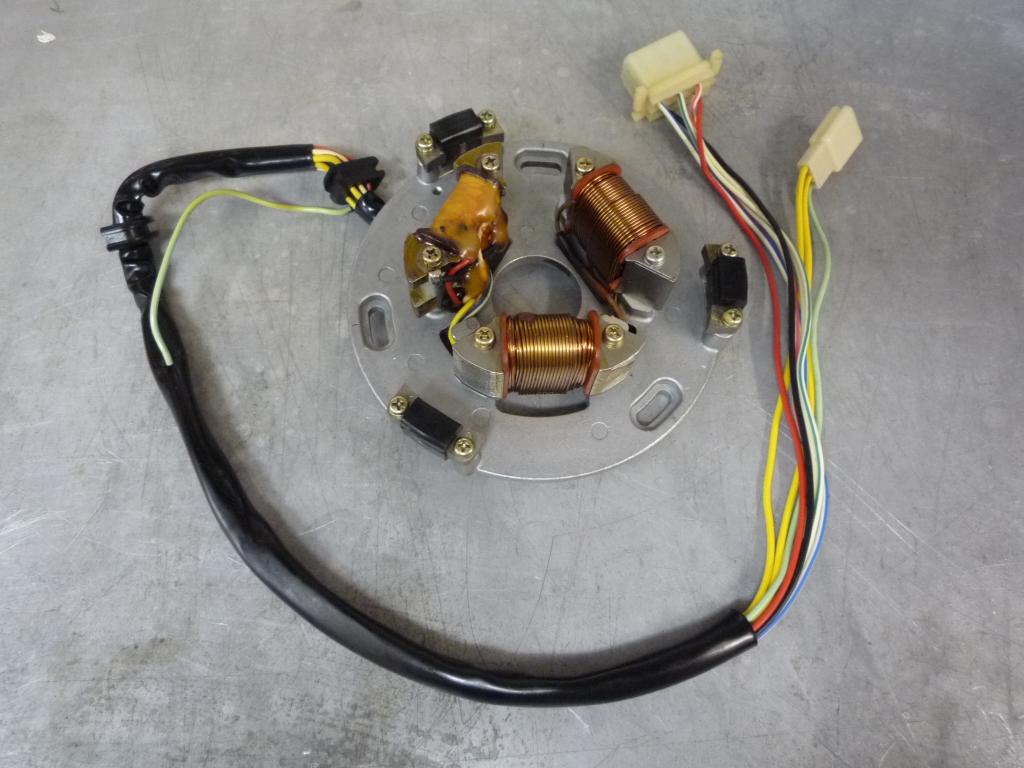
Cleaned up my stator plate, it all
looks to be in good condition but I will carry out a few checks on it with
Martins assistance (cheers matey )just to make sure its ok.
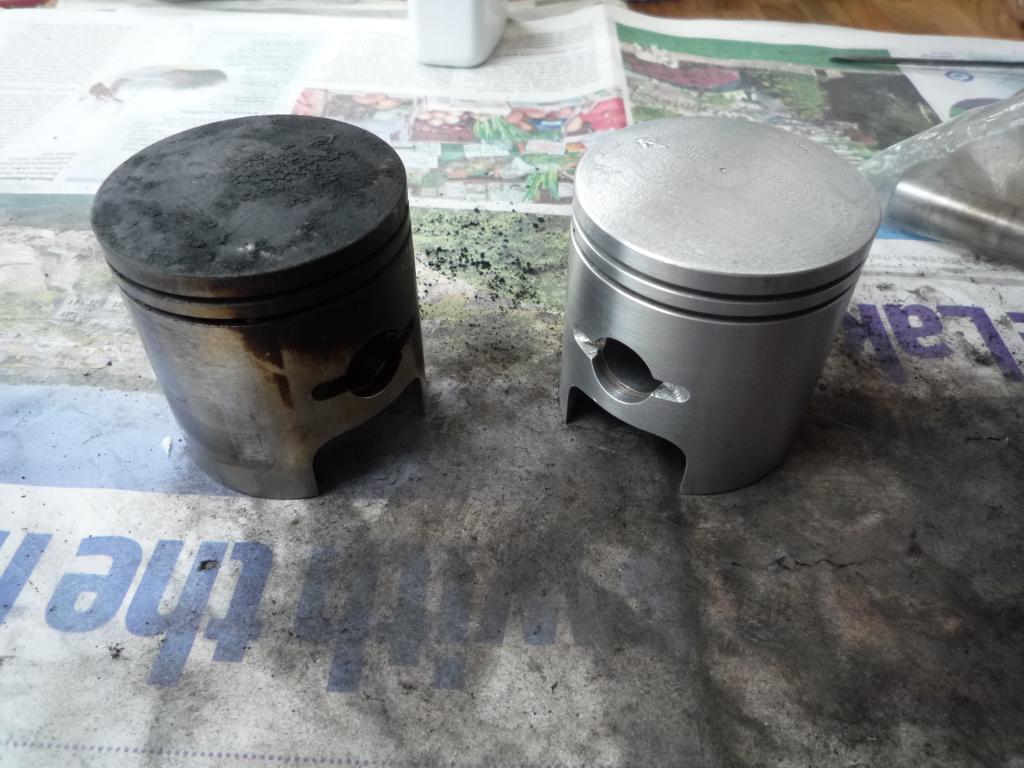
I have also started work on the
pistons and rings, one of the rings was originally stuck but now freed off and
they all seem to be in good condition, I didn't realise there was a third ring
under the lower one but very delicate it is.
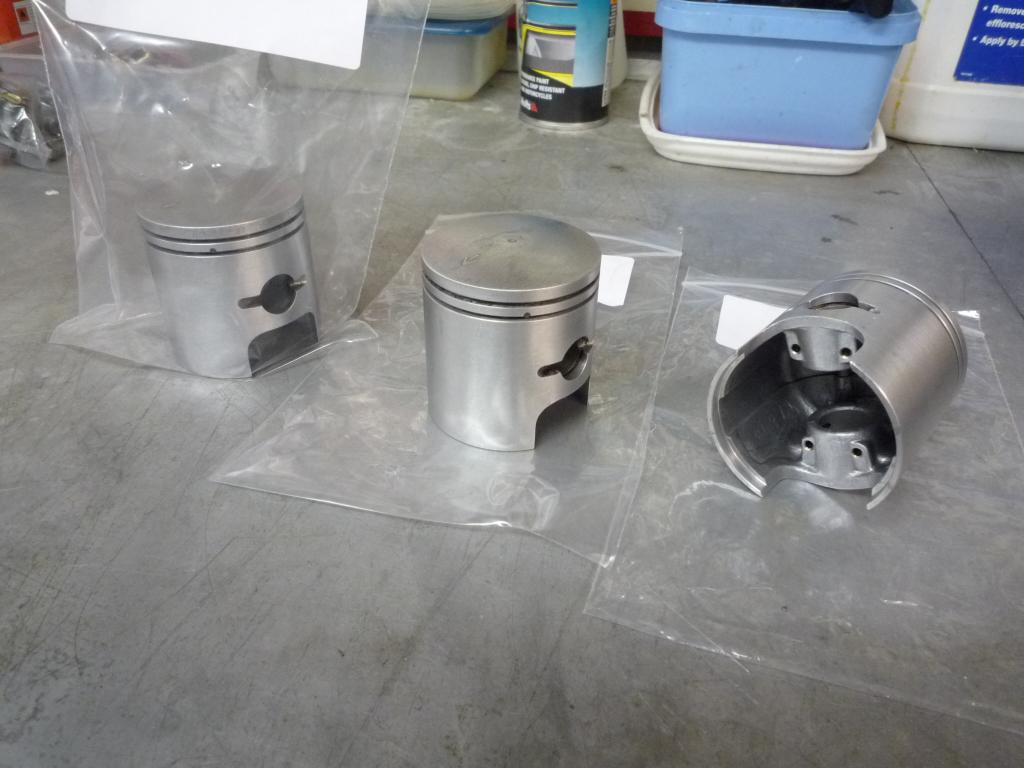
I Will be taking some measurements of the bores soon to
check the condition of them and I am hoping to get away with just honing
them.......we shall see....
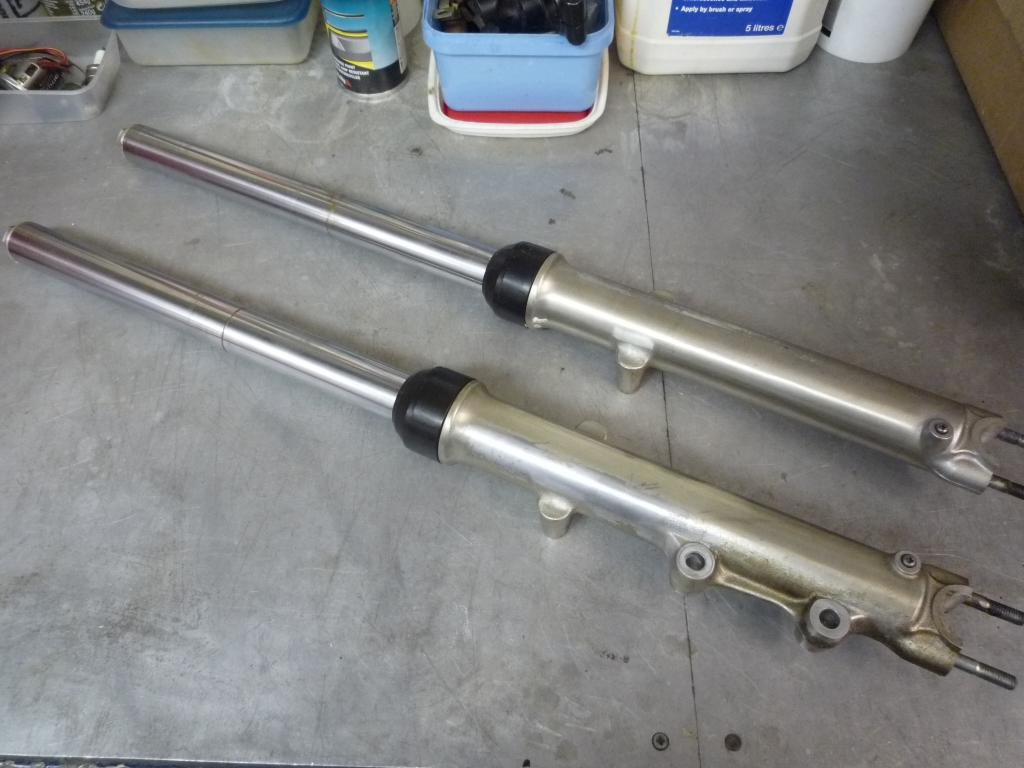
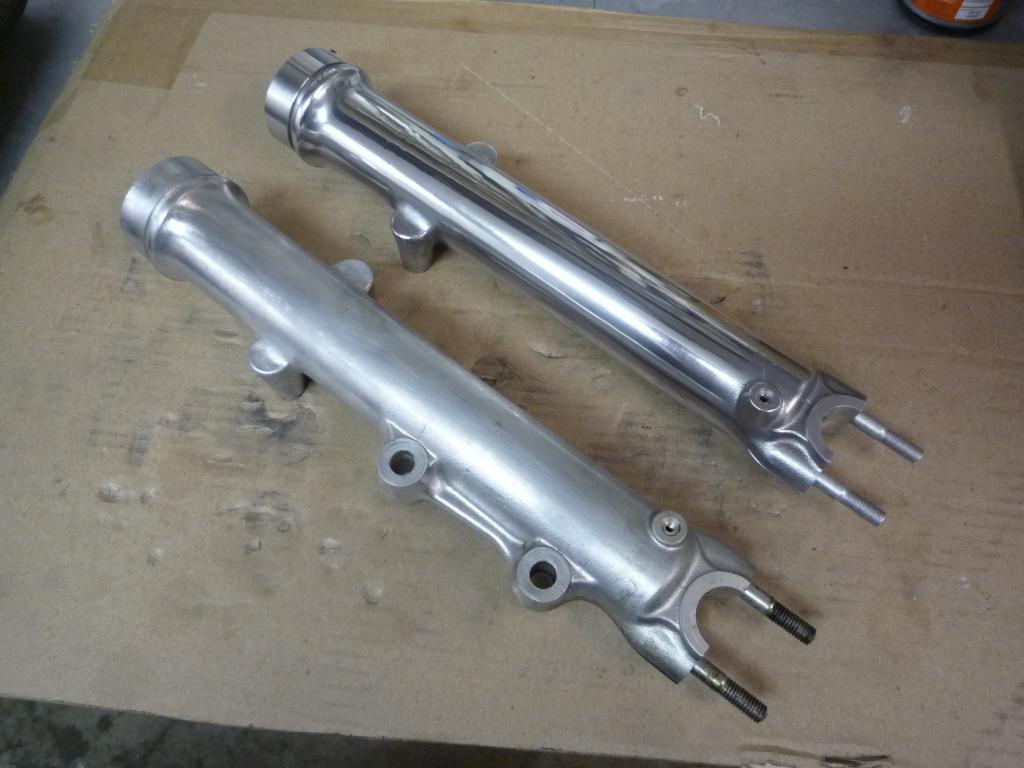
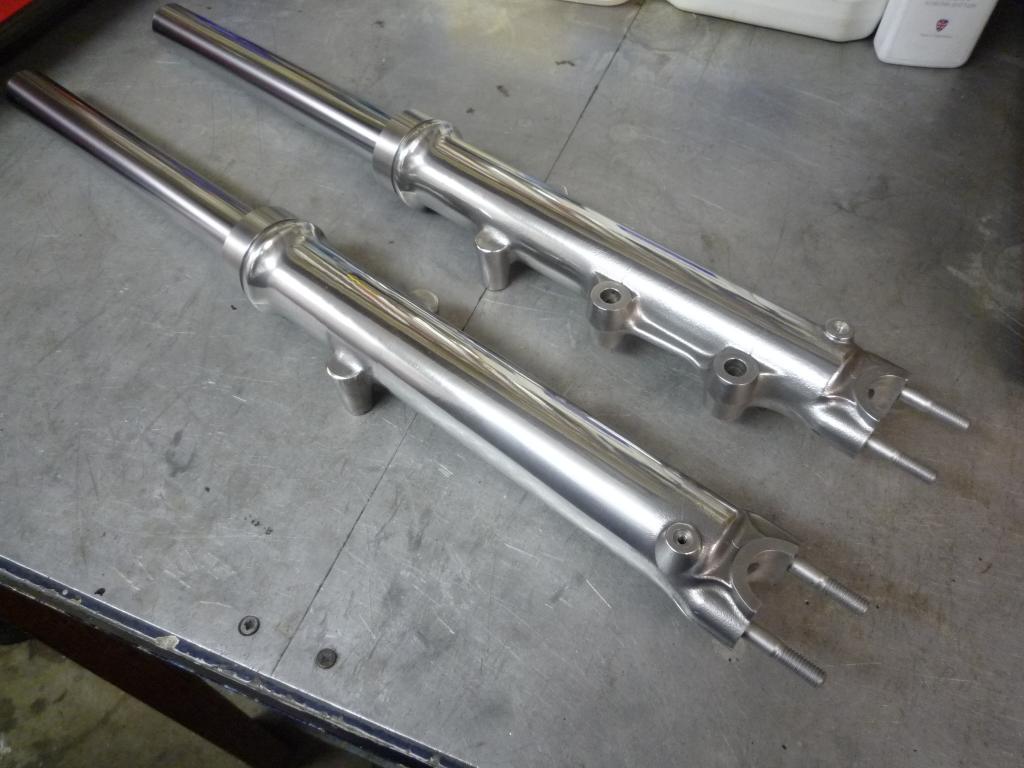
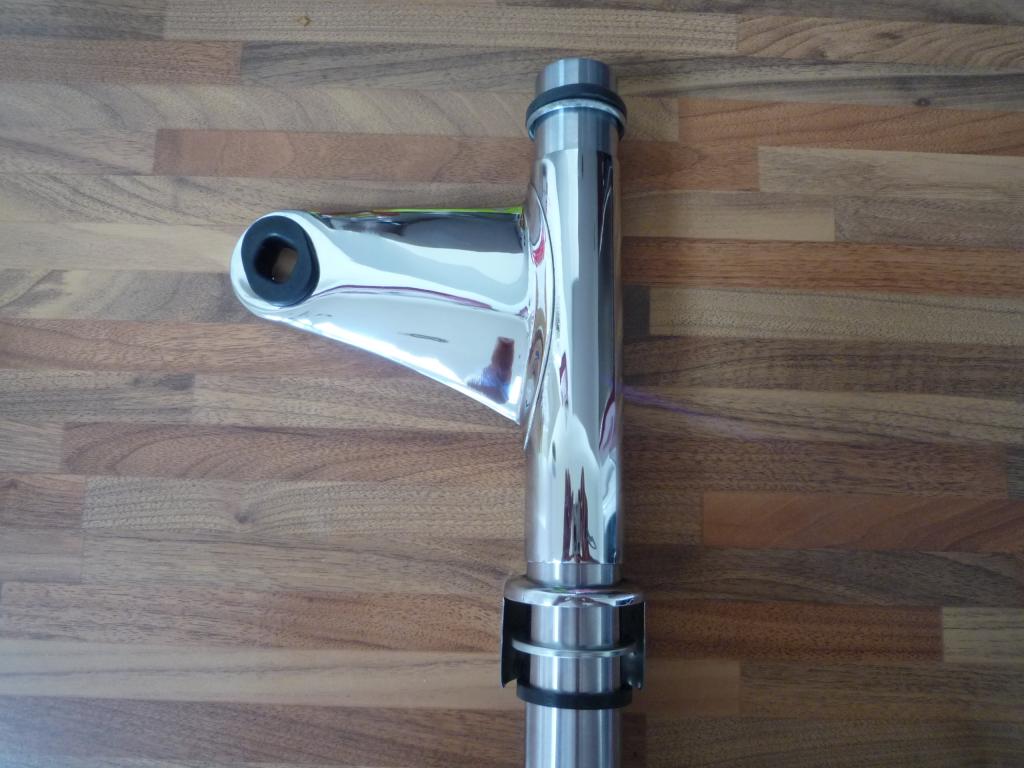
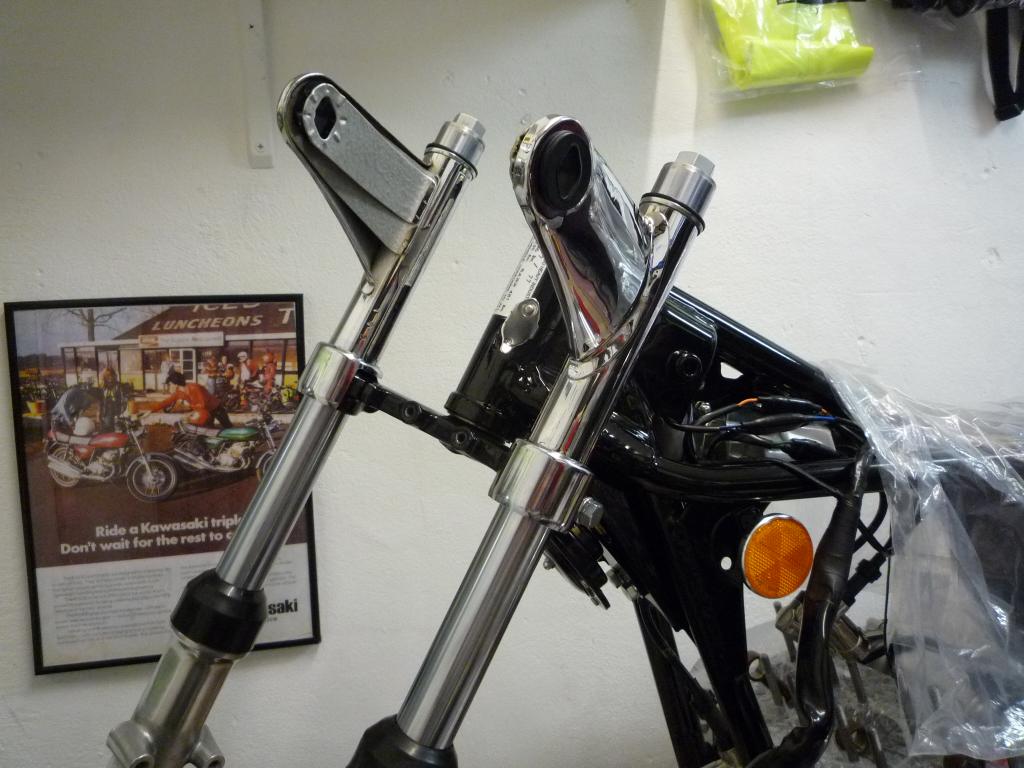
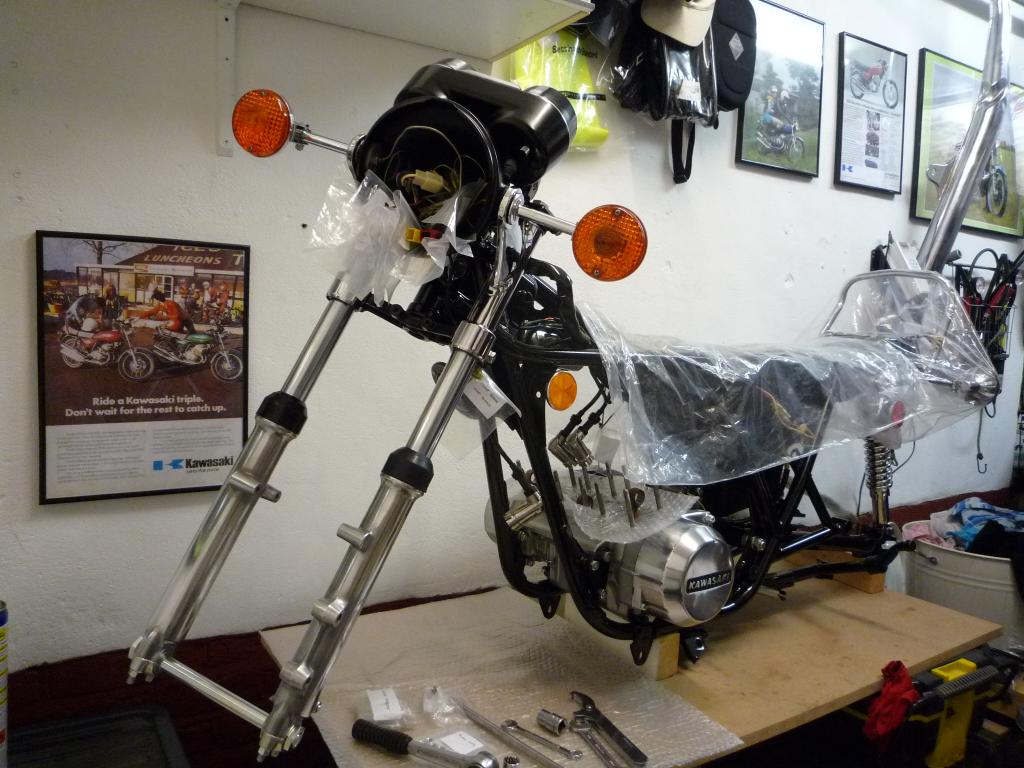
So now it was
was time to attend to the forks, the stanchions looked to be in good order but
the lacquer was wearing off the lower legs, having learnt from the 250 resto
they are best stripped and polished.
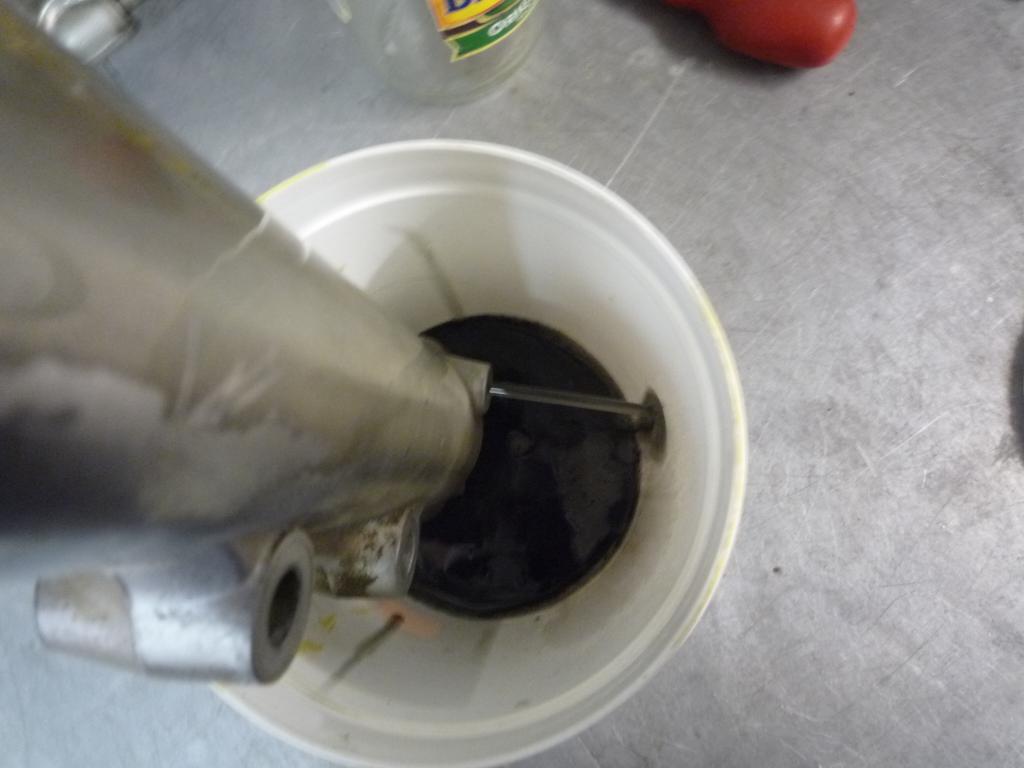
There is no sign of the fork seals leaking but they will be changed along with
the oil just to be safe. Once the drain screw was removed the oil was pumped out
and boy did it smell!!
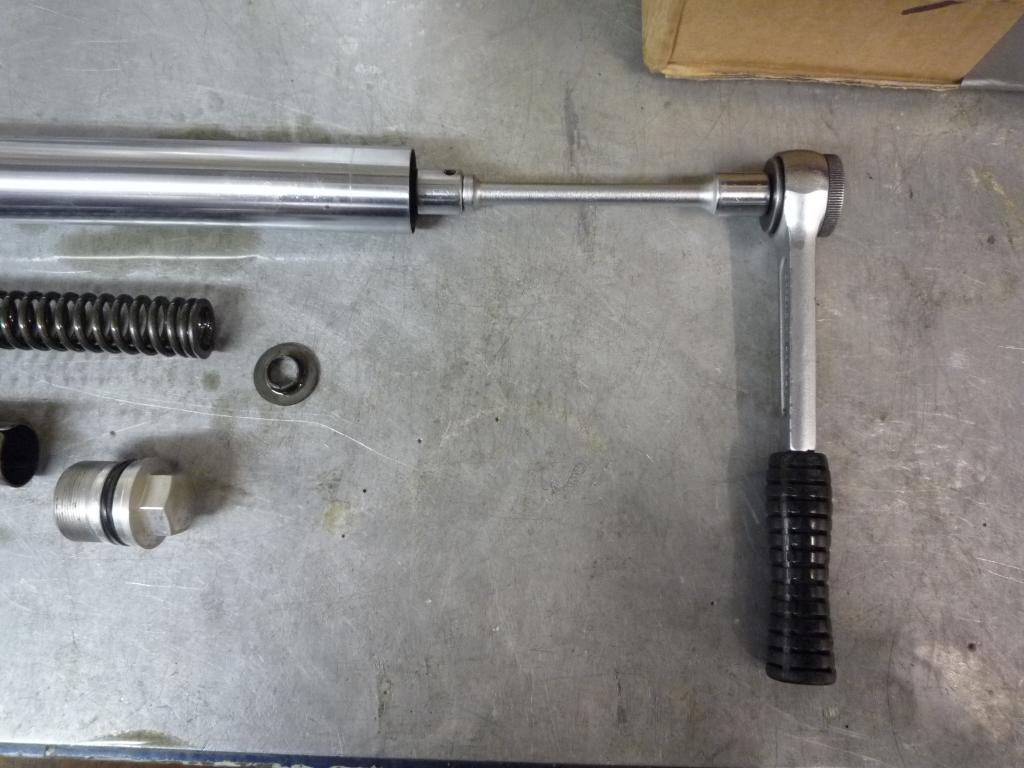
Then after loosening the allen bolt on
the bottom of the leg the top cap was removed and the internals taken
out............Leaving the cap and spring in place should help when doing this
though one of the bolts was fairly stuck and wouldn't play ball. (impact gun or
air drill would help).
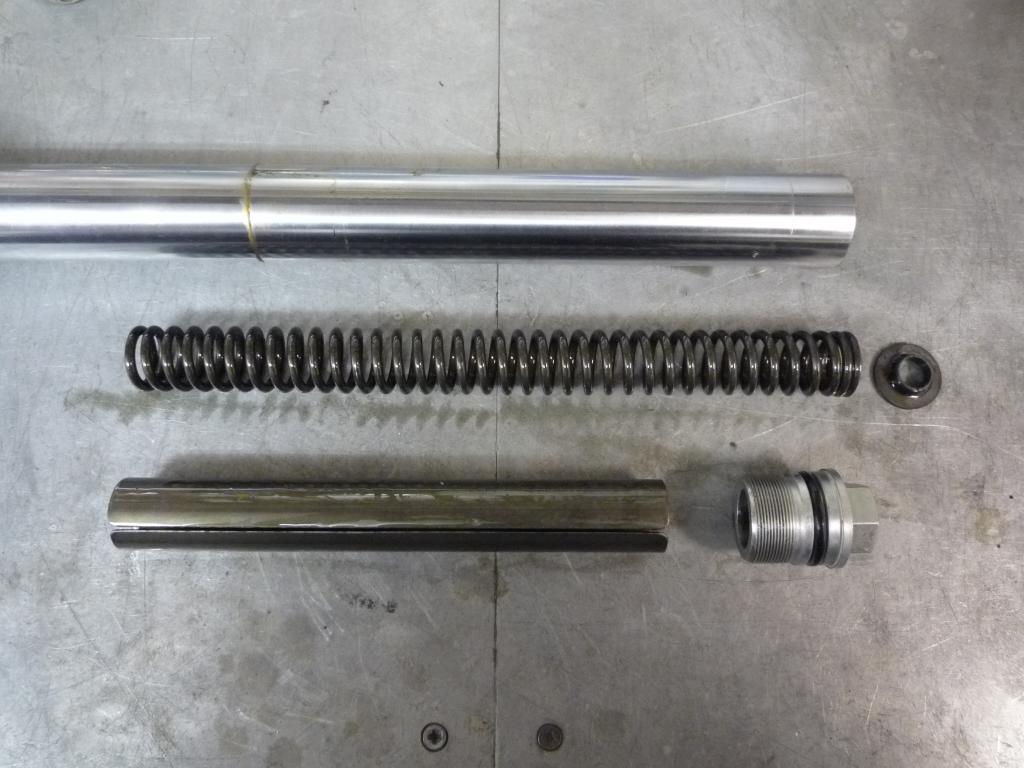
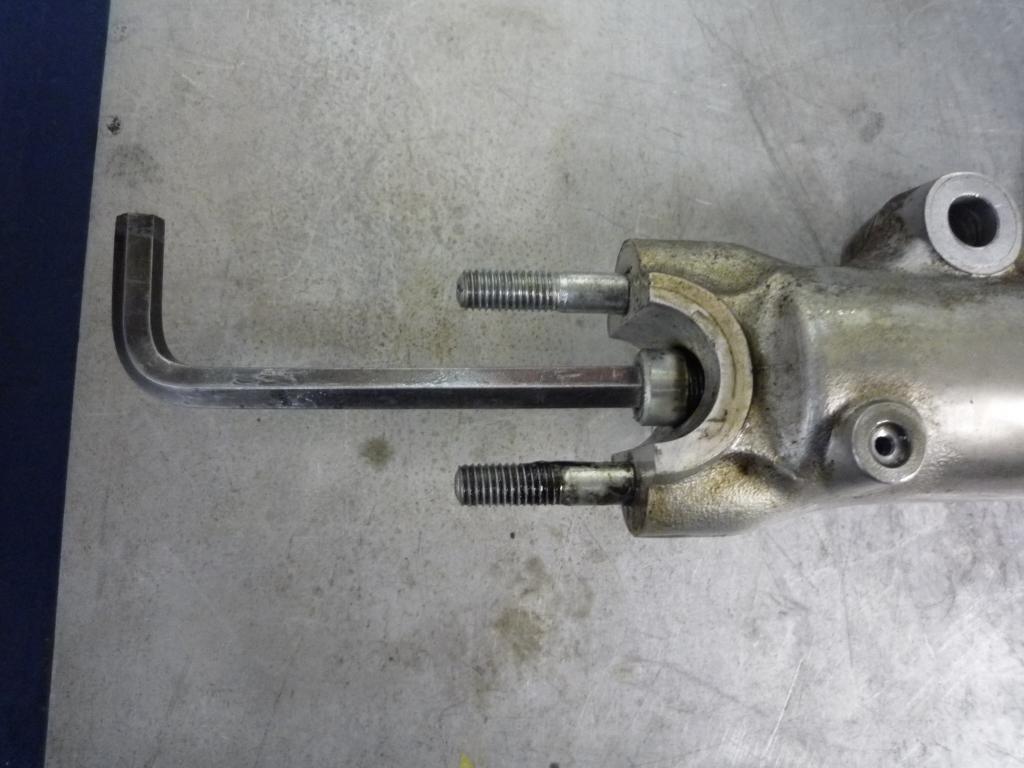
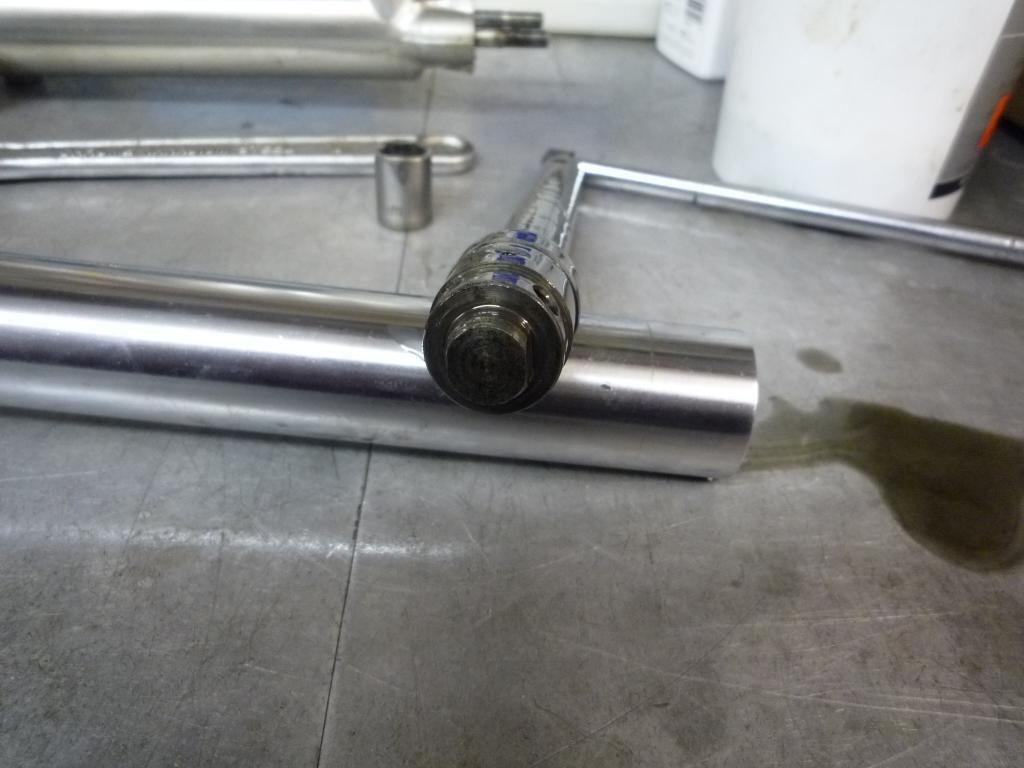
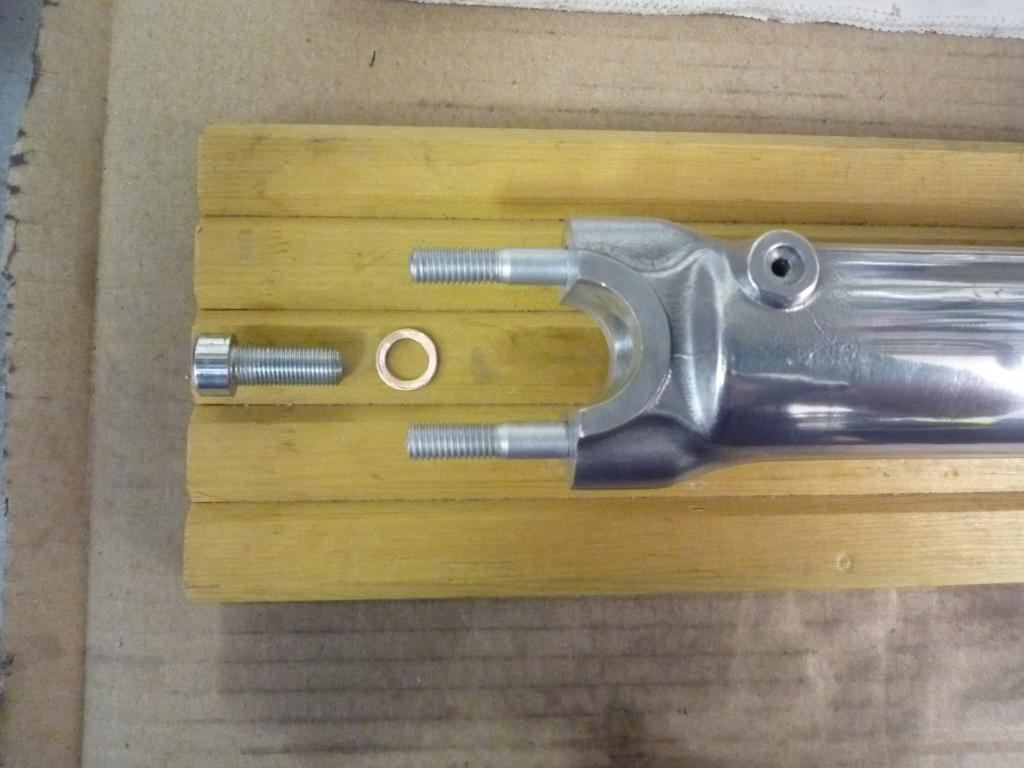
Using the allen key and my special
socket (flattened 6 sided 14mm) and a bit of effort, the bolts were loosened and
the inner valve and spring assy were removed.
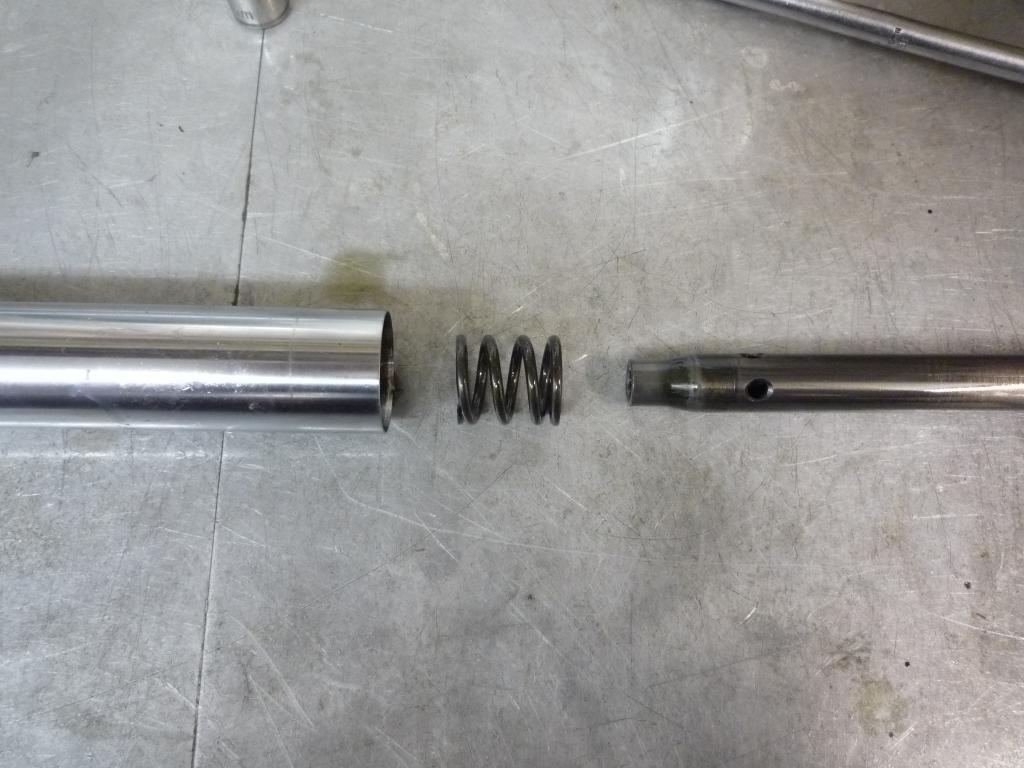
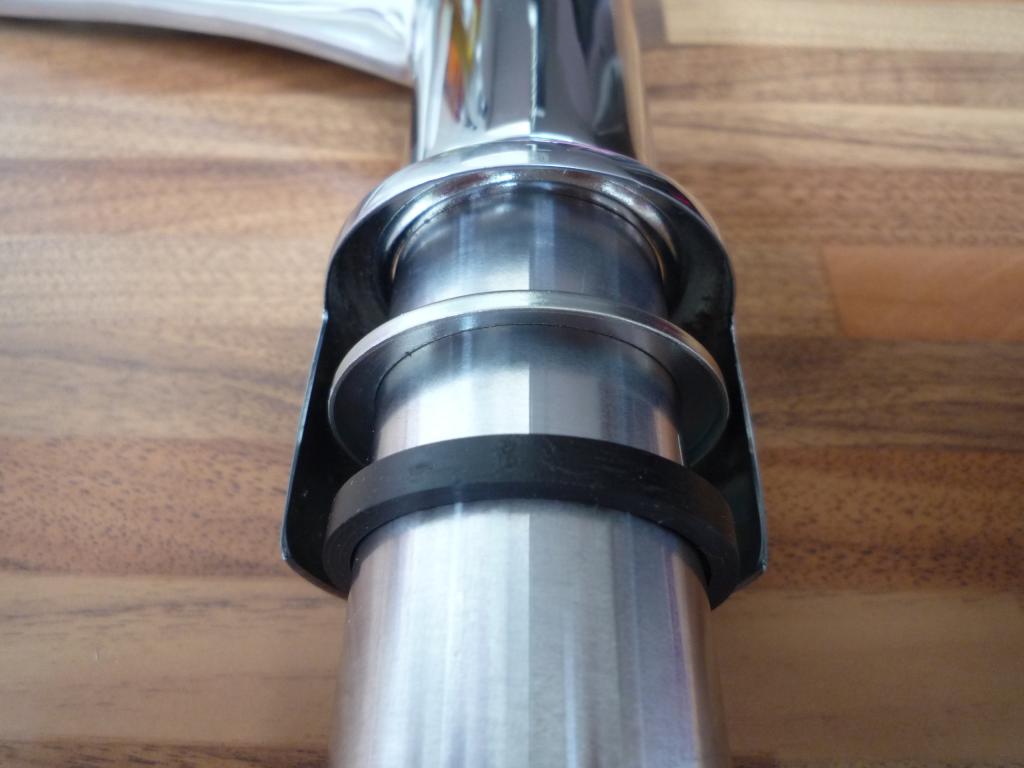
And the stanchions were now free of the
lower leg.

And the lower piston and valve assy can be removed.
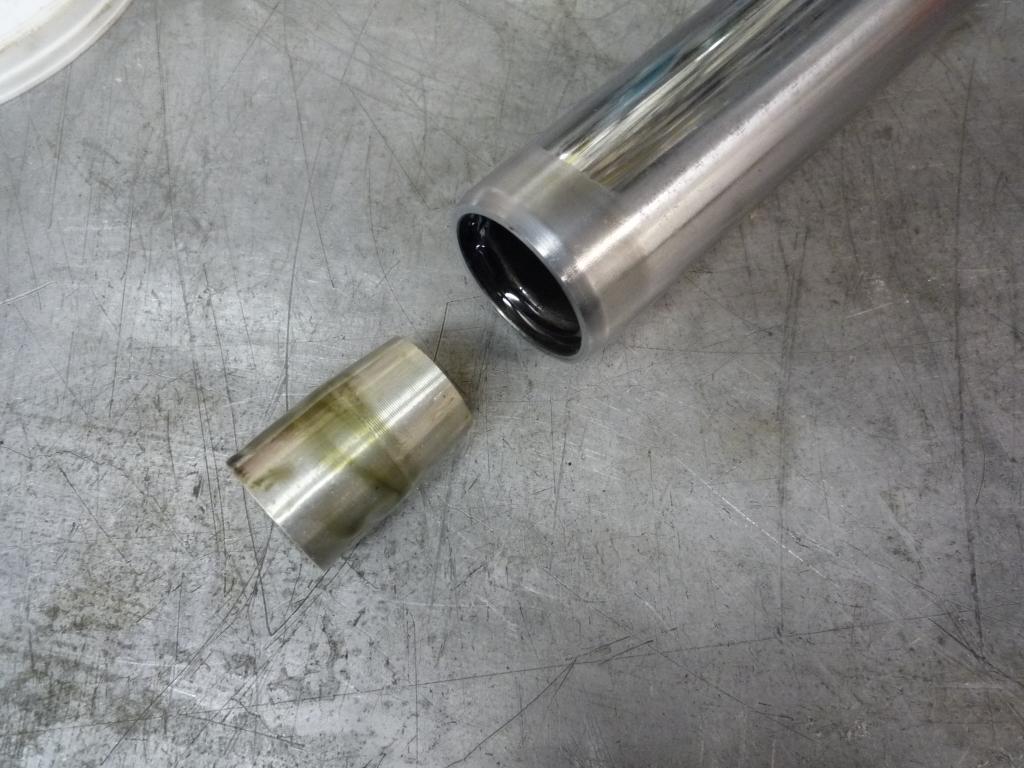
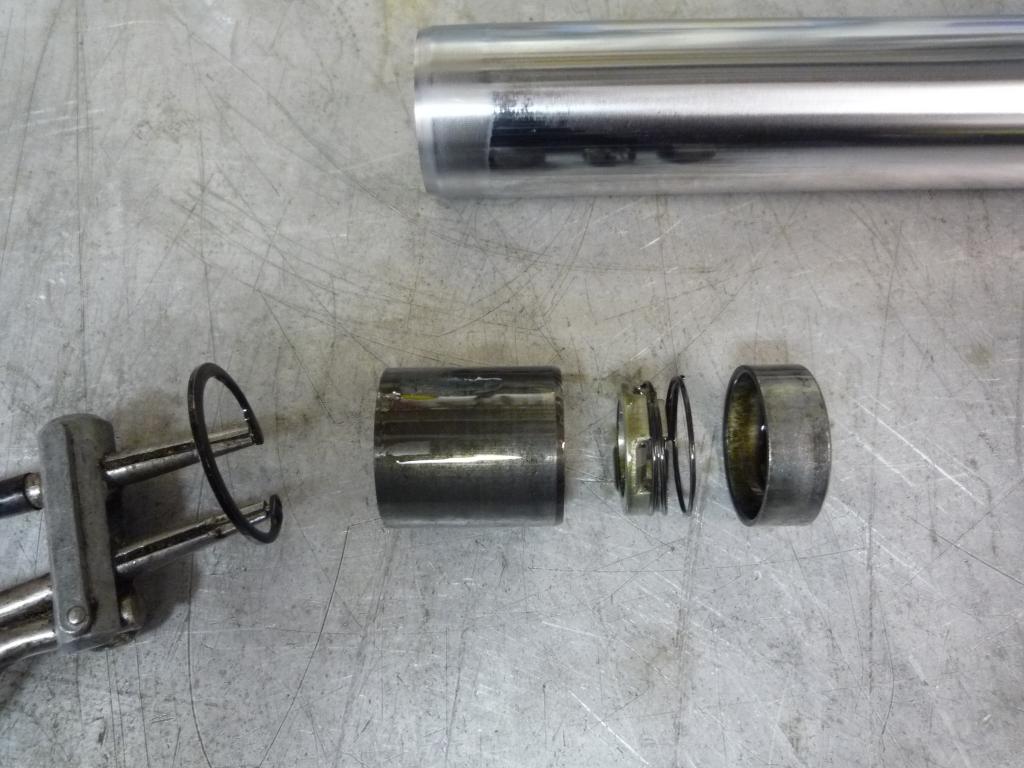
On the lower leg the dust cover the retaining ring and washer were removed
allowing access to the fork seal which was then removed.

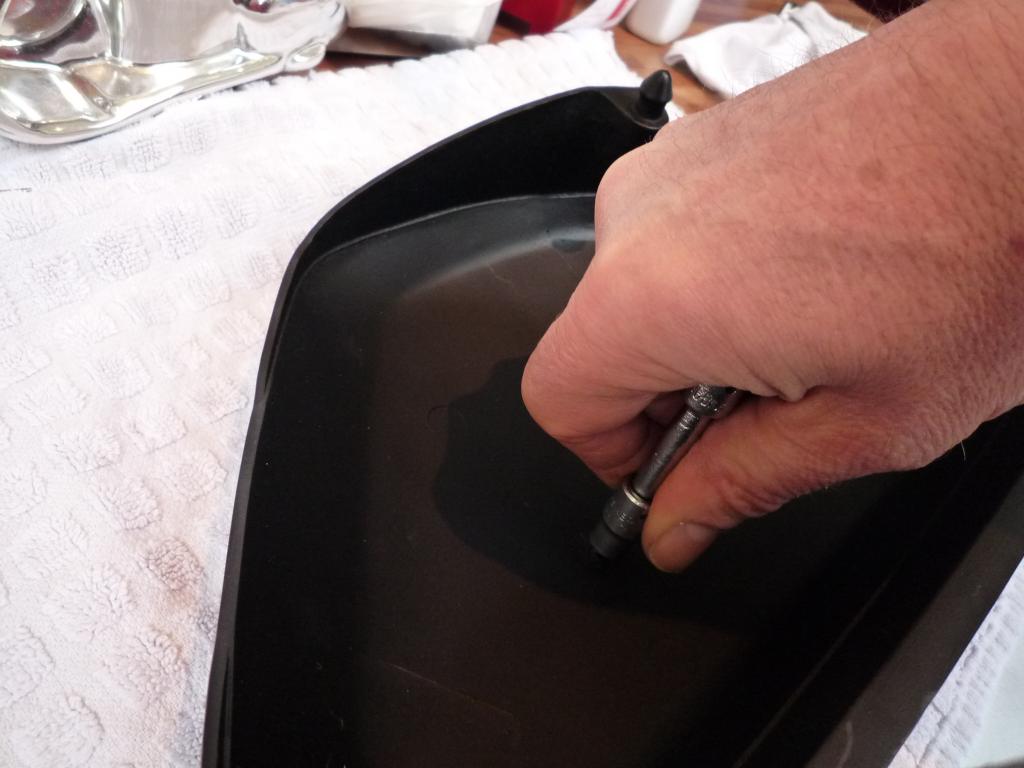
All stripped
Putting my cooking skills to good use
once again the legs were basted with stripper in an oven tray to remove the
lacquer.


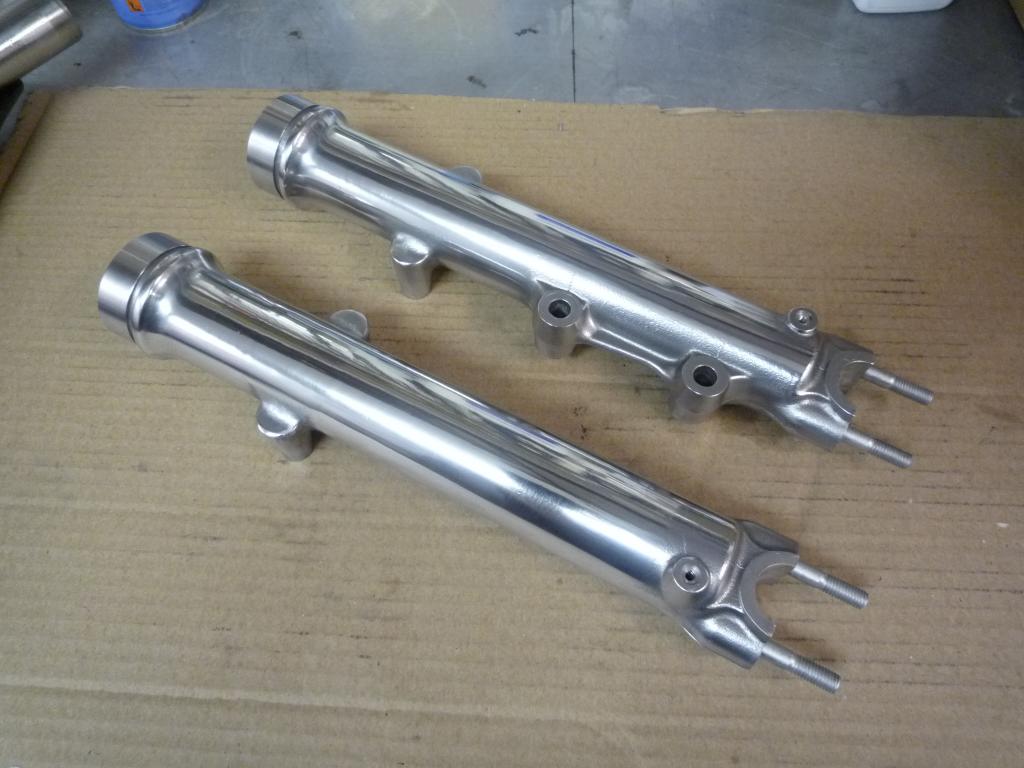
Before the polishing could begin,
having no corrosion on them made the job easy unlike last time. After a good
clean up.......
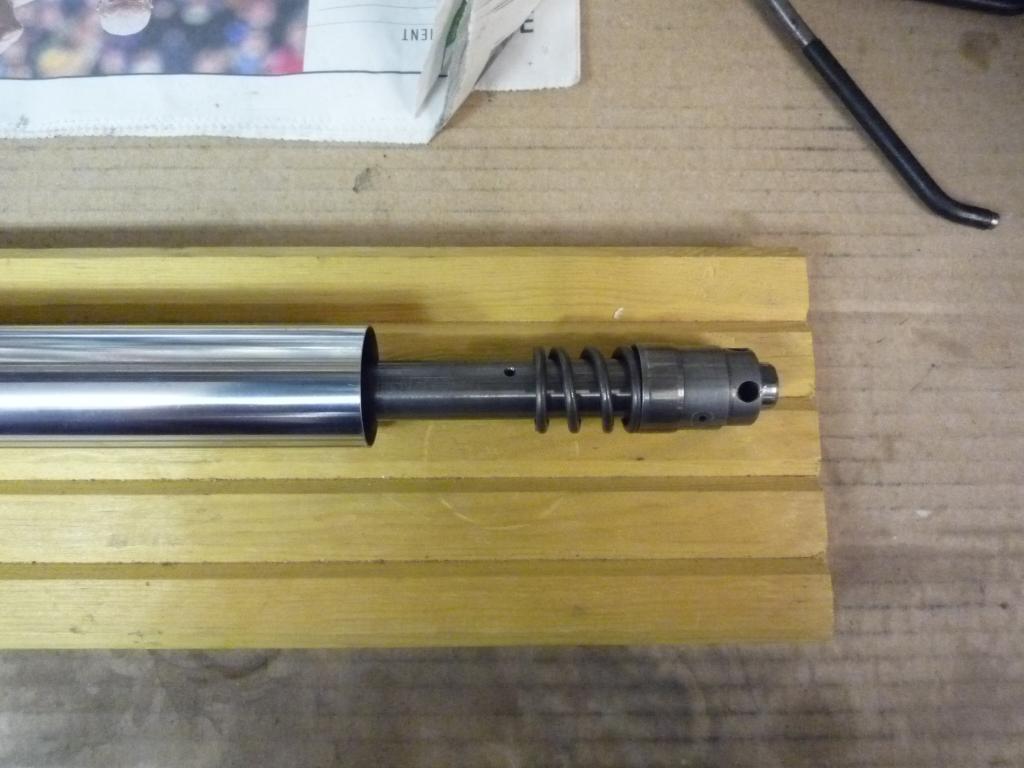
The new seals were fitted using the freezer and hot water technique (seal in the
freezer for 15 minutes and leg top dipped in boiling water for 5 min roughly in
case you didn't know) works well for me and I used the old seal to help drive
the new one in place.

Then it was a case of reassembly, so pictures for reference.

Loctite and copper gasket on assembly
for the allen bolt. And back together in no time.
I still have to finish the top caps
off, replace the dust covers as they are cracking, fit the spring etc, the drain
screws and service with oil before they are ready to fit.
Thinking back to my first attempt in the early 80's at changing fork seals which
ended up with me in casualty with a slashed wrist :oops: sitting next to a chap
in a Karate suit who had smashed his knuckles whilst trying to chop wood.
I am glad to say that this time it went smoothly.
With house painting and repairs taking
up most of my spare time recently there hasn't been a great deal to show
progress wise, but now we are leak free I can work on preparing the assembly
area.
I hope to start on the engine rebuild very soon once I have ordered the new
seals then we can start putting her back together again.
The delivery of gifts from Postie has slowed down but as ever there are still a
few items that need to be purchased ie, chain, sprockets, tyres, tubes, filter,
and a couple of cables but the list is getting smaller now which is always nice
to see.
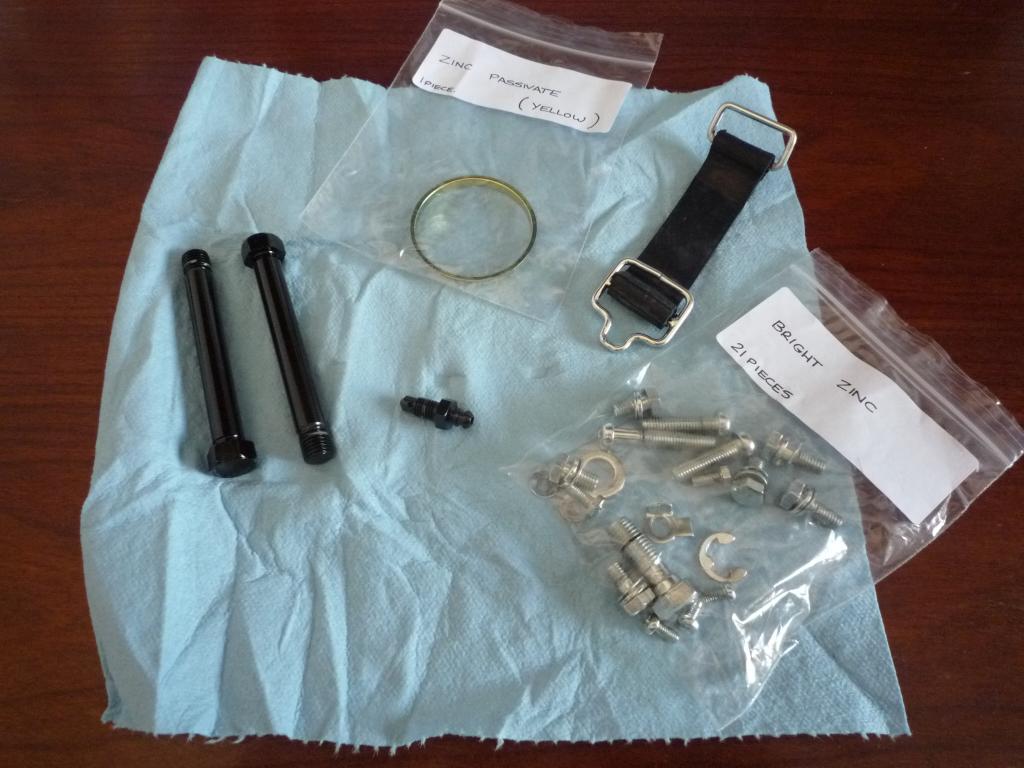
I have finished polishing and painting the last of the engine cases, and fettled
and sorted out what I hope to be the last of the zinc plating plus a few more
odds and sods that have been sitting around in various boxes.

I still have the seat to finish which I
have started looking at and a couple of small items to paint.
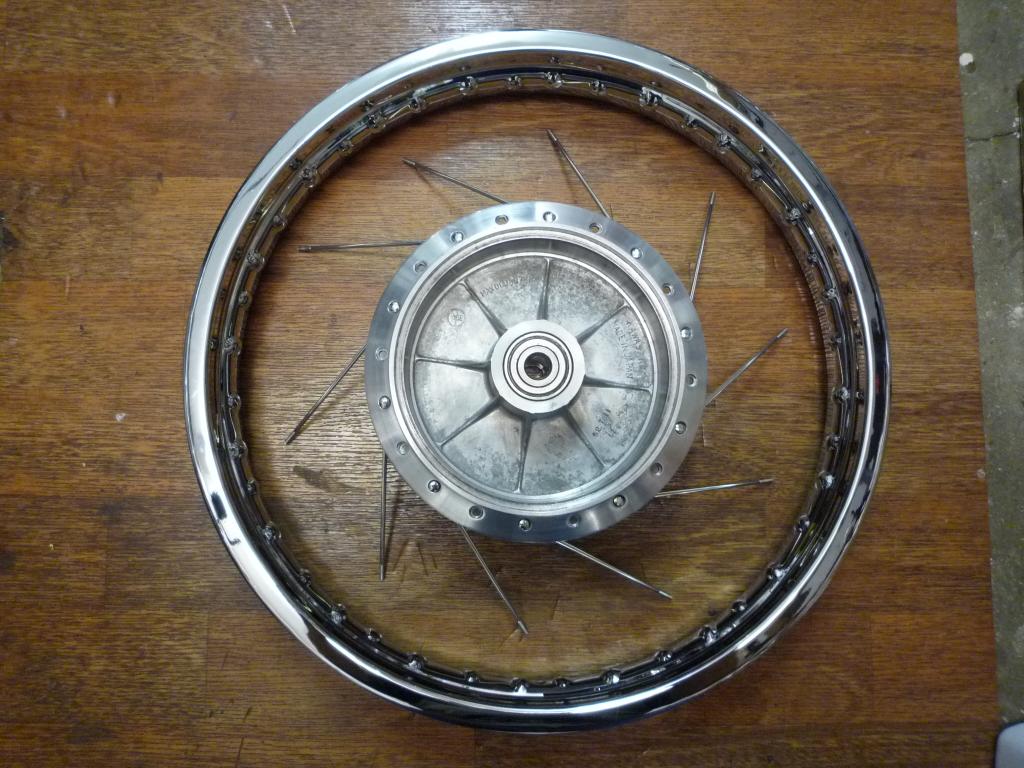
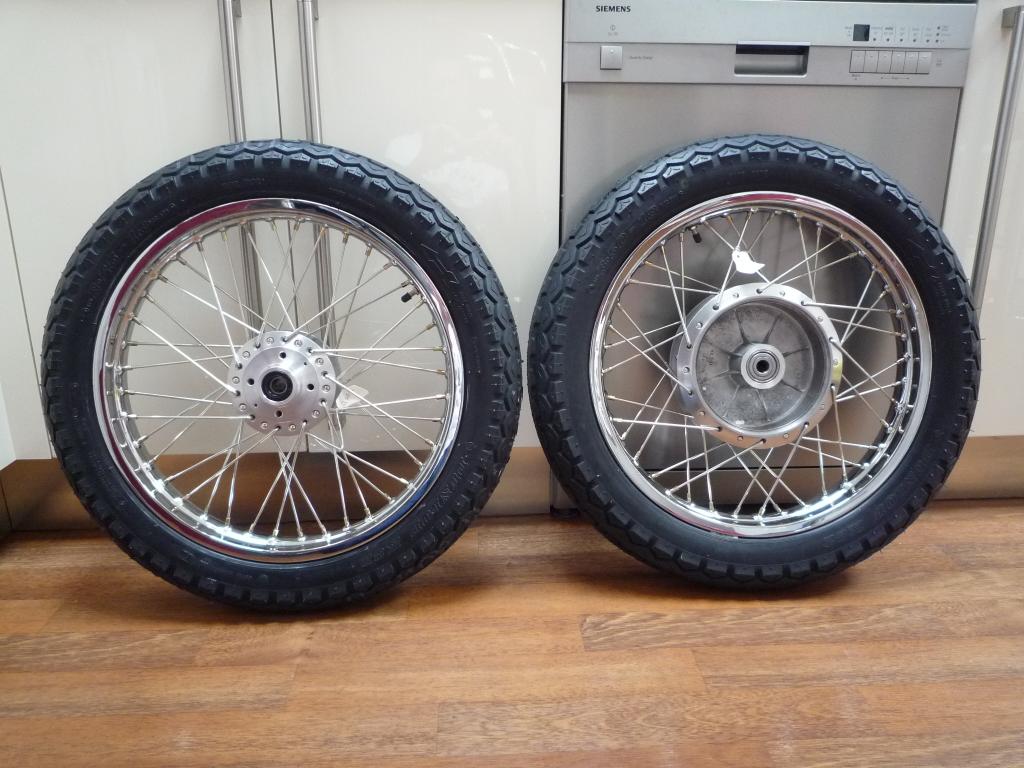
The last of the Zinc was dropped off this morning on the
way to picking up the last of the chromework (bar the Exhausts) I am now in a
position to rebuild the wheels too.
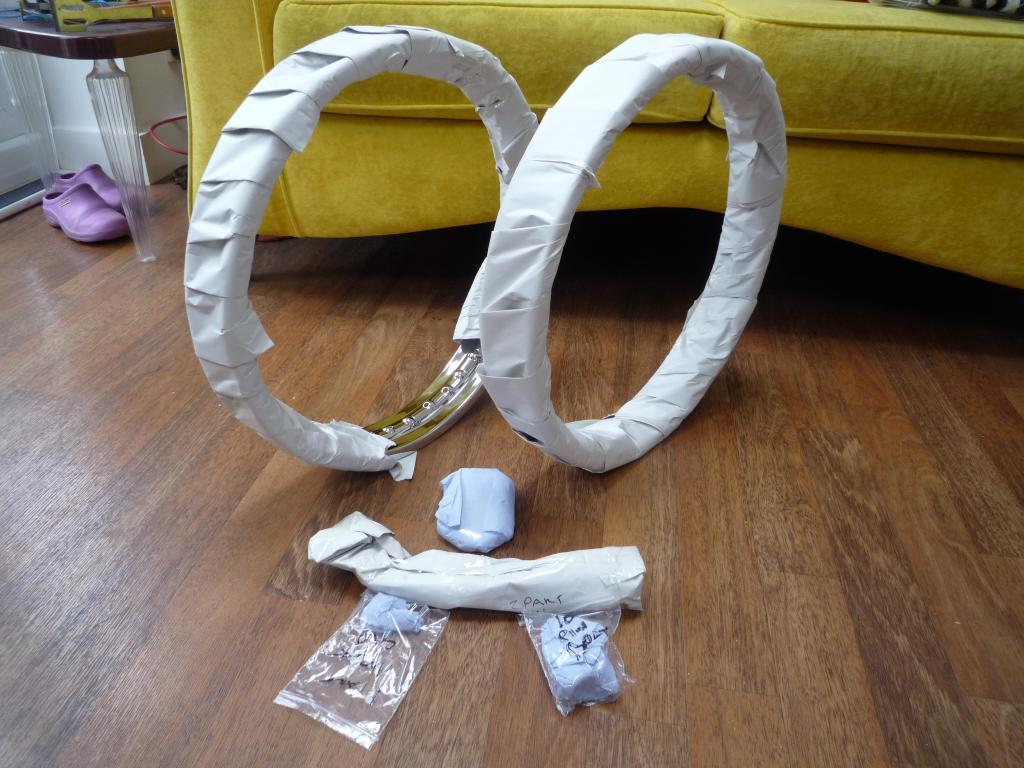
Rims have come out well with ident's
intact though one slightly less so.
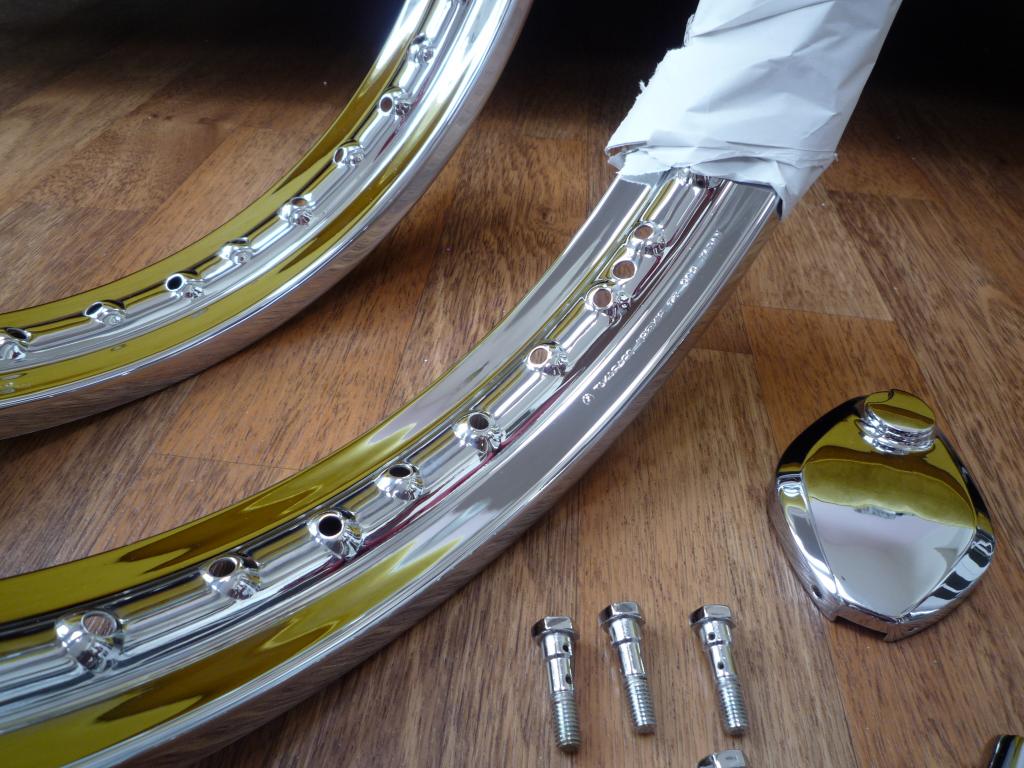
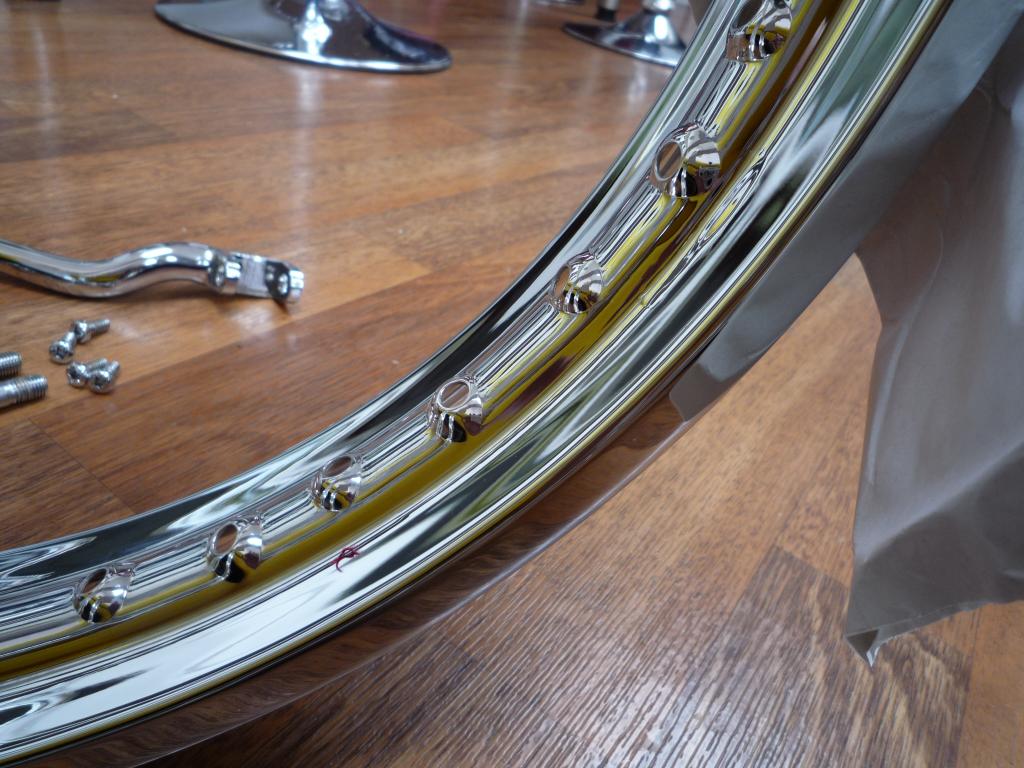
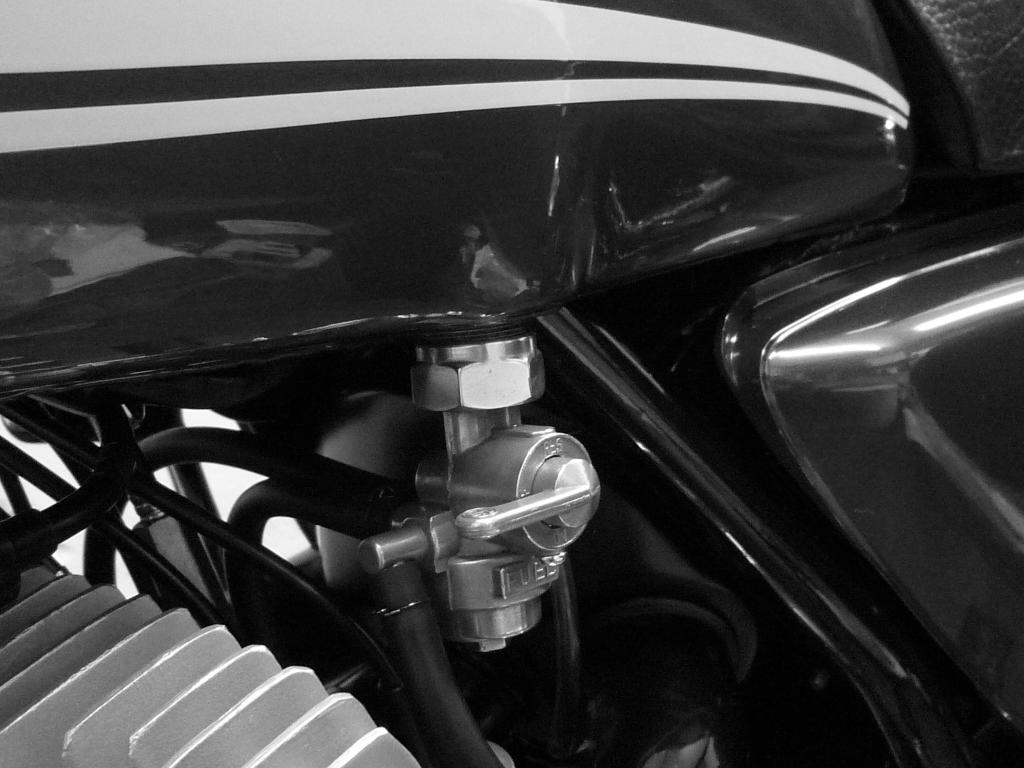
The only flaw is with the fuel cap that
seems to have given them issues and kept blowing the chrome it may have to be
redone again due to some defects in the flatness of the polishing.
But happy all the same
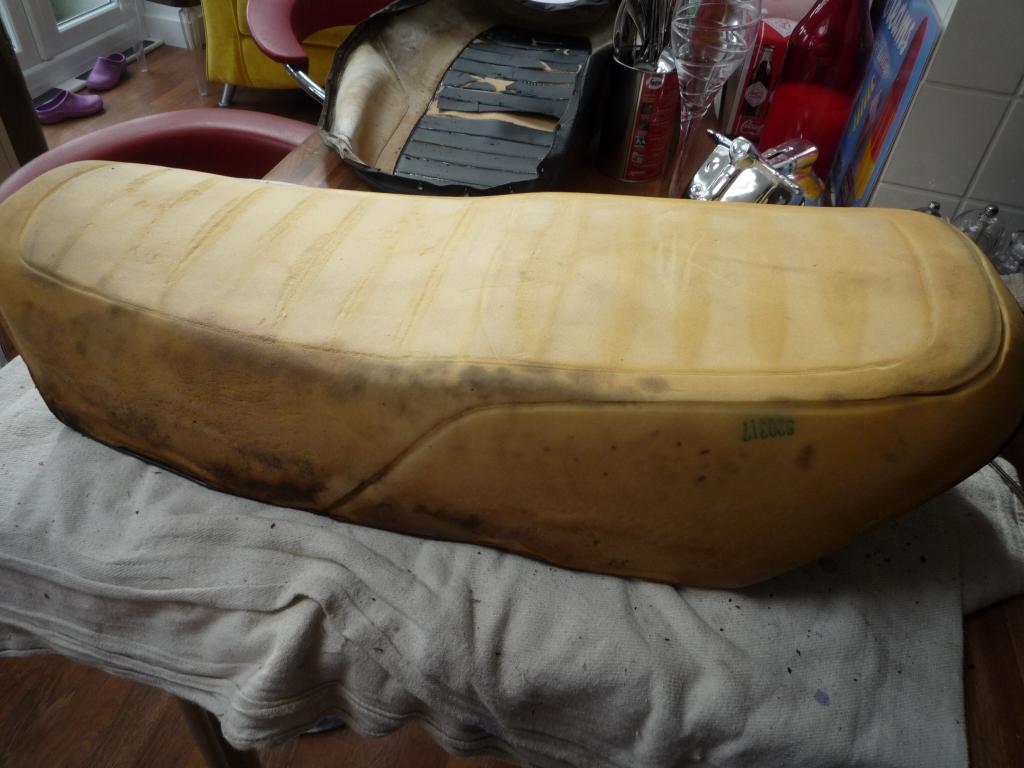
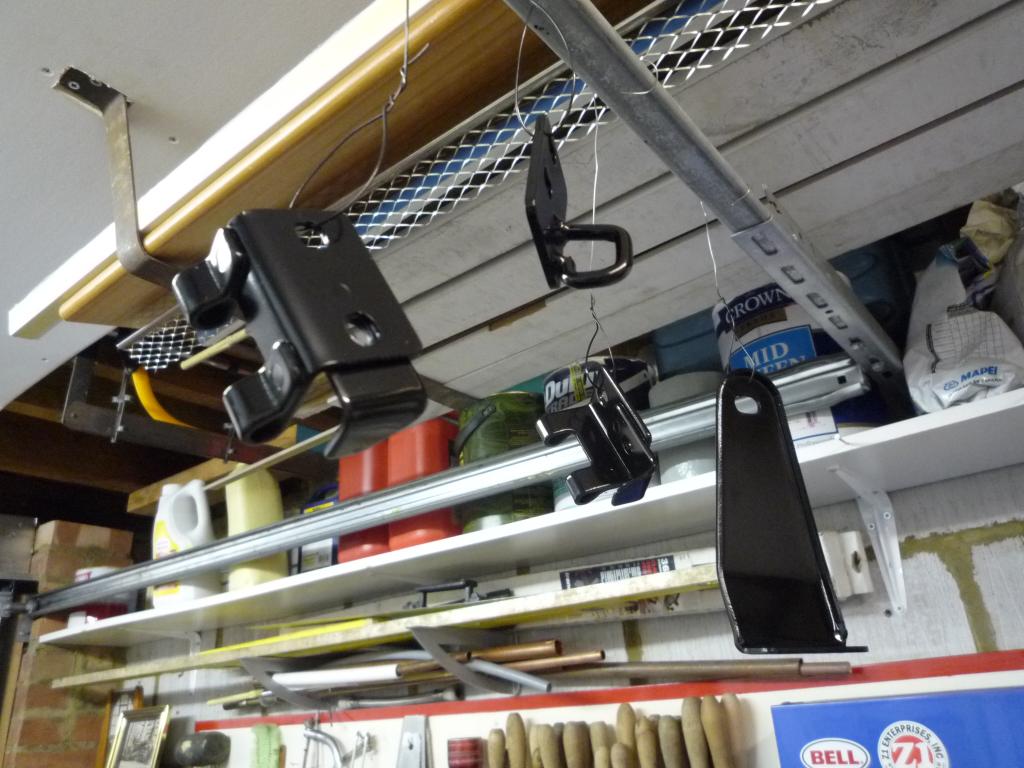
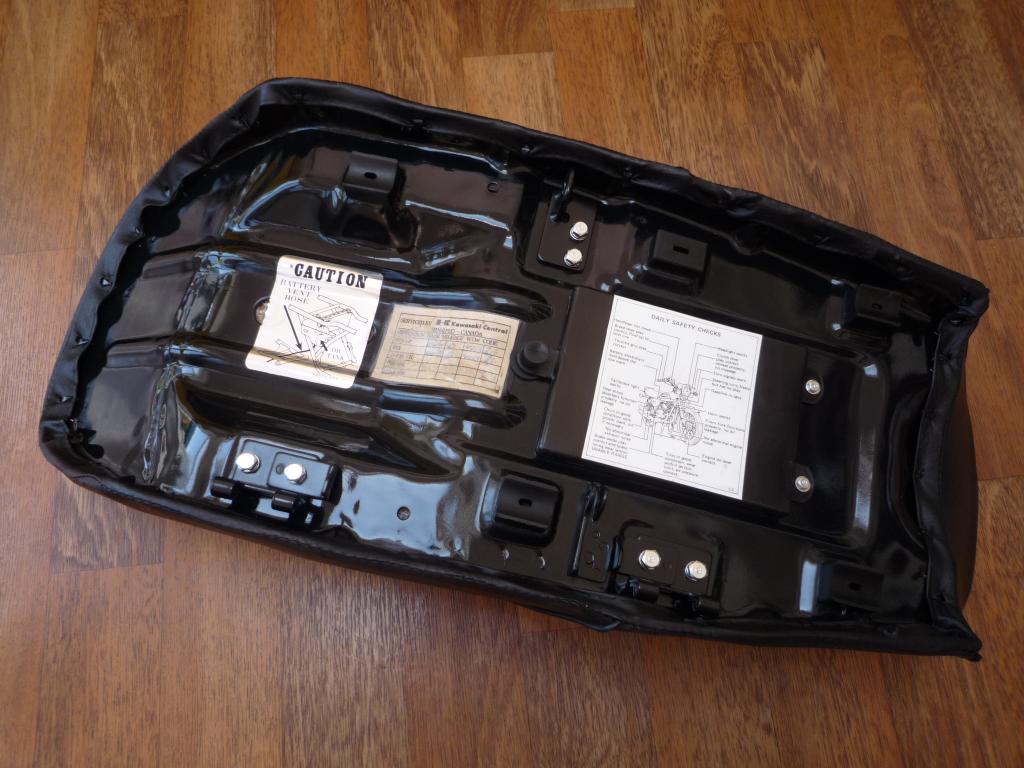
So today I decided to work on the seat,
I had already removed the hinges for refinishing and the bolts for replating and
I thought the rest of the base was in good order which it was but as with
everything else it had faults and would need a little work.
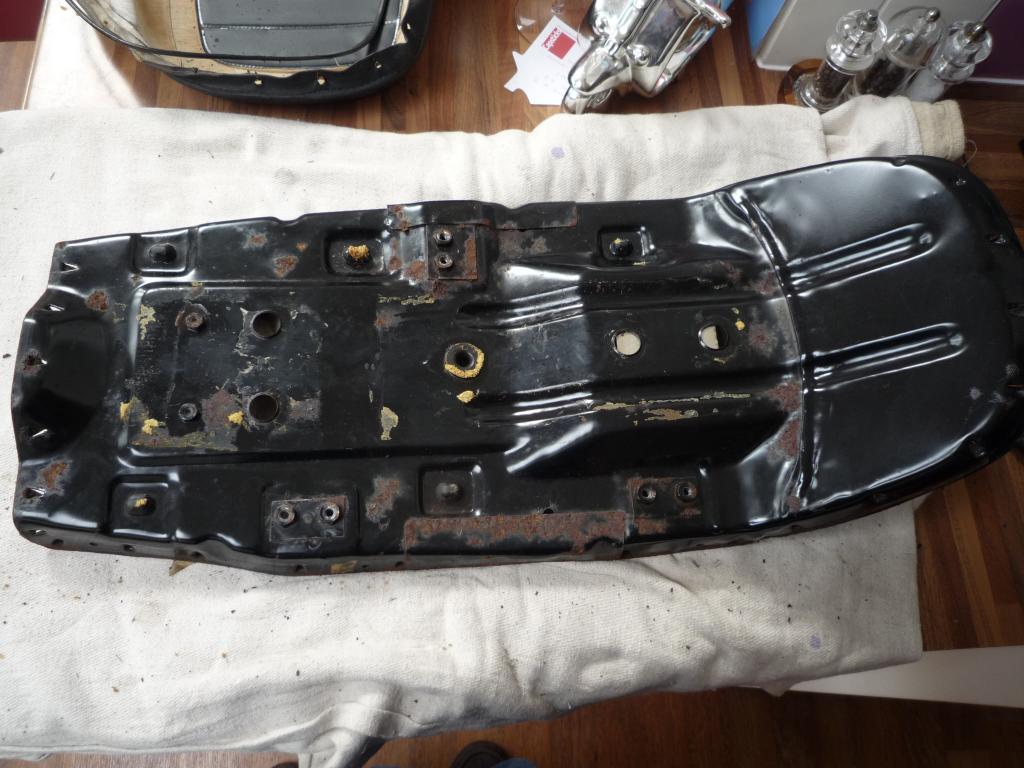
This ended up in a full strip down
It wouldn't have looked right touching it up and as it turned out there was a
lot more rust lurking under the cover.

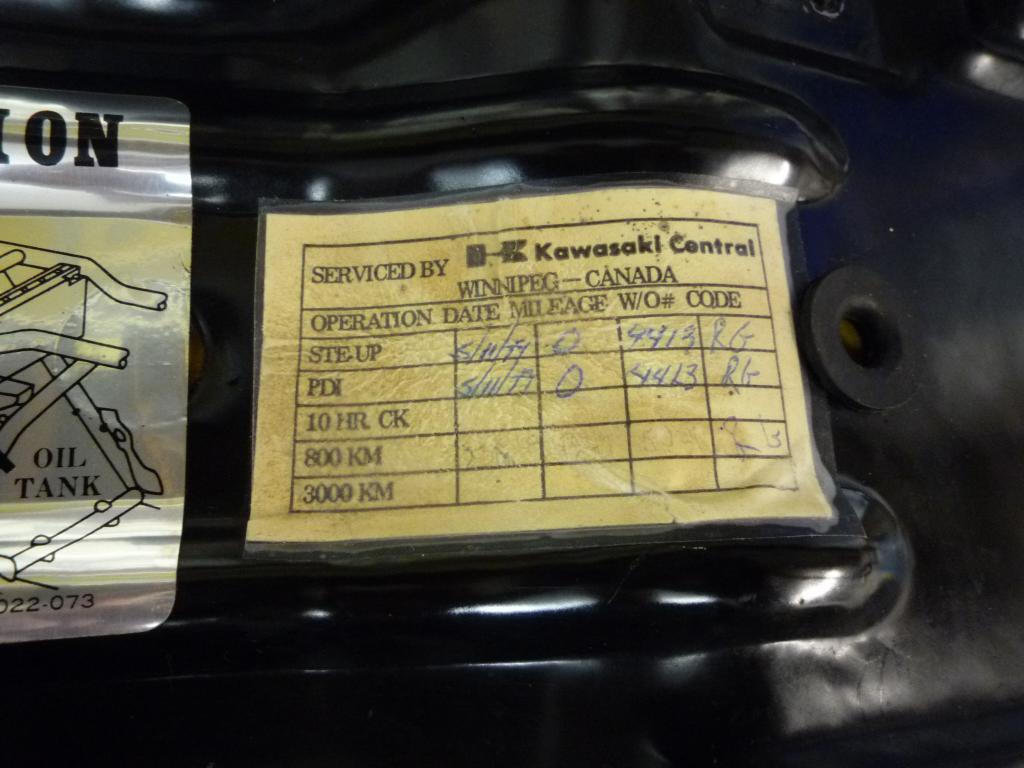
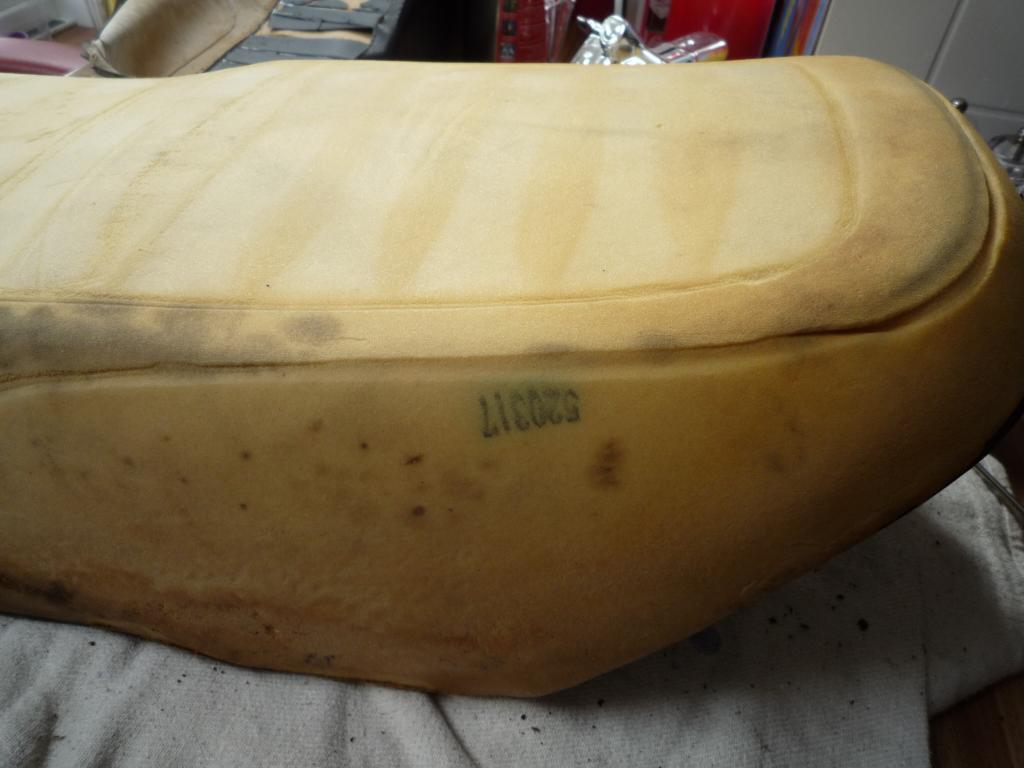
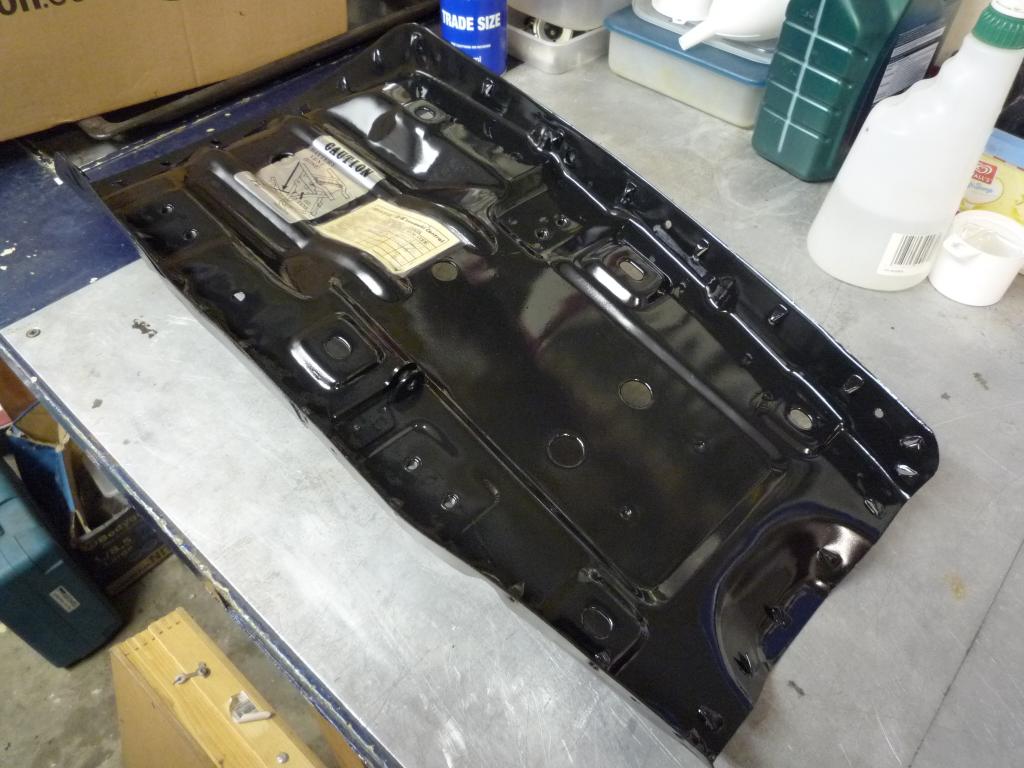
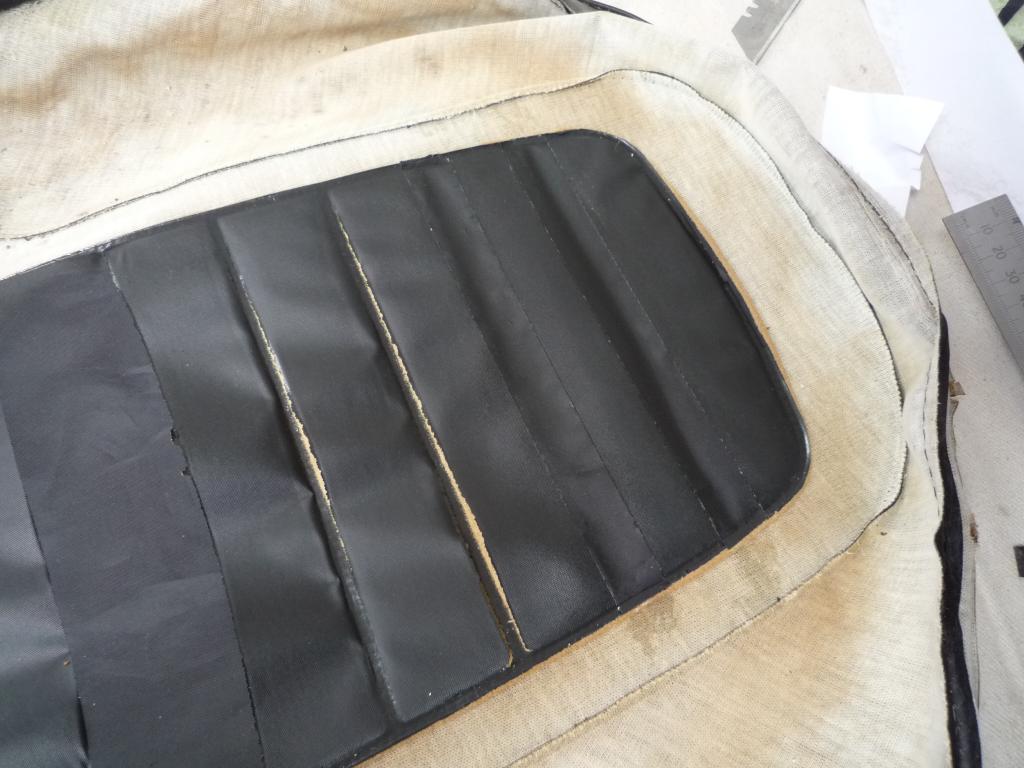
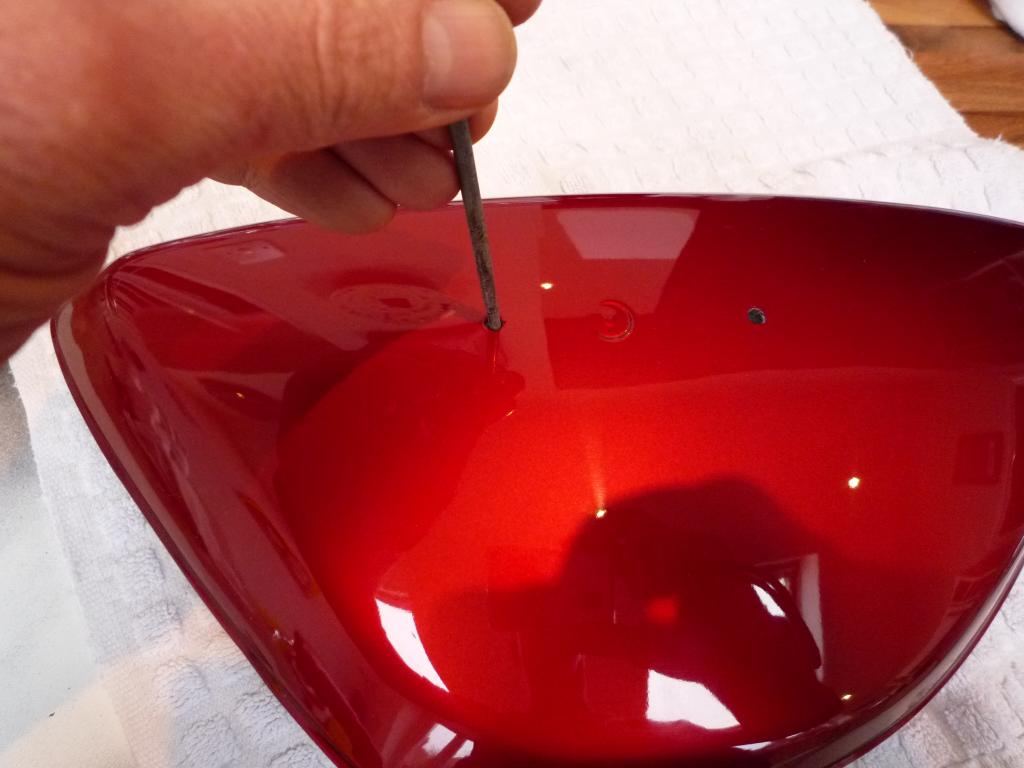
First job was to cover the PDI sticker
with clear film to protect it for the future.
Then I started to carefully unbend the
retaining spikes and remove the cover.
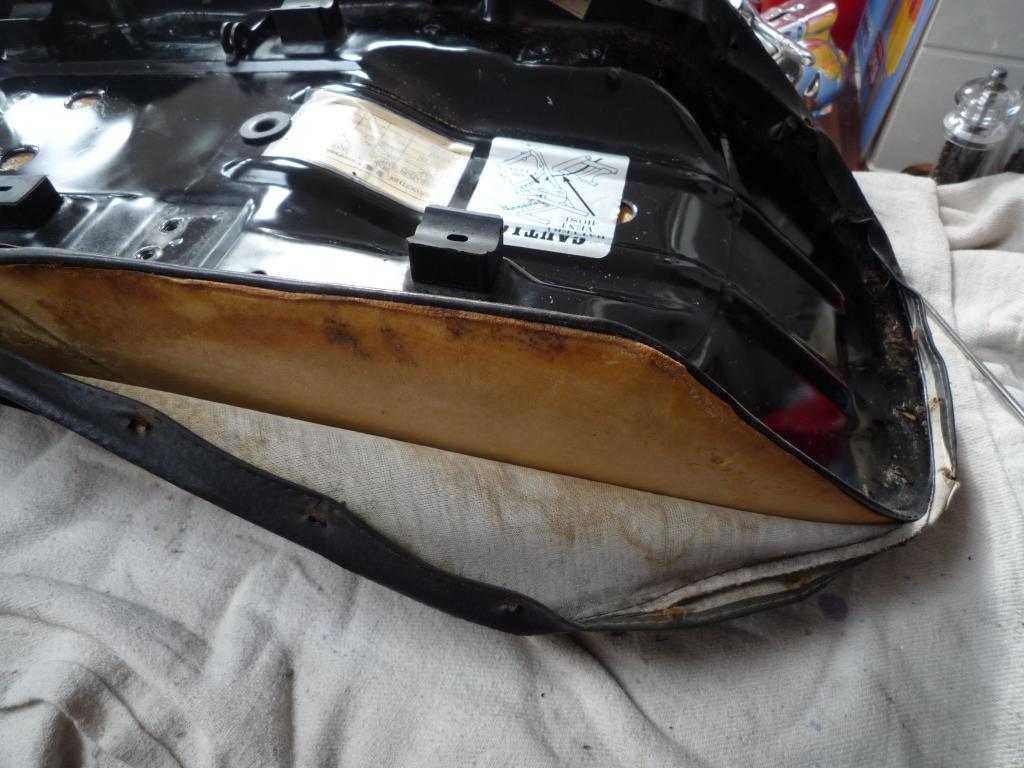
The cover is in good order just rather
stained and will be freshened up a little later.

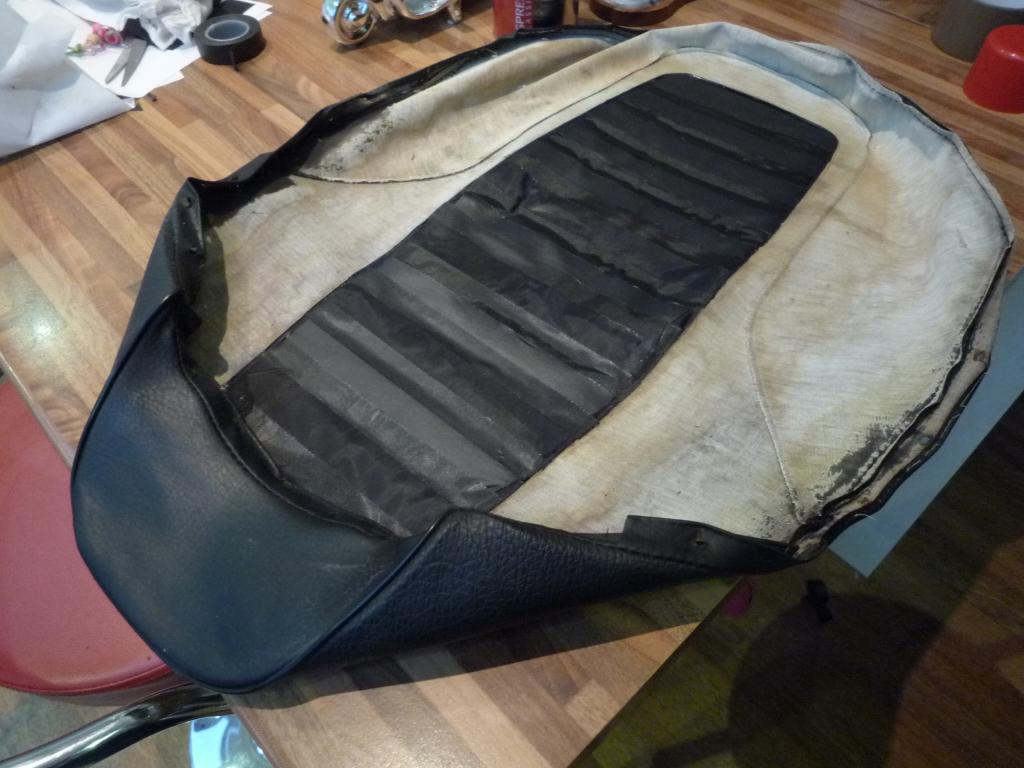
And after removing the base edging
strip.... the seat foam was removed.
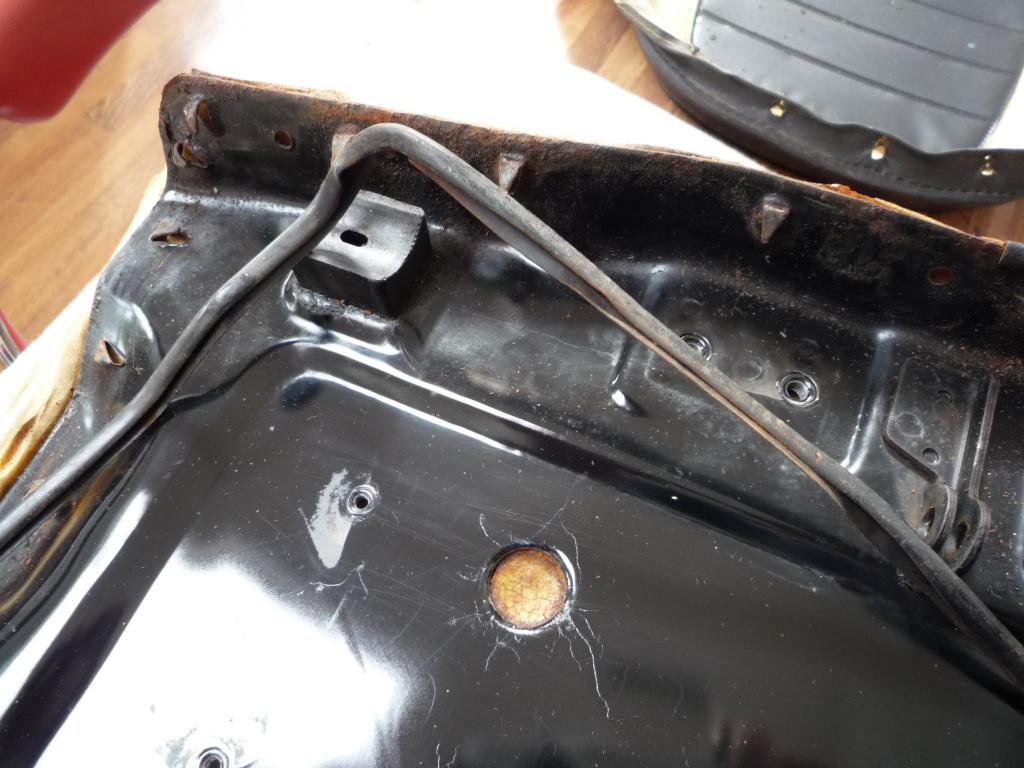
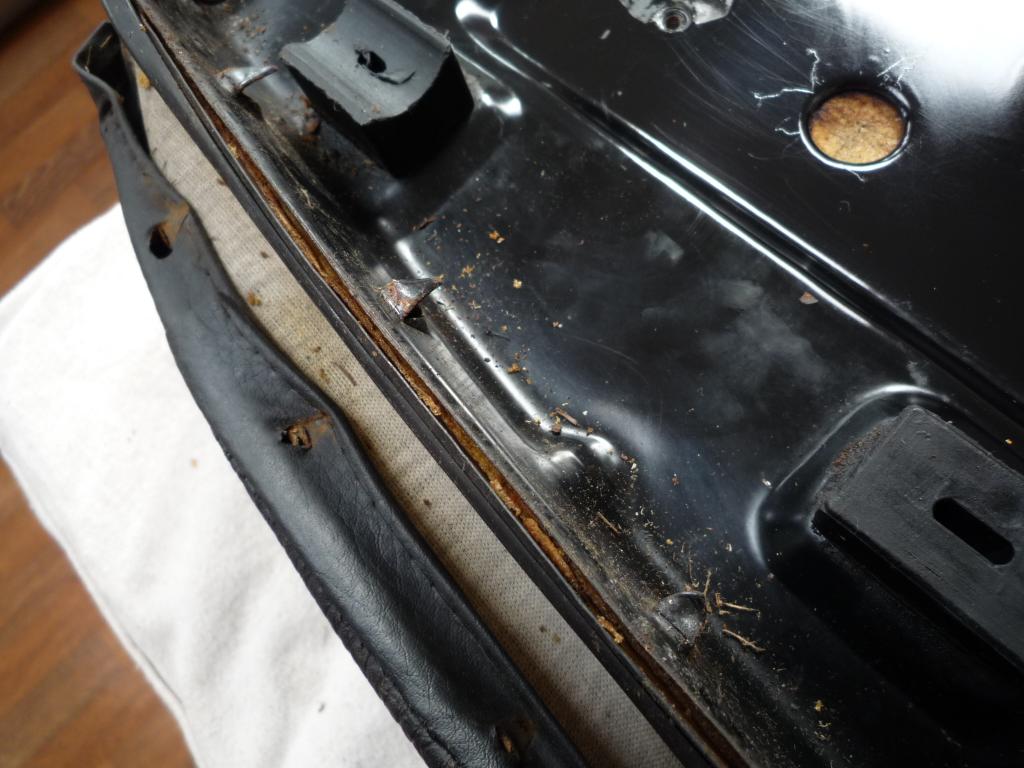
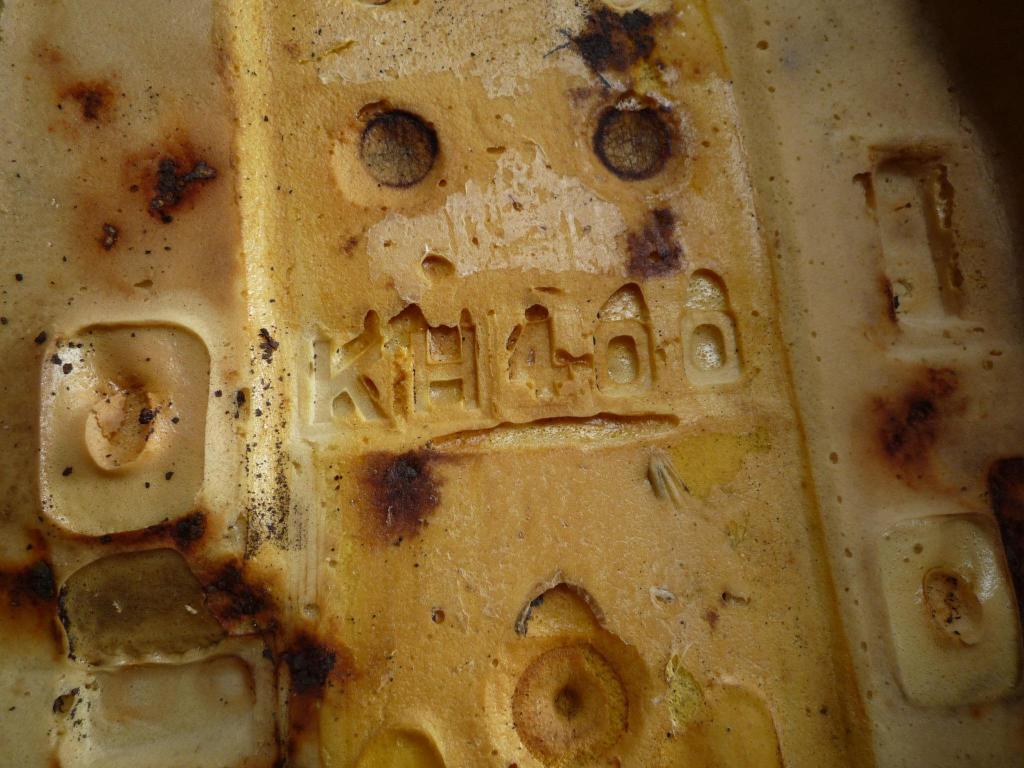
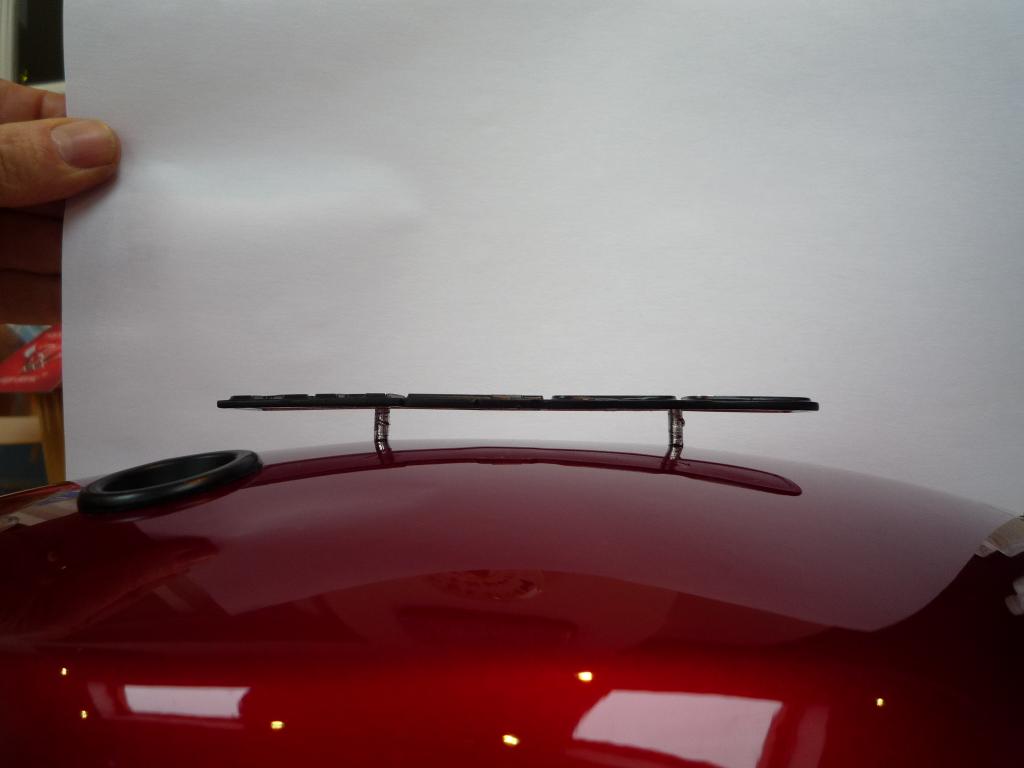
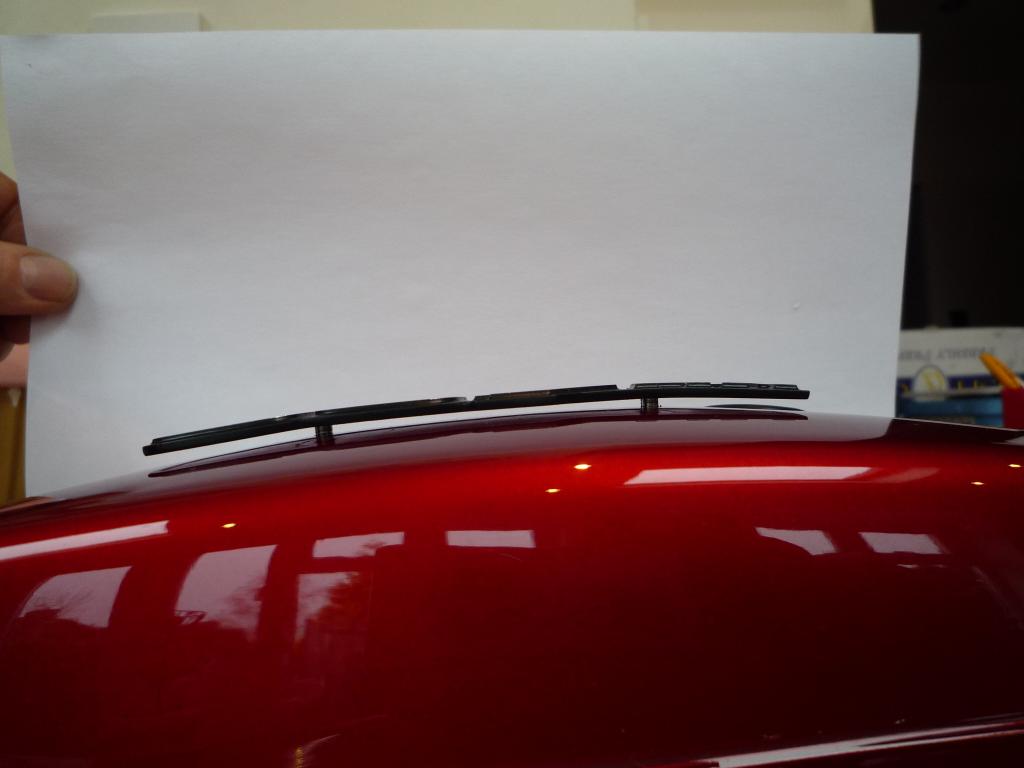
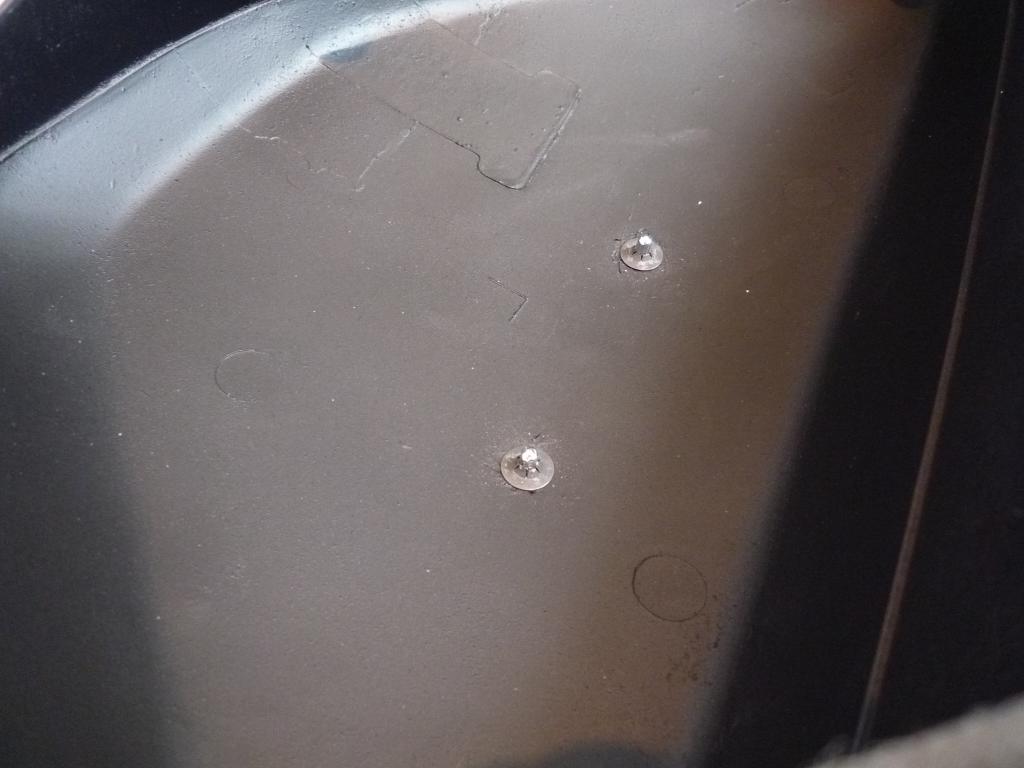
Part number detailing possibly? and
model imprint underneath.
Quite surprised at the amount of
rust on the pan especially down the sides considering the condition but then
again there is no primer applied during production.
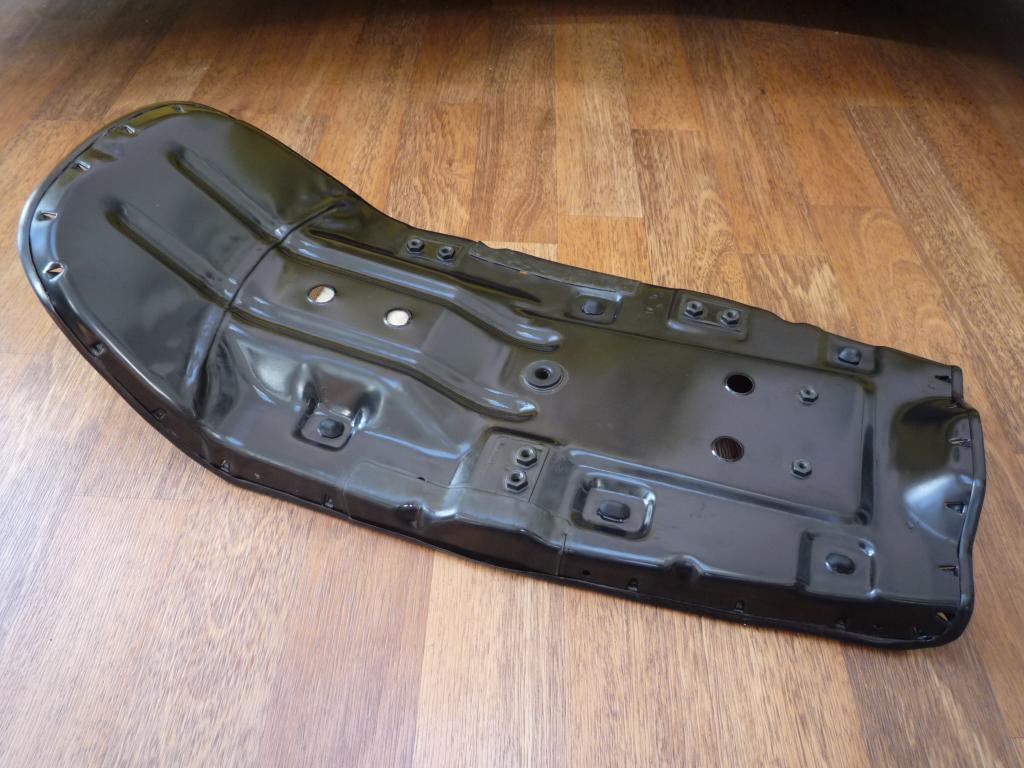
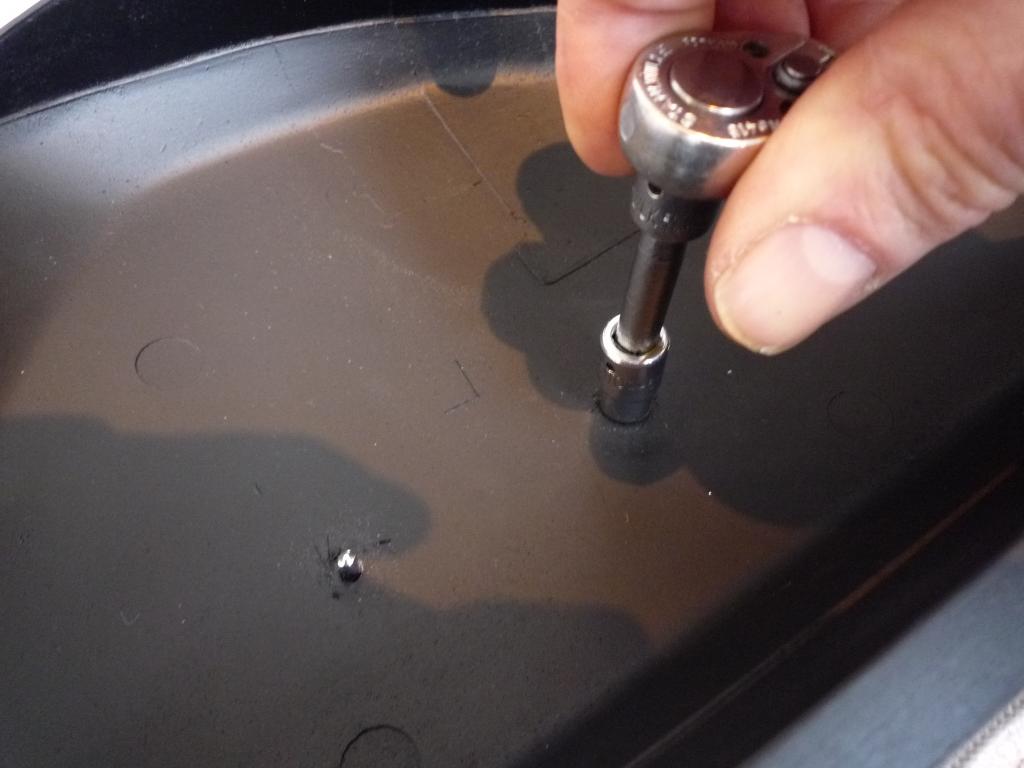
Spent today rubbing it down.
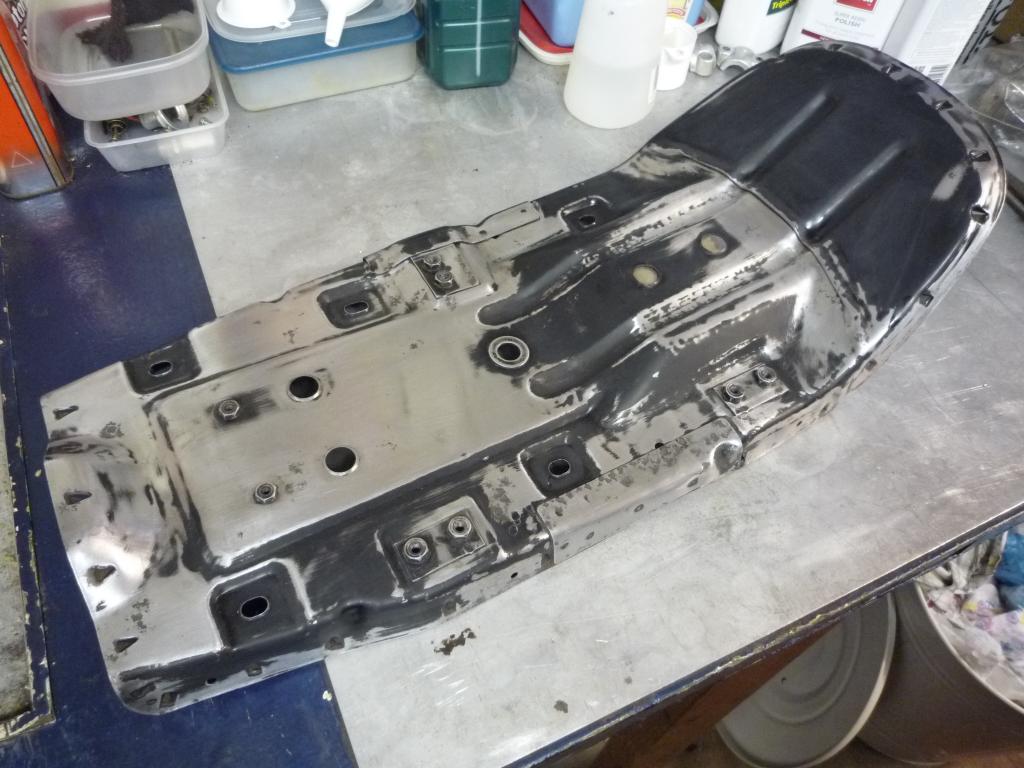

before applying the first coat of
primer
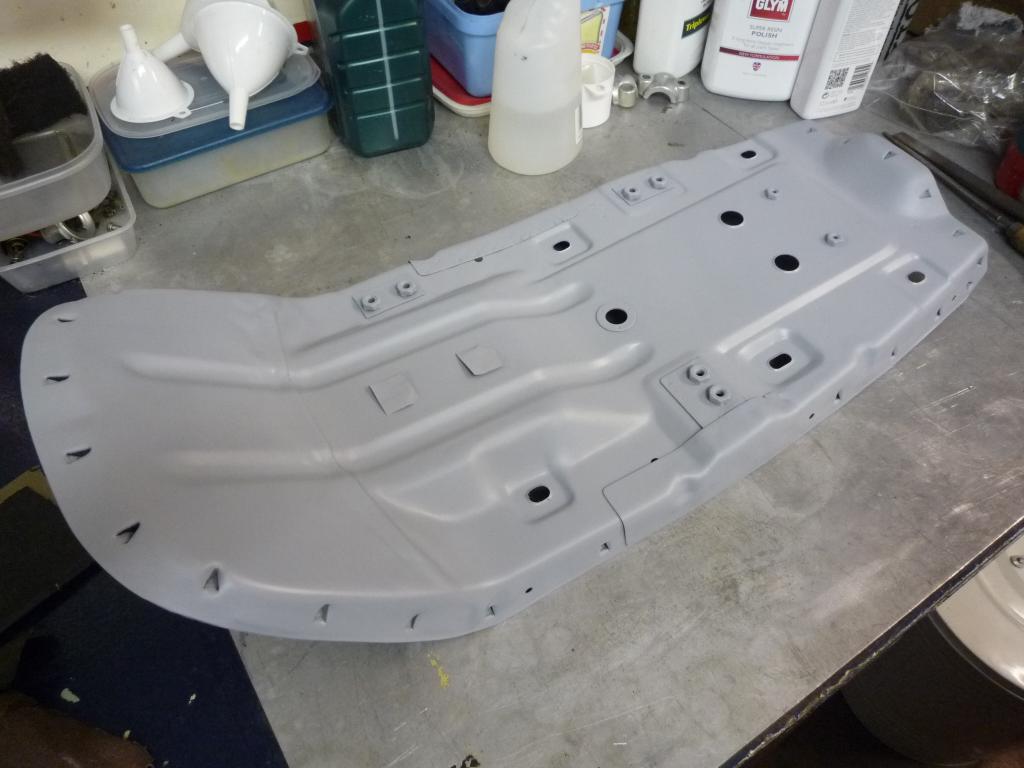
To be
continued................................
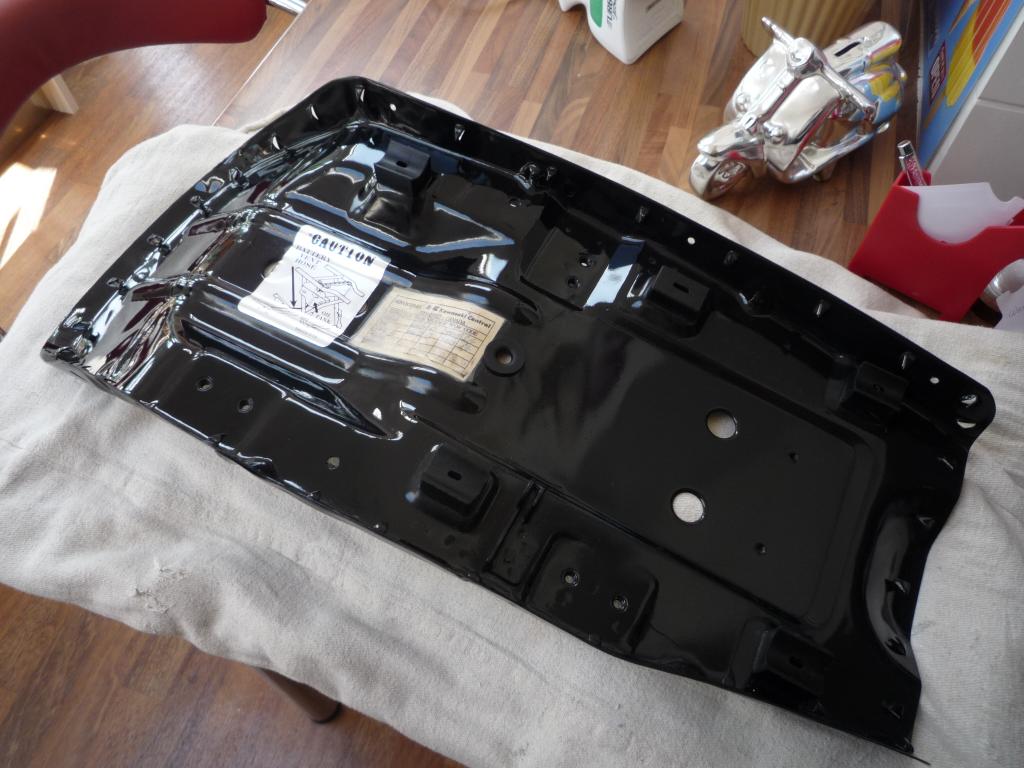
Making the most of the good weather,
the paint shops open again for business. Seat base and brackets now done.
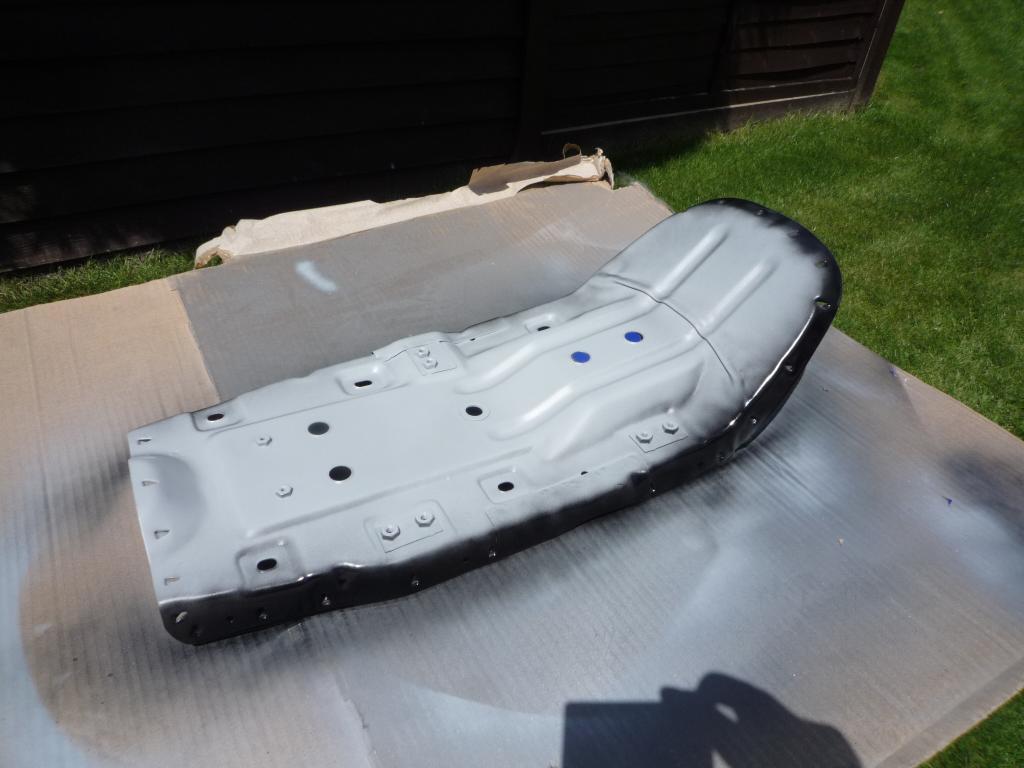
Now I have to keep well away from it
before a final cut and polish, I think I will wax seal the seams and corrosion
prone areas before refitting the foam.
Also picked up the last of the Zinc which is now safely back in the workshop
again.
Sweet
Back on the seat today and time to wrap it up so that I can
start on the engine, even a seat can get quite involved and produce a lot of
work but its all a challenge and worth doing in the end (so I keep telling
myself) anyway................after a cut and polish it was back on with the
rubbers all fixed in place with a dab of black silicon, then on with the edge
trim.
The seat cover was given a good dousing of interior shampoo to
clean and freshen it up and the foam panel covers were repaired after hunting
high and low round the house trying to find a suitable material. A plastic suit
cover is ideal but I had already used that on the 250!

With the cover done it was time to fit the foam. Using some
spray adhesive (recommended product
) applied to the seat pan and the base of the foam.
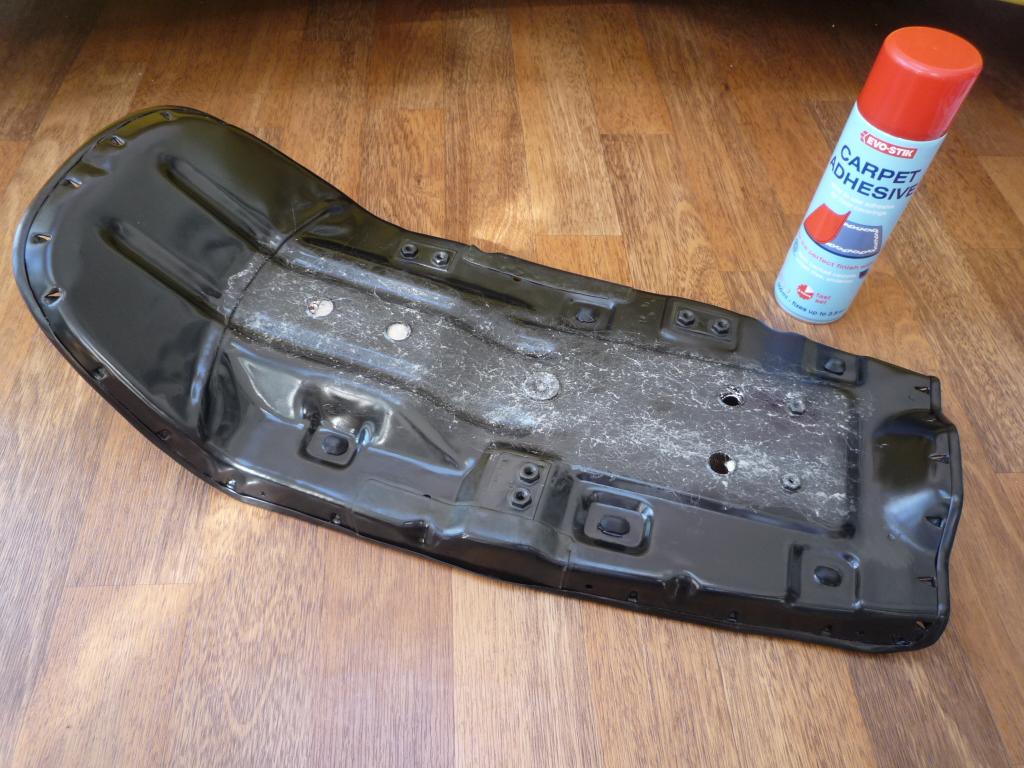
It was stuck back in place. Then it was back on with the
cover.


Final job was to replace the hinges, the latch plate and the
handbook cover.
Job done and I am more than happy with it
though rather relieved its finished

If the spikes are missing its going to
be tougher, either cut some more into the metal if you can or I'm sure others
have welded or pop riveted spike strips on........There are always solutions
that can be thought up.
Engine
rebuild time
 .......
So the time has come to start
getting the engine back together again Yippee!! another milestone reached (about
time I hear
).....
good thing is once that's done I can drop my workbench down and move the frame
out of the dining room and start assembling.
As mentioned before this is my first full engine strip and the work is carried
out with the help of the Kawasaki shop manual, mraxl's excellent resource site
and finally and just as importantly the guidance, support and banter from you
guys.
This is how I have chosen to do it and will try and work in the reverse order to
how I stripped it down. I don't assume to know everything but would hope to use
the approved methods, manuals, parts, torque figure and correct (mostly) tools
necessary along the way to complete the job.
Should you wish to copy and carry out this work yourself I would strongly advise
you to do the same.
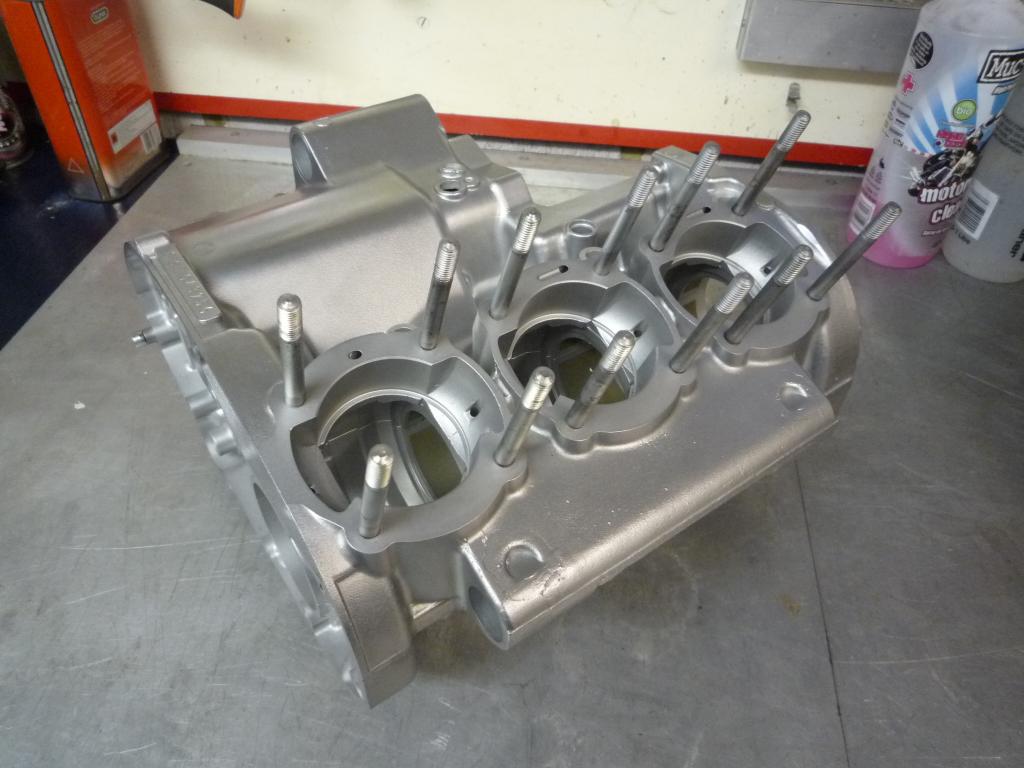
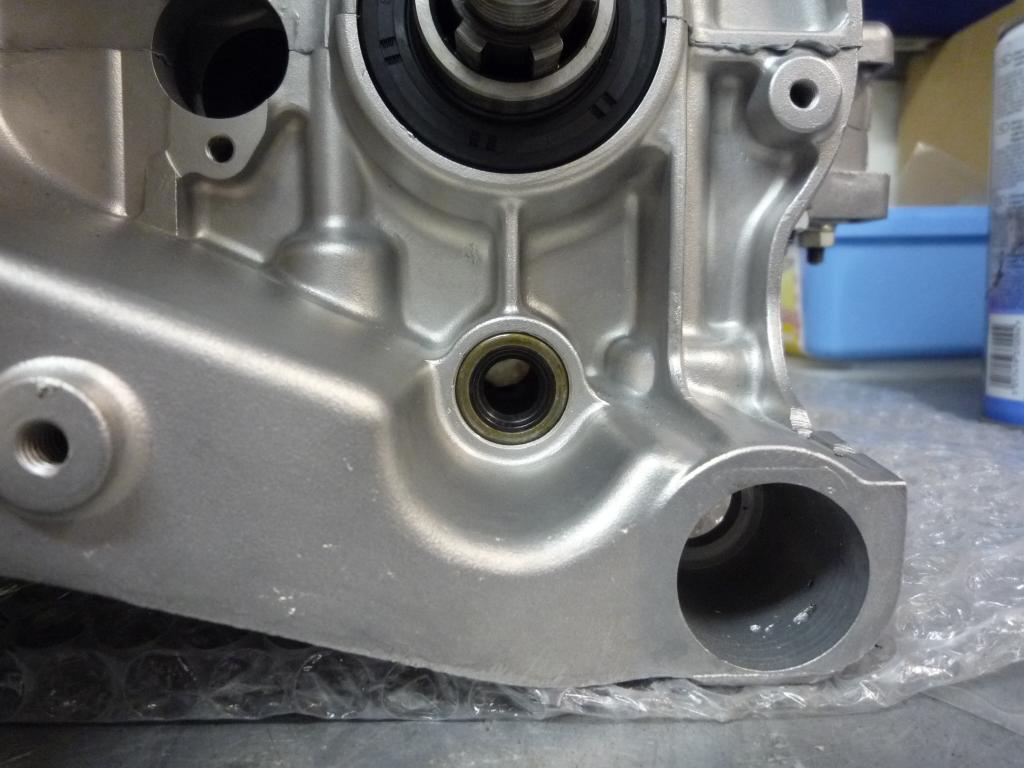
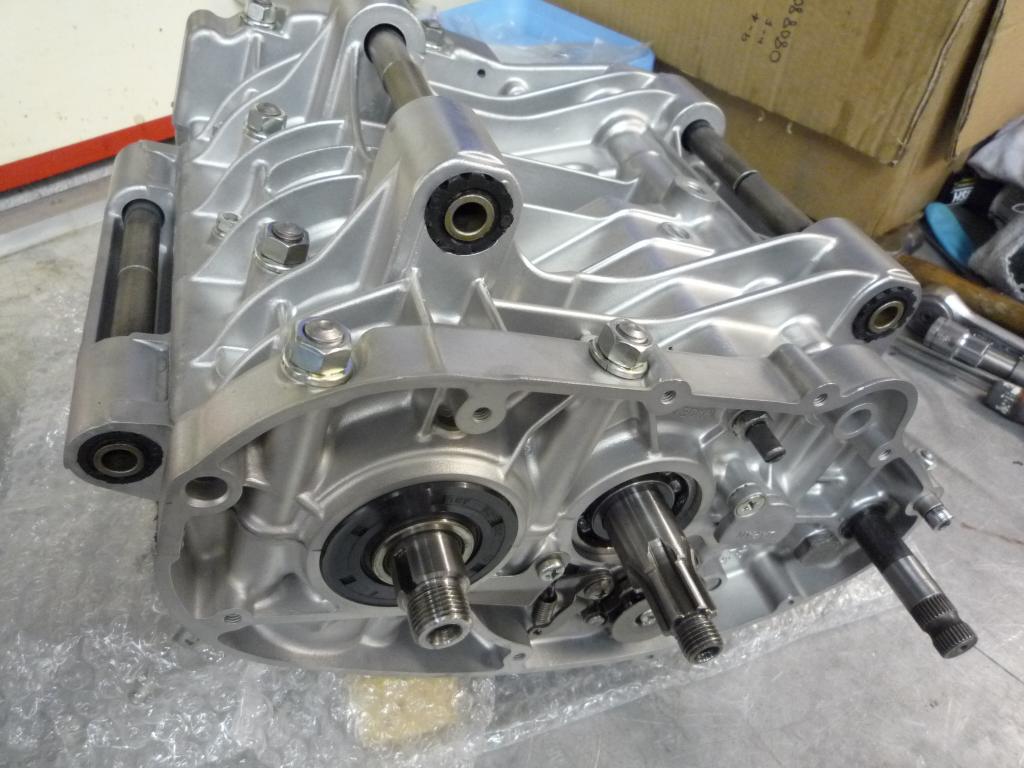
So we start with freshly Vapour Blasted
cases which have been cleaned over again and oilways and threaded holes are
checked clear.
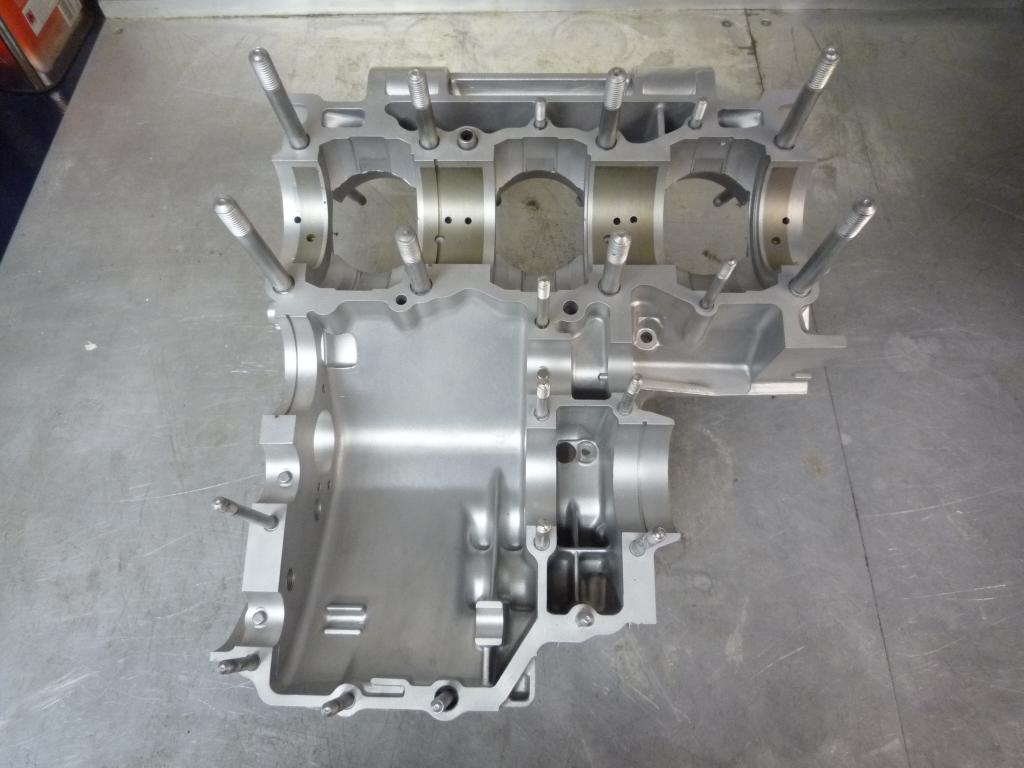
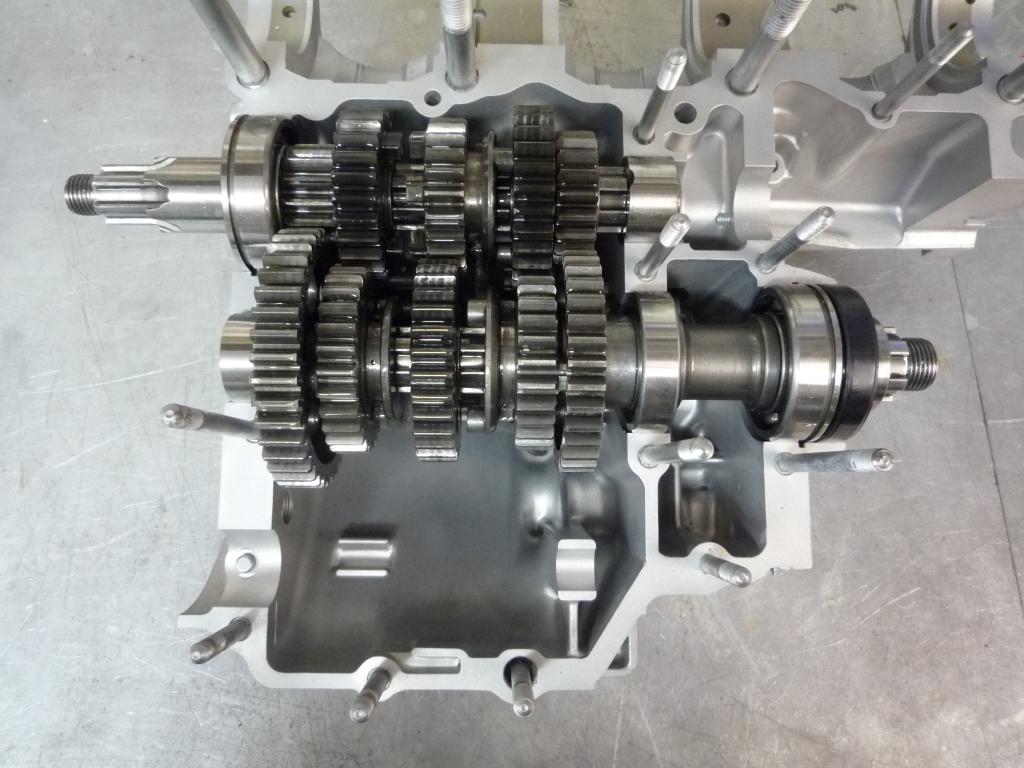
The shift drum is fitted first along
with its selector fork and the locating pin secured with a new split pin.
Next the remaining two selector forks
are positioned on the shift rod and the circlip retainer fitted.
The left hand bearing set ring is put
in place allowing the drive shaft to be positioned whilst making sure the
selector fork is properly located in its groove and that the end bearing ring is
seated on its locating peg.

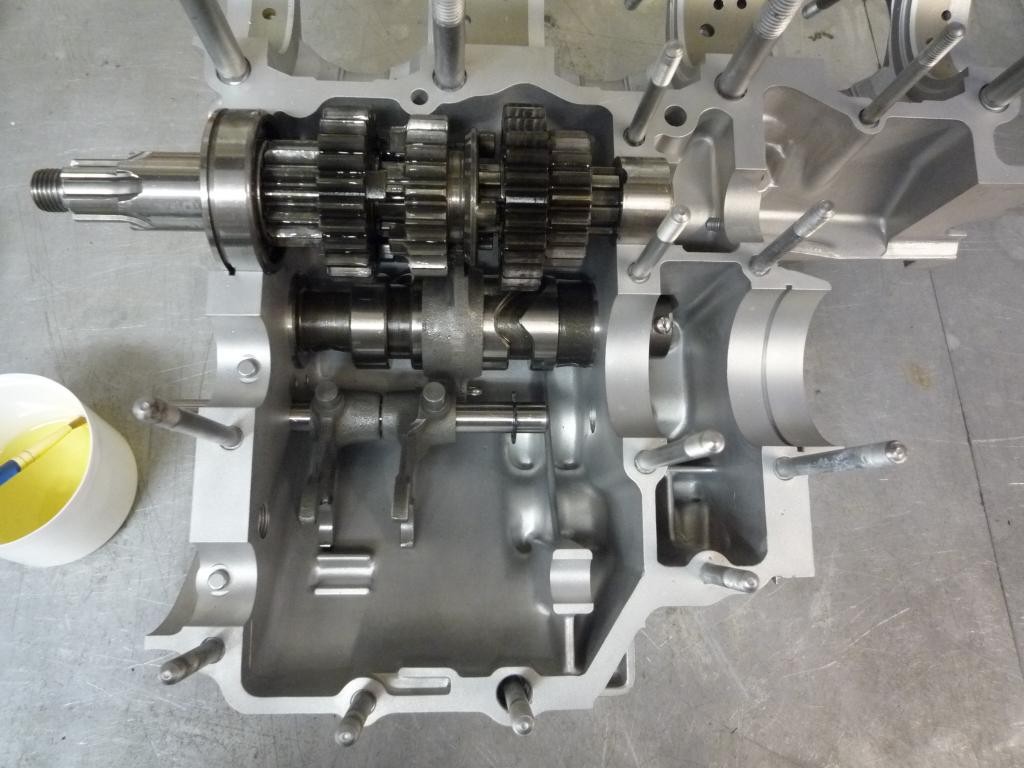
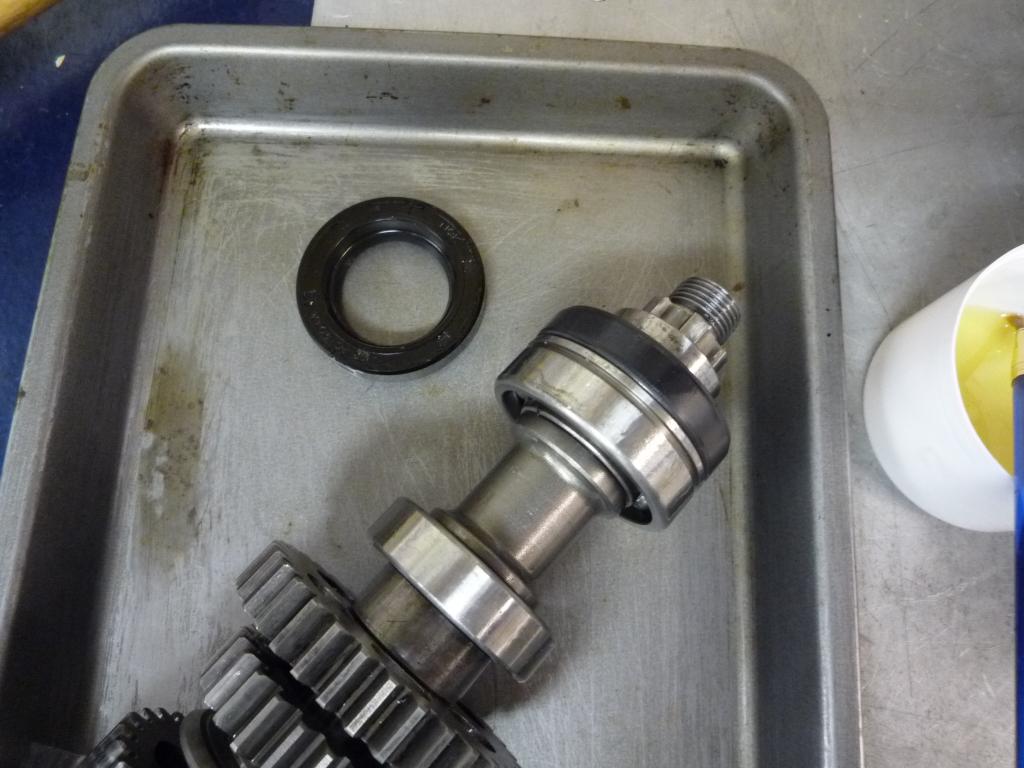
Then a new clutch push rod oil seal is
fitted at the end of the drive shaft.

Following on, the output shaft bearing
set ring is pushed into place making sure the ends are sitting below the
crankcase upper surface.
A new oil seal is fitted on the shaft
before putting it in place,again checking the selector forks and bearing ring
are located correctly.
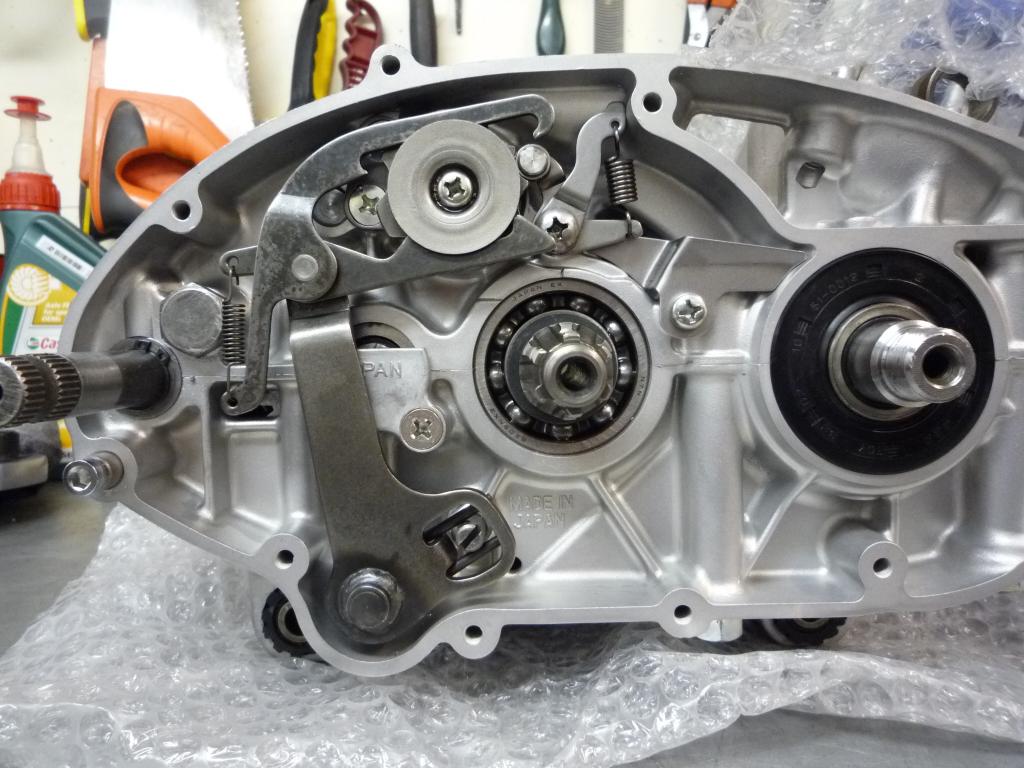
Then it was on to the kickstart
mechanism..........................................
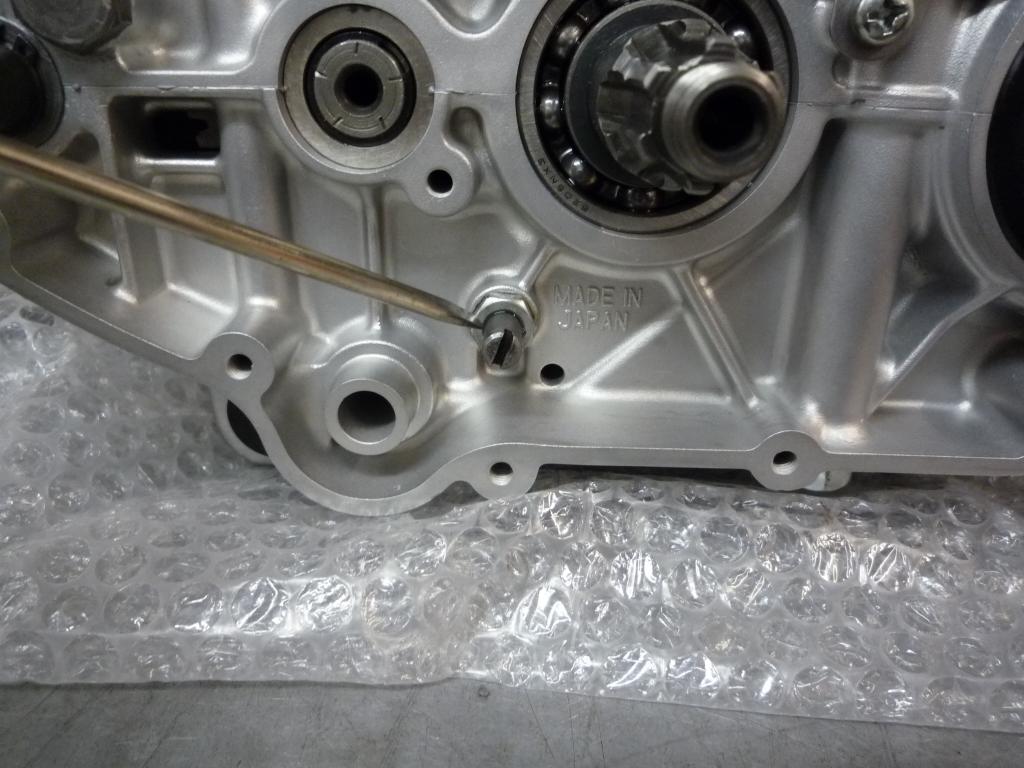
I threaded the kick stopper bolt in and left it flush with the inner face until
later, I understand how this works now and its not as confusing as it seems.
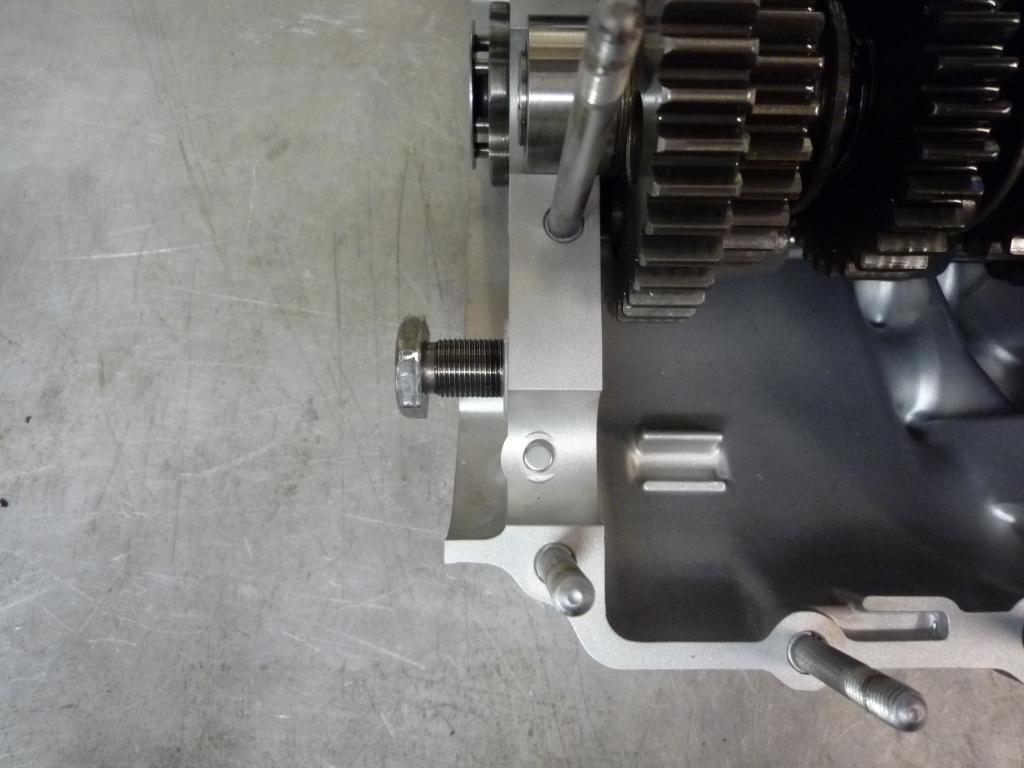
With the kick start mechanism you must
make sure that the kick gear holder and the tang on the kick spring are
correctly located in the crankcase before closing the cases otherwise you will
have problems with your kickstarter engaging.


Once you are confident with the
positioning, you can place the kick start mechanism in the crankcase.
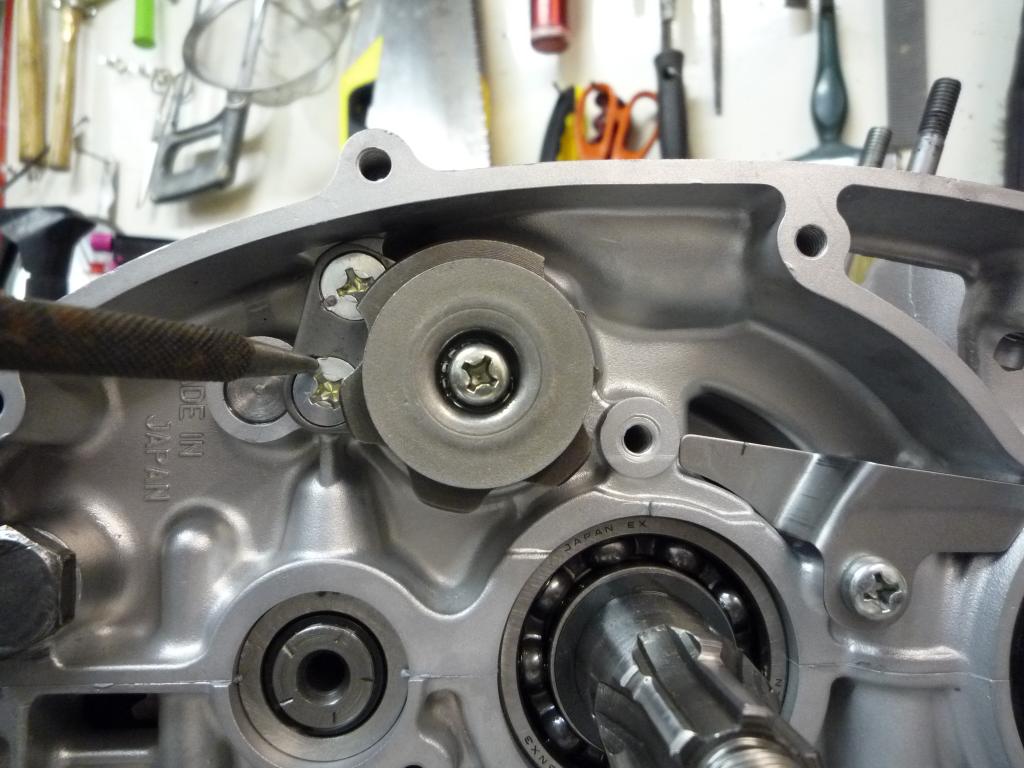
Here shows the kick stopper lever which will be rotated later and held by the
stopper bolt.
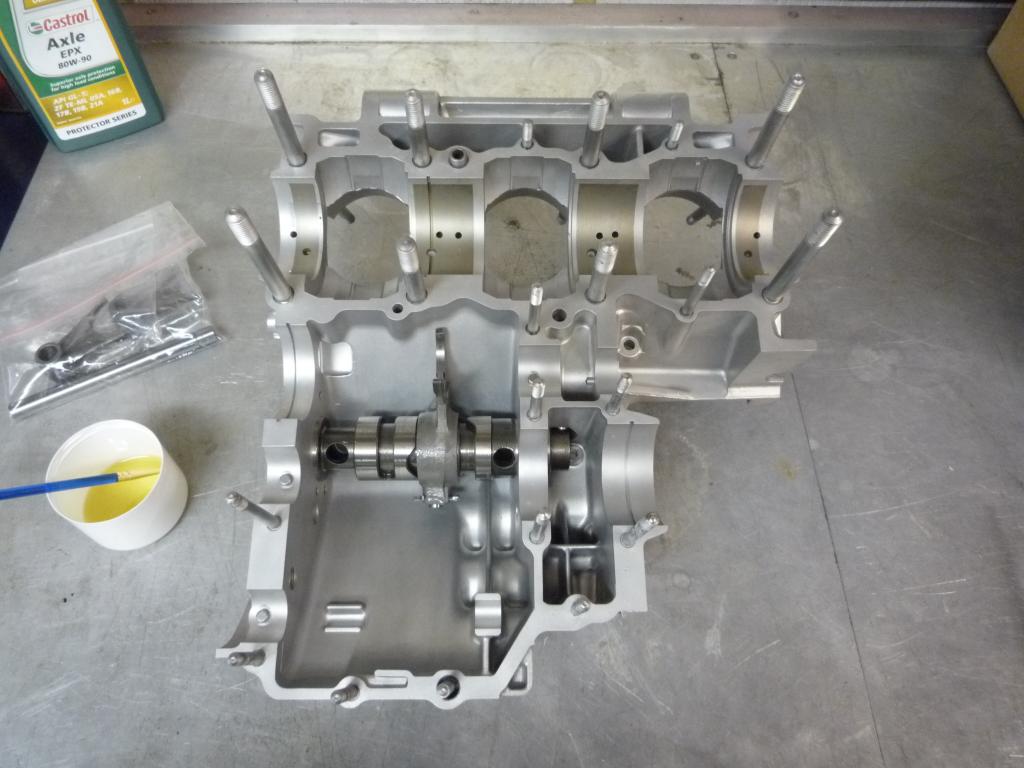
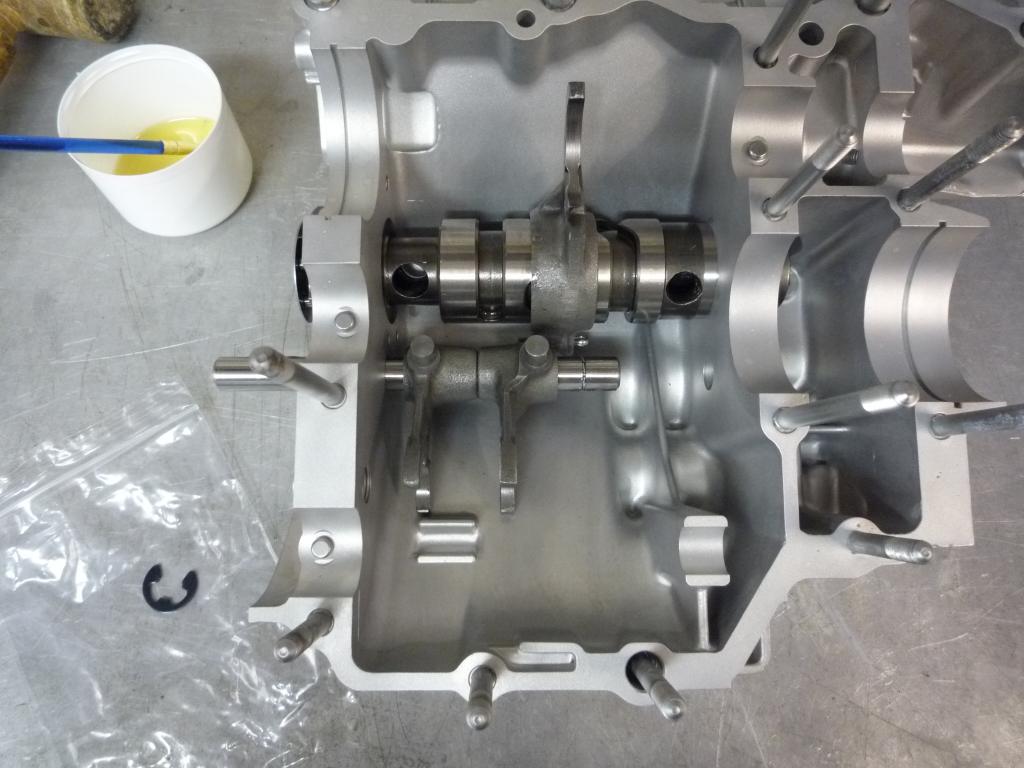
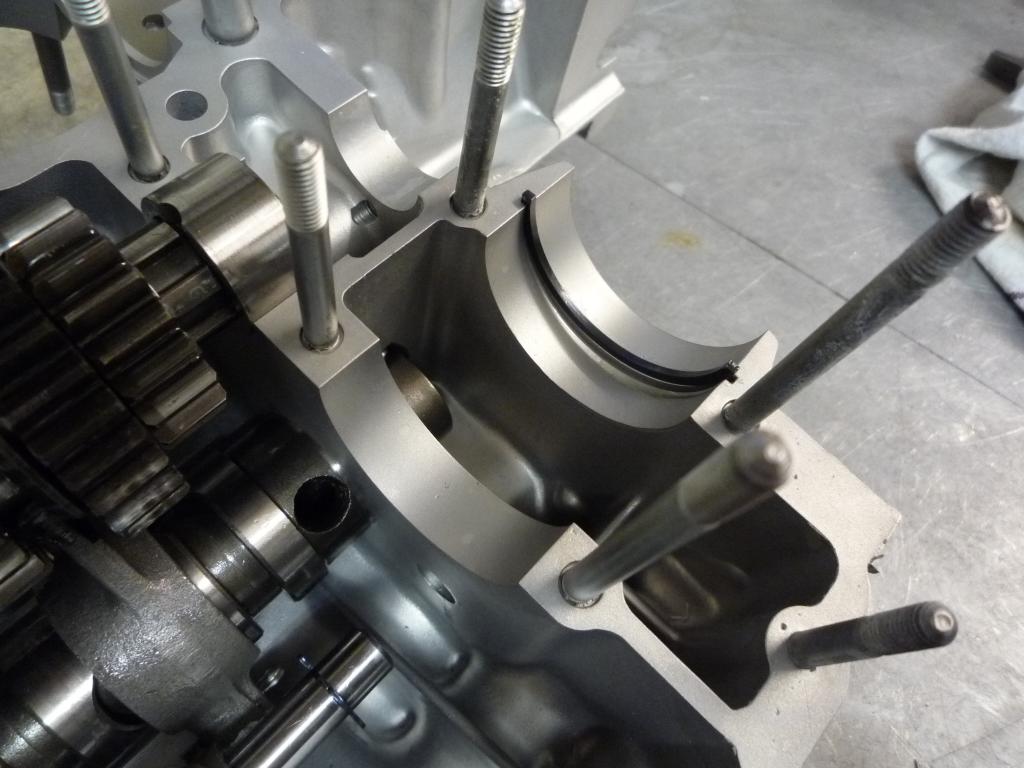
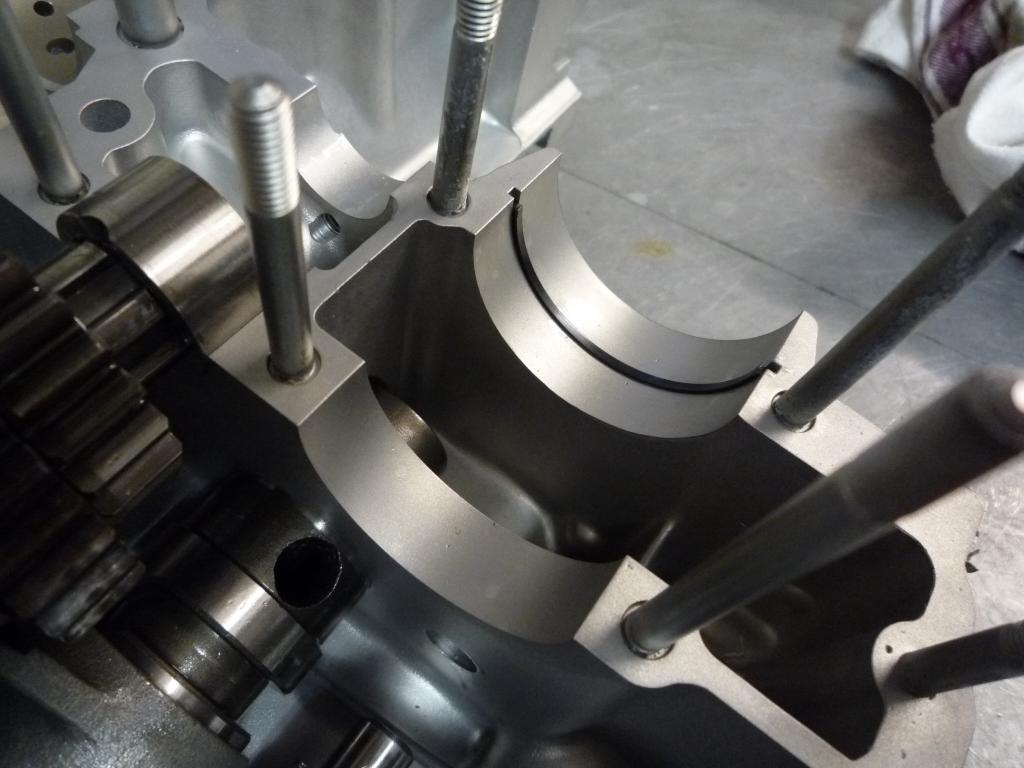
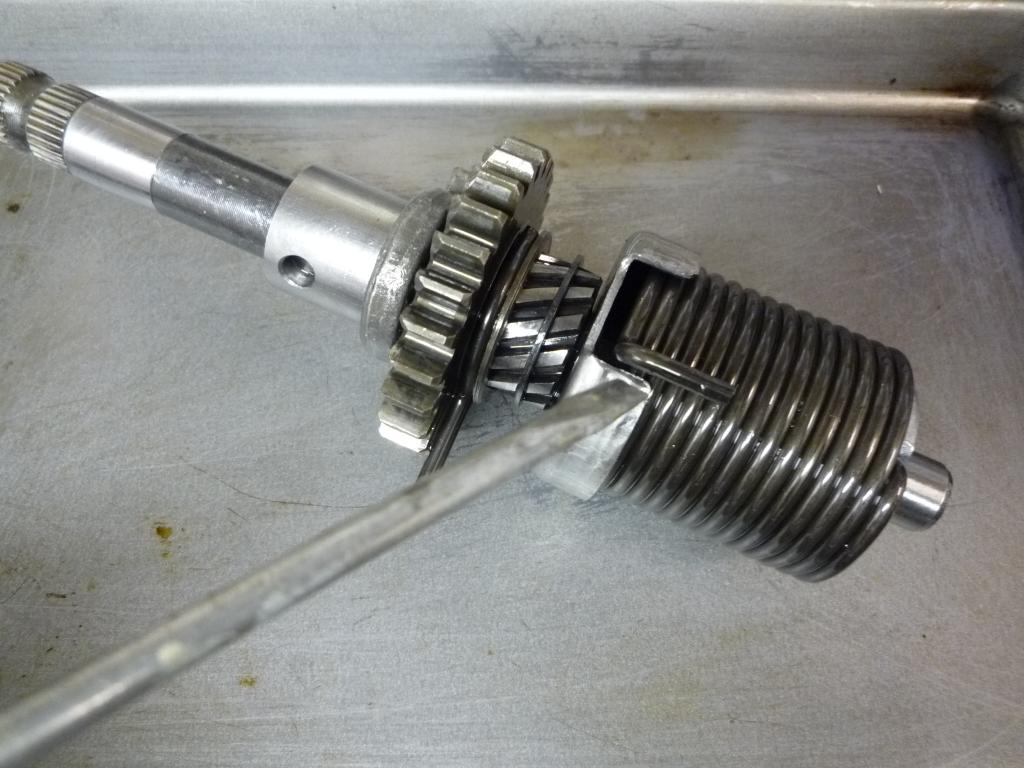
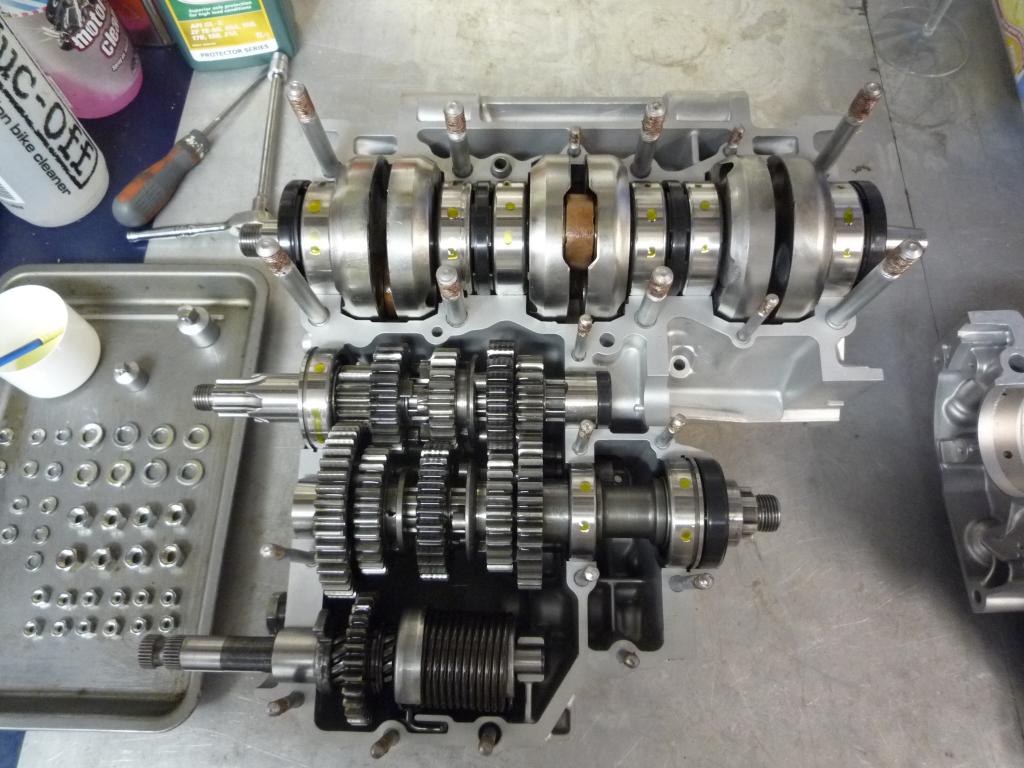
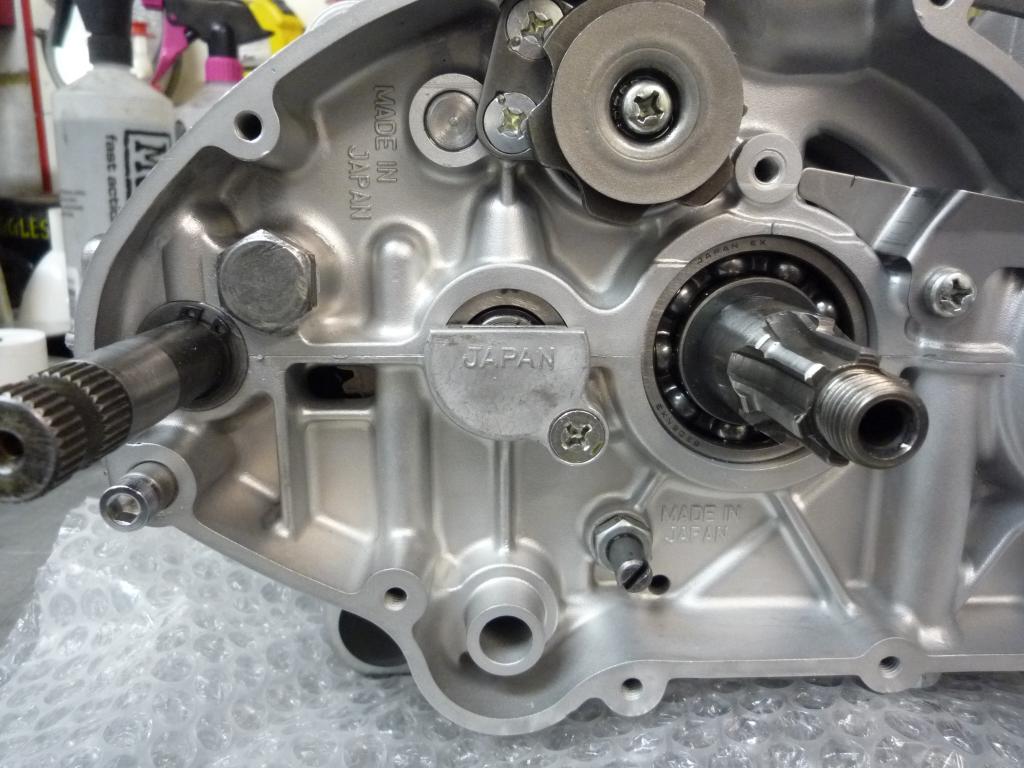
Now after fitting the crankshaft
bearing set ring in position which I seem to have forgotten to take a photo of
due to the excitement of getting my crank out!!
But I did fit honest.
So here for reference is a photo from the stripdown showing it fitted.

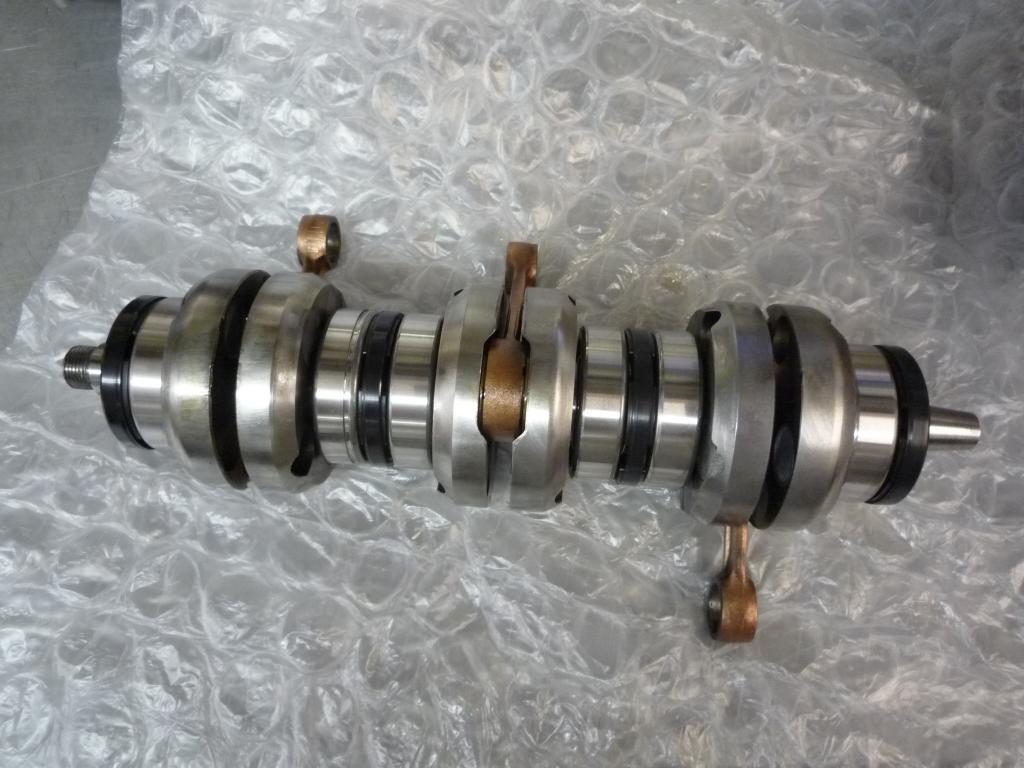
Then you take one tasty new Crankshaft (thank you Gary downpipe3) and after a
little wipe over set it in place.
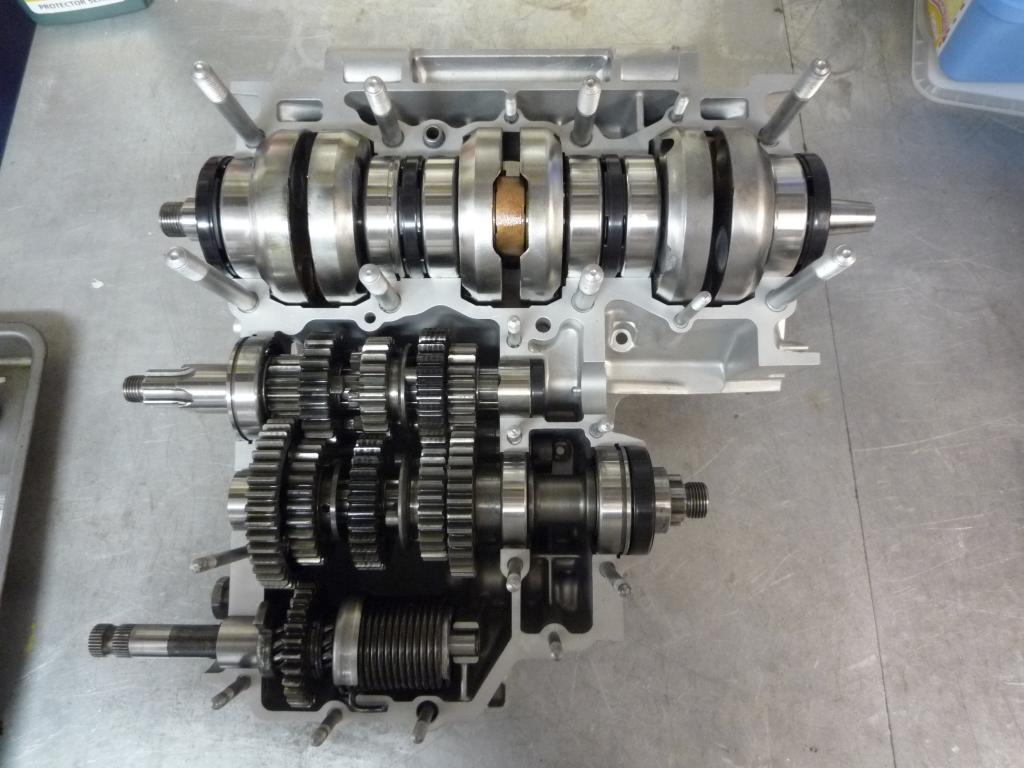
With the Crankshaft in place it was
time to prepare the lower crankcase.
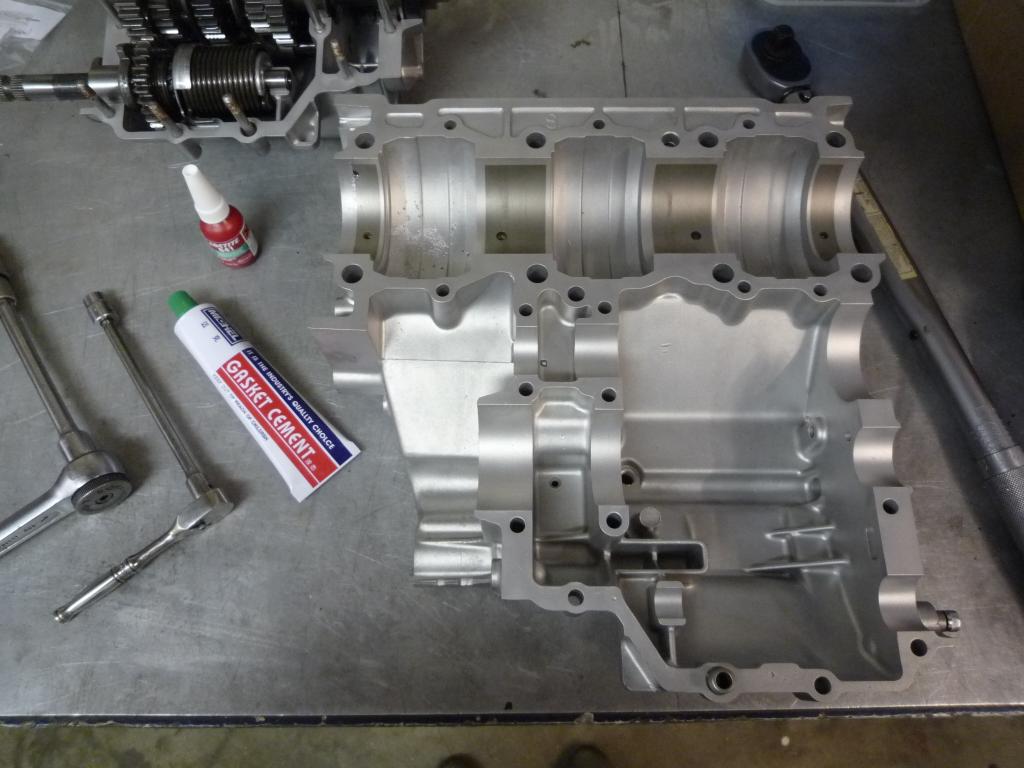
After giving the case a good wipe over
with degreaser a thin even coat of gasket cement was applied to the upper mating
face.
Then before closing the cases together a few drops of loctite bearing retainer
were applied to the crank and gearbox bearings.
Having done a bit of research on this and
questioning it some people use it and some don't, and others prefer to use a
different type of product.
The manual recommends loctite 609 but some recommend using 620,my choice was 641
which is similar to 609.
At the end of the day it is entirely your choice whether you think it is
necessary or not and based on your experiences.
Also applying it to the gearbox bearings may not be entirely necessary but it
certainly wouldn't hurt it.
Care should be made not to over do the
application and assemble the cases together taking in account for product curing
times.
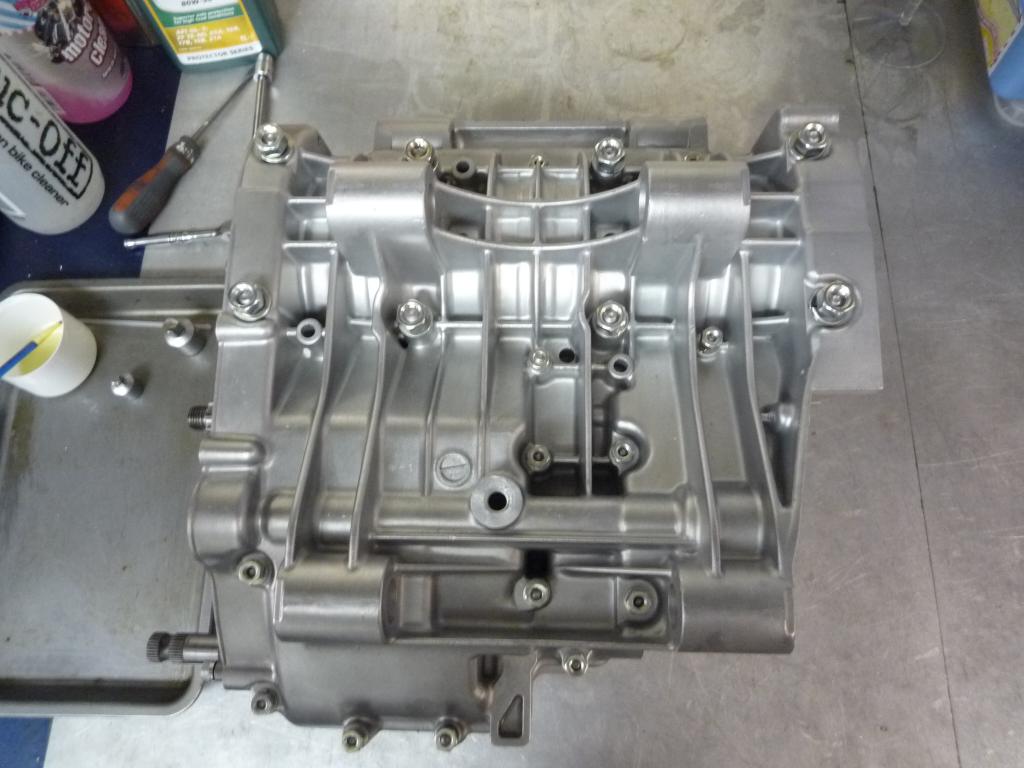
After having last check over the cases
were closed and the 8 x 8mm and 13 x 6mm nuts and spring washers were fitted and
nipped up.
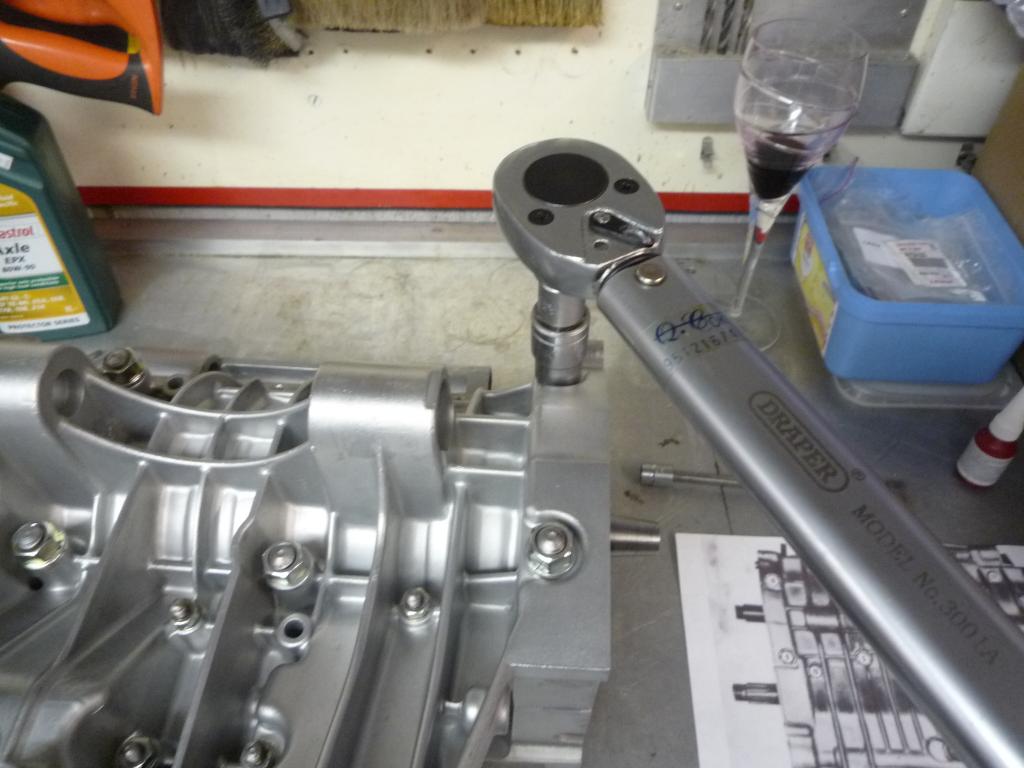
I did follow a general tightening
pattern from the 500 manual and then it was a case of torqueing them up to the
correct values and checking a couple of times after settling.....(note the use
of red wine needed at this stage)

Job done
and looking a whole lot better than
before

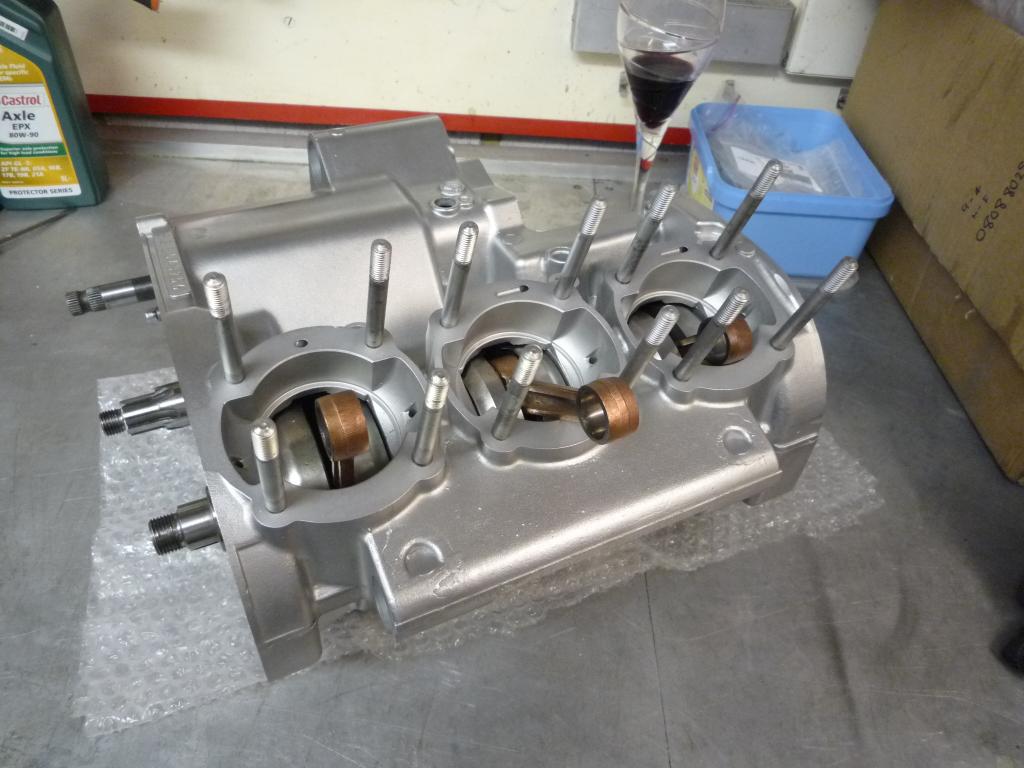
Time to fill my glass up again
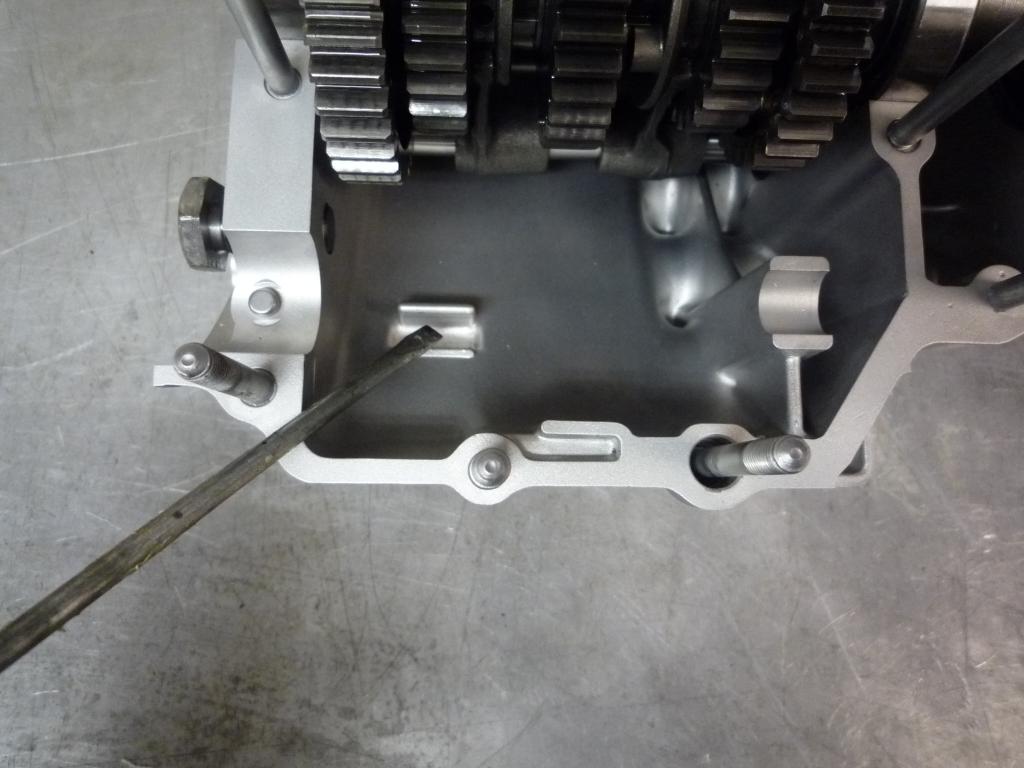
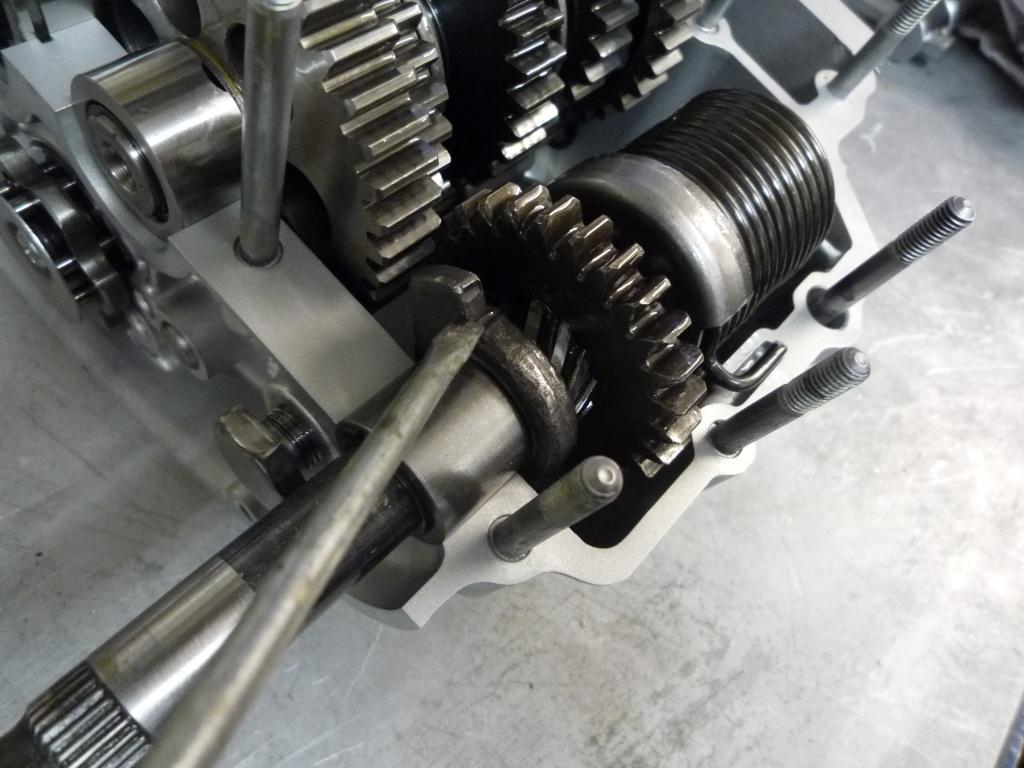
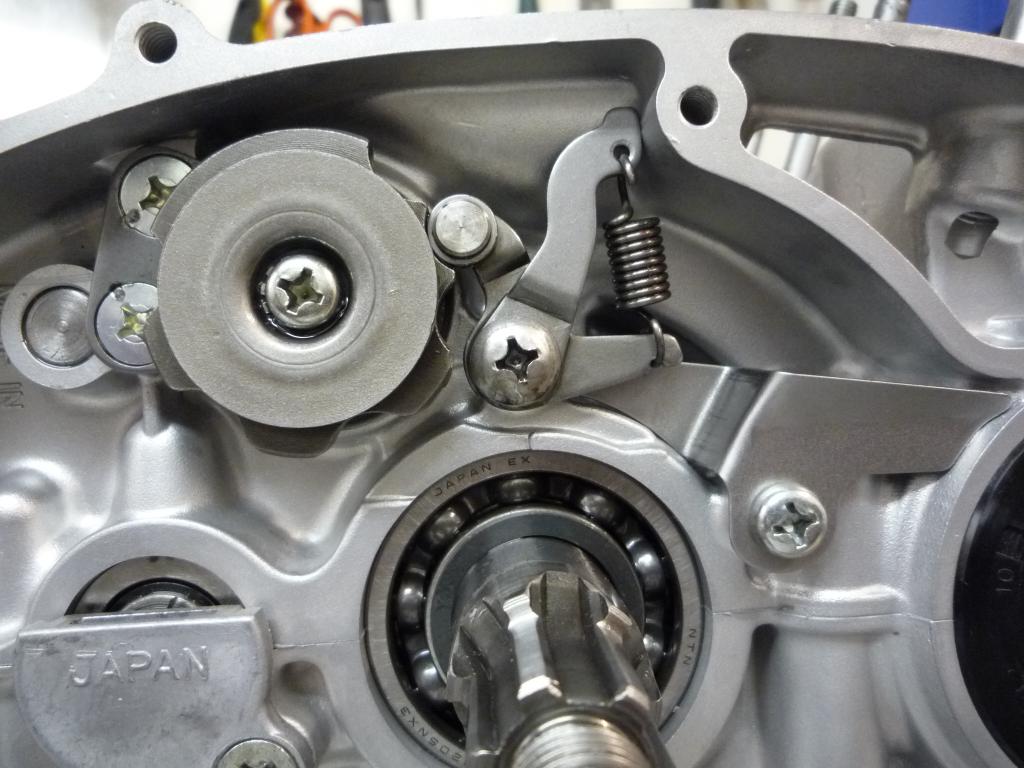
With the cases now closed the next step
was to tension the kickstart mechanism up, to do this I made a mark on the
kickstart shaft and used a soft faced clamp to rotate the shaft anticlockwise.
Watching through the window in the lower crankcase you can see when the kick
stopper lever passes by (left of window) and when you are confident that it has
moved pass the kick stopper bolt, hold the tension and tighten the stopper bolt
up.

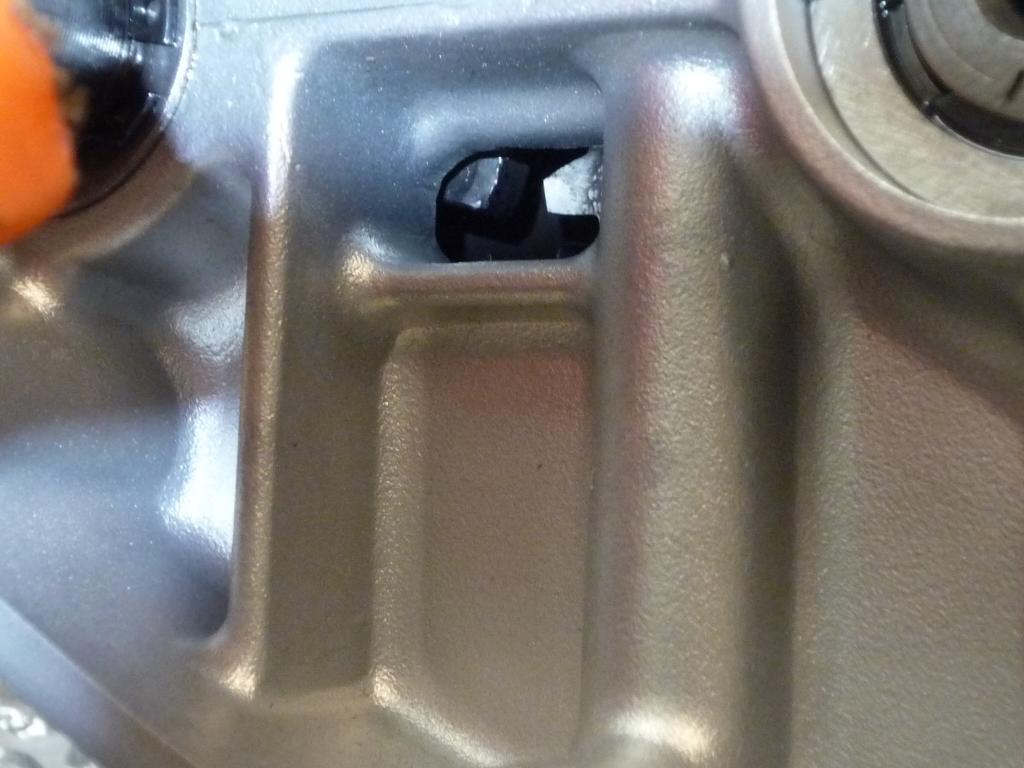
The kick start mechanism should now be
tensioned, and the shaft held in a different position to when you started.
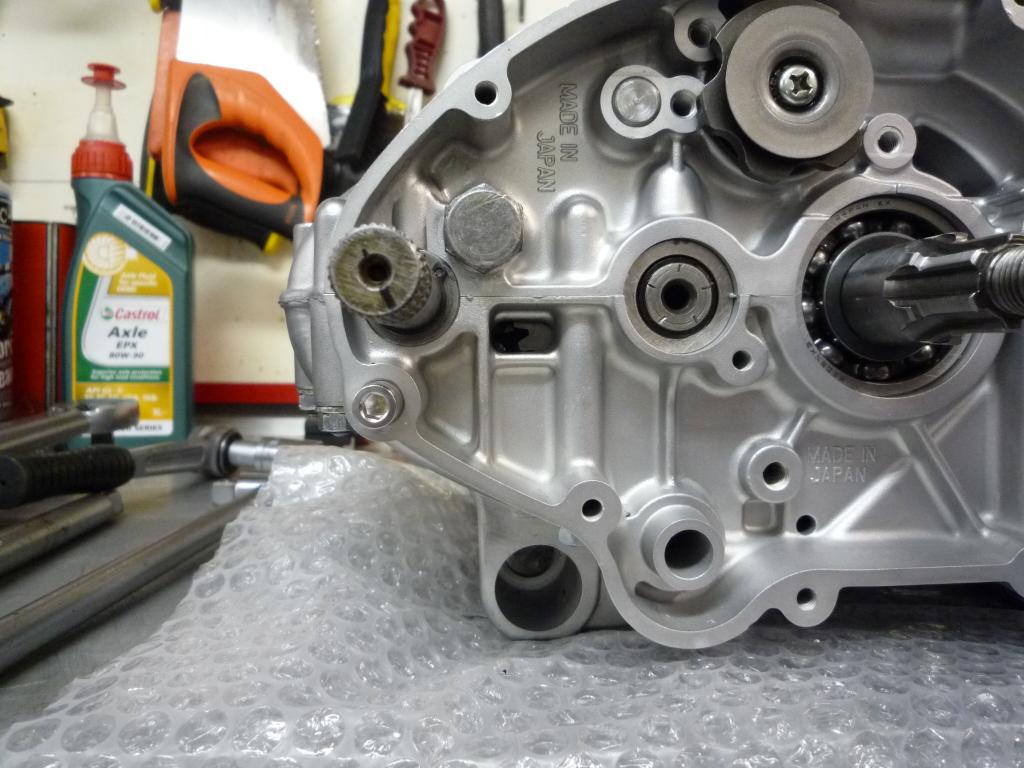
Carrying on with the assembly on the
clutch side of the engine, we refit the Crankcase Oil receiver.
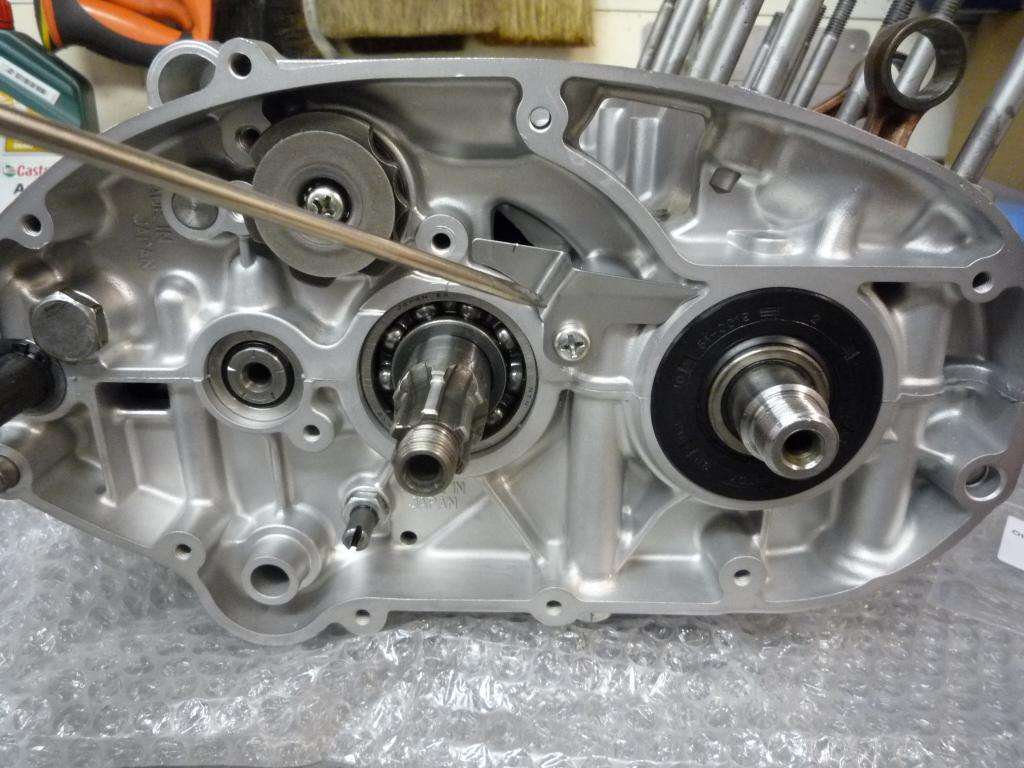
the return spring pin
And the shift drum position plate.

I have replaced the screws with new
items as you will remember I had to drill one of them out when taking it apart.
The new screws are centre punched after tightening to prevent them loosening
off.
Next is the Transmission Oil
receiver. Then onto the shift set lever and
spring.
And after fitting a new gear shift oil seal.... The Shift lever assy is set into place
around the shift drum.
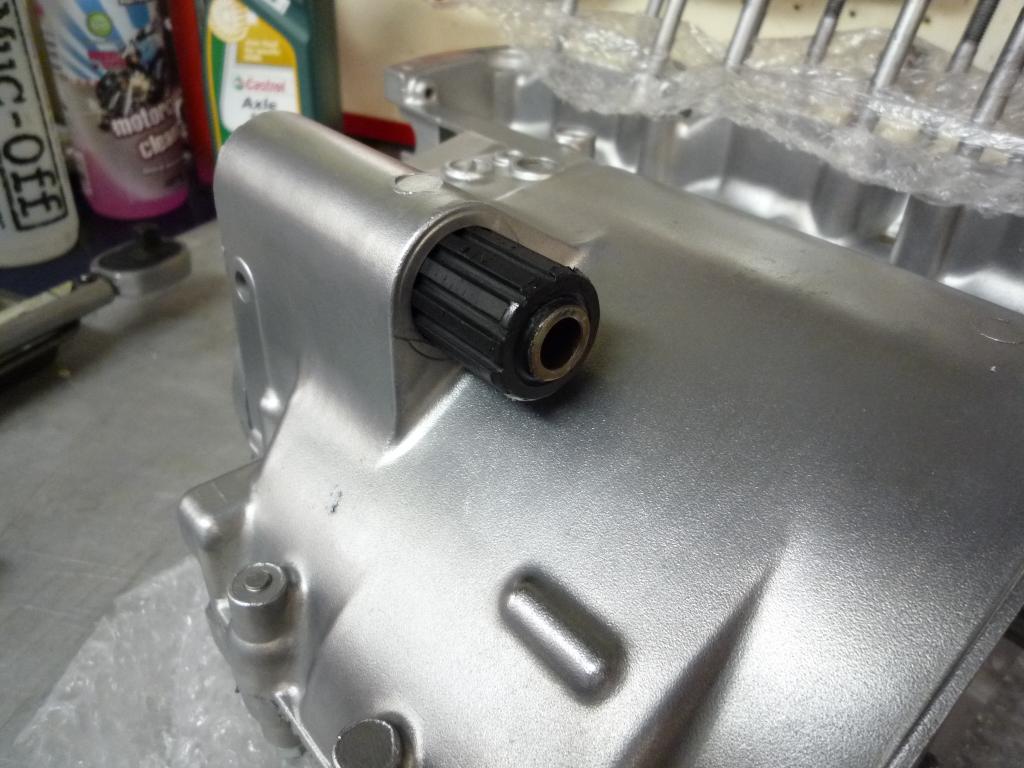
Before the engine became too heavy to
man handle about easily I then decided to refit the rubber engine mounts which
had been all been given the clean up treatment.
One of them had suffered a little over the years but was given the ok to use.
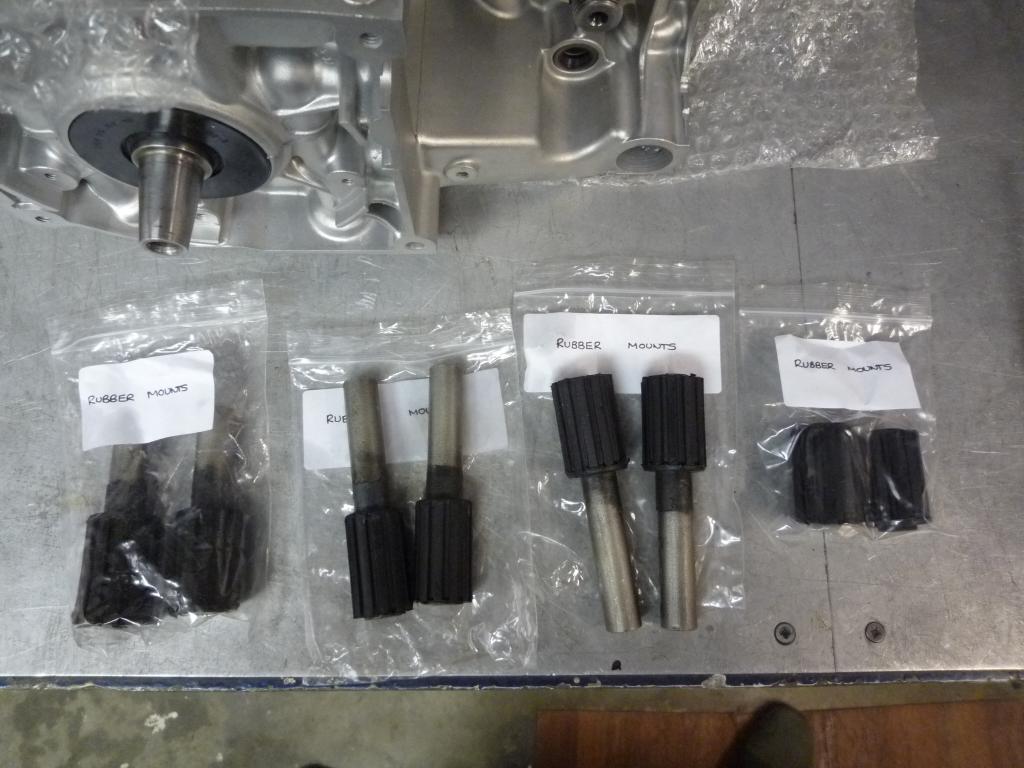
With a little bit of lubrication they
all slid in nicely.
And before I forget, the drain plug and
gasket were fitted and tightened.

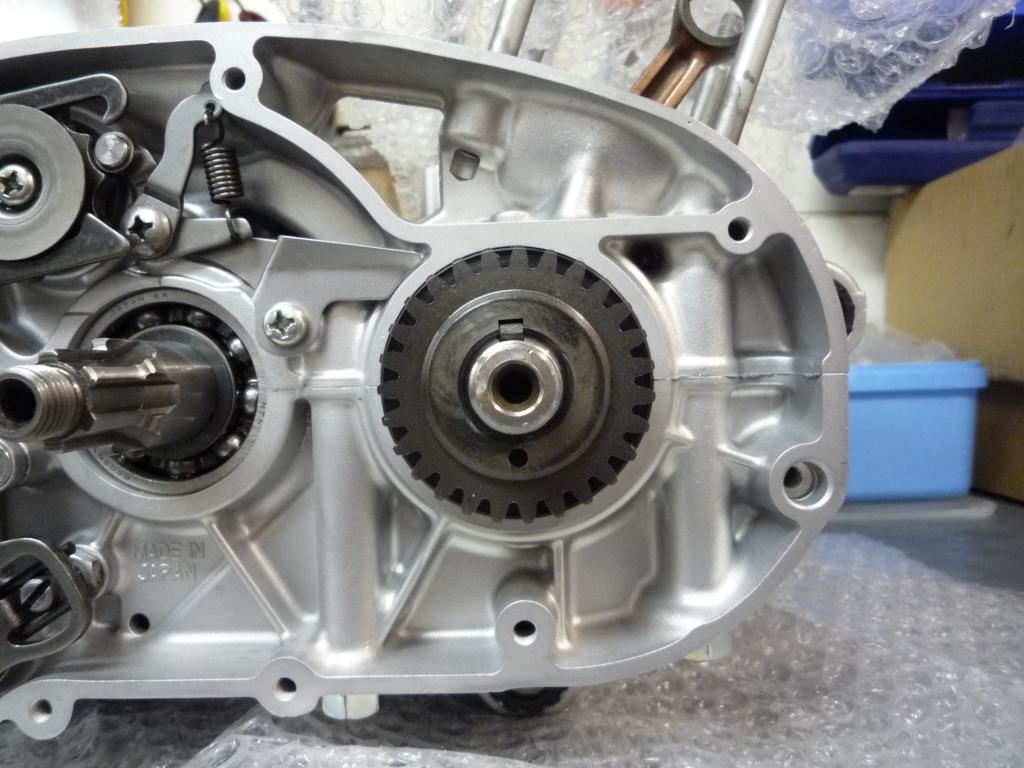
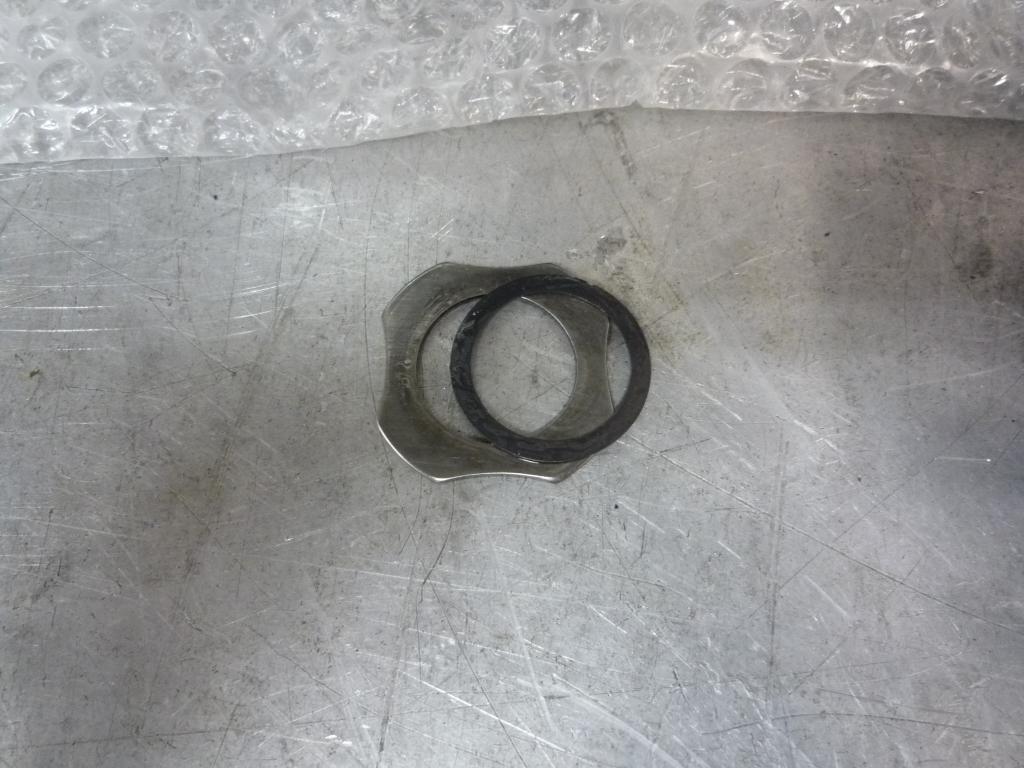
Back on its base the primary gear and
key were fitted, unfortunately the locking tab washer needs to be replaced and
so I am unable to refit and tighten the nut at this time.
I did source a replacement but it has the wrong size centre hole (20mm) it
should be 18mm so I am trying to source the correct part.
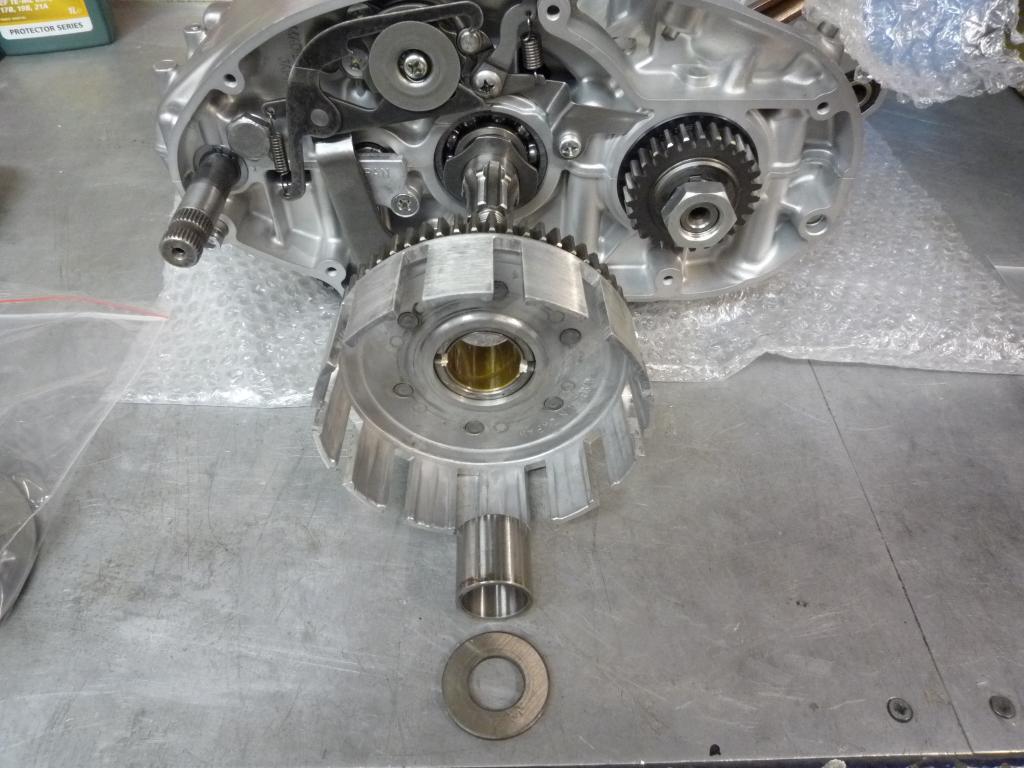
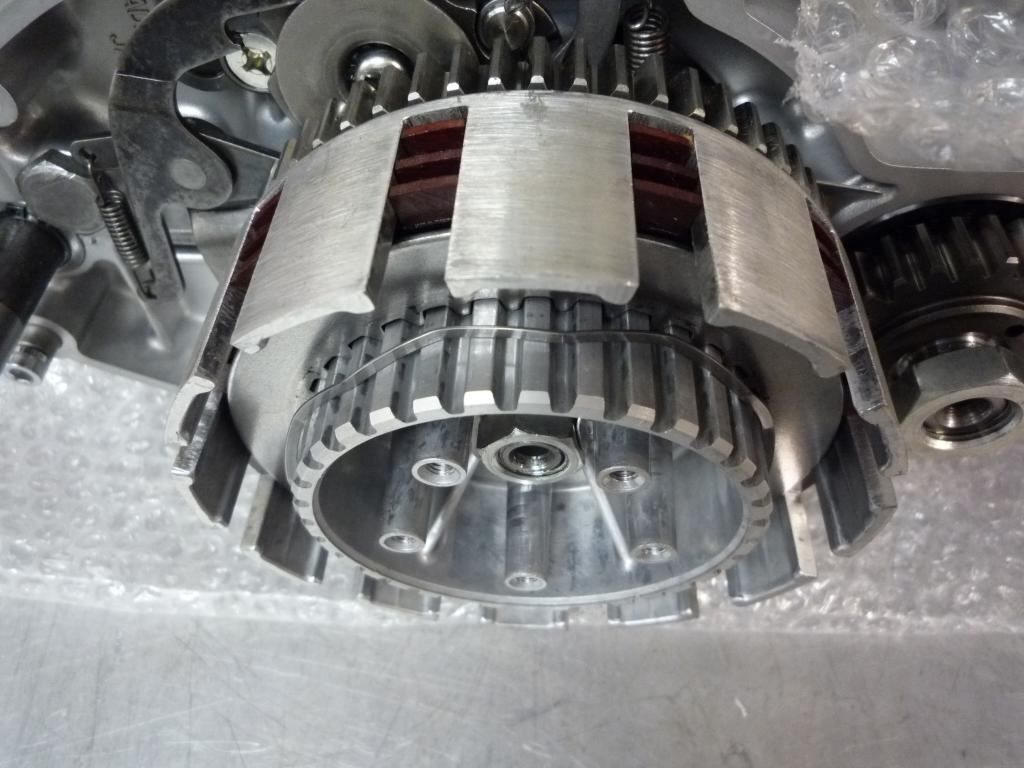
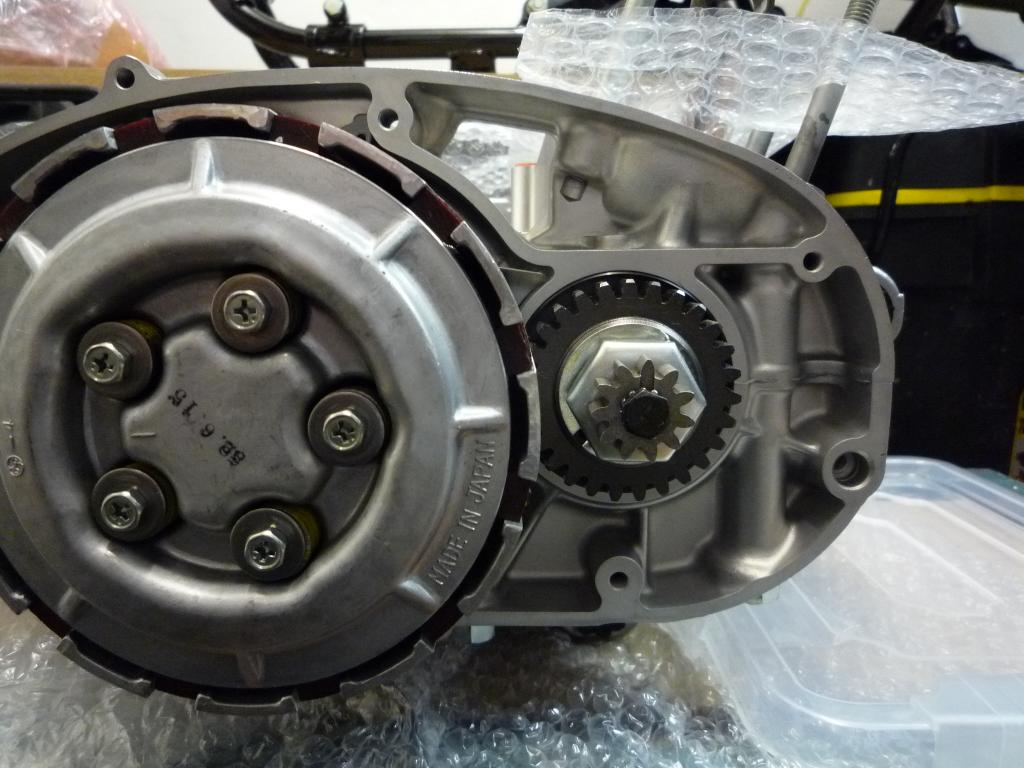
Moving on to
the clutch housing, the thrust washer and very
easy to miss shim were fitted on the shaft.

And the housing, bush and thrust washer
followed.

along with the clutch hub, locking
washer and nut


Again
special care and the correct tooling should be used when tightening the hub nut
levering against the Clutch housing fingers will end up breaking them off. Also
check that the tab washer spigot is located in the hub housing hole.
Clutch plates are next.

Assembled as per the manual.... until they are all fitted.
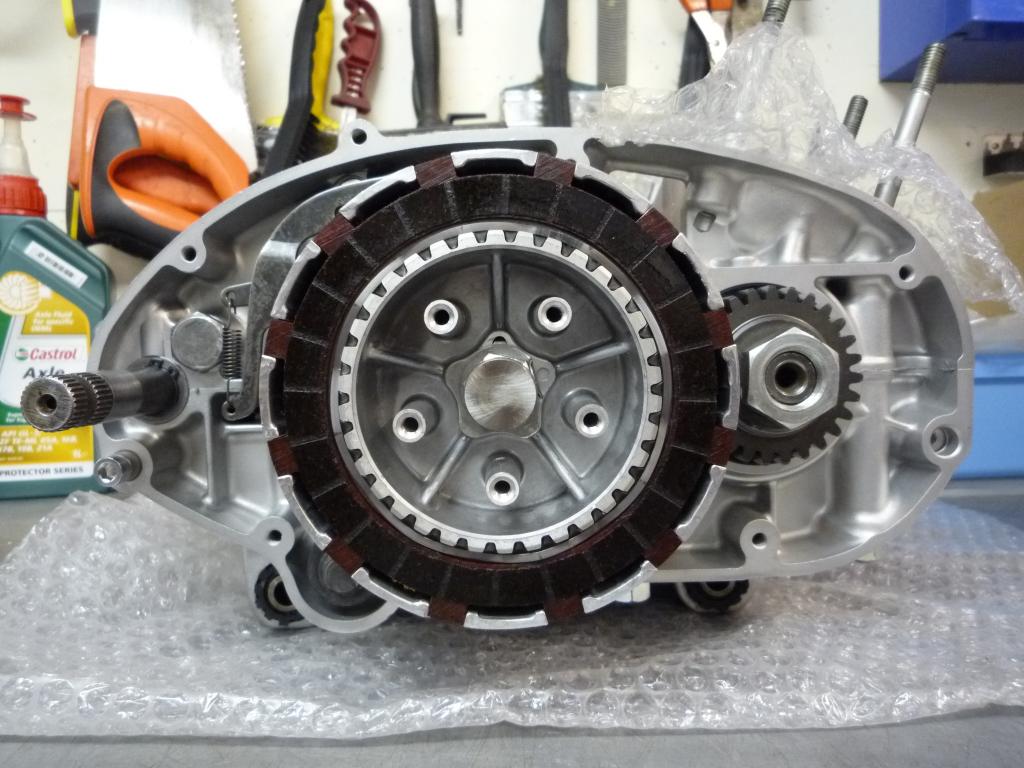
Then its the spring plate pusher into
the shaft before fitting the Spring pressure plate, springs, washers and bolts.
Taking care not to over torque the bolts and making sure of the correct Spring
pressure plate alignment as per
link.
http://kawatriple.com/partid/clutch/clbasket.htm bottom of page.

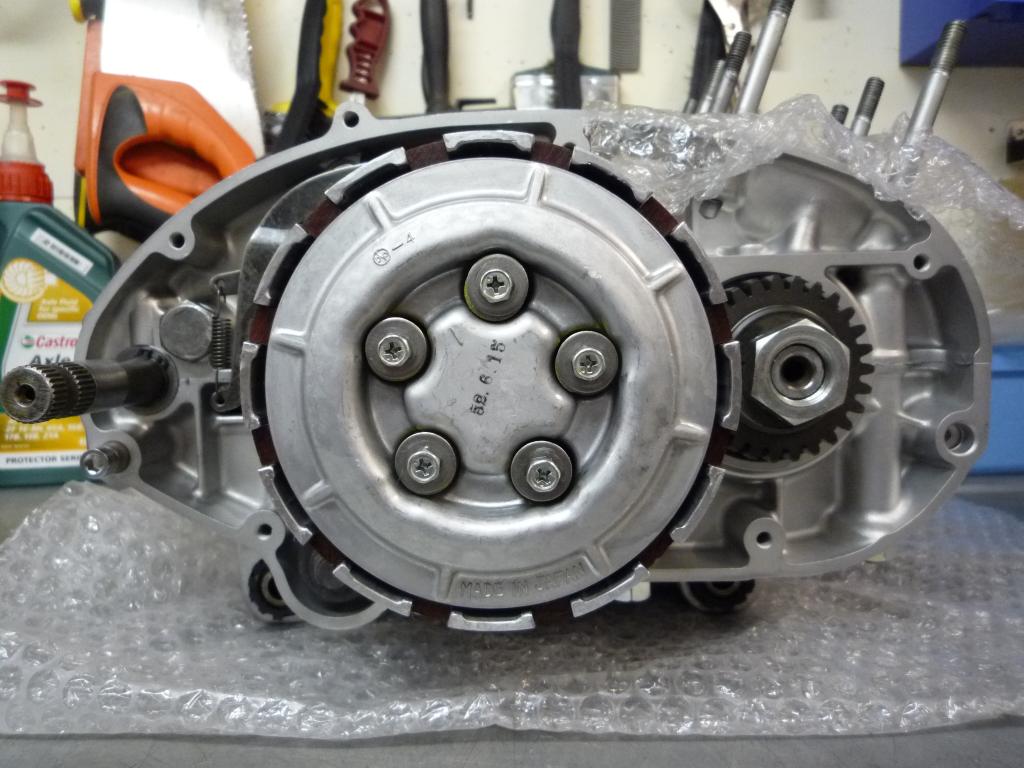
And that brings us to where we are
today
......Once I have sourced a locking washer I will put the engine to one side and
move on to other things
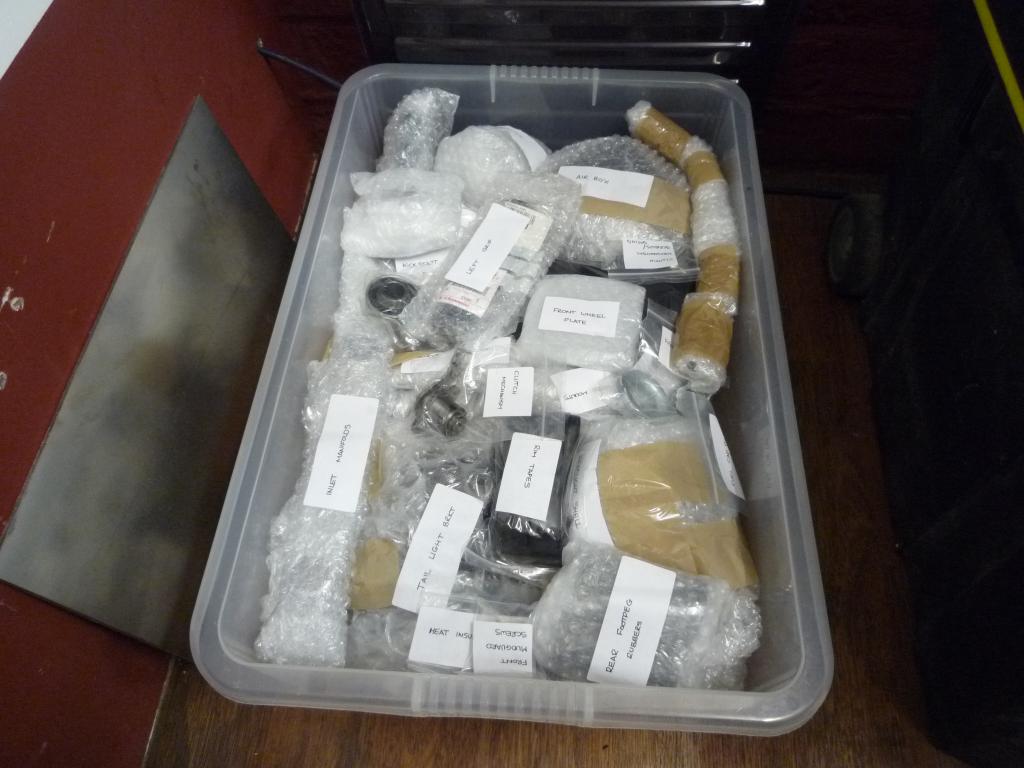
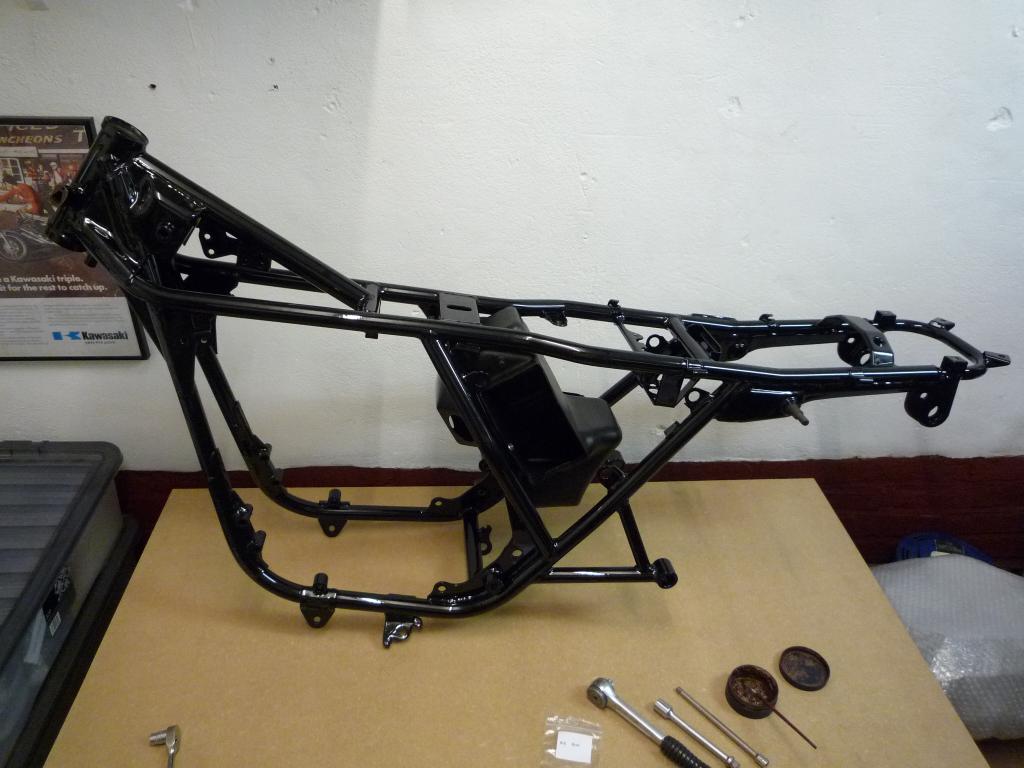
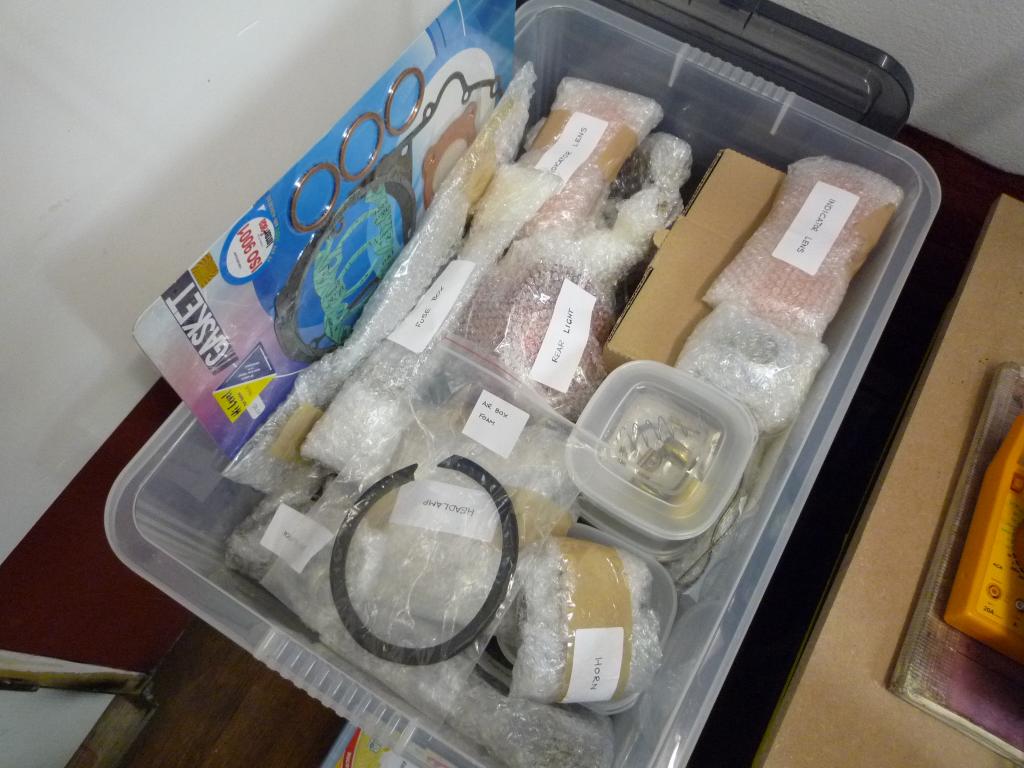
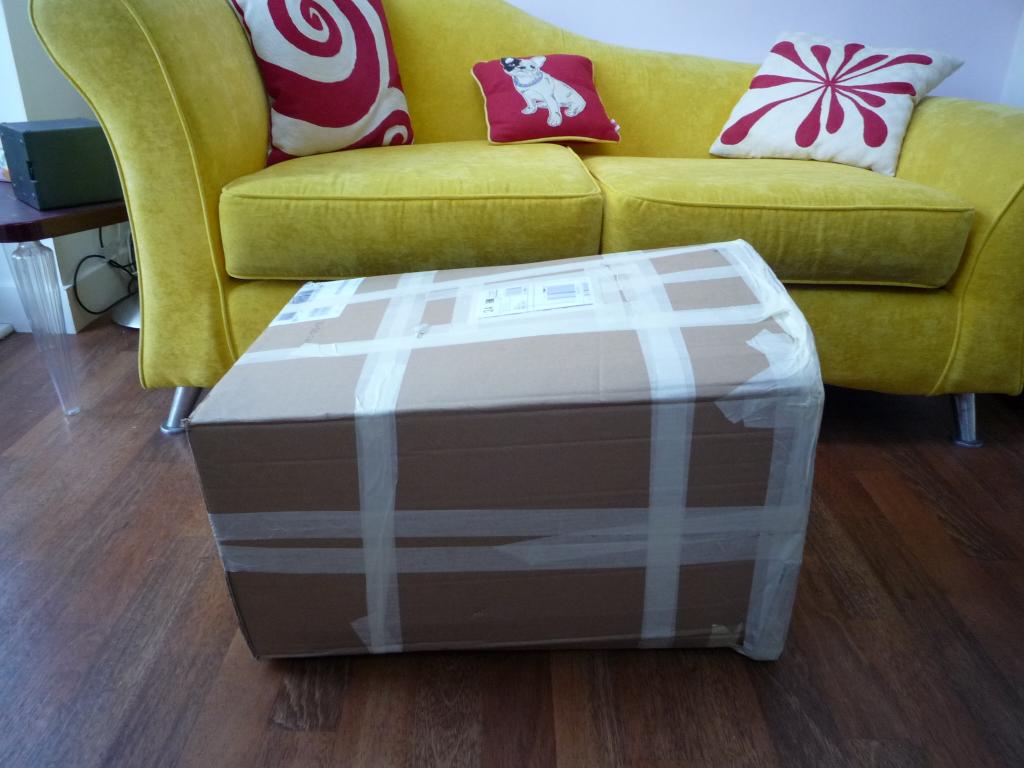
So Christmas has finally come early
this year,..........I may not get my money back, it may not be the best
investment plan, it has will and may still cause me headaches and sleepless
nights in the future BUT,...... feeling as excited as a kid in a toy shop ready
to start unwrapping this little lot is Priceless 
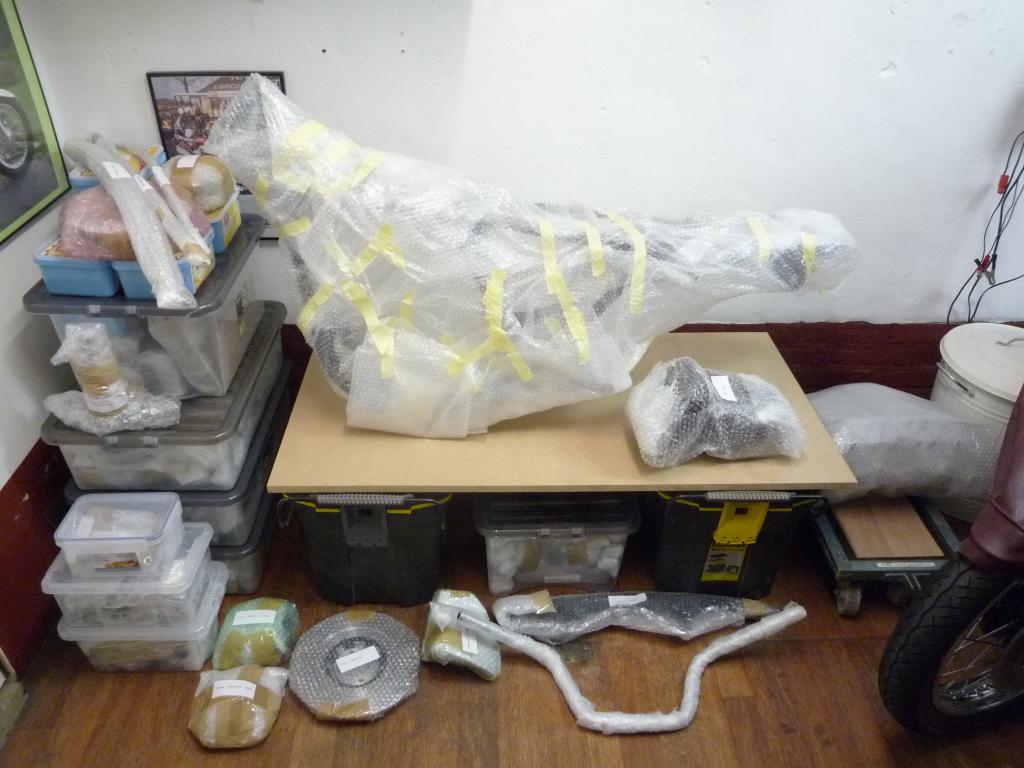
Time to do some work..
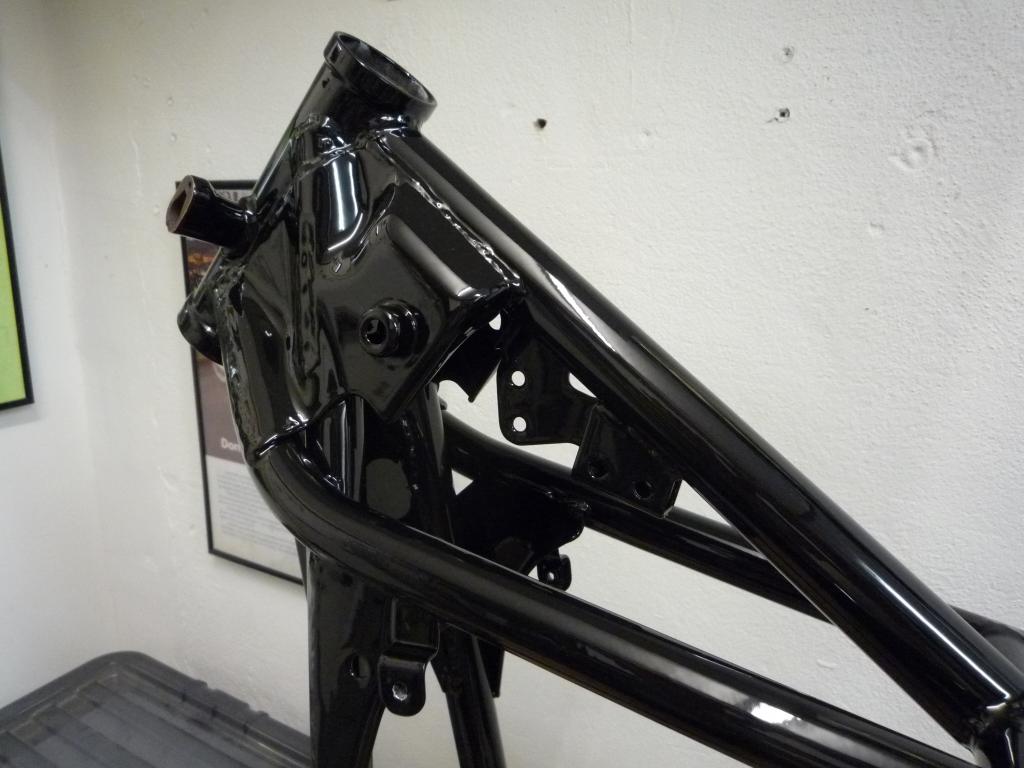
made a little start last night.
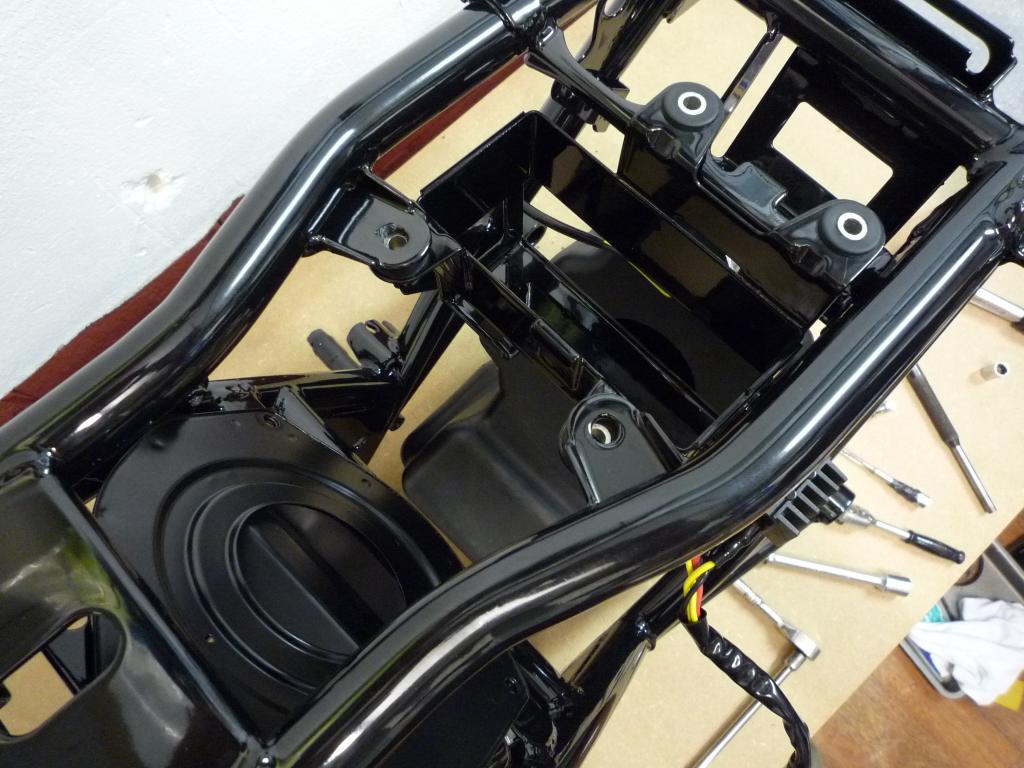
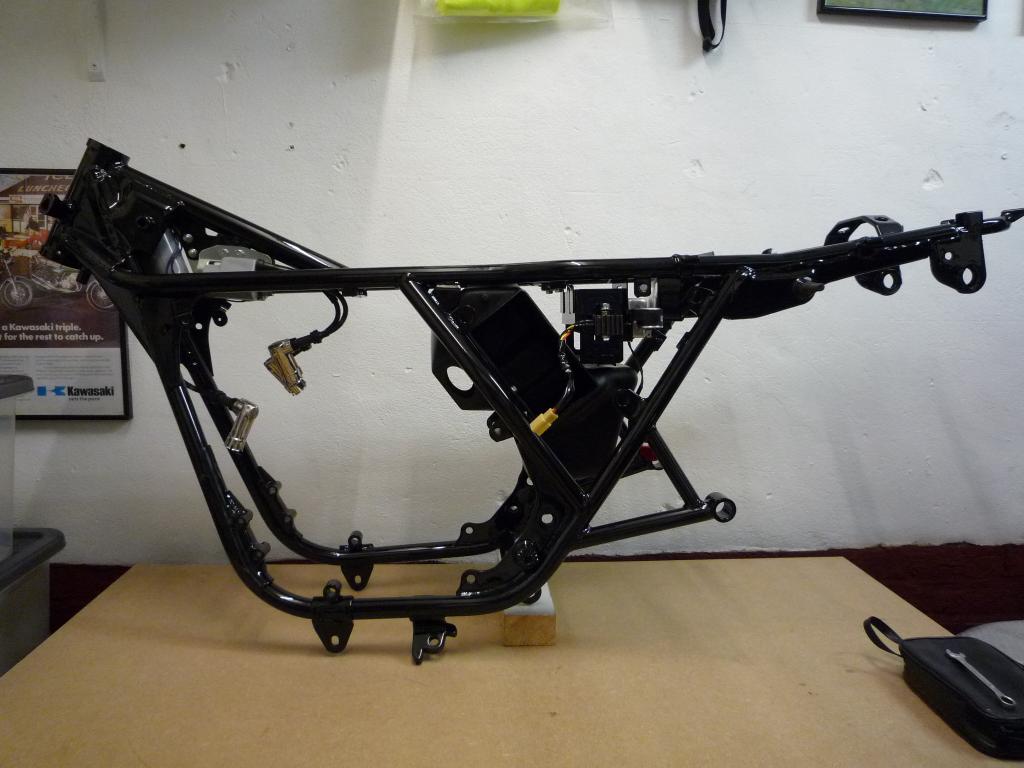
With the frame now looking lovely again.
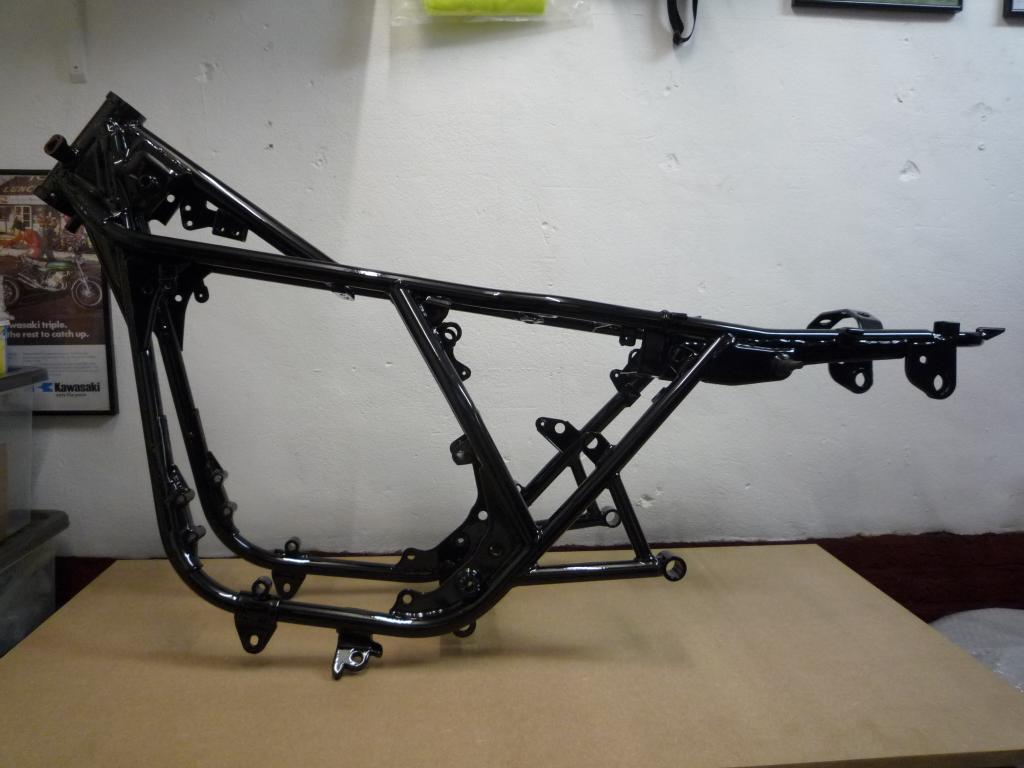
It was time to start rummaging in the boxes and find the
airbox which from memory had to go in first. (Note: Airbox should be fitted
after battery box and CDI cable run.)
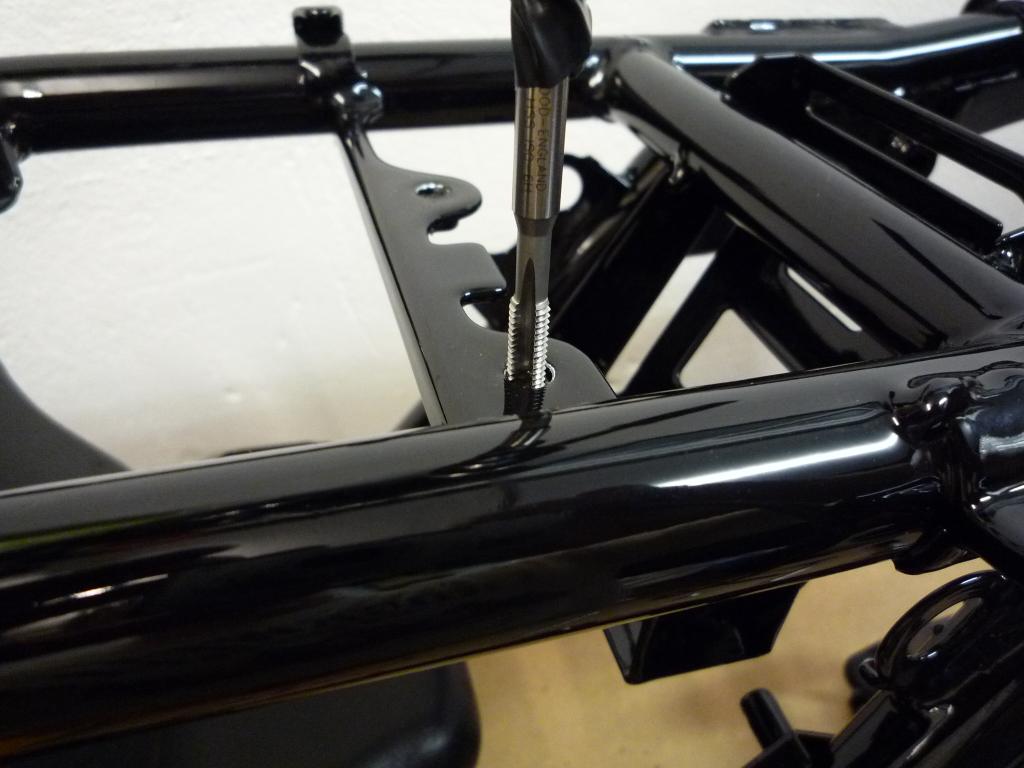
After clearing the 3 mounting holes using a tap the front and
rear parts of the airbox were bolted into place.
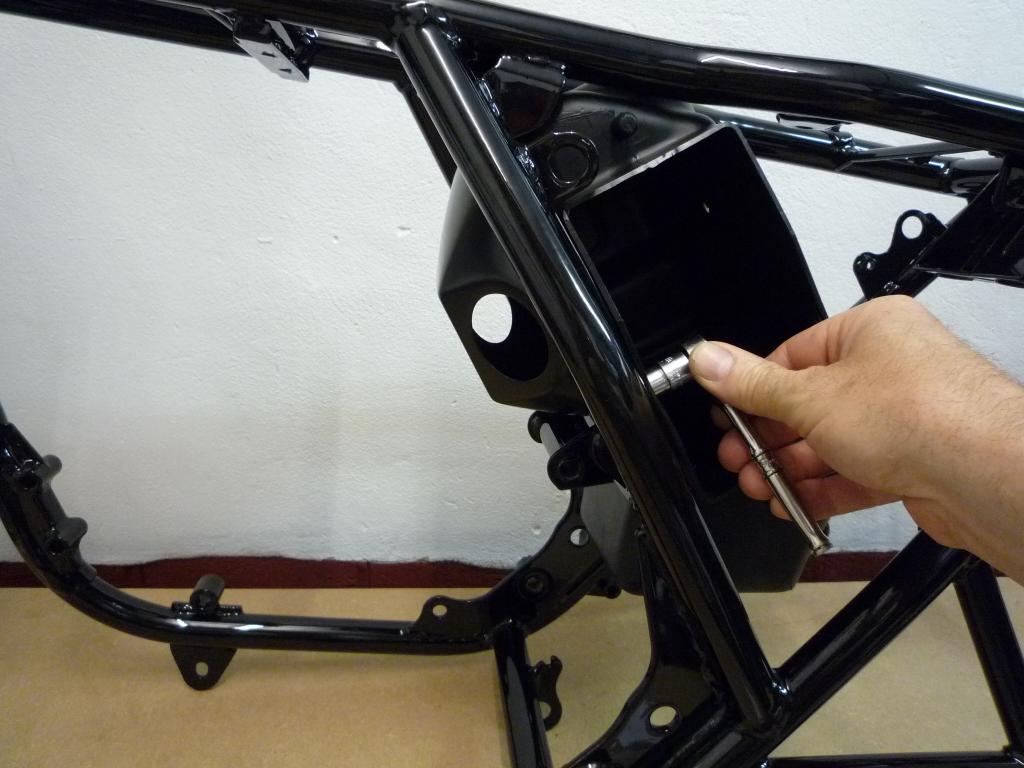
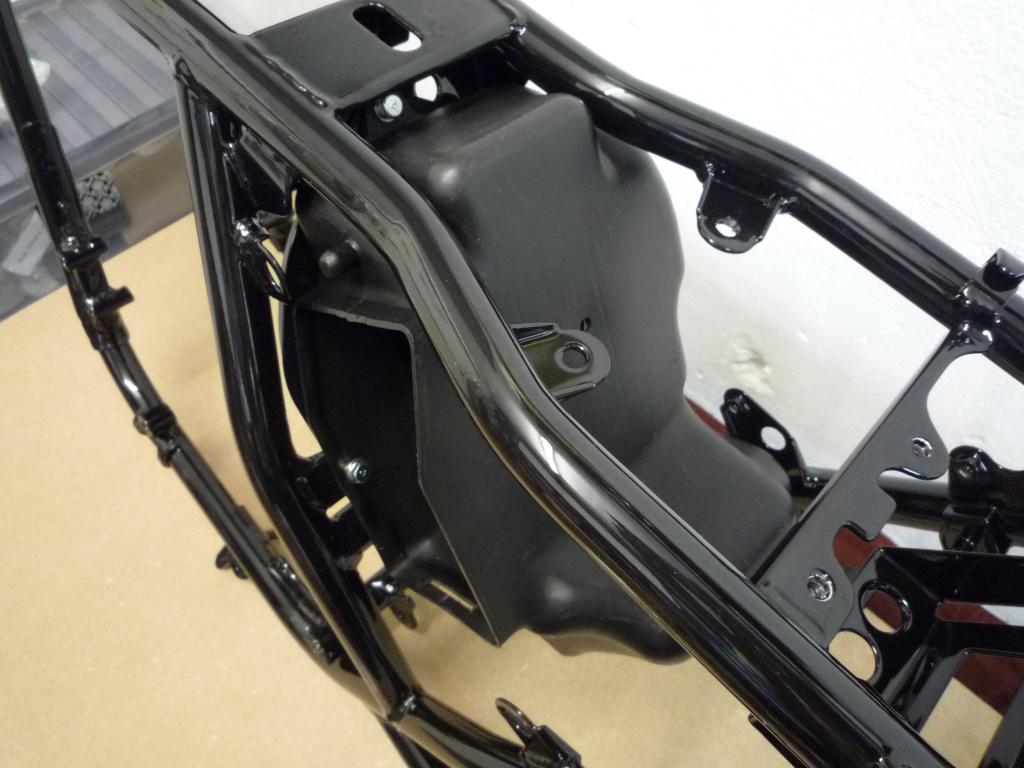

Still pondering at the size of that airbox, the battery box
would be next.
So more holes to be cleared, and the coating was removed from the main earthing
point on the frame in preparation for the wiring later on.
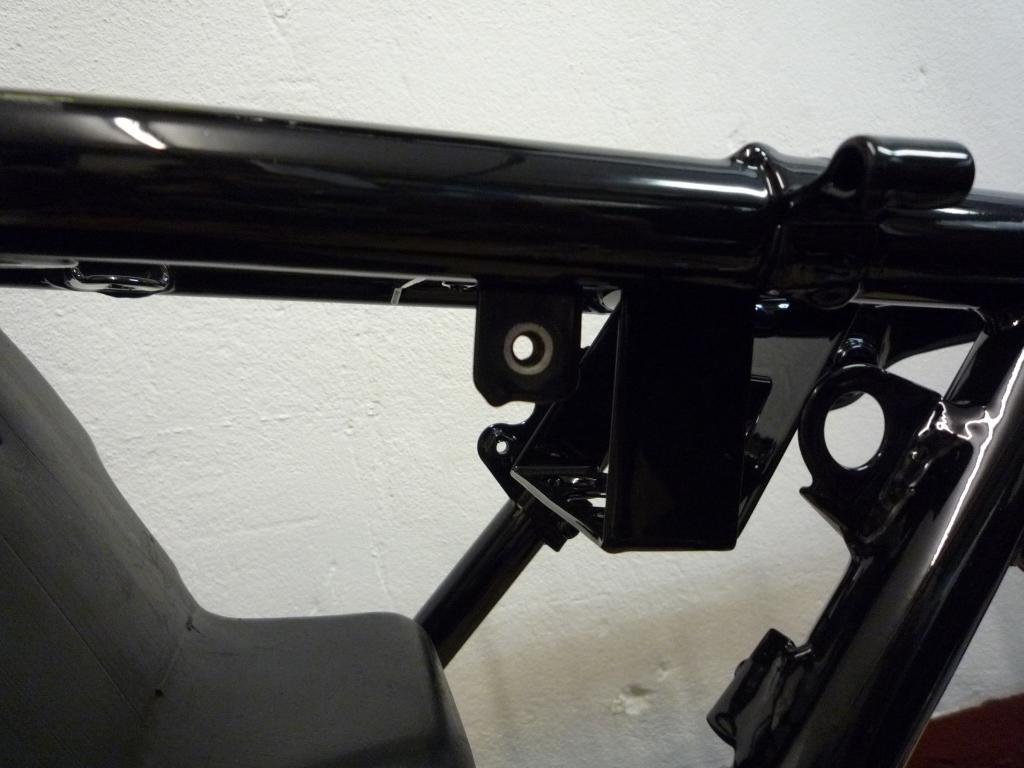
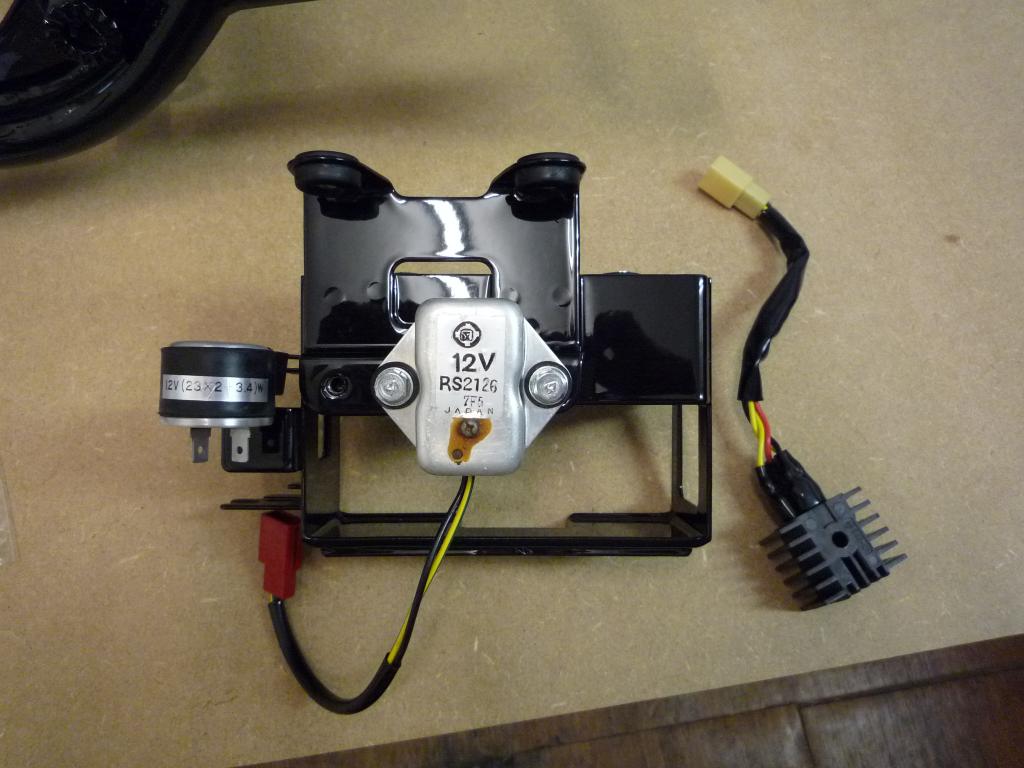
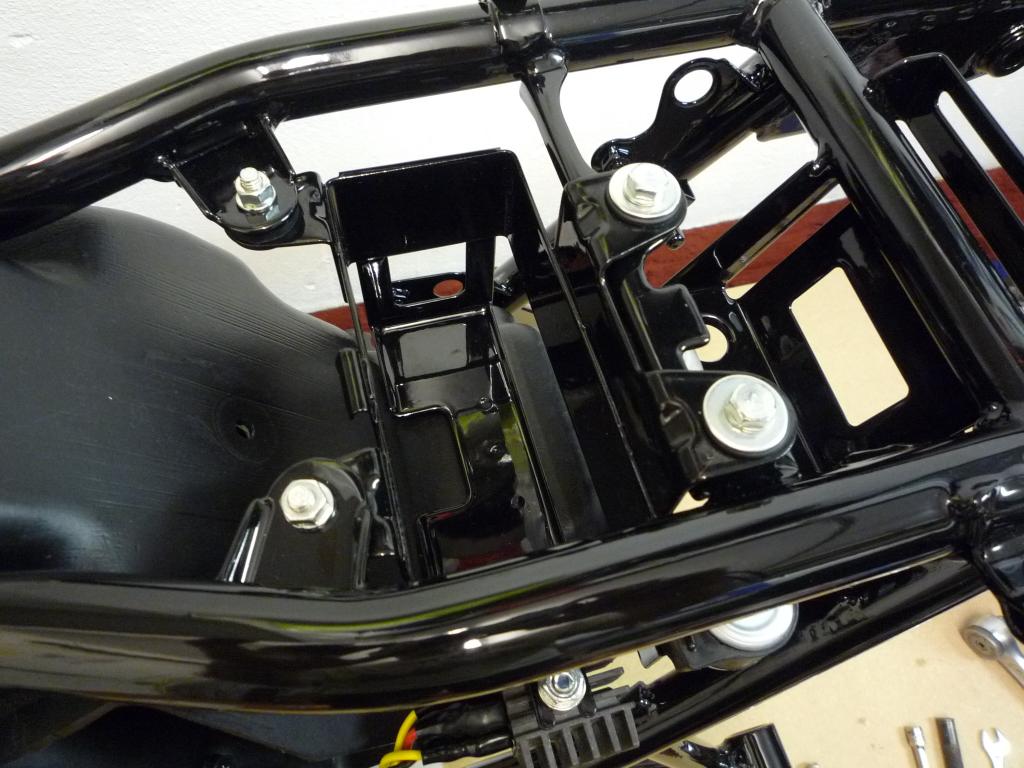
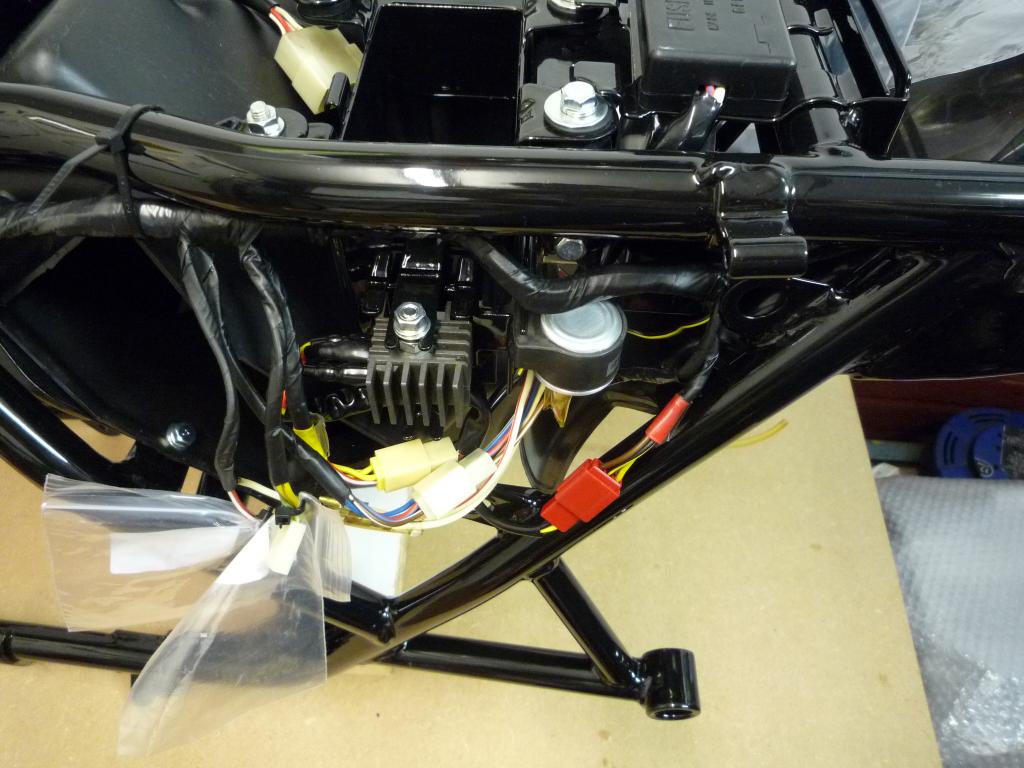
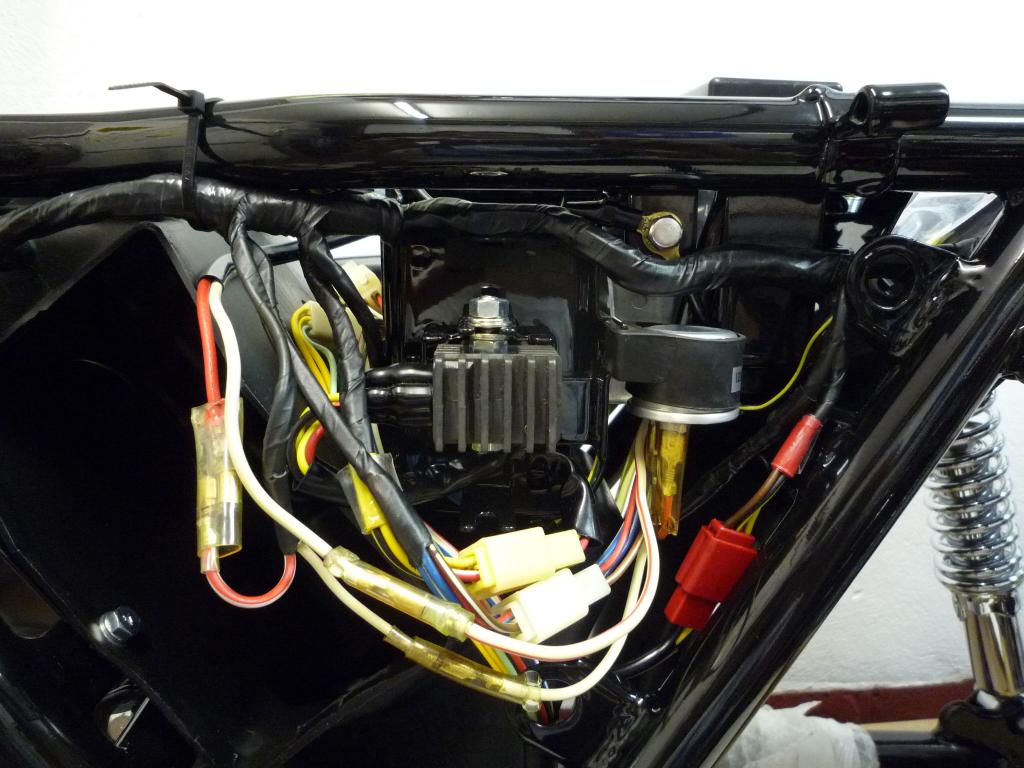
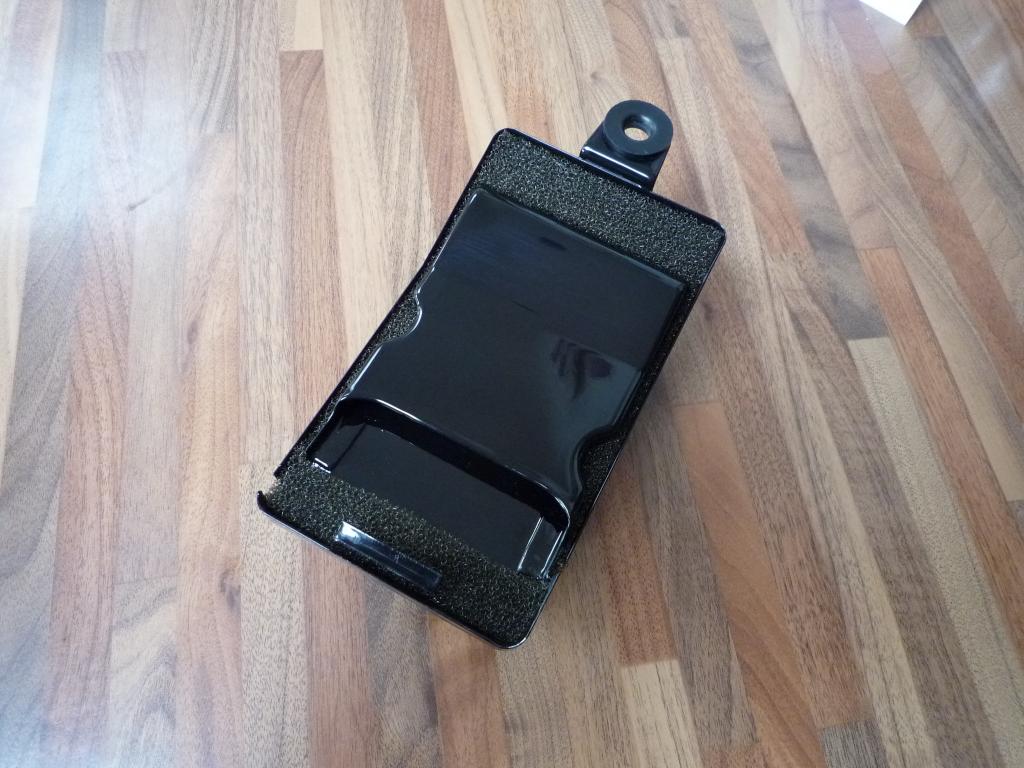
With the Regulator, rectifier and
flasher unit unwrapped and bolts and bushes found
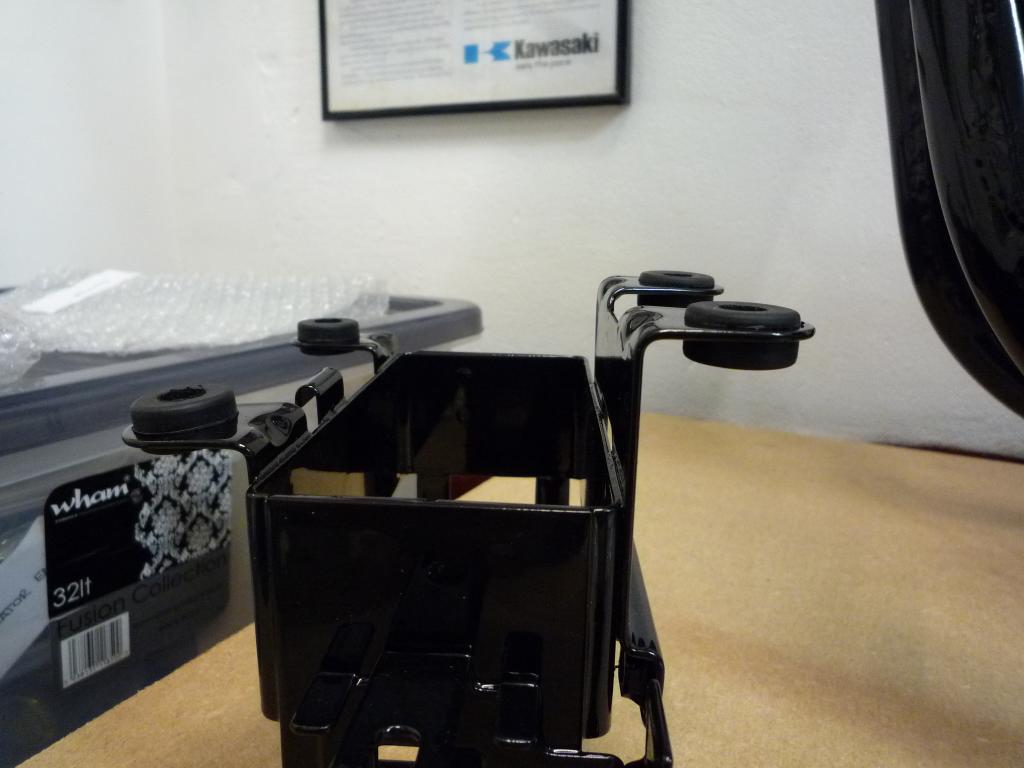
the battery box could be assembled.

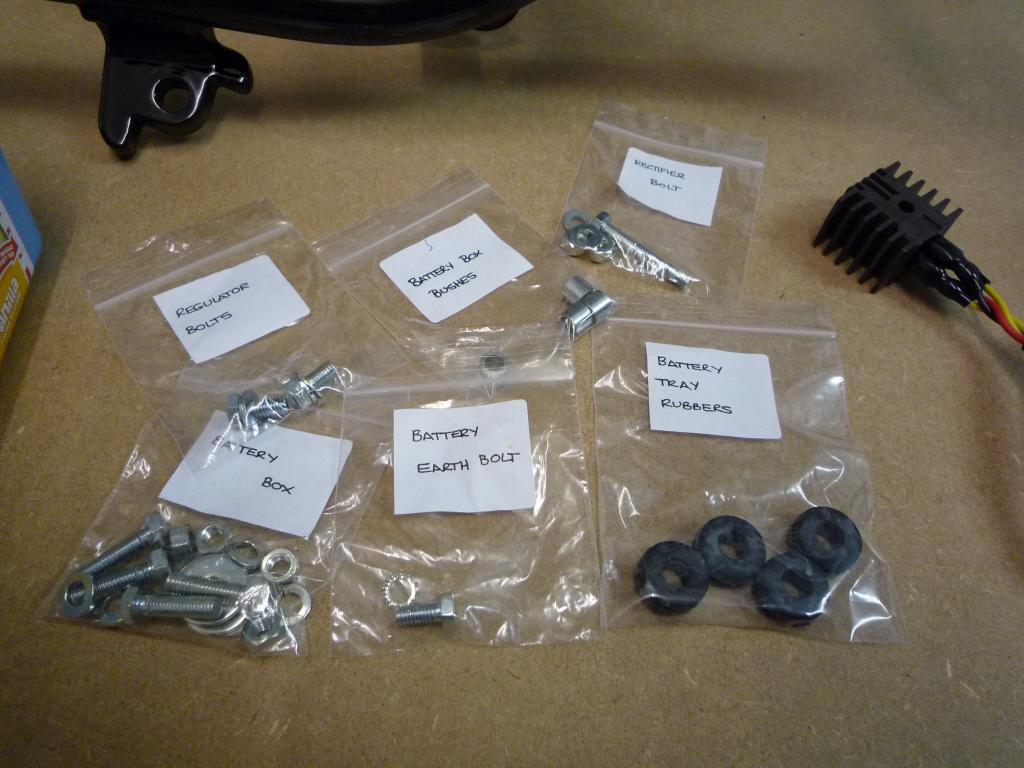
Note the fitting of the grommets.
Regulator and flasher unit fitted fitted. Then the rectifier.
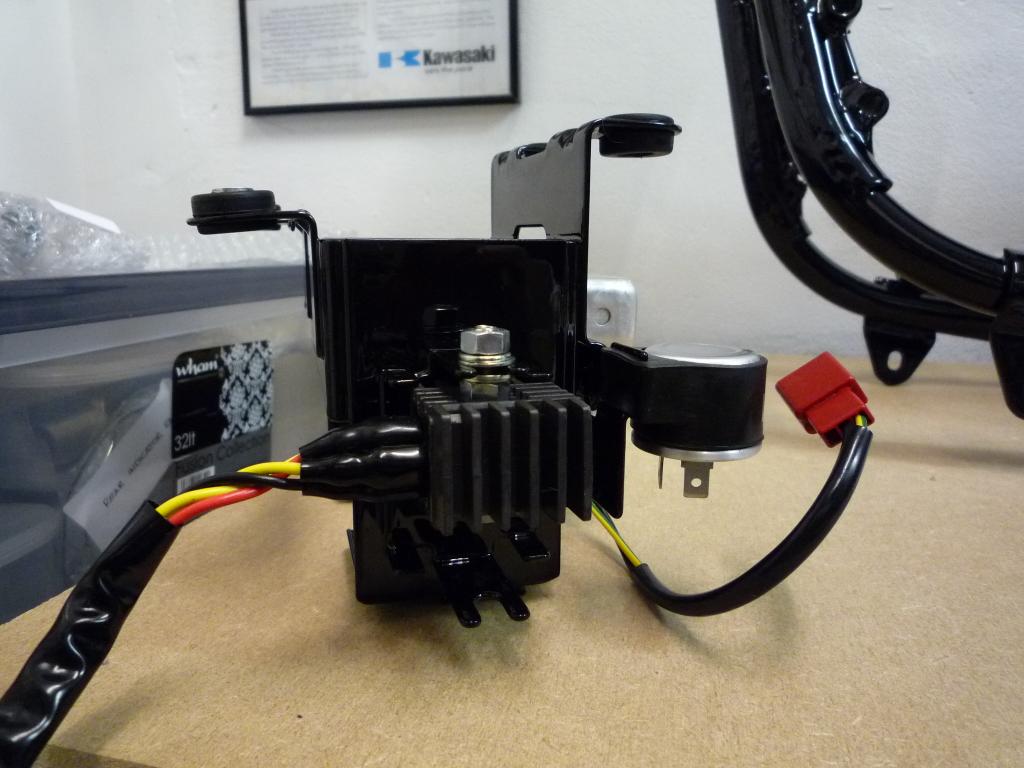
Now off to the frame and slide it in, simples
and the first little hic up.
With the complete airbox fitted it seems you are unable to put the battery box
in place so to do this I had to drop the plastic part down and then fit it, not
a huge problem just adds to the 400 learning curve and a note to remember.
With the battery box secured in place and the airbox refitted.
In went the spare plug holder (must order some plugs)............
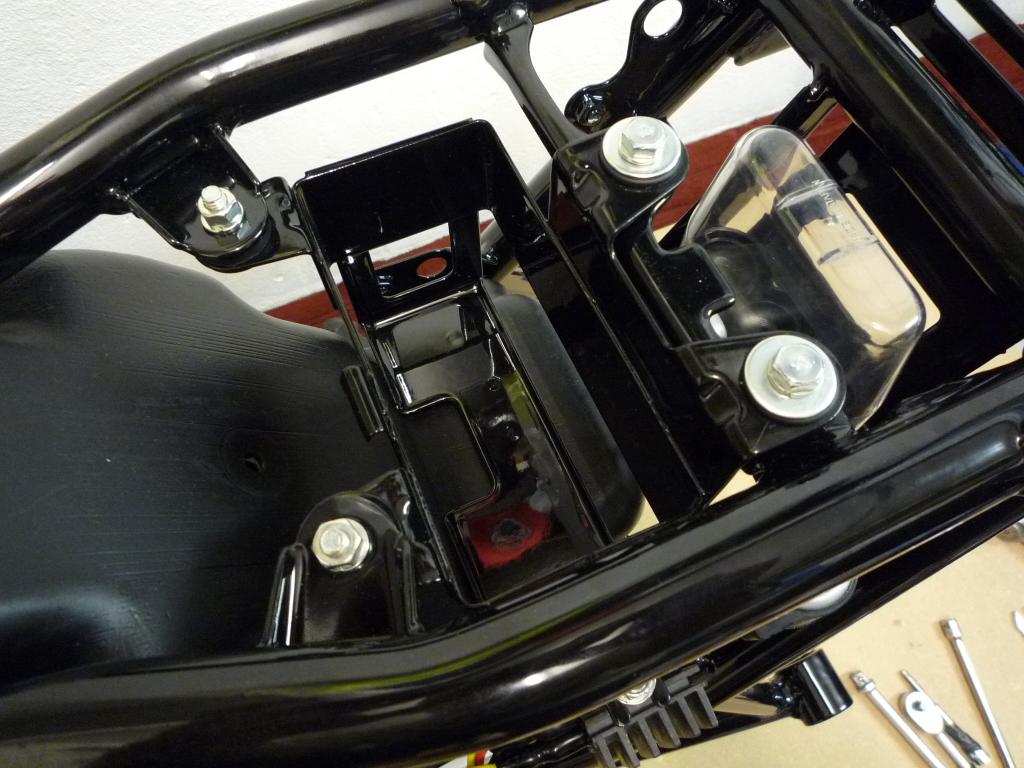
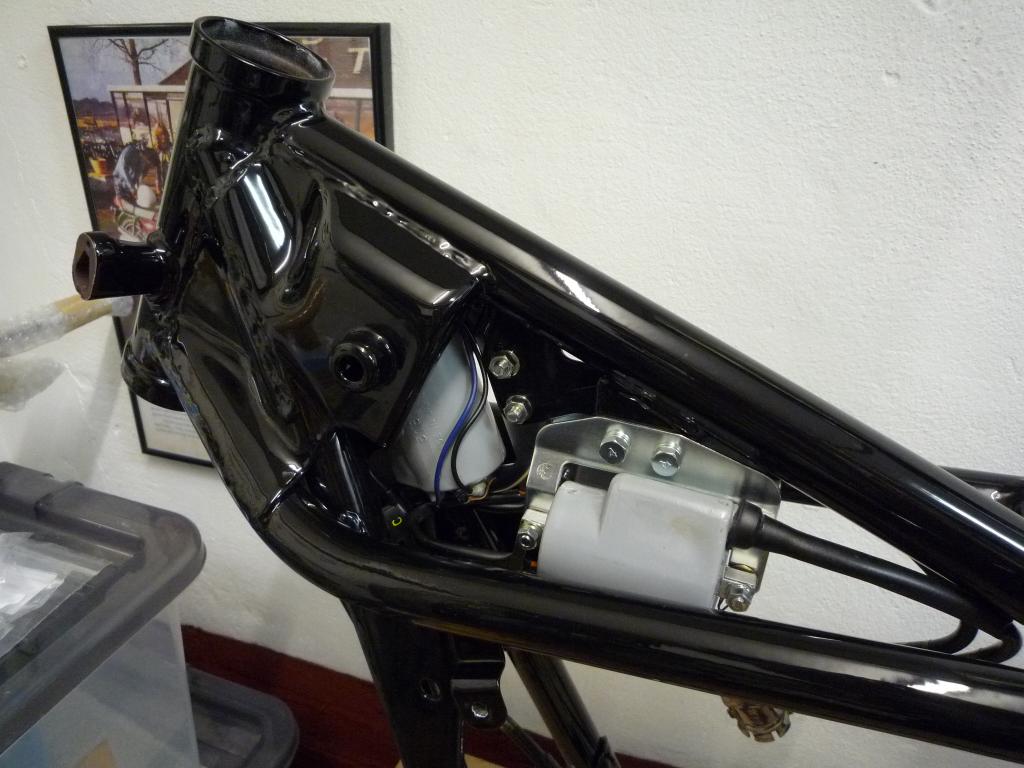
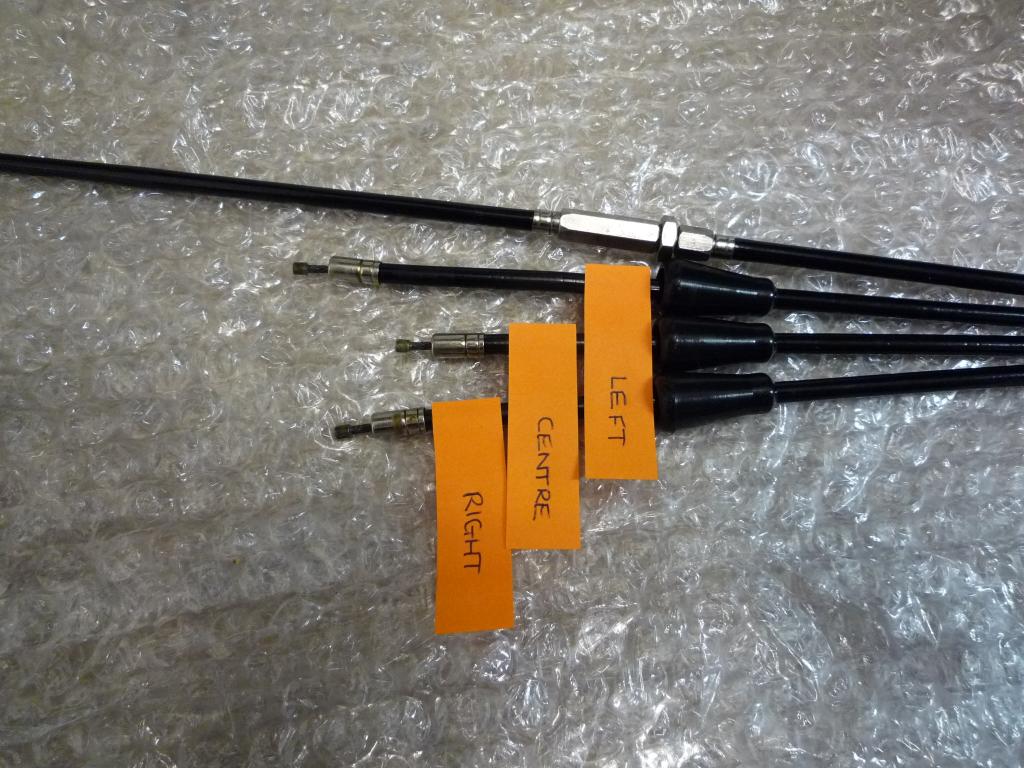
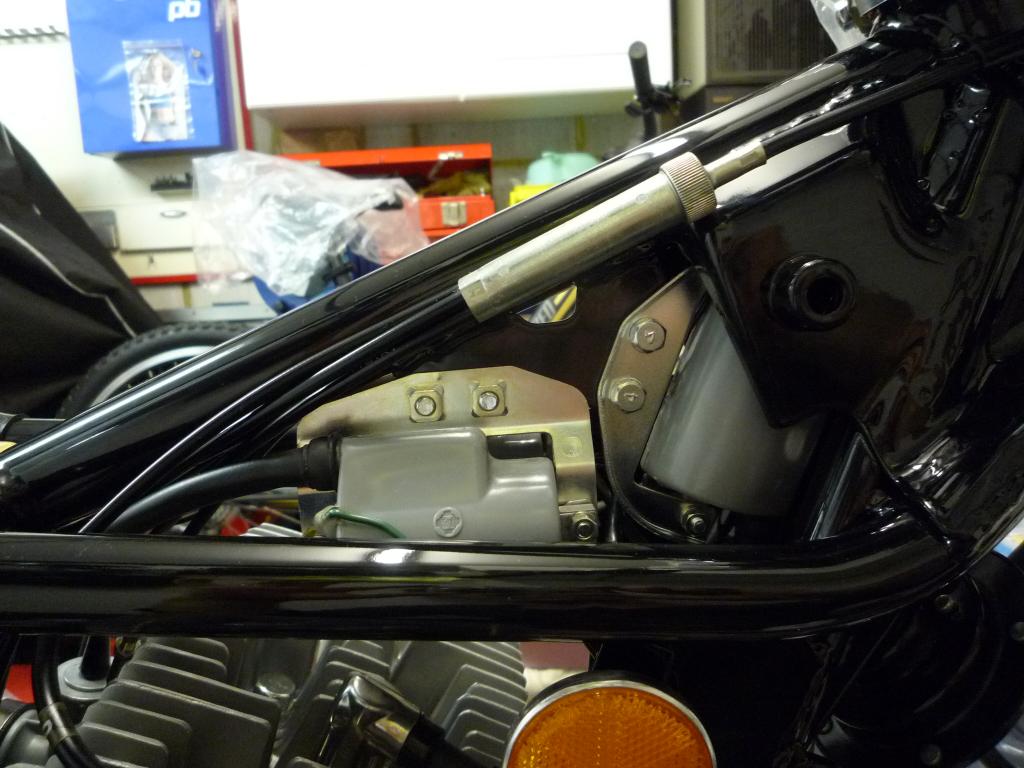
Next step was to fit the coils, these
have to be earthed to the frame so an earthing point was prepared as originally
done.
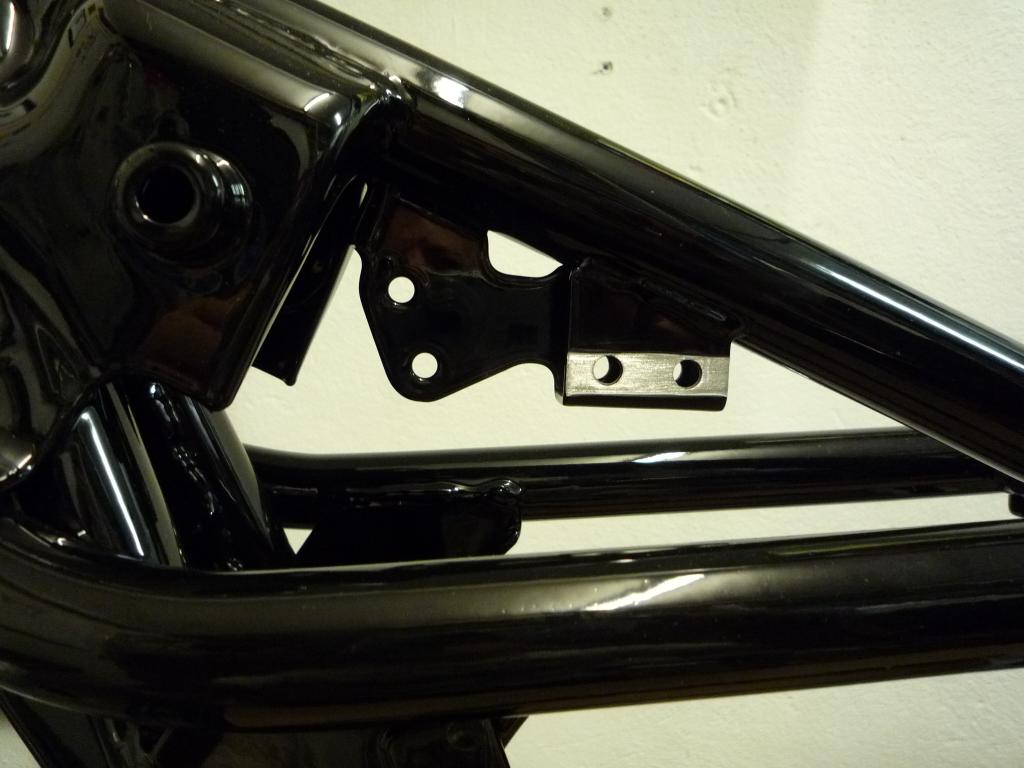

I can't remember seeing any earthing
point on the frame for the centre coil and I wondered if they were linked
somehow through the wiring, after checking the manual which showed it earthed I
decided to prepare another earthing point on the other side for it.
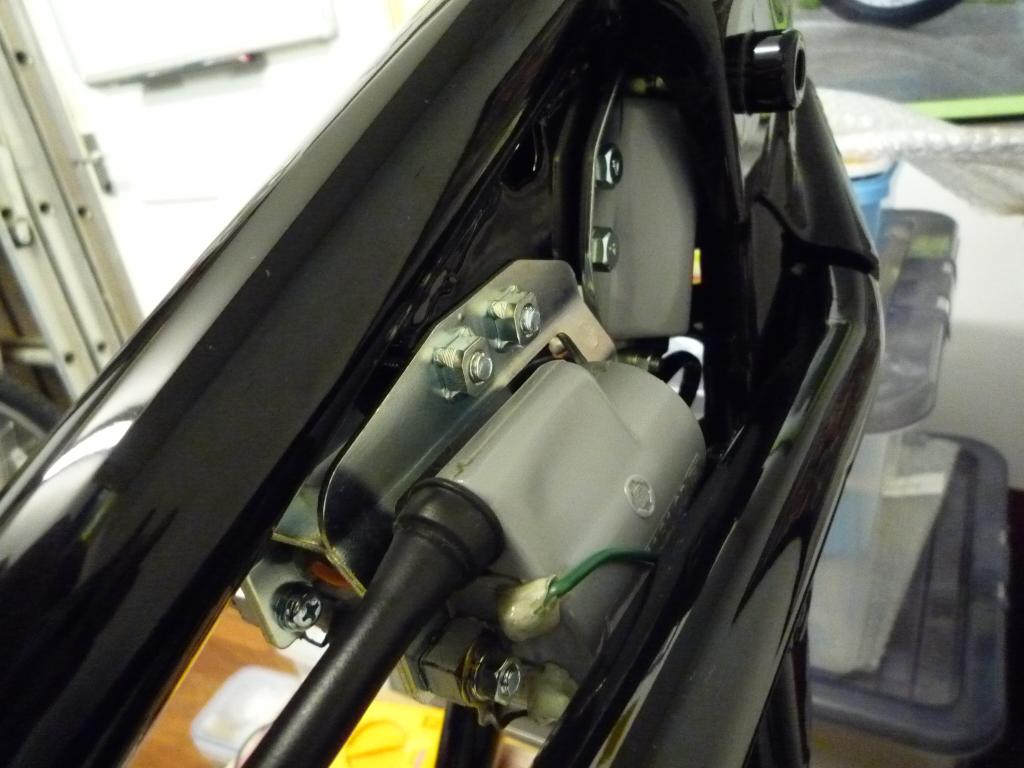
The left and right coils were found.... and fitted to their mounting plate.

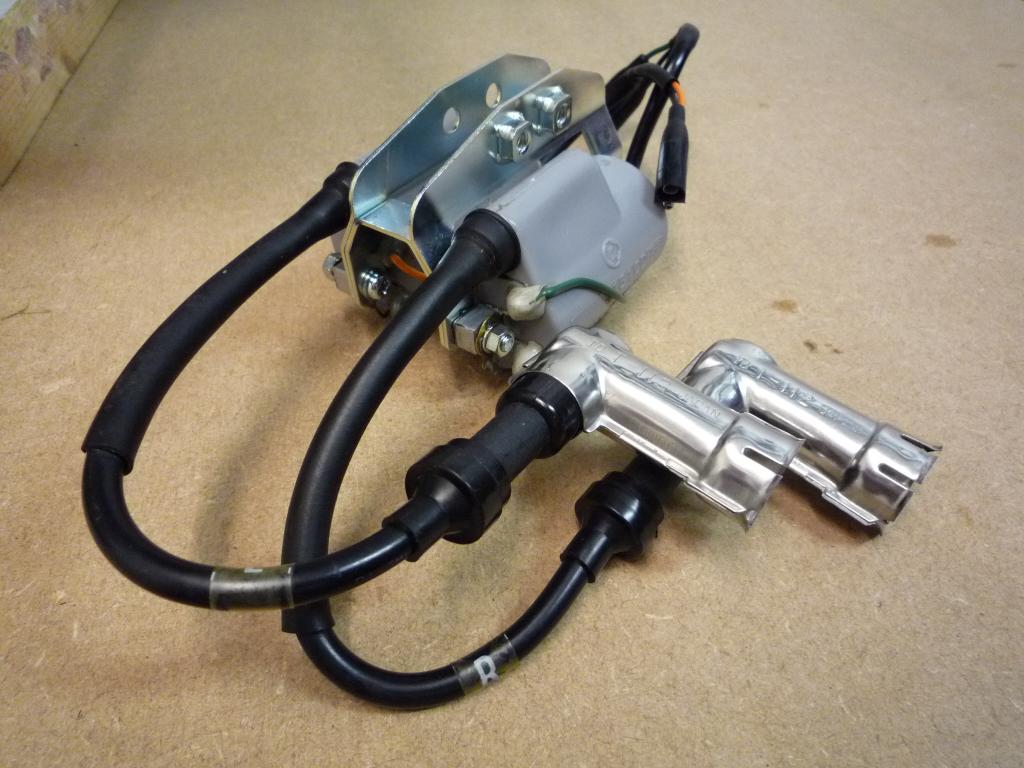
Same process for the centre coil.

They were then bolted into position and the earthing checked
The centre failed the test so an extra washer was fitted between the frame and
the mounting bracket to complete the circuit and allow a good earth.
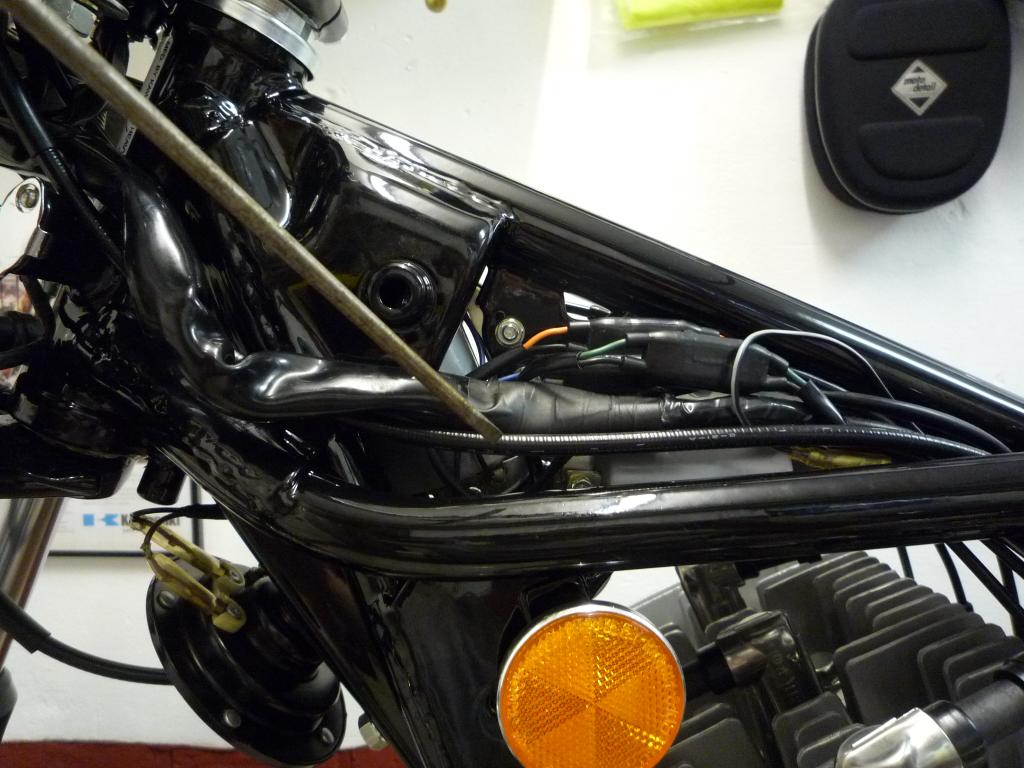
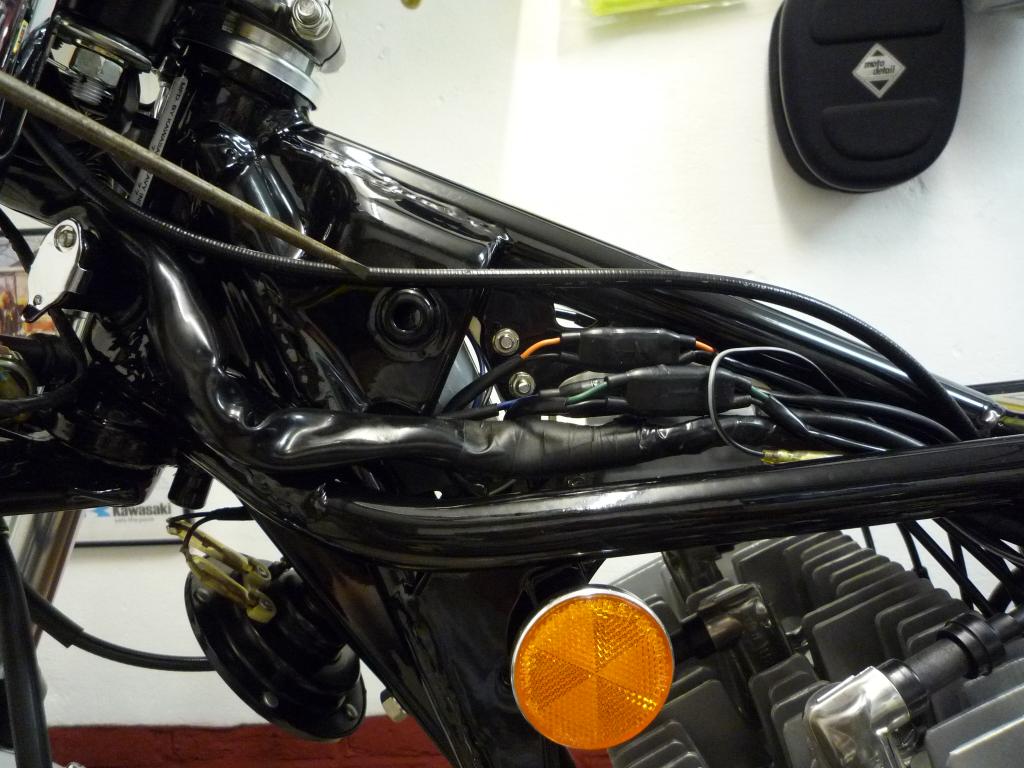
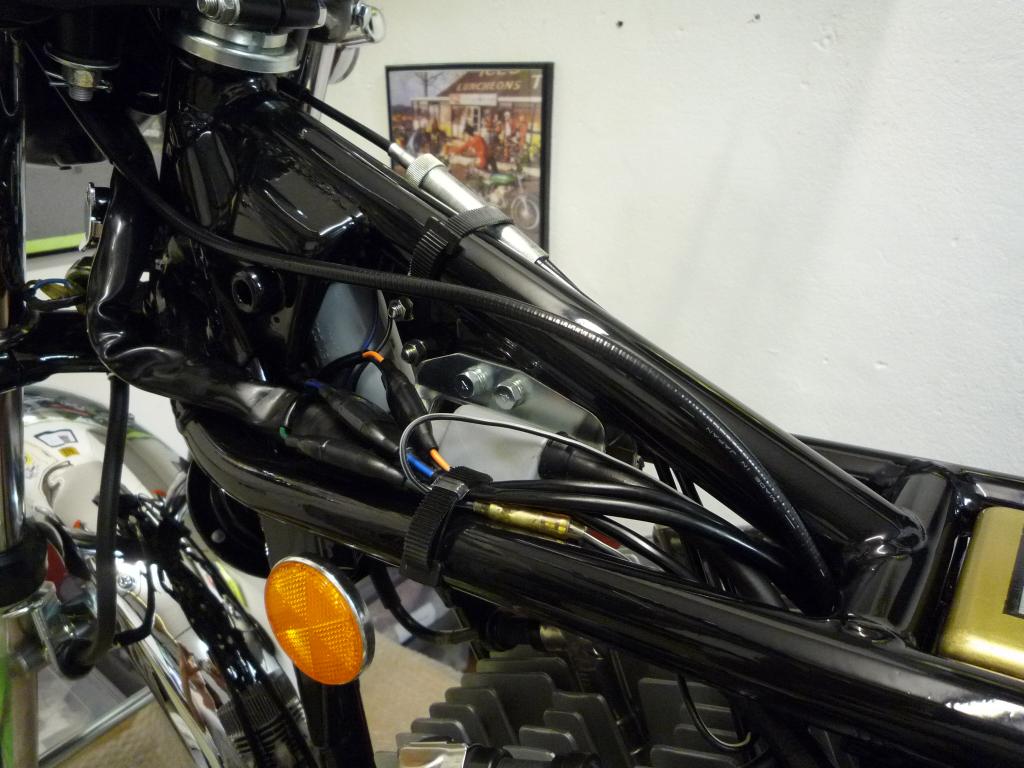
So today we added a bit of colour to
the frame, first with the front reflectors.
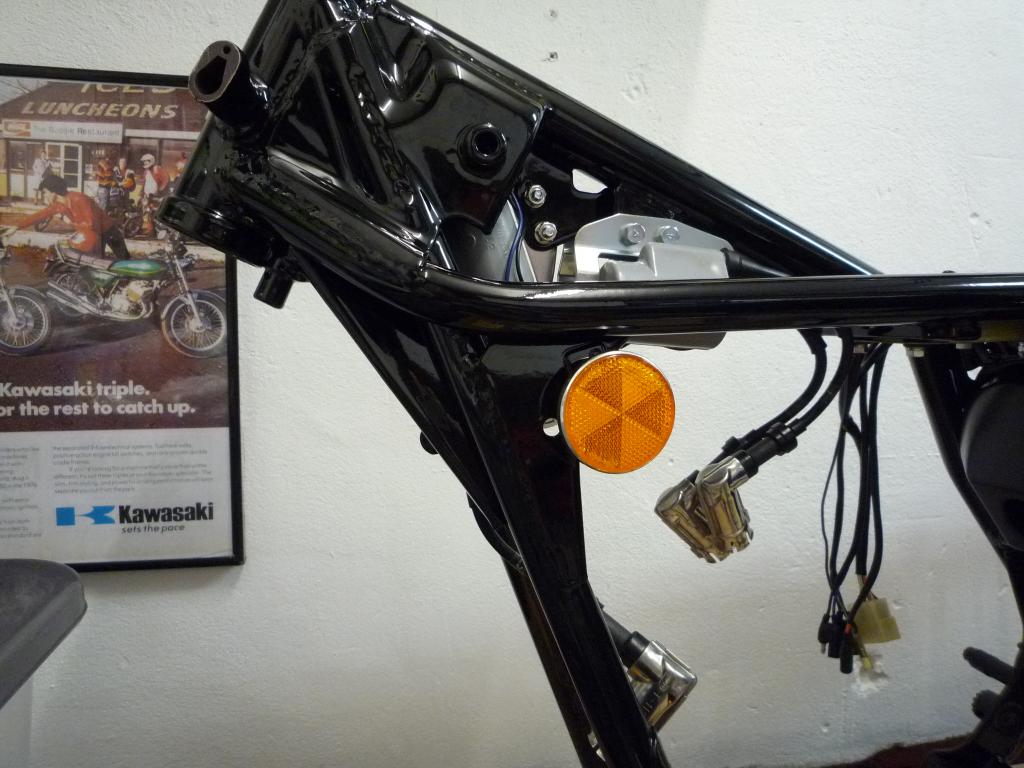
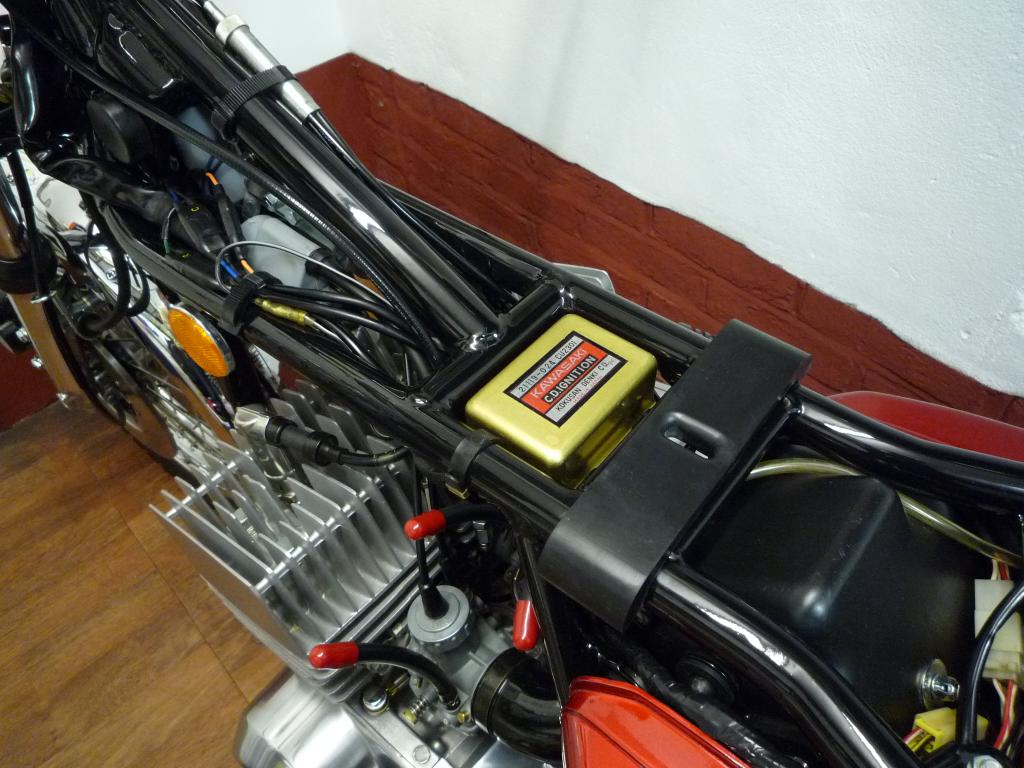
Closely followed by the CDI ignition
unit,.............I had originally changed the worn mounting rubbers for new
grommets from Maplins but I was never happy with them being more of a plastic
than a rubber type material, luckily I found some perfect replacements at an
autojumble a while back and they fitted a treat.

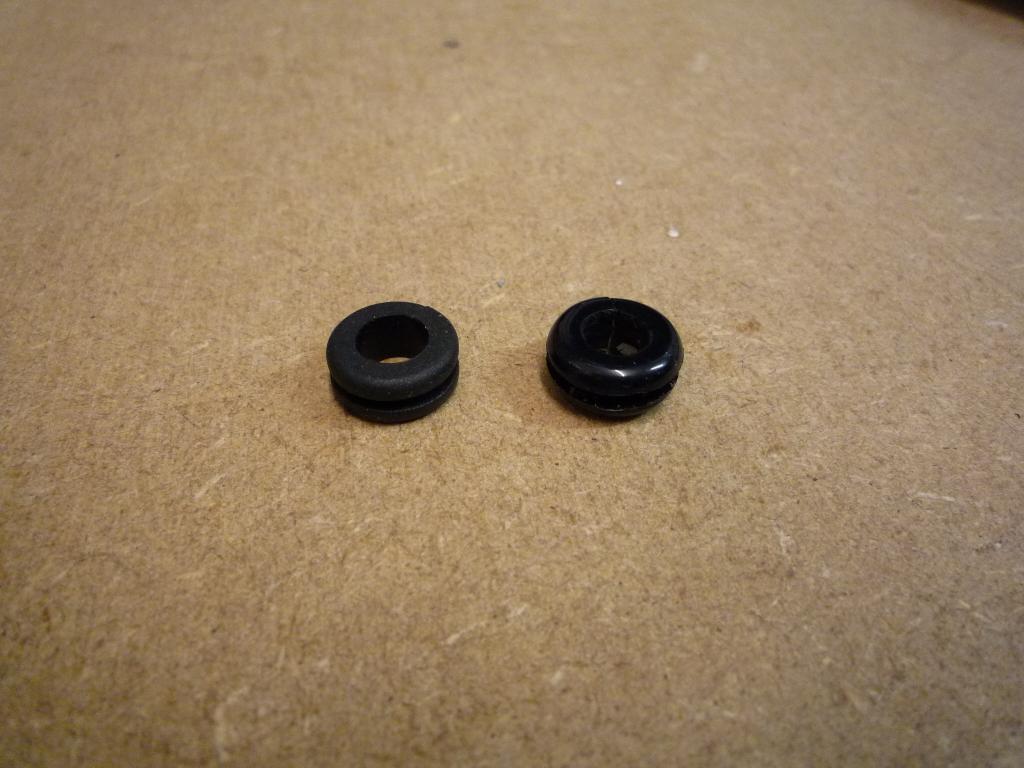
New ones on the left, Maplins on the
right.
Anyway fitting the CDI unit brought up
my old friend the airbox again but this time I was expecting it as I knew where
the wire went.
The main connector plug runs past the airbox and you can't feed it through with
it fitted so guess what..........................So glad I haven't fitted the
swingarm yet.

With the CDI connector threaded
through, the airbox refitted again and confident that there was absolutely no
need to remove it again
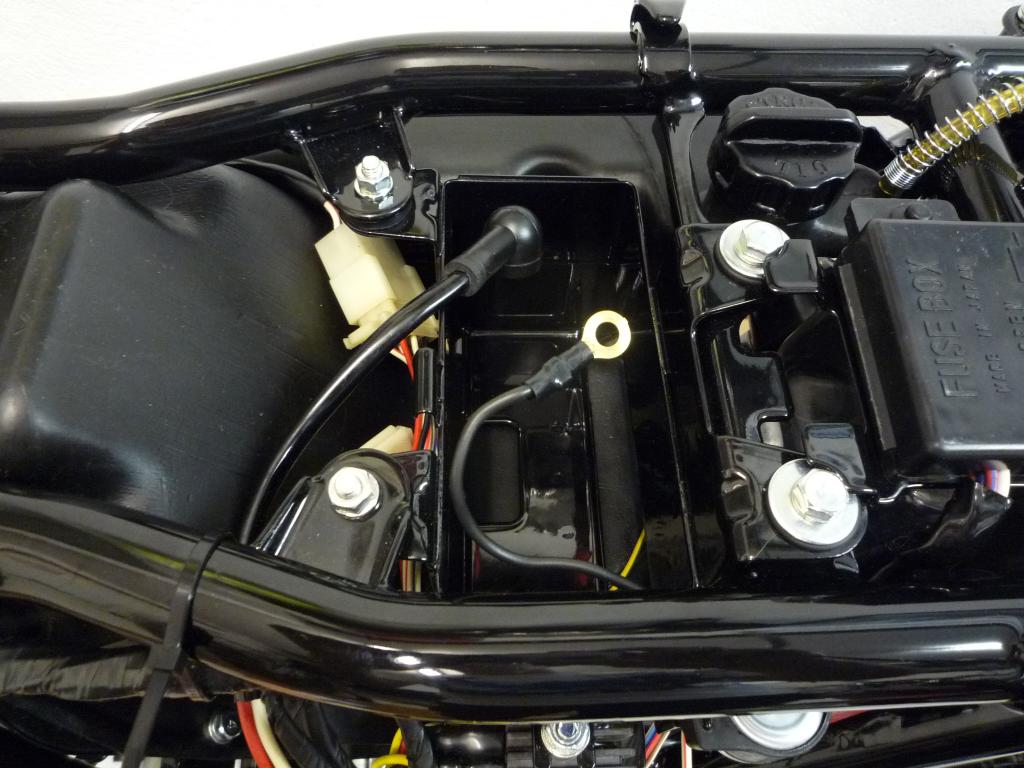
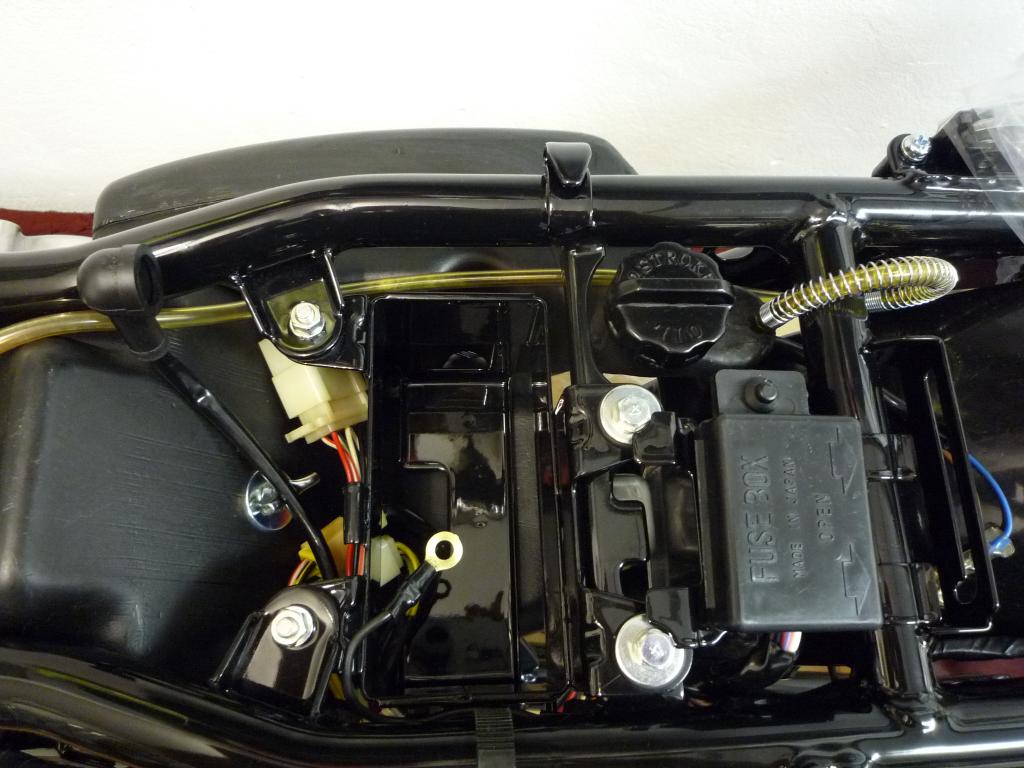
I fitted the oil tank.
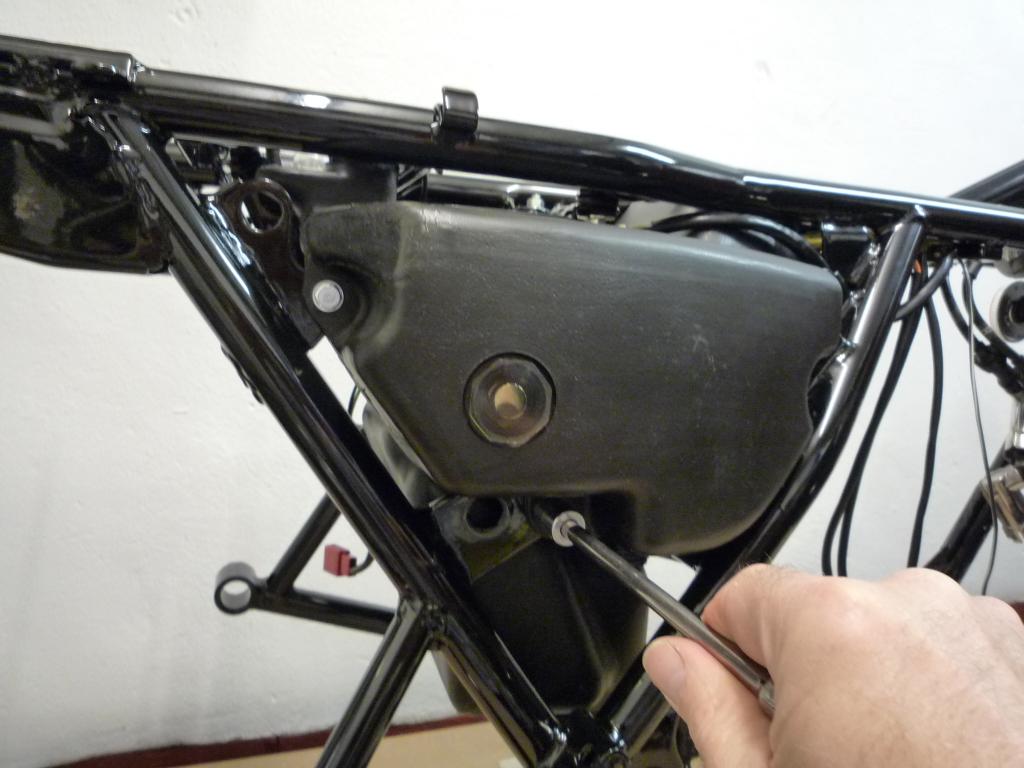
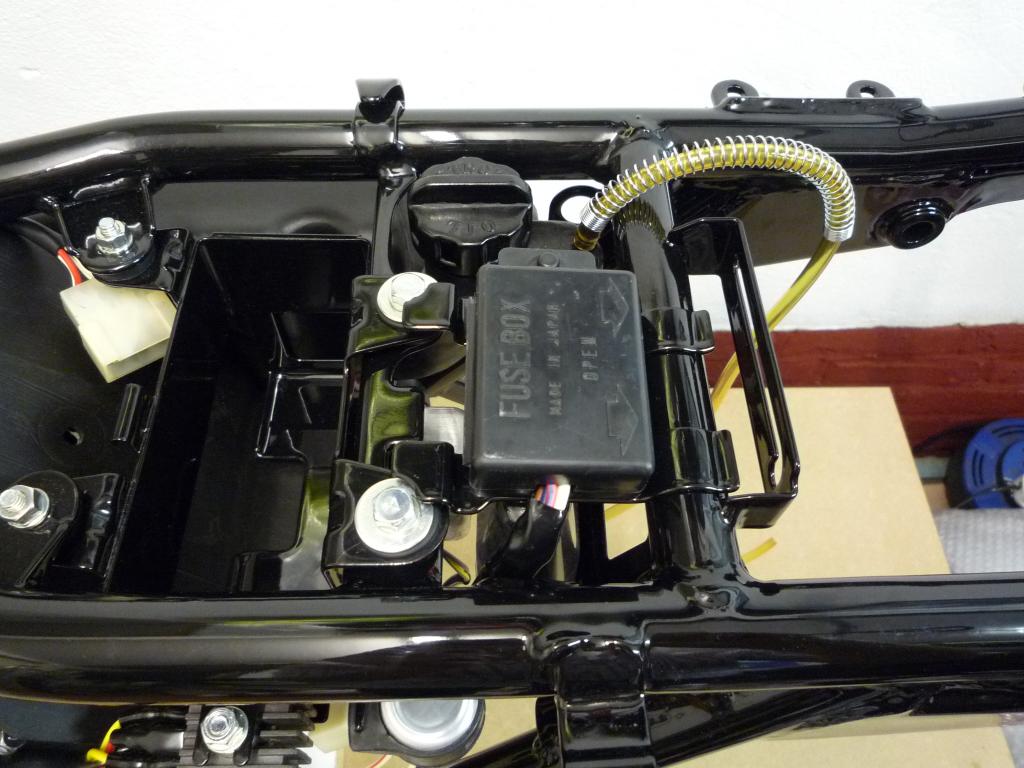
Then it was another trip to the stores
to find the fuse box bracket, the fuse box and the oil tank breather pipe and
spring (sitting alongside Simon's Gasket set).

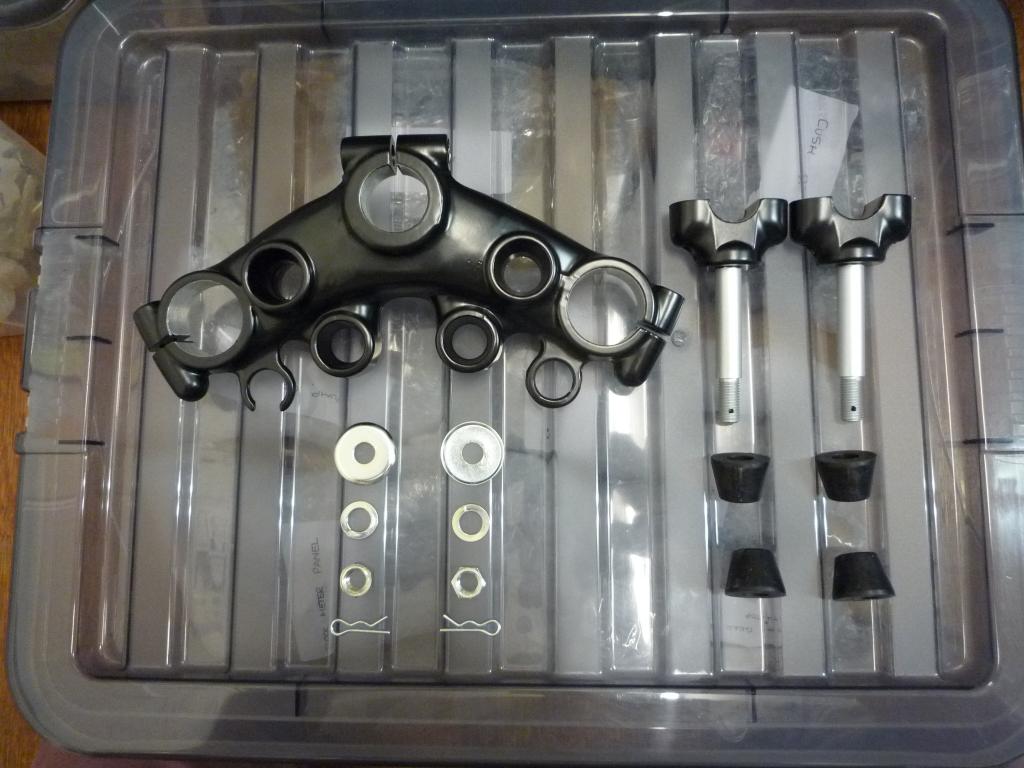
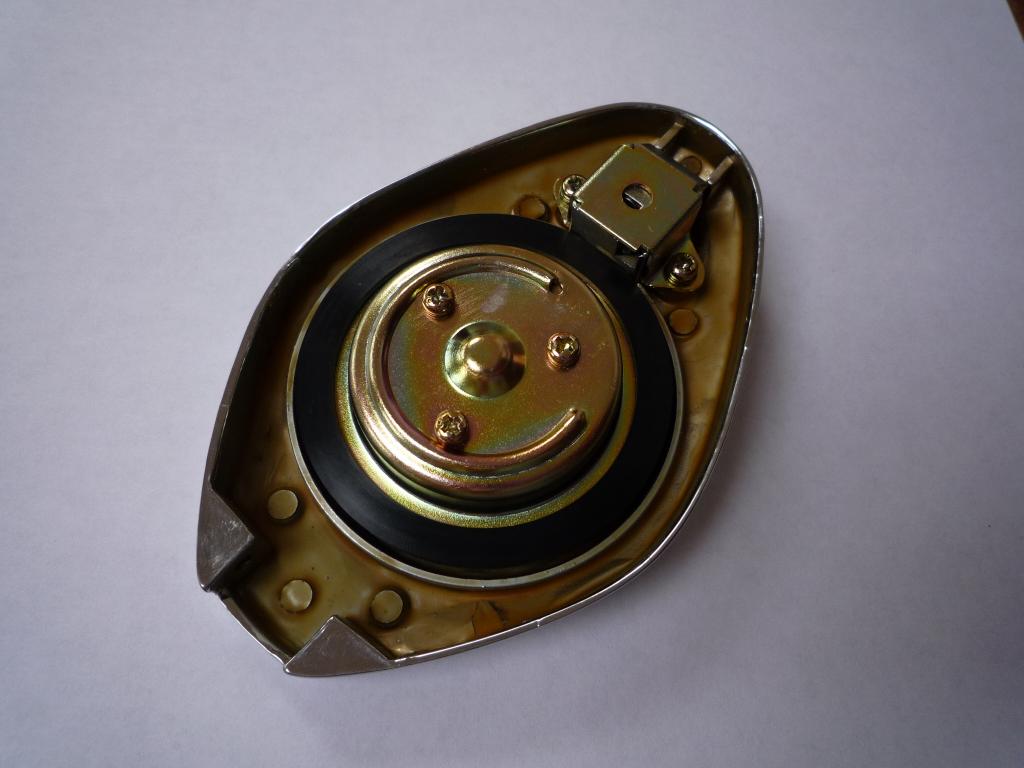
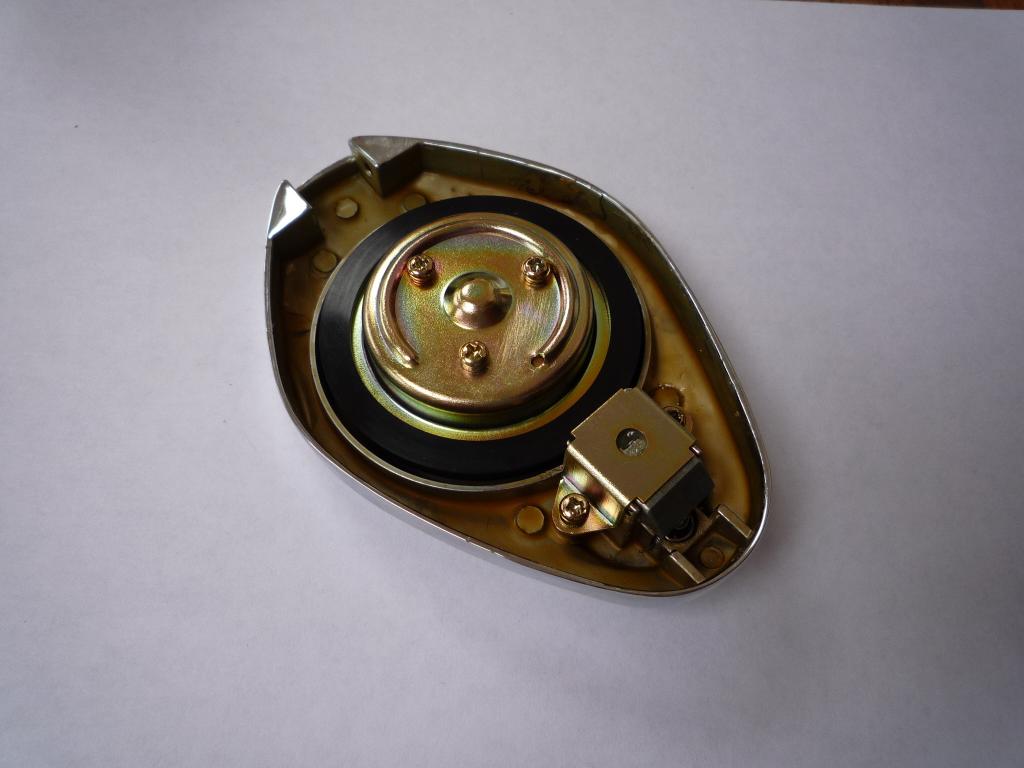
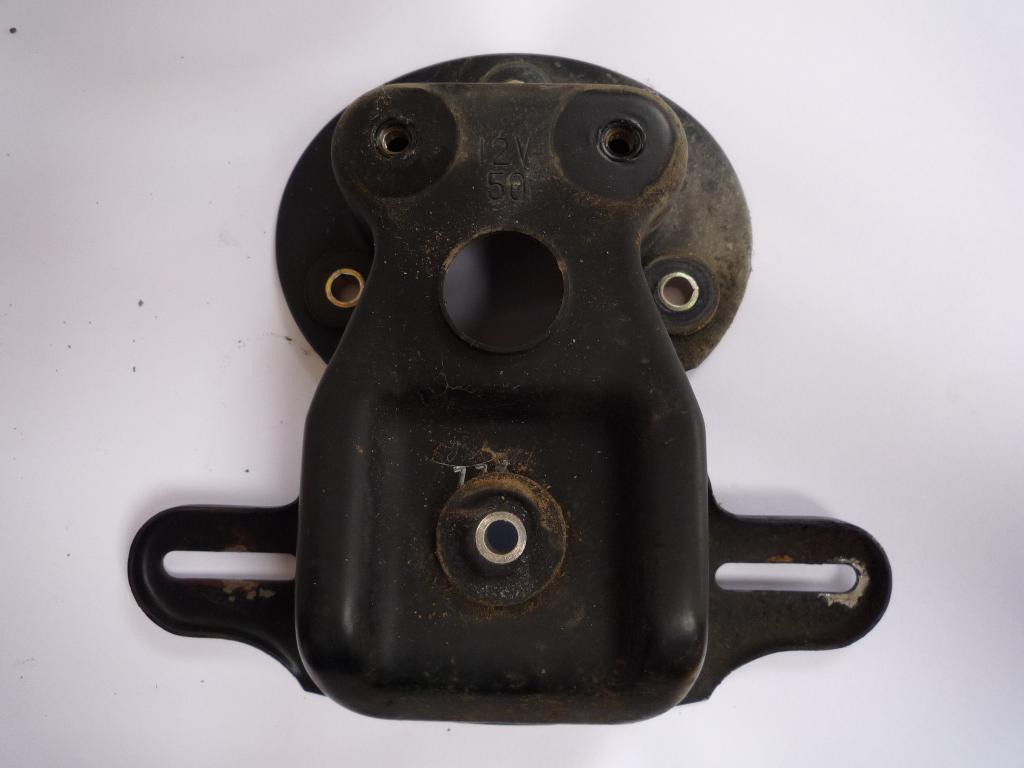
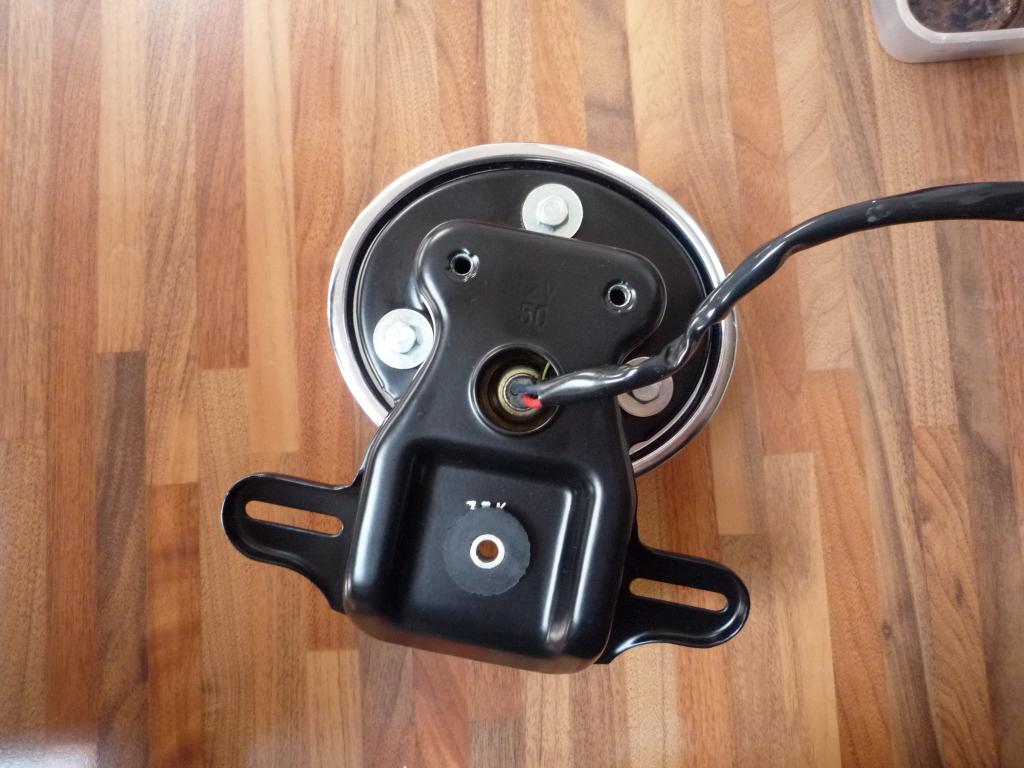
Next stop was the Horn, the body all
original bar a little touch up and polish which I am pleased with and the
refinished mounting brackets and fittings.
For reference it is assembled as it is shown laid out in
the photo ie Washer, brkts, washer, nut.
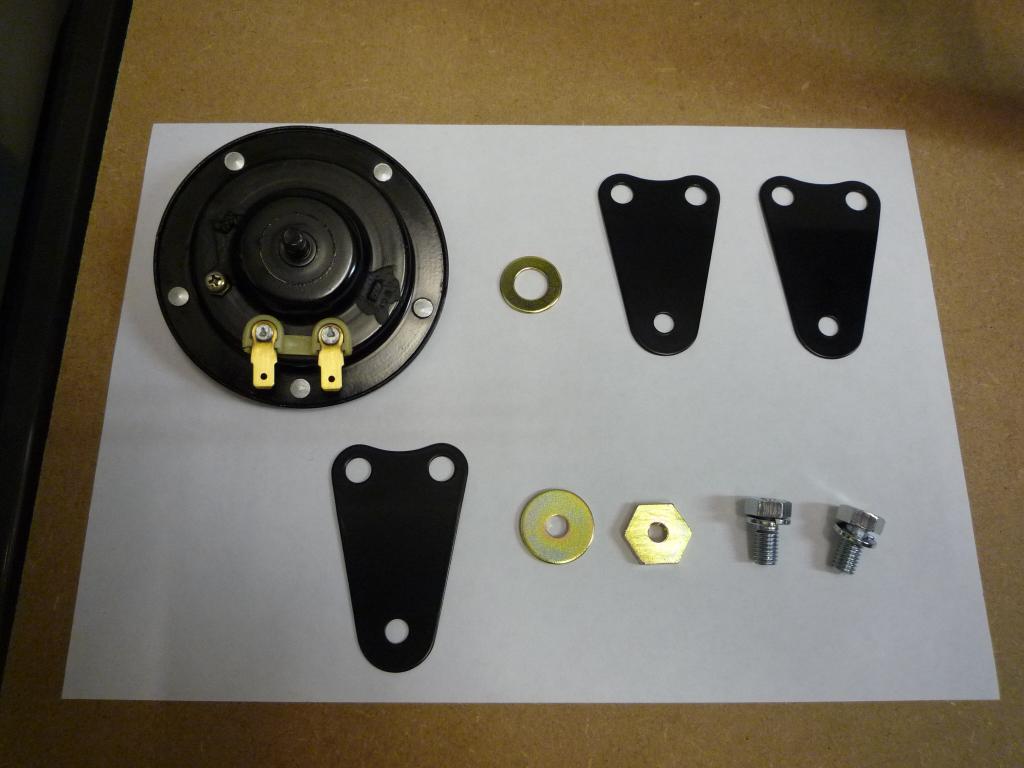
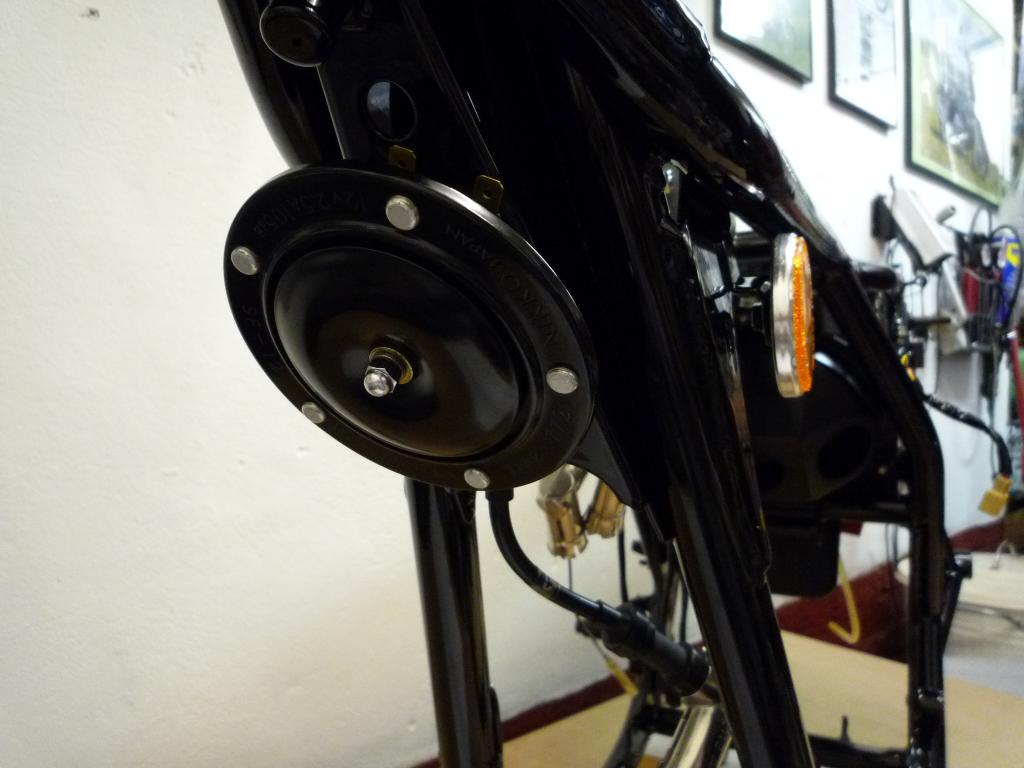
But most importantly, mounted the
correct way up
.................see I have been paying
attention.
Coming along just dandy.
So with Chris
todd and bonebaggers words echoing in my ear we have a late night in the garage
and fit the wiring loom, and true to their word the airbox needed to be moved
yet again to allow for the correct routing. Oh lordy
 anyway Cheers guys
I will try and remember to add a note at the beginning reminding others of
this.....or maybe not.
anyway Cheers guys
I will try and remember to add a note at the beginning reminding others of
this.....or maybe not.
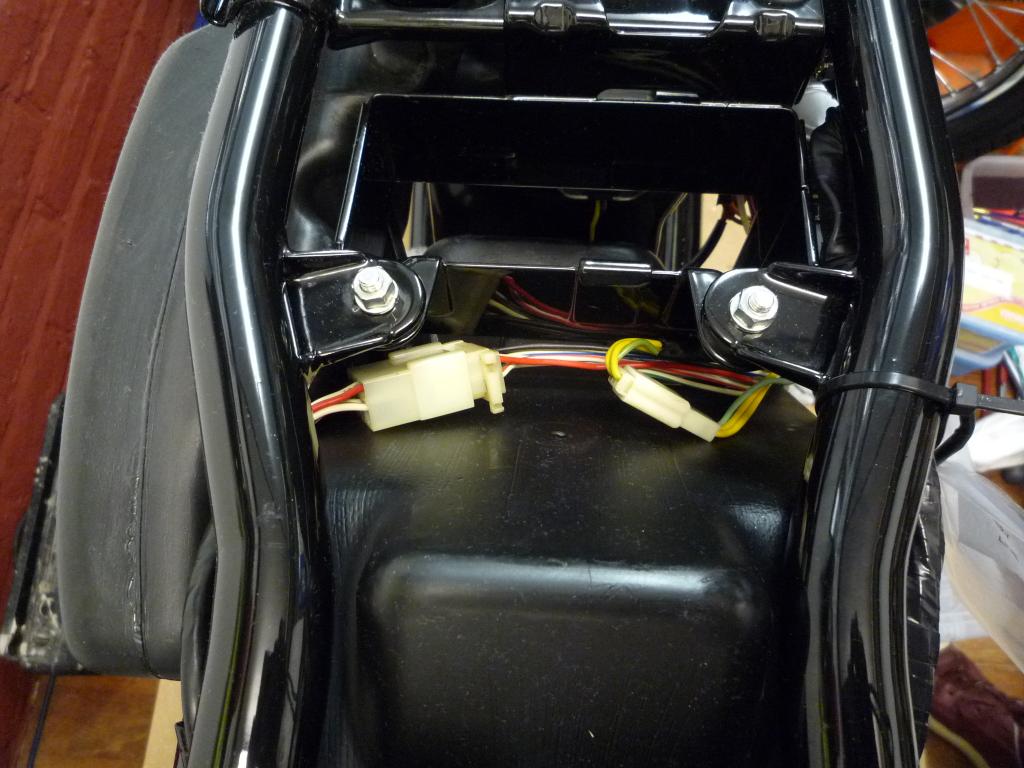
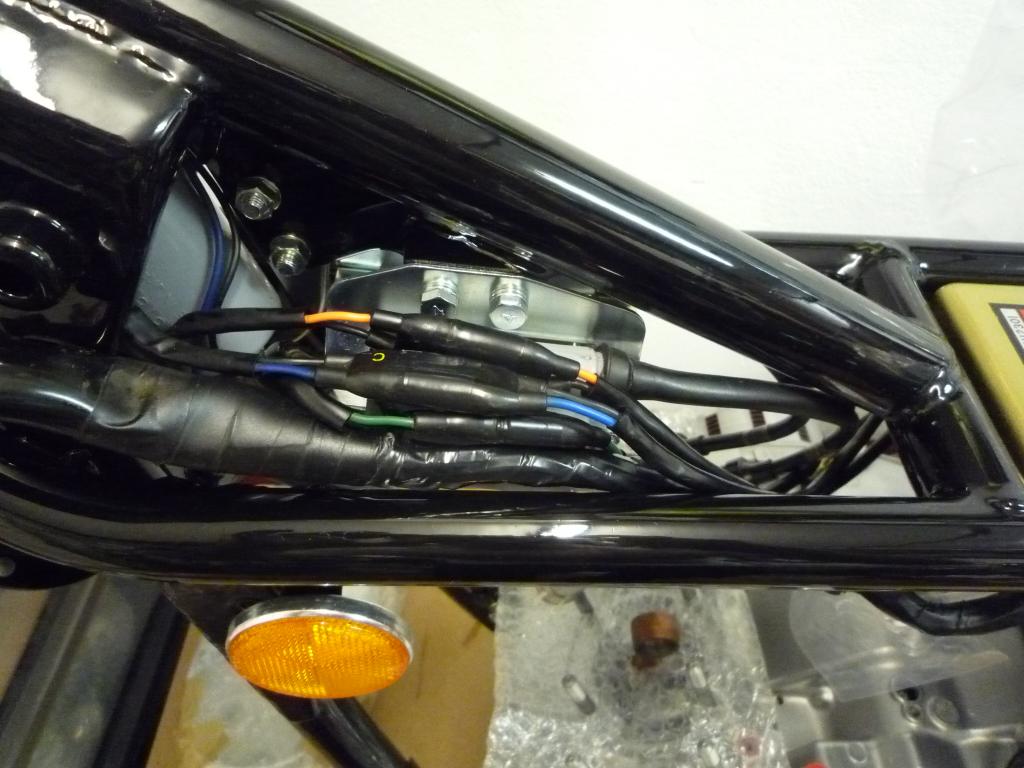
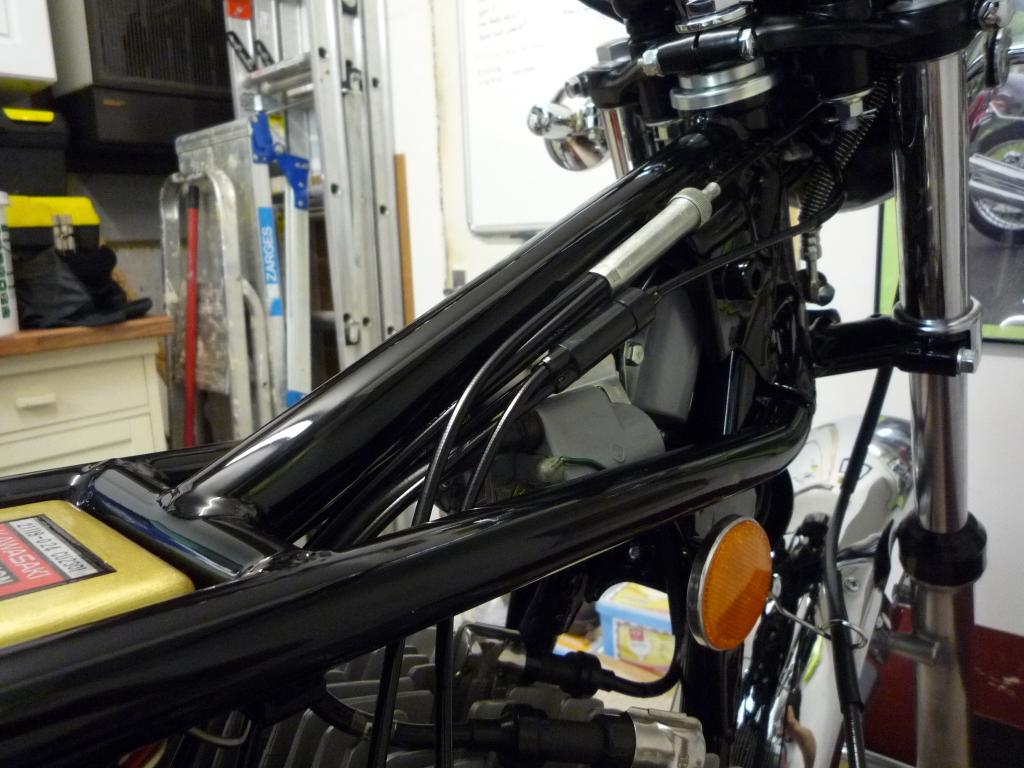
Anyway so the wiring loom is in loosely fitted and as you can see all labeled up
to make reconnection easy.
I find it is a good idea to do this, spend a little time sitting with the wiring
diagram and the loom and get to know it, does make life easier and can help with
future trouble shooting.

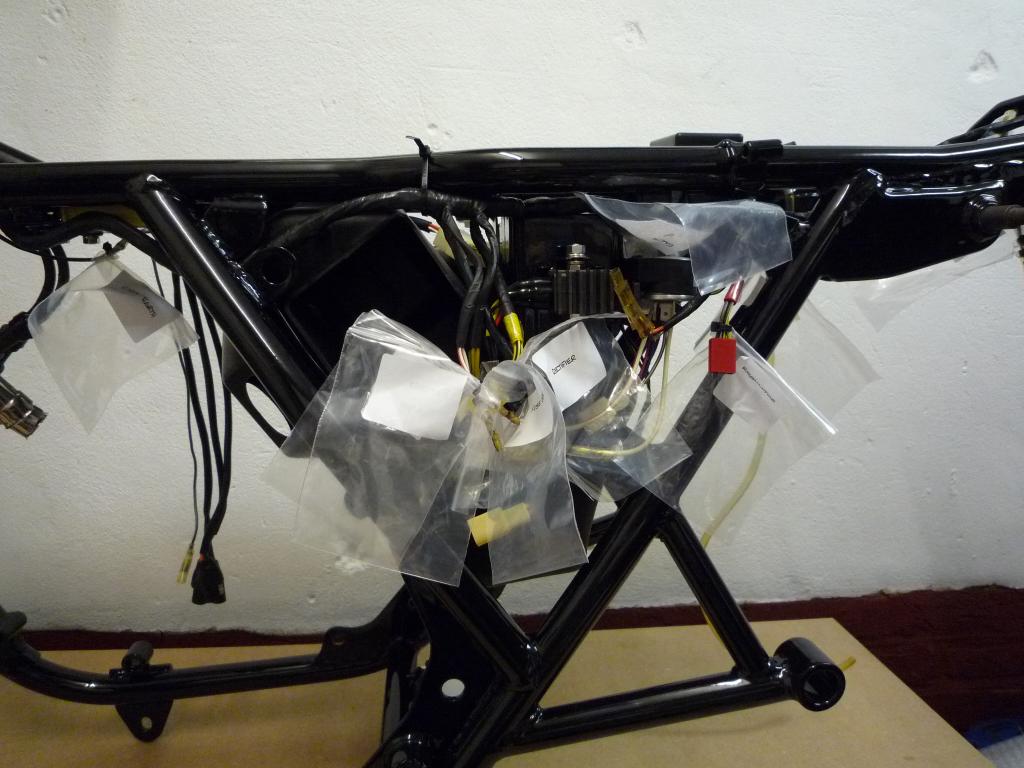
Routing for reference.

I was then able to connect up the
battery box components loosely attach the earth wire and wire up the horn.

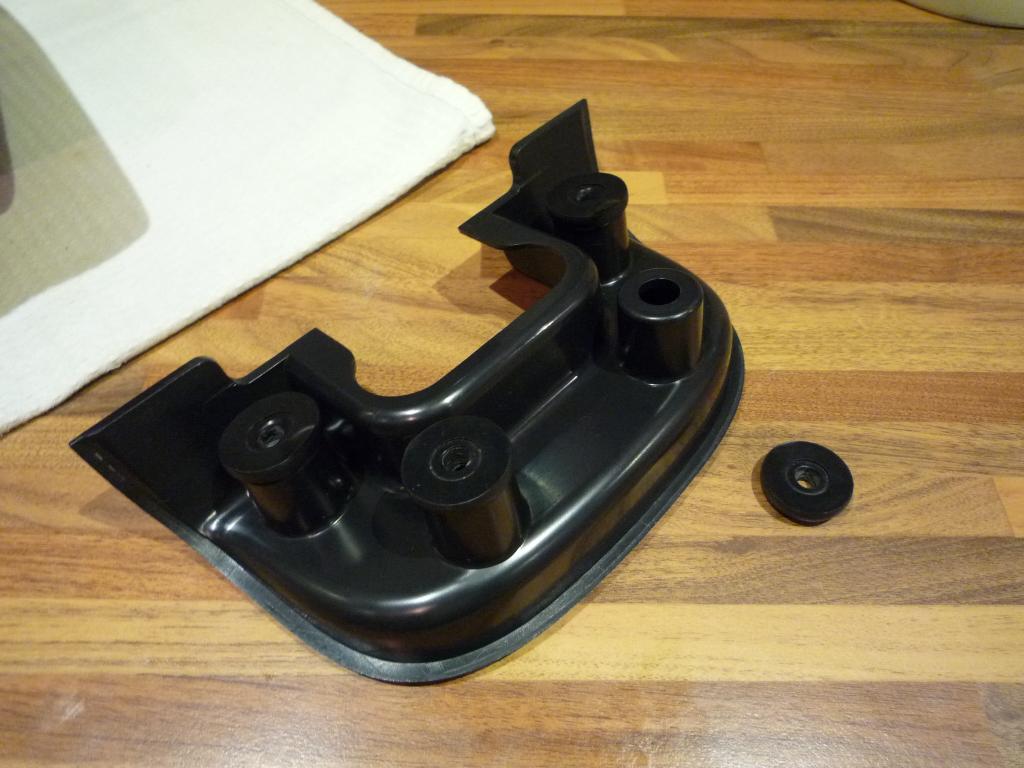
Next was
the inner rear mudguard with new rubber grommets and refinished clips.
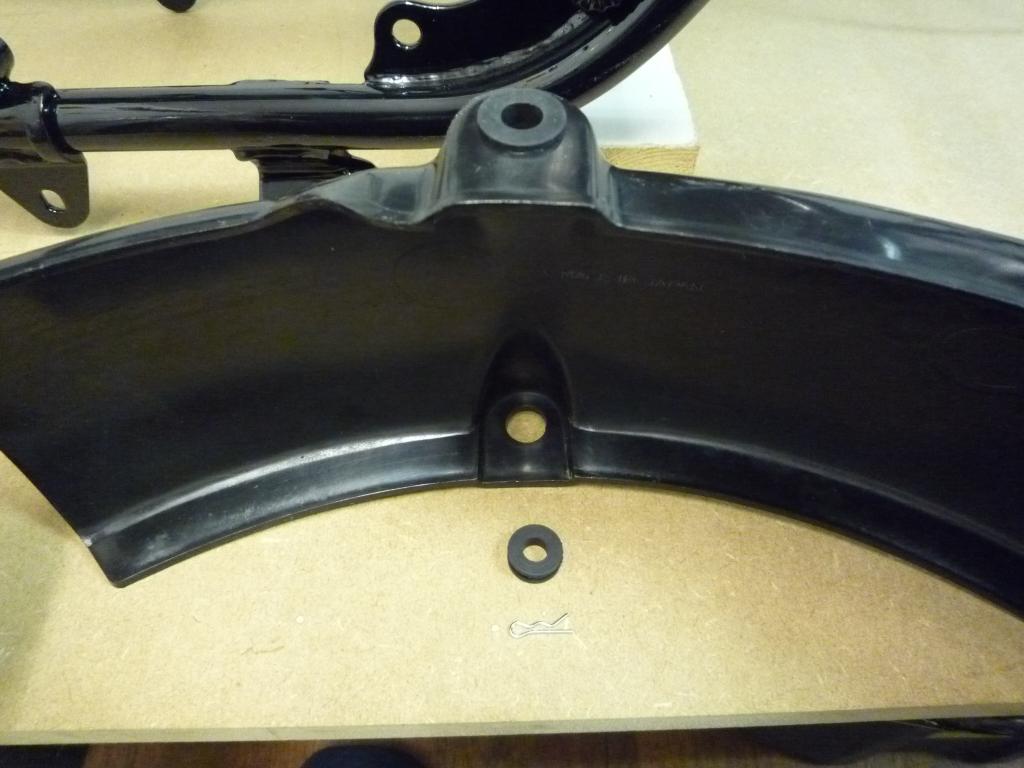

The rest of the parts were laid out
ready to fit, checking on the parts diagram there are various versions of how
this is assembled depending on the model type and mine will be reassembled as it
was found.
The original top hat bushes fitted
first into the mudguard,
The large rubbers with washers and
bushes fitted below the frame brace.
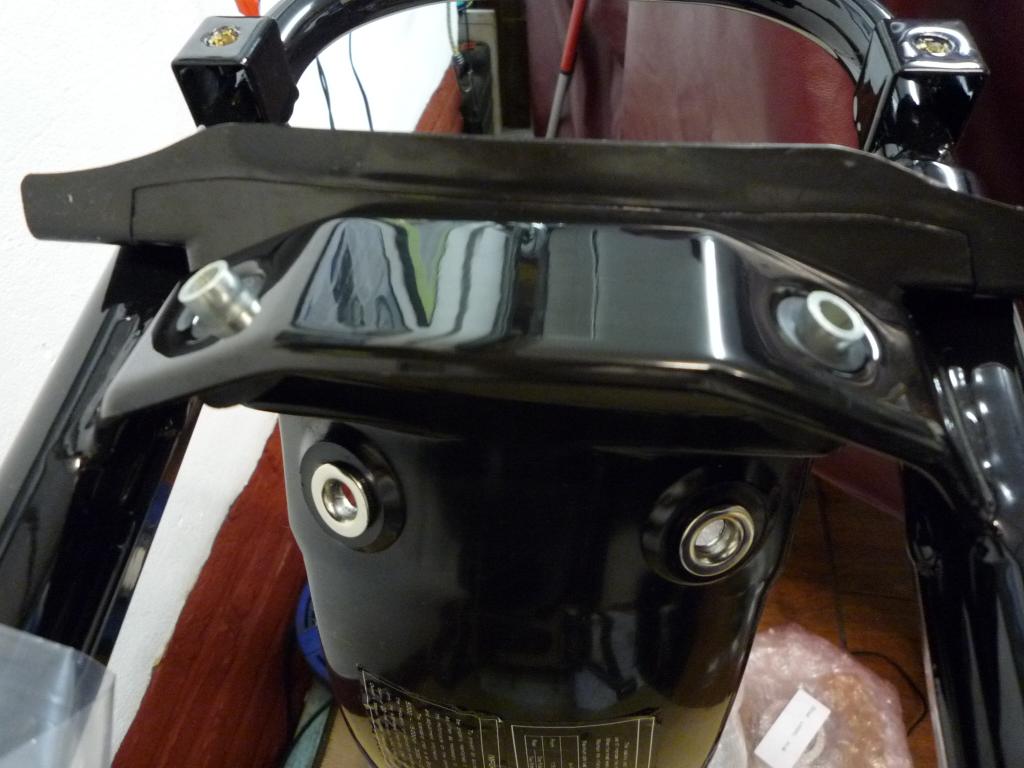
and the remaining rubber on top
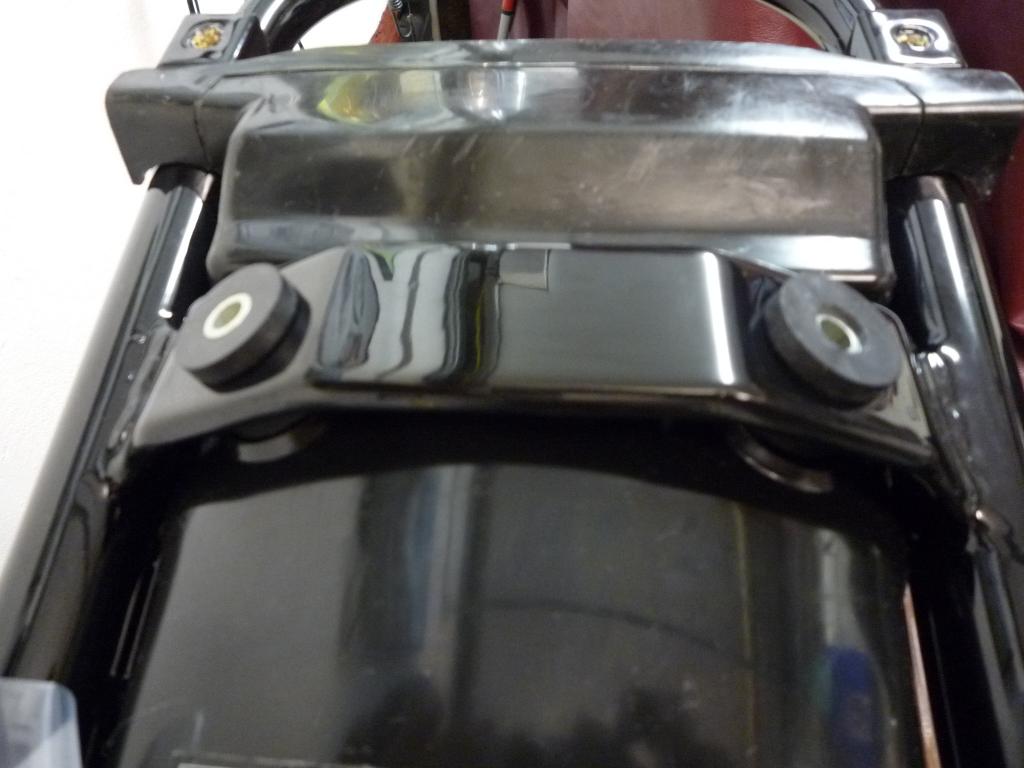
Bolted through with the remaining nuts and washers, new wire retaining tangs to
complete the assembly.
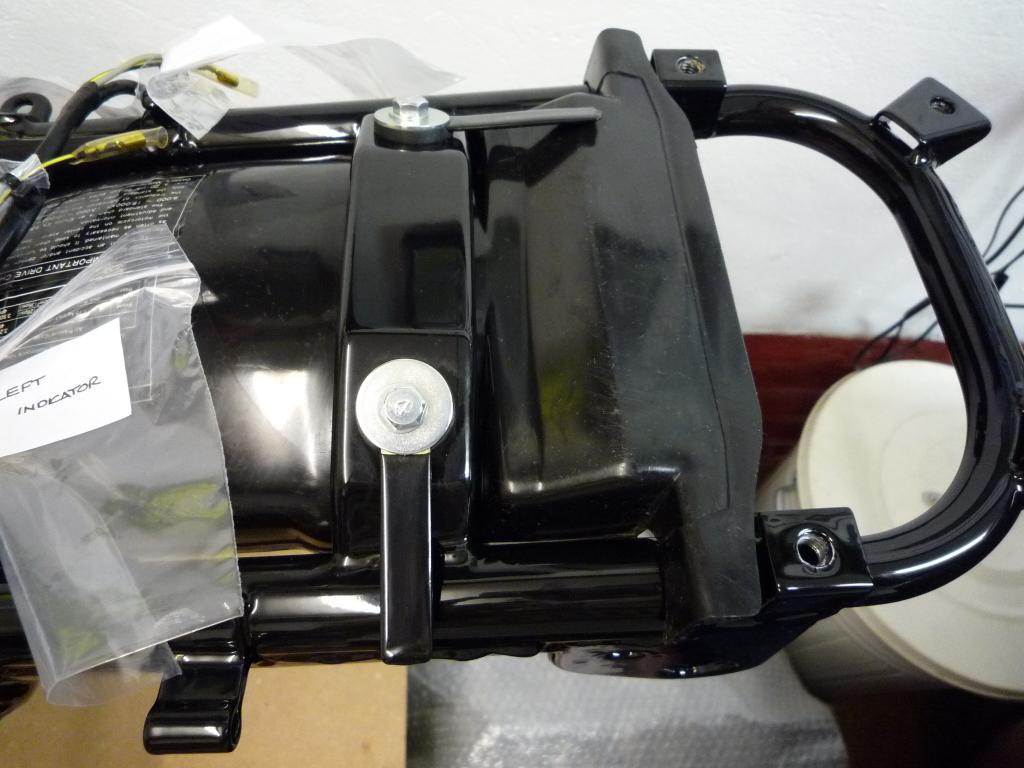
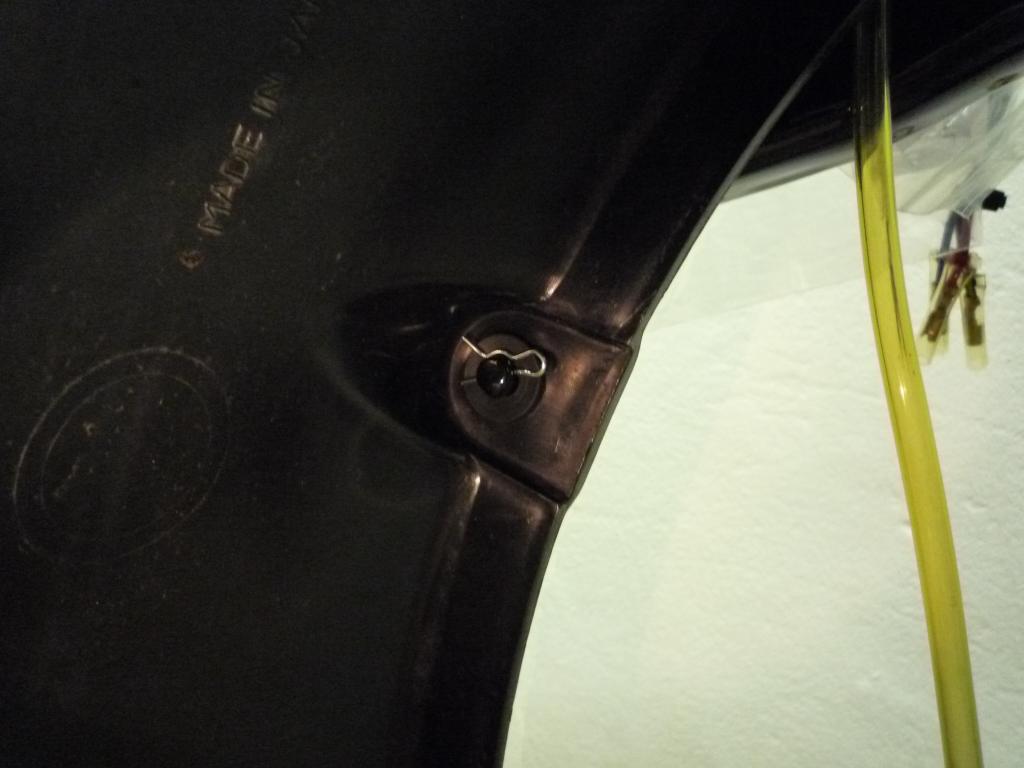
And further down the R clips were fitted to secure the front.
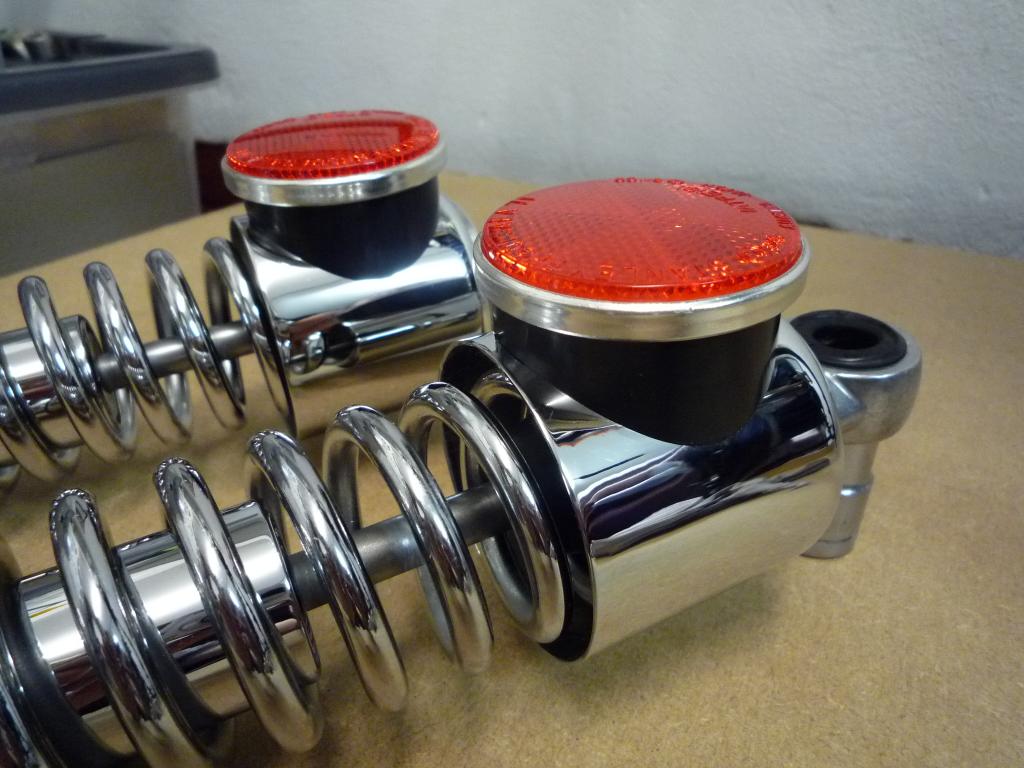
Time for some bling I think
with the reassembly of the rear shocks.
First dig out the parts........................
and unwrap.......best part.

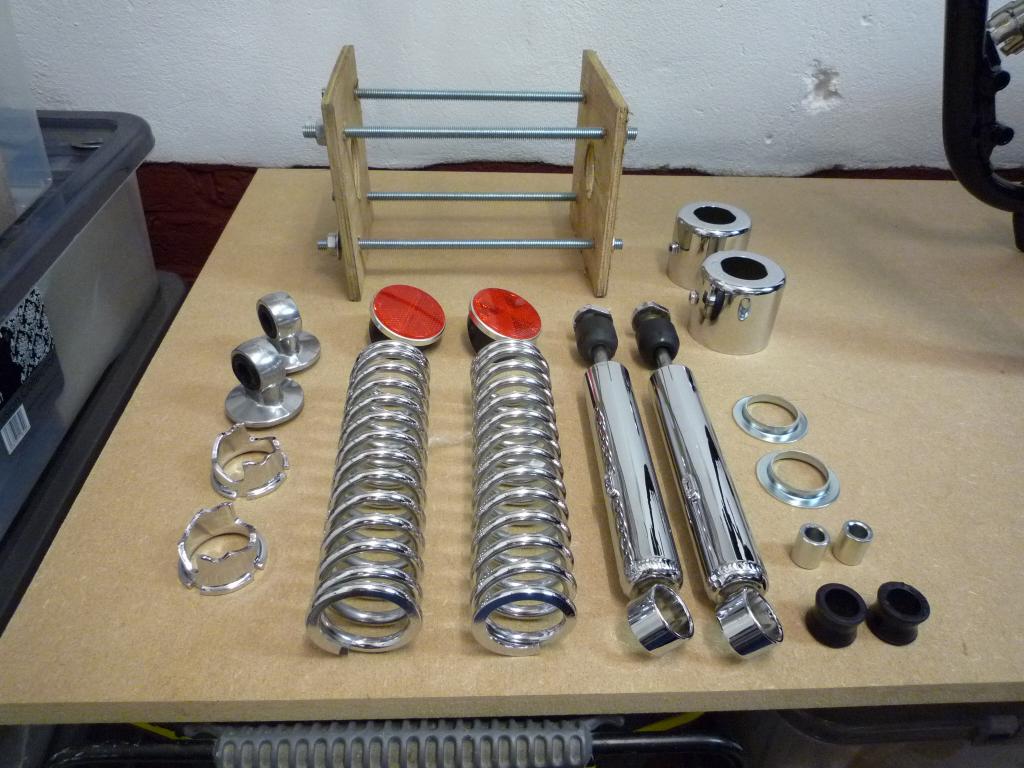
Slide the adjuster ring and retainer on the body....
followed by the spring.
With the shroud fitted it was placed in the jig....
and the nuts tightened to compress the spring.


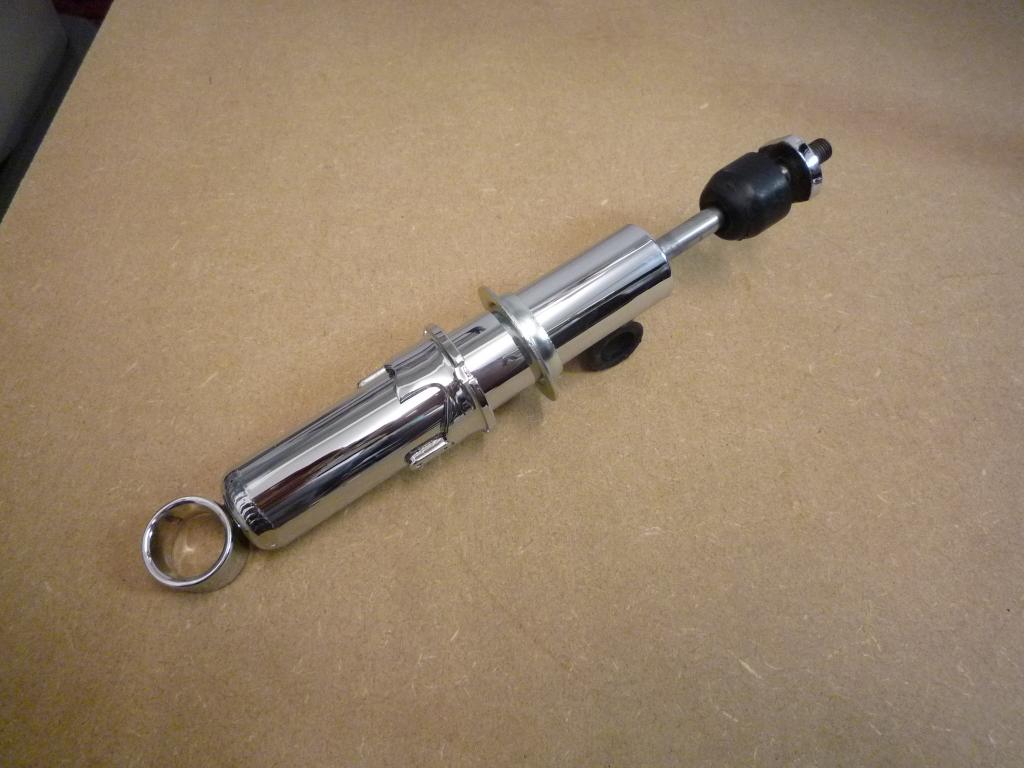
The top mount could then be screwed on and tightened.
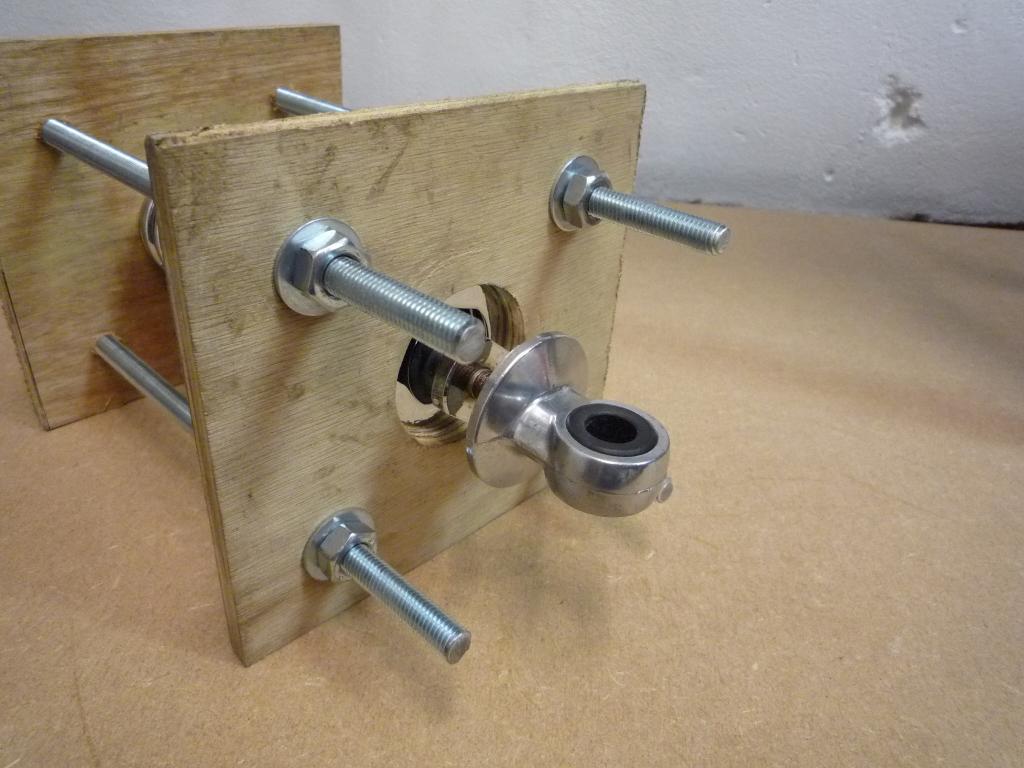
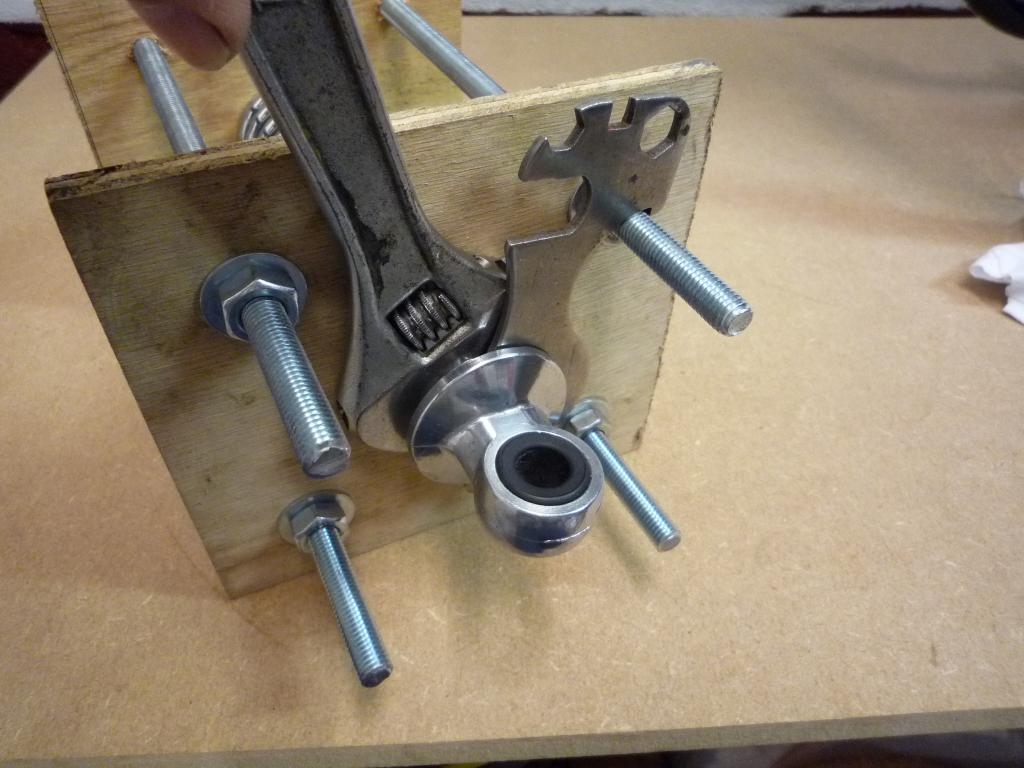
A cycle hub spanner being very nearly the ideal tool for the job, just needed a
light file to fit.
Then remove from the jig, making sure the top mount aligns with the shroud as
you release the tension.
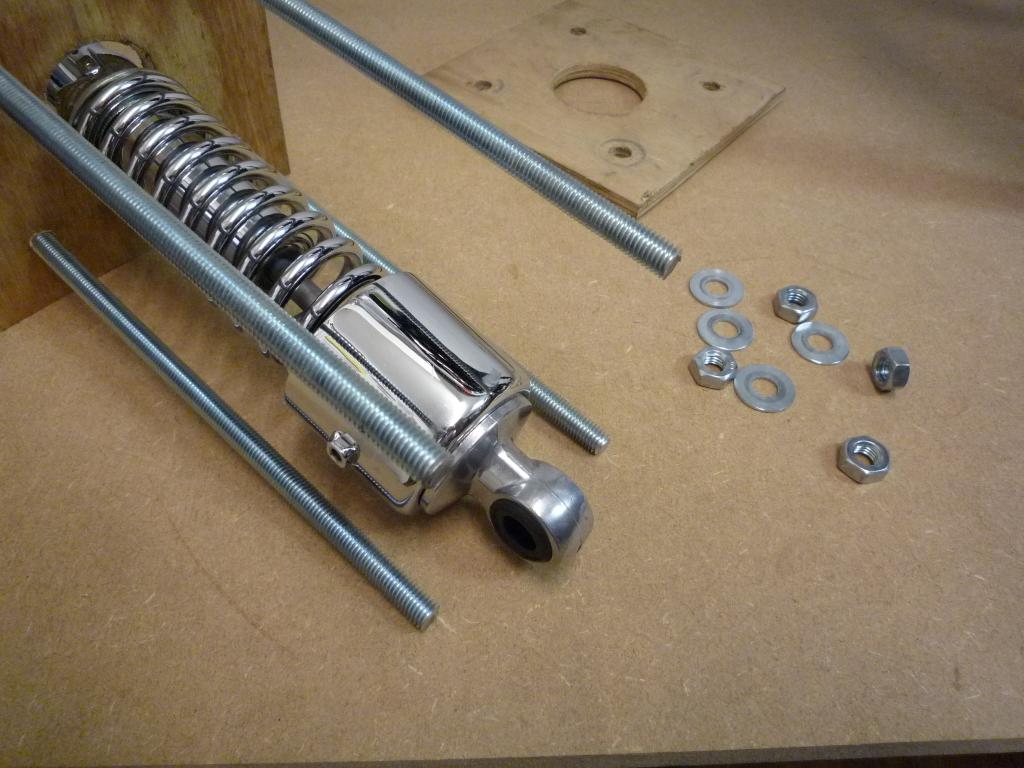
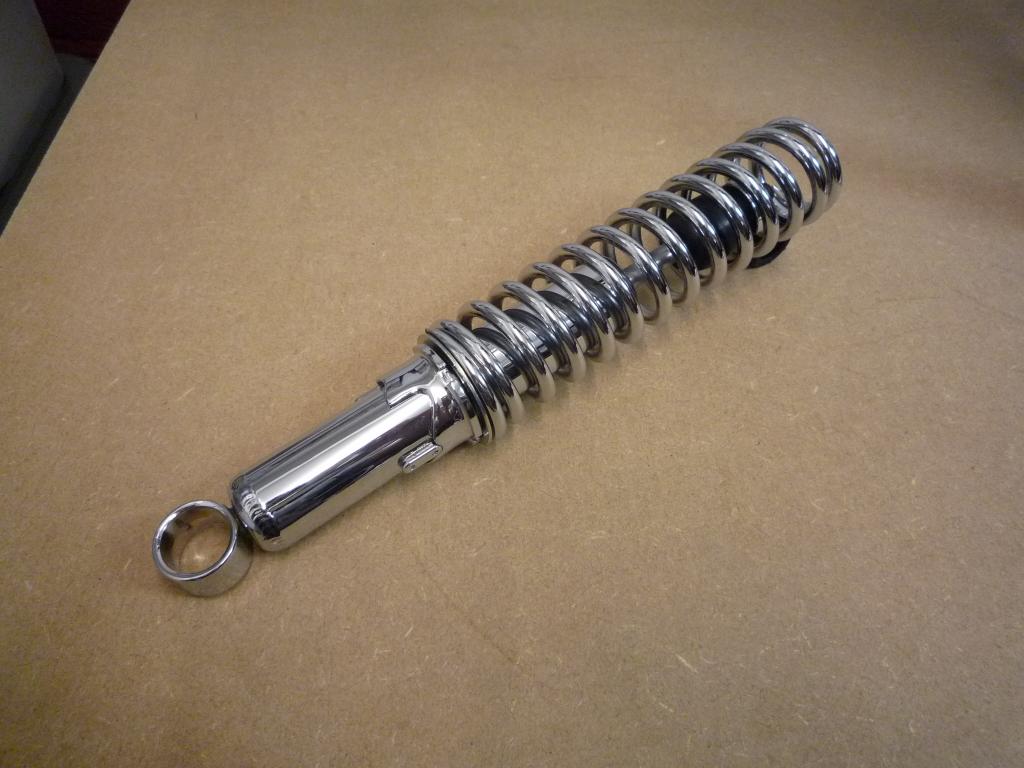
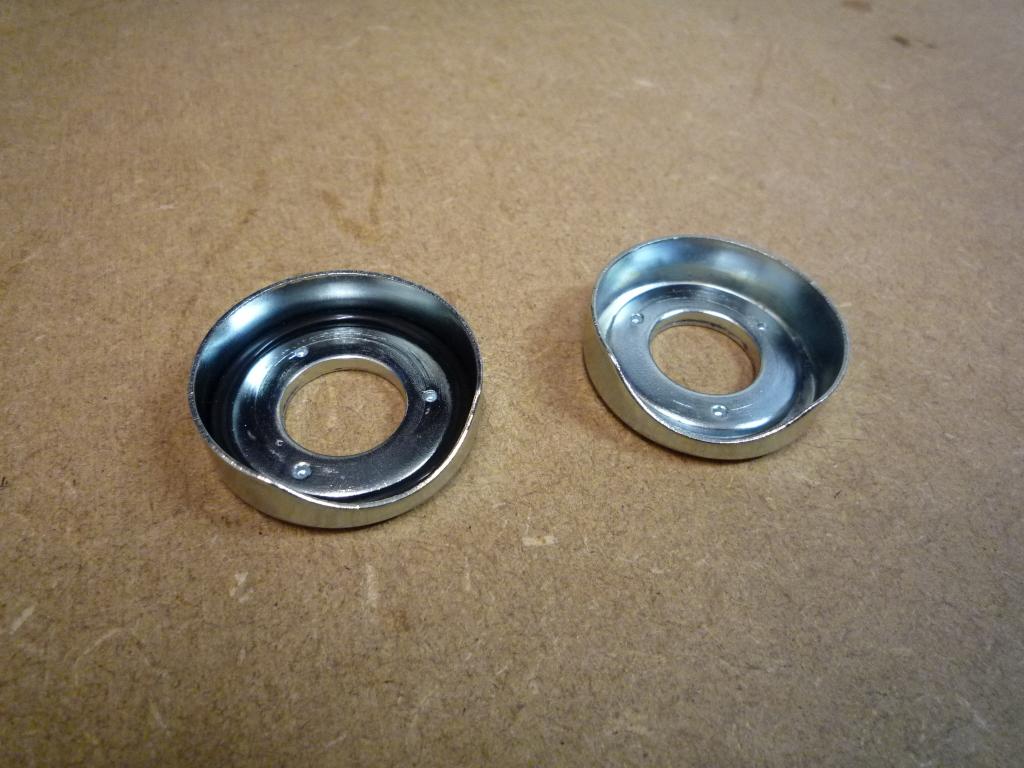
Fit the lower mount rubber and bush and shroud reflector to finish off.... and
repeat ................
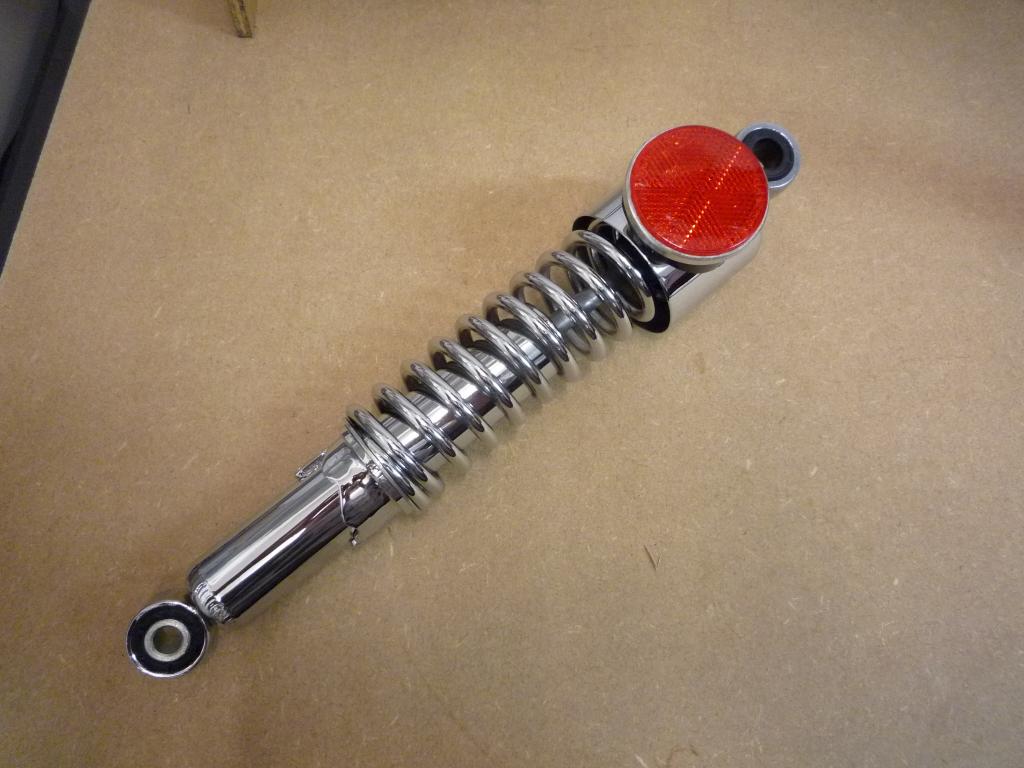
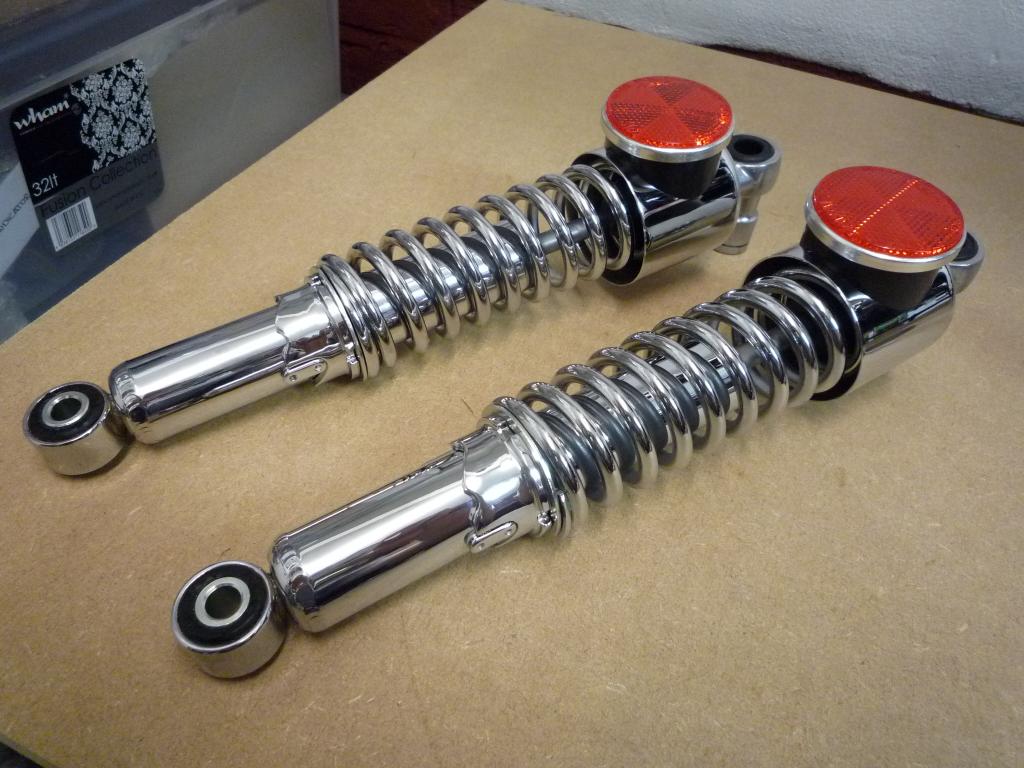
Nice
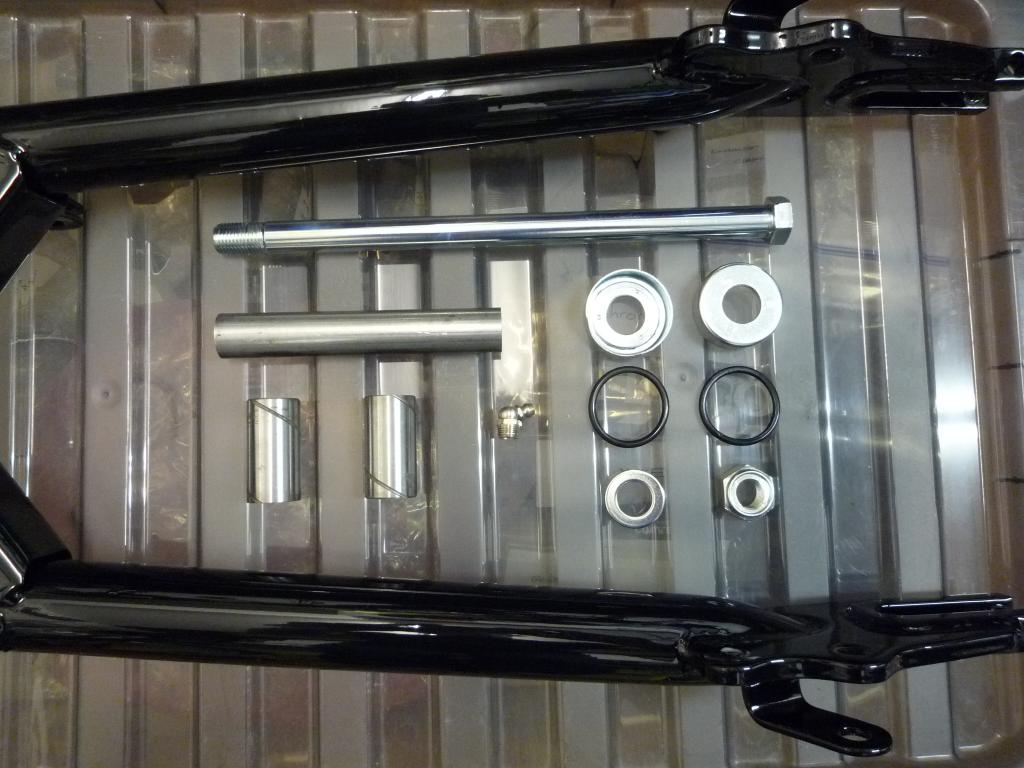
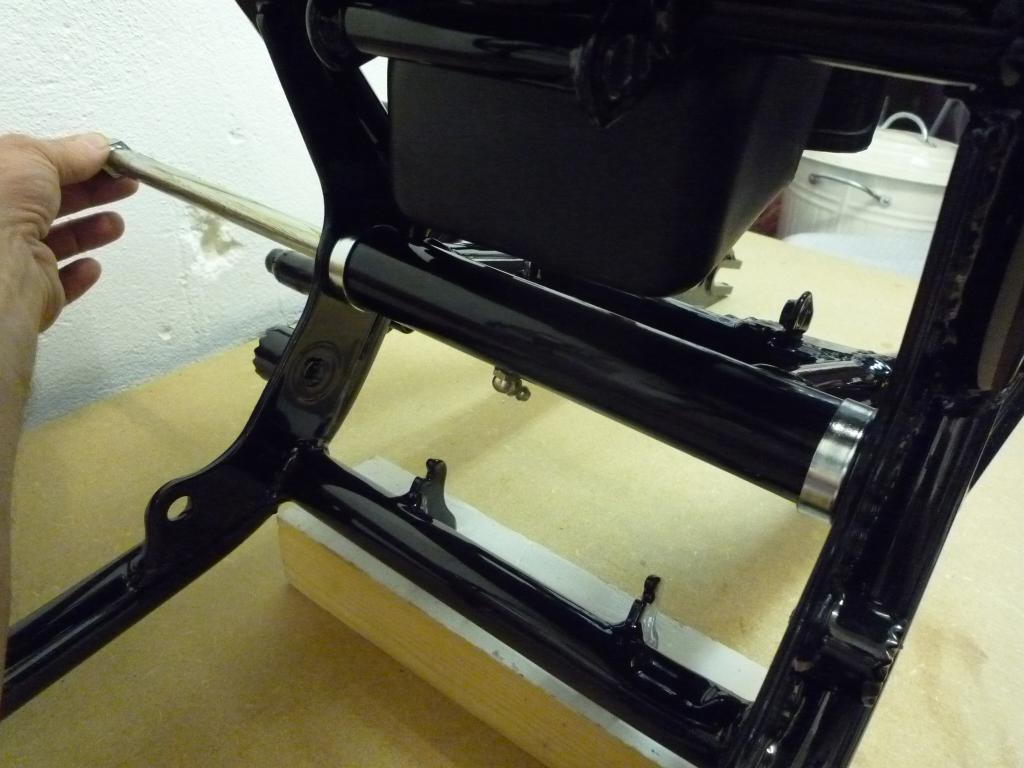
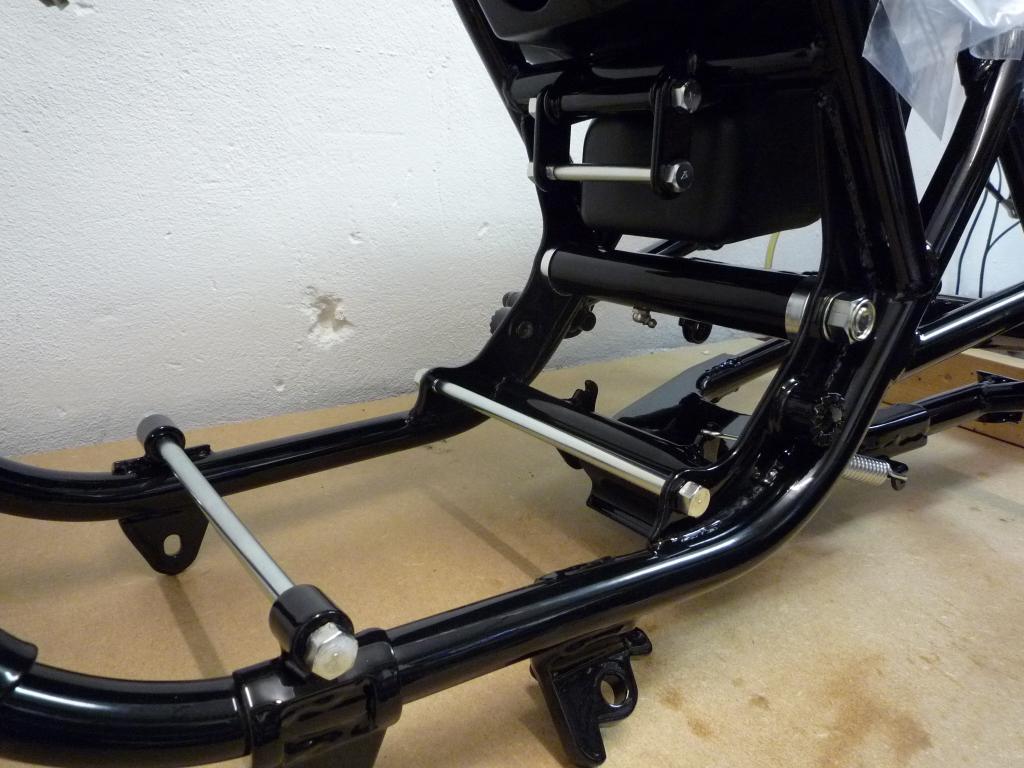
Seat lock and swinging arm today.
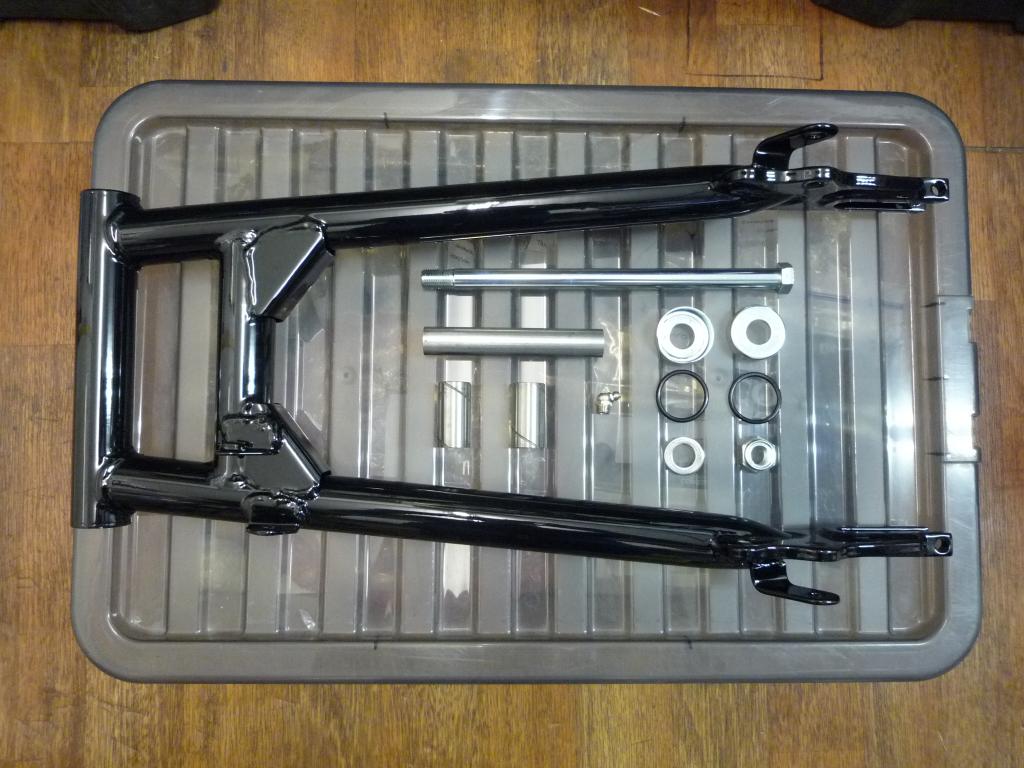
Grease nipple goes in first followed by the spacer and the two swing arm bushes
all lightly greased for now. And not forgetting to fit the O'rings on the end caps.
After checking the pivot holes for clearance the swinging arm slid into place
nicely and the pivot bolt was pushed through.
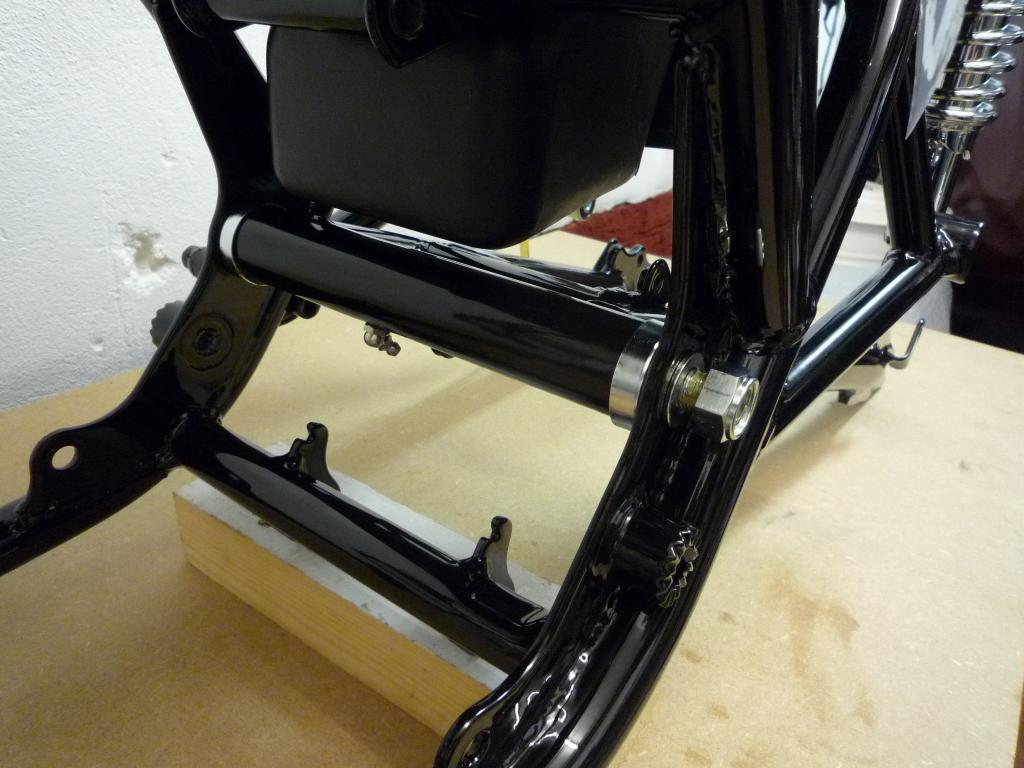
And secured with the lock nut and washer.

Rear shocks could then be connected.
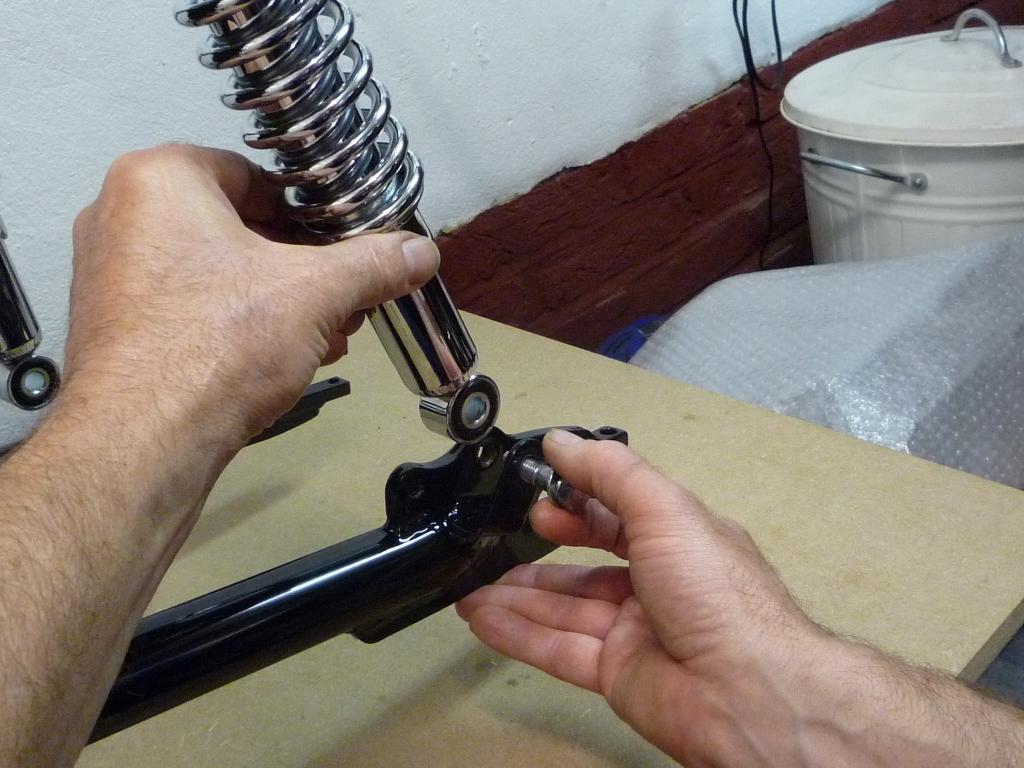

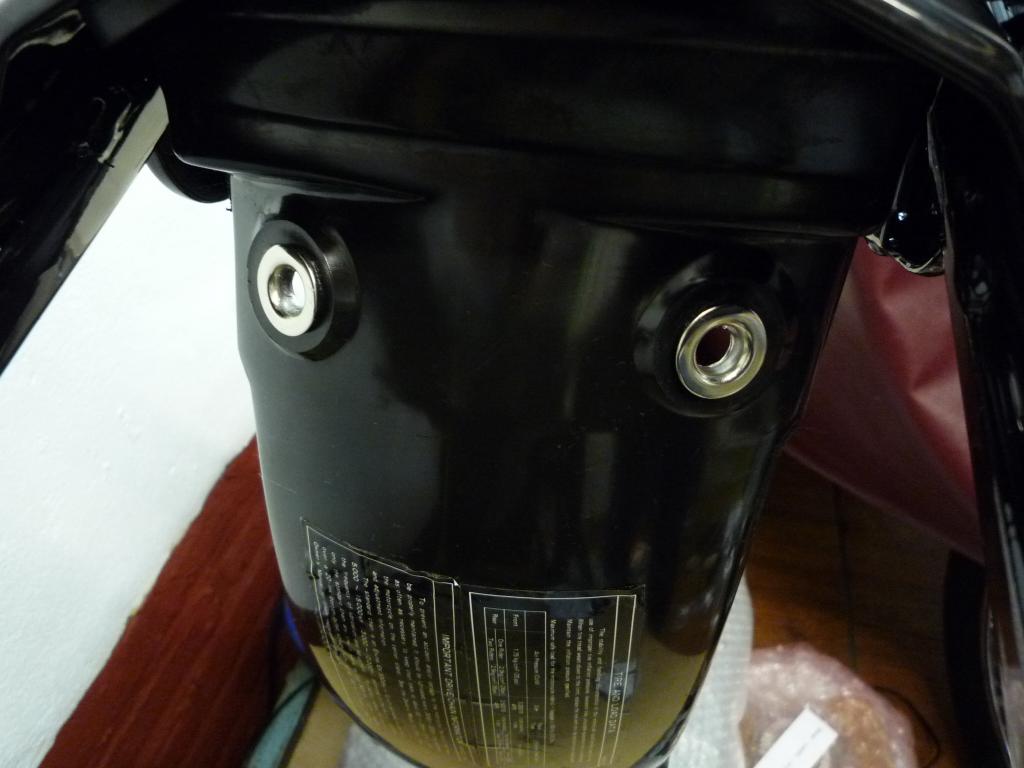
So we managed to progress a couple of
small jobs when I could find the time to sneak out to the garage
the top mounting nuts for the rear shocks I will leave loose until I fit the
grab rail.

After
fitting the steering lock I pressed in the steering head bearing cups using some
threaded bar and made to measure aluminum washers.
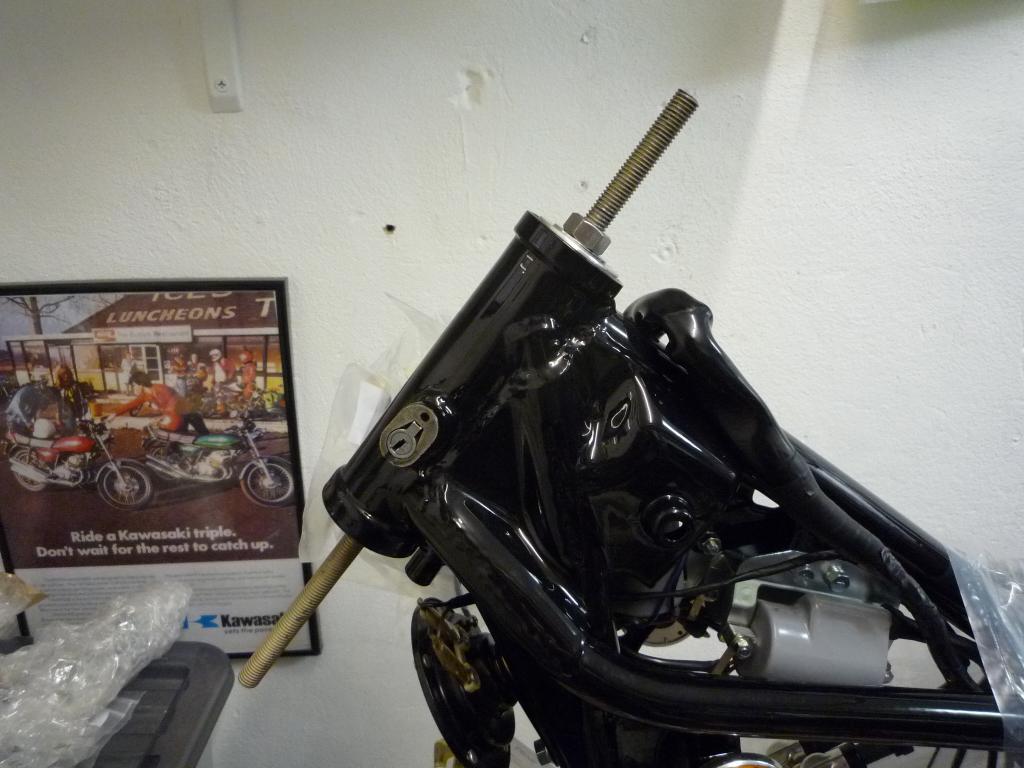

Then with Simon's help I was happy to
fit the new cover plate, pin and washer.
Bearings went in next 19 in all (each
cup) nestled in a bed of fresh grease.

And the bottom yoke was prepared ready
to fit, then slid into place and tightened.
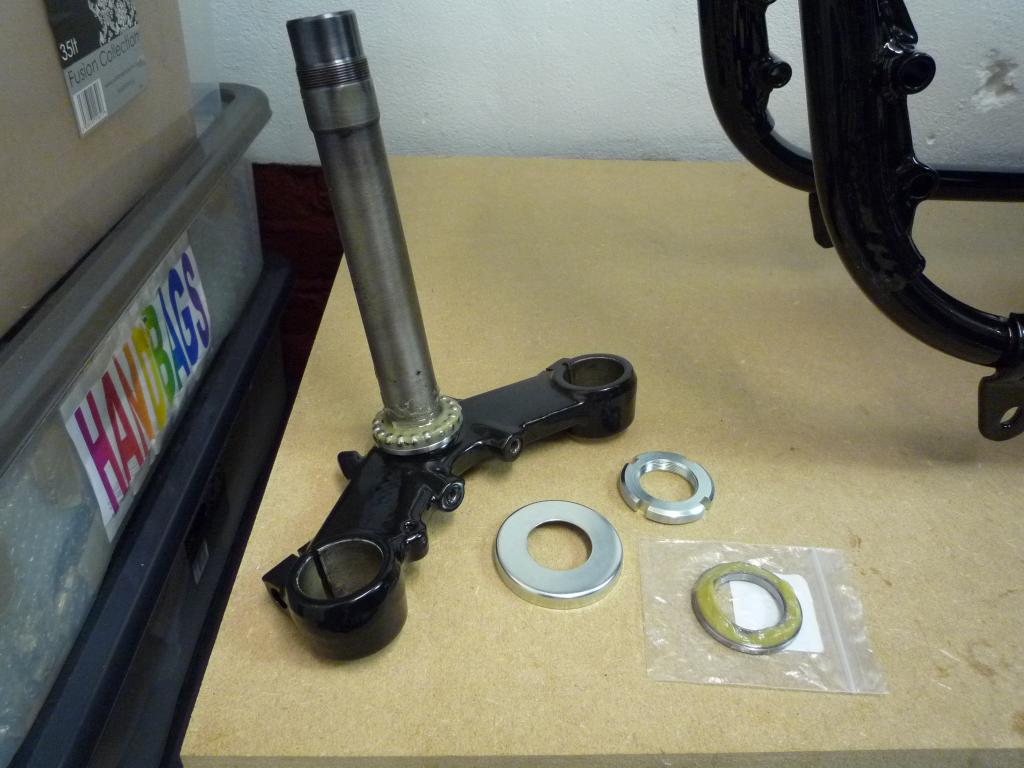
I will re check and tighten the
headraces later on once the forks are fitted and after a short bedding in
period.
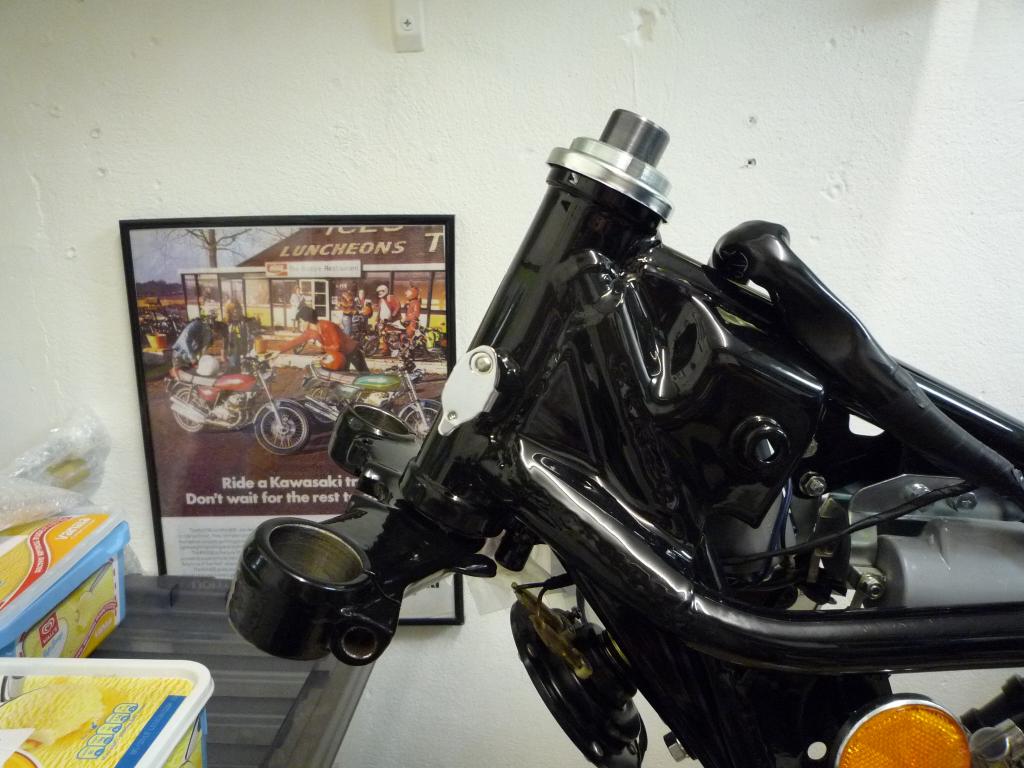
Next came a new headstock ident sticker which although meant to be identical to
the original does seem to come up slightly wider, not a major issue though and
looks good.
Then on
to the top yoke, parts gathered together.

And the handlebar mounts fitted with
new rubbers and secured with r clips.
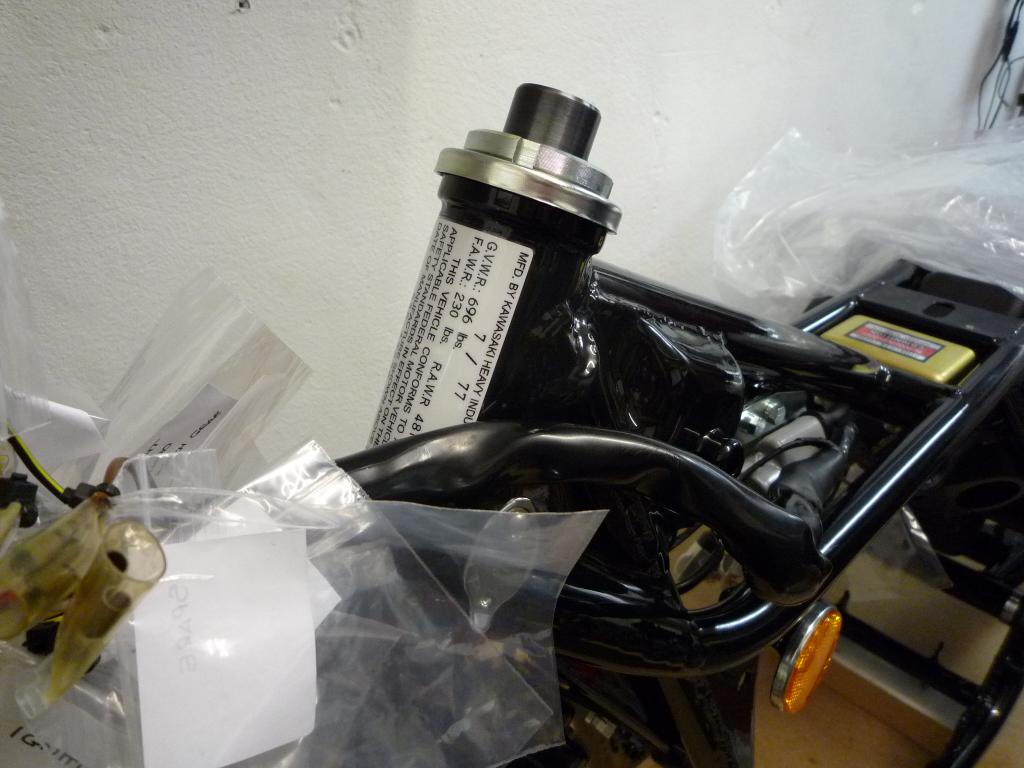
Then with the steering head bolt,
chrome washer and wavy washer read.
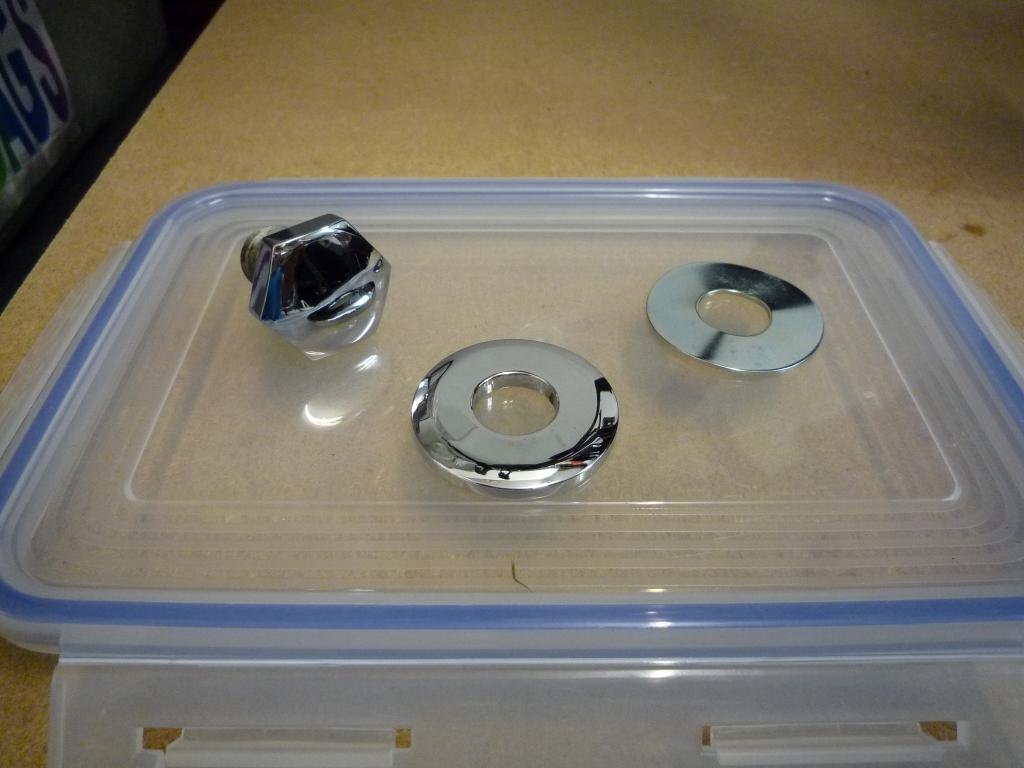
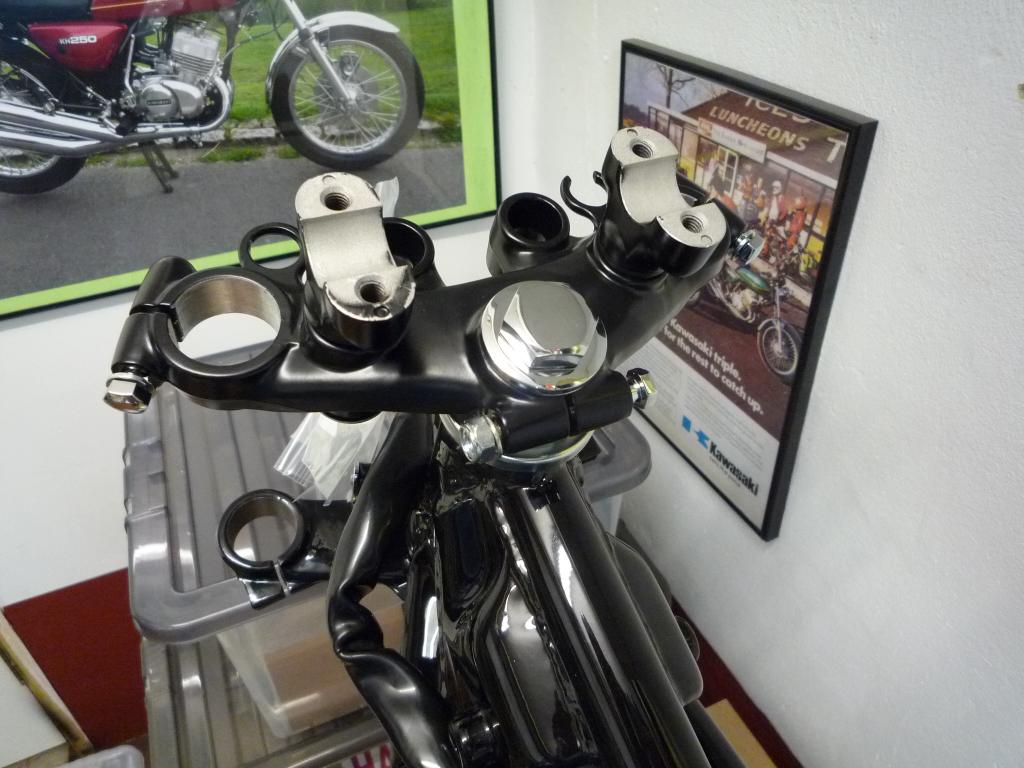
The top yoke was soon on (mmm I can
build the clocks up now
excellent ).
And with the remaining fixings loosely
assembled to both top and bottom yokes I can now also realistically fit the
front forks.
But for now they will have to wait.
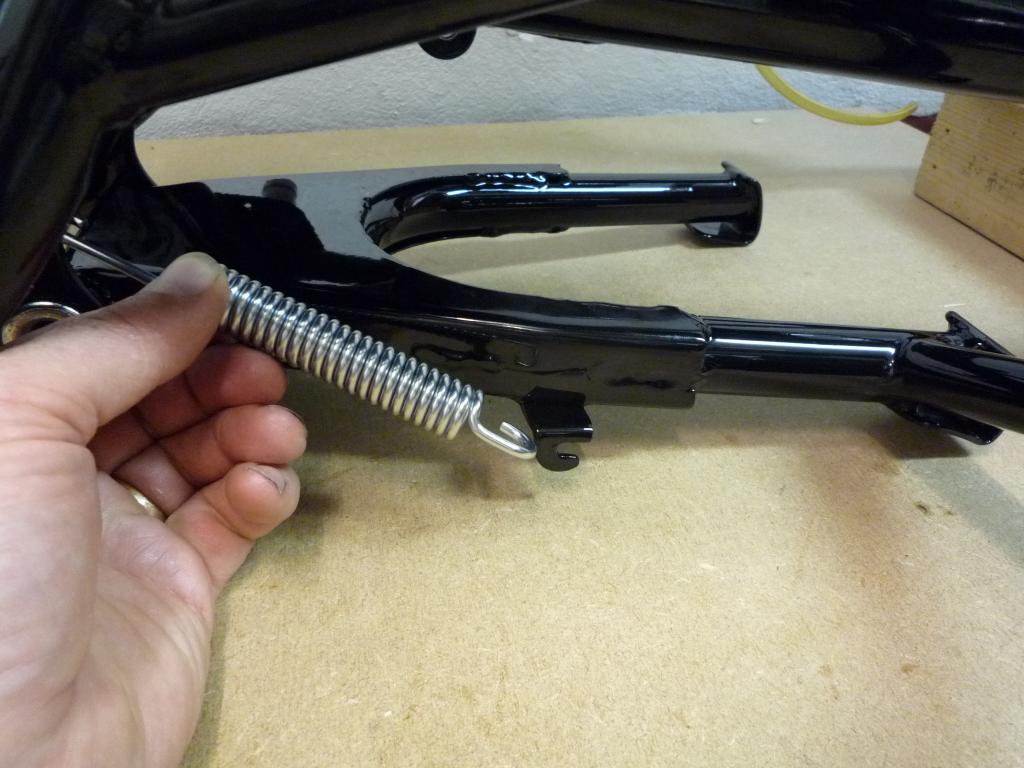
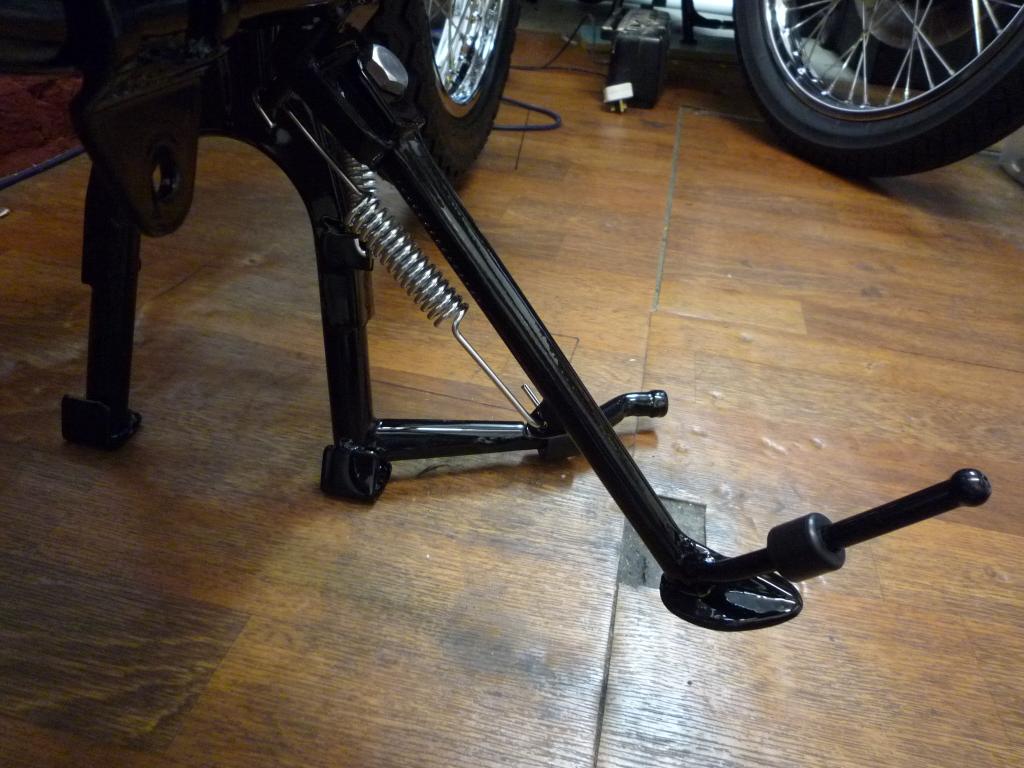
While it is easy to access and the engine is still out
the centre stand can be fitted, I had to lightly clean out the pivot holes
before it would push through and after greasing up the stand it was slid home.
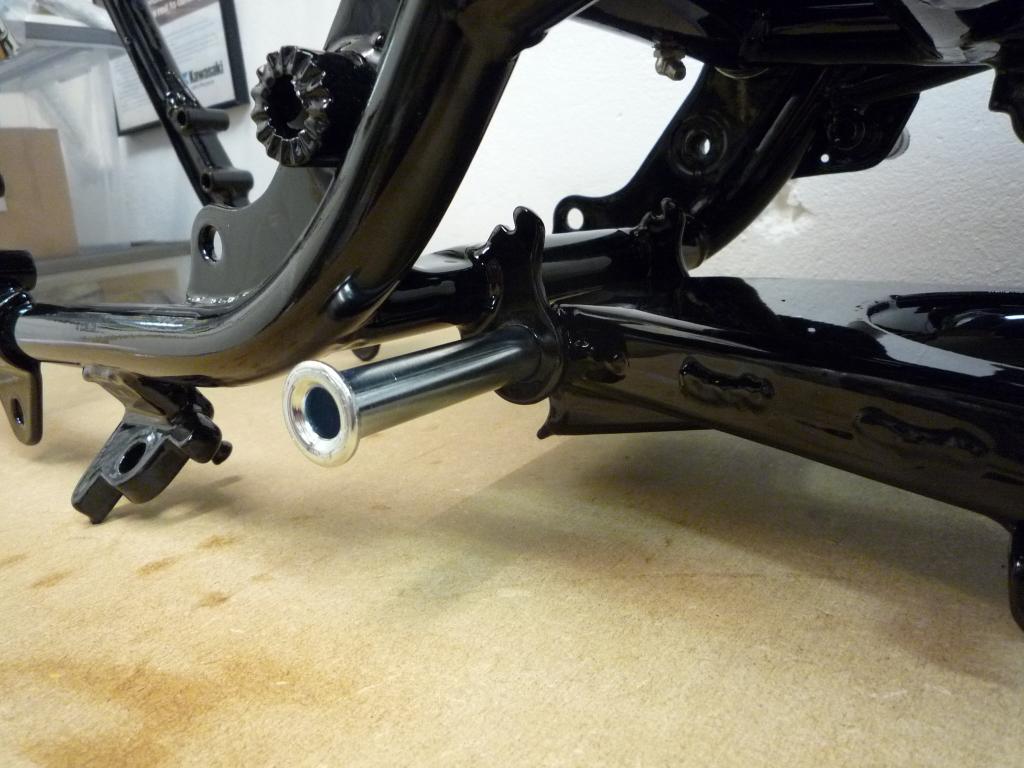
There are various ways of fitting the
spring but I opted for the 9p version and you get your money back at the end!

And to finish up for now the engine
mount bolts were loosely assembled

So its all coming together rather
nicely and there is lots to be done just need to find the time to do it.
Good news is I now have the correct lock washer for the primary gear so I can
finish the engine off and she can go in, but that's something for the weekend
..........Can you remember when we used to be asked that
Happy days
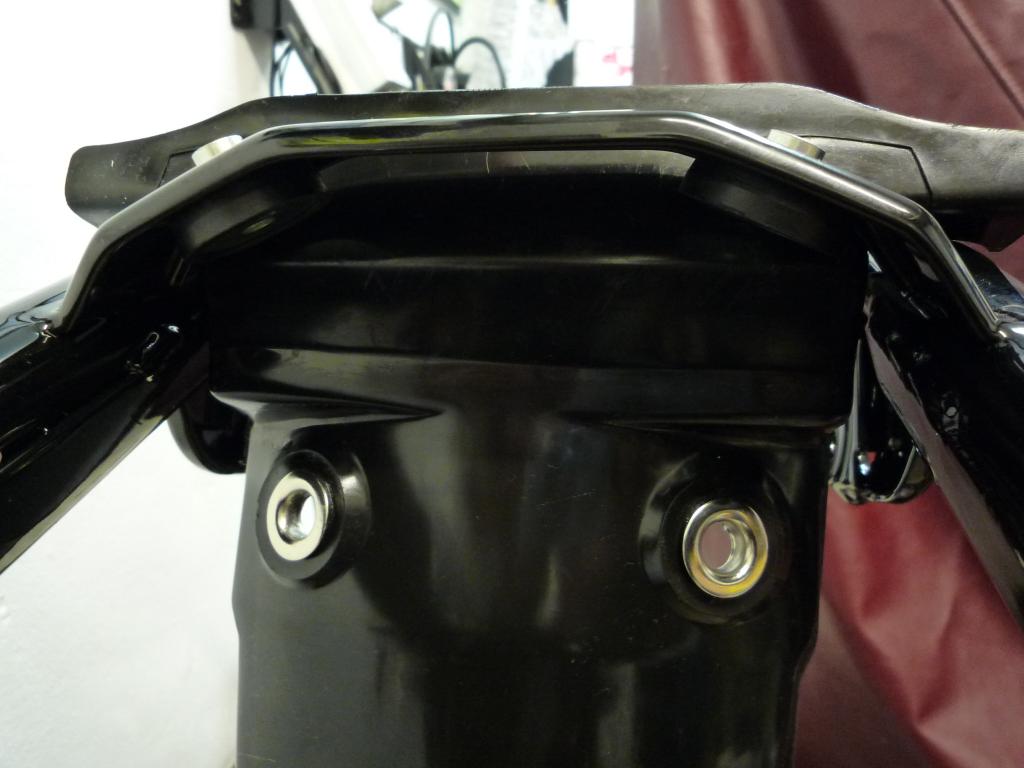
So time to unwrap a bit more chrome,
this time its the grabrail.
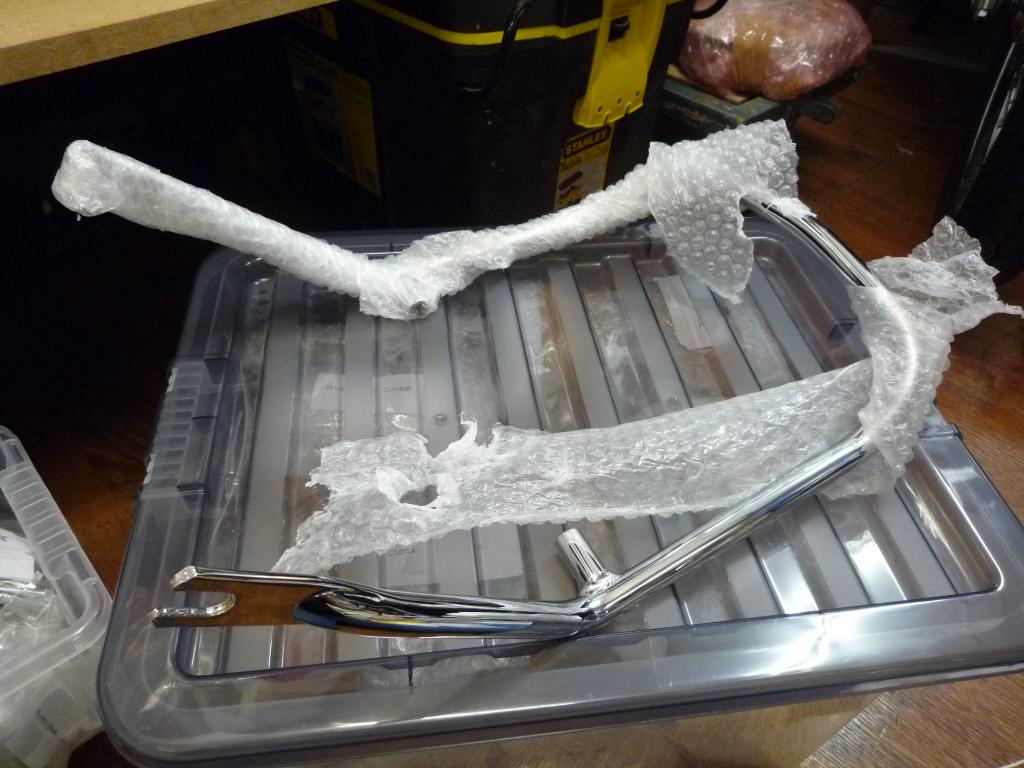

Which slips nicely into
place........................
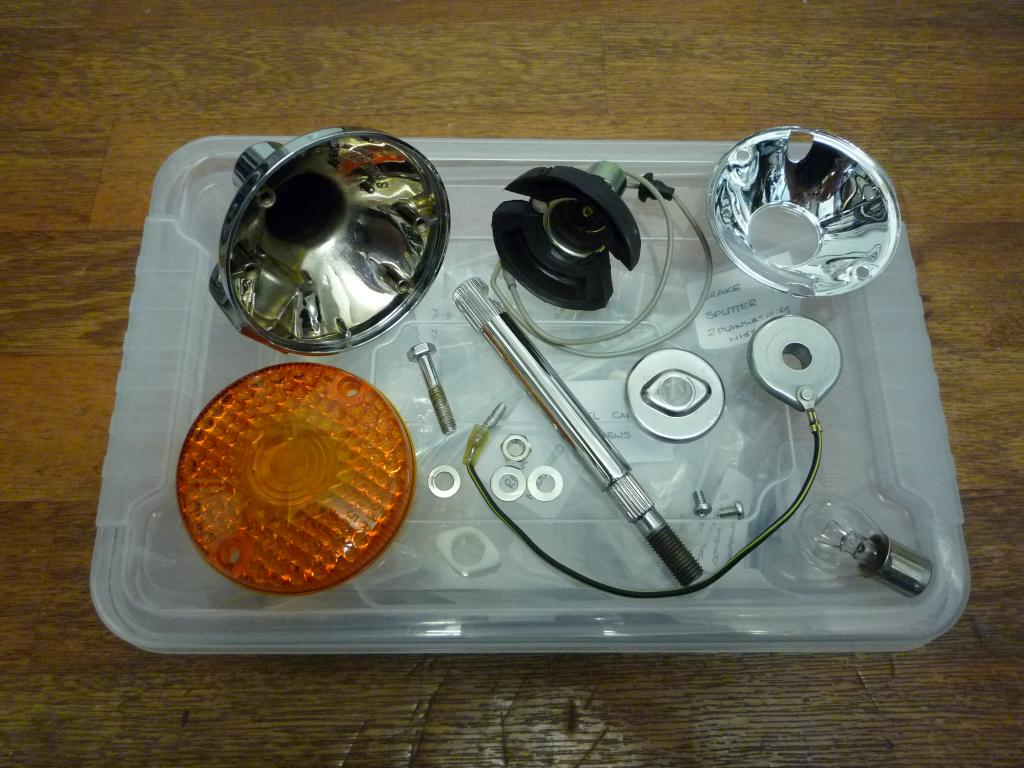
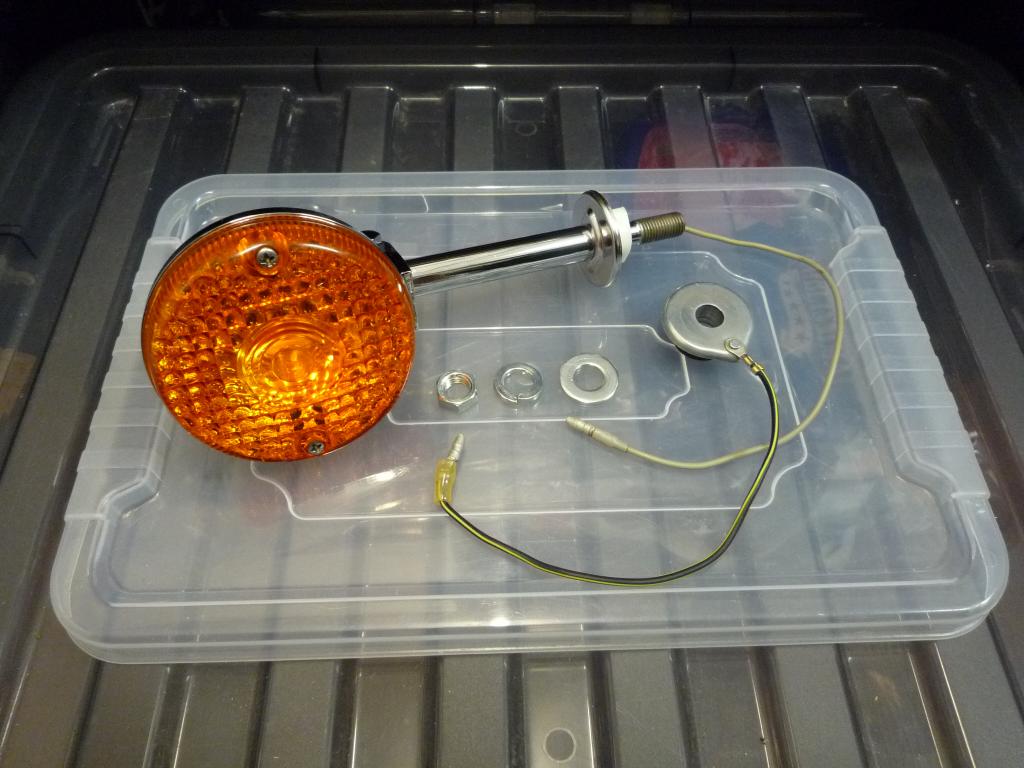
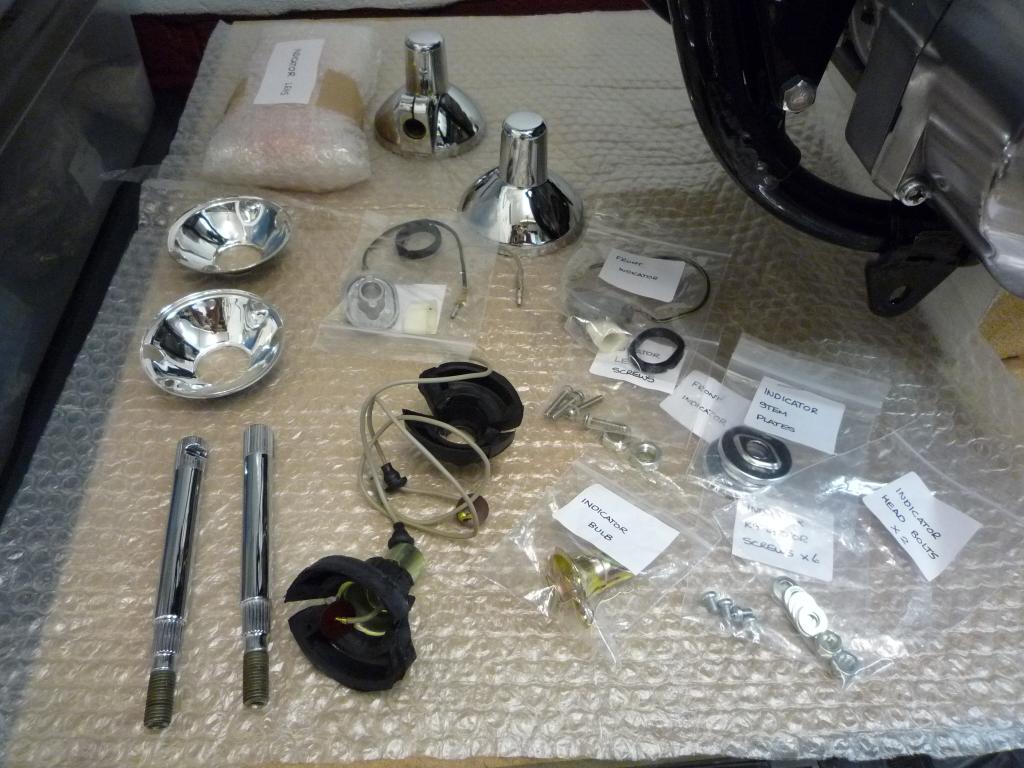
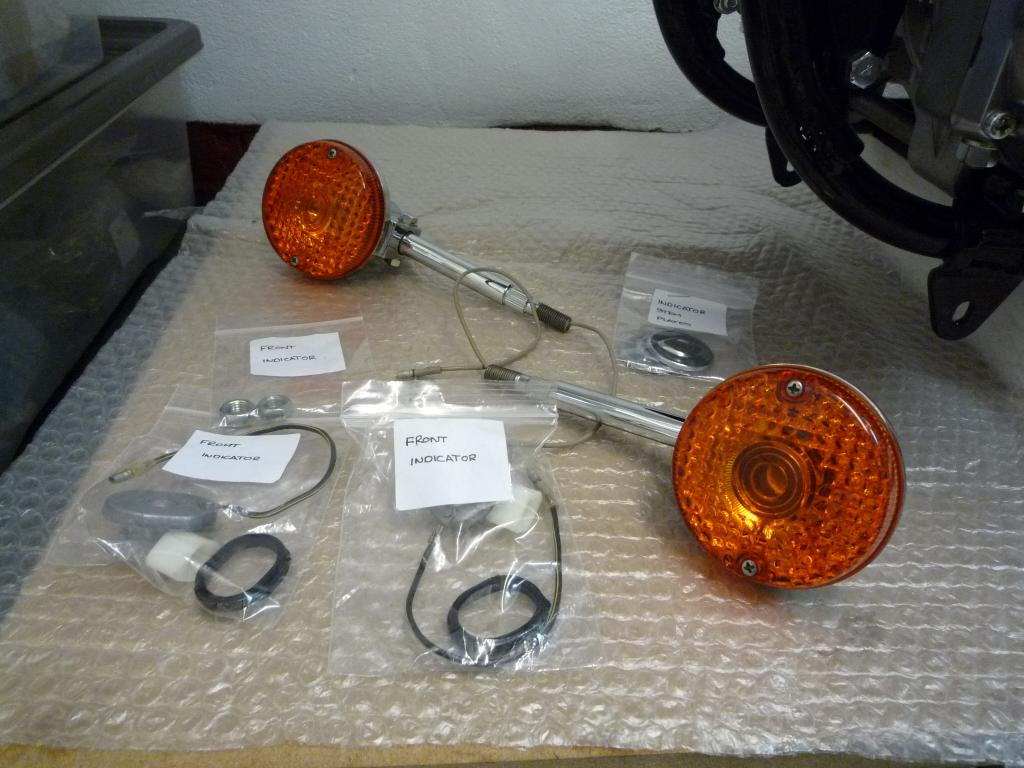
I find there are some bits of a
restoration that are so satisfying to do more so than other parts and the
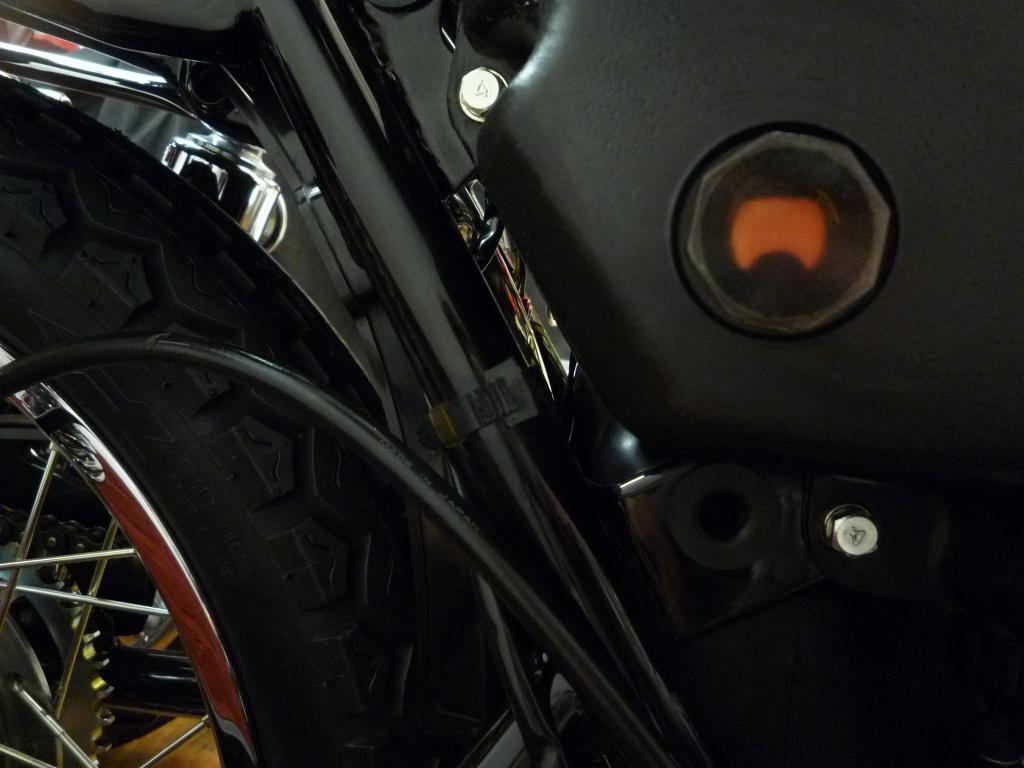
indicators are one of them.
It must be the combination of the bright orange Lens and the Chrome, whatever it
is I always enjoy building them.
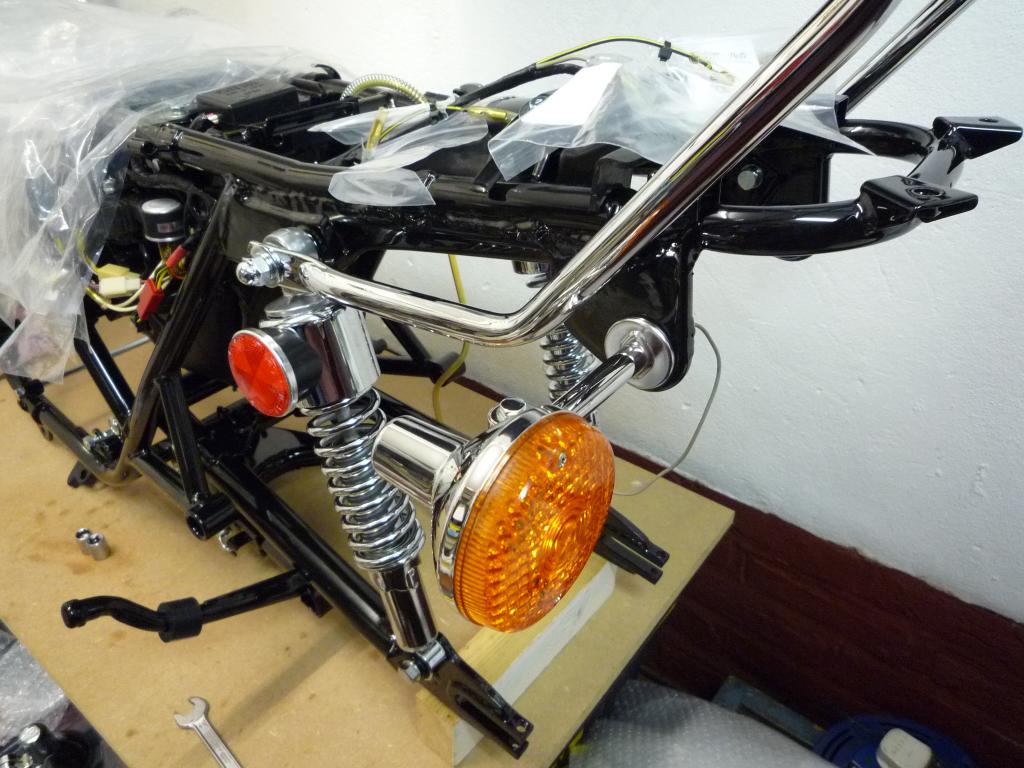
Here is the first of the rear ones ready to go.
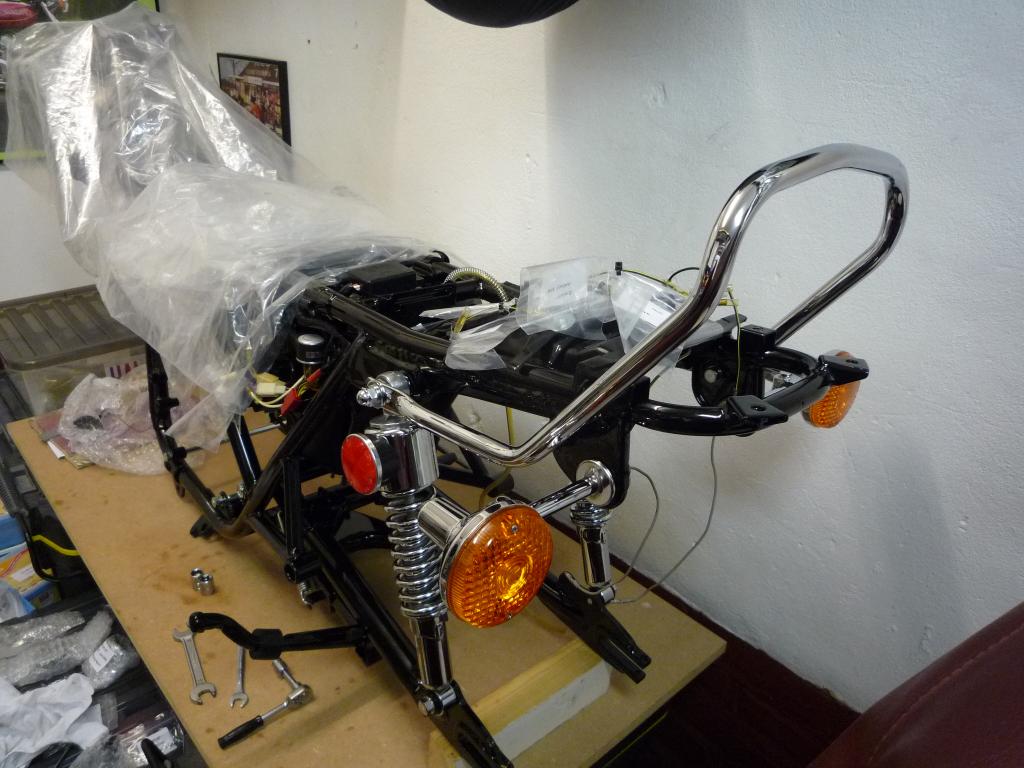
assembled
and fitted
........ Then there was 2.
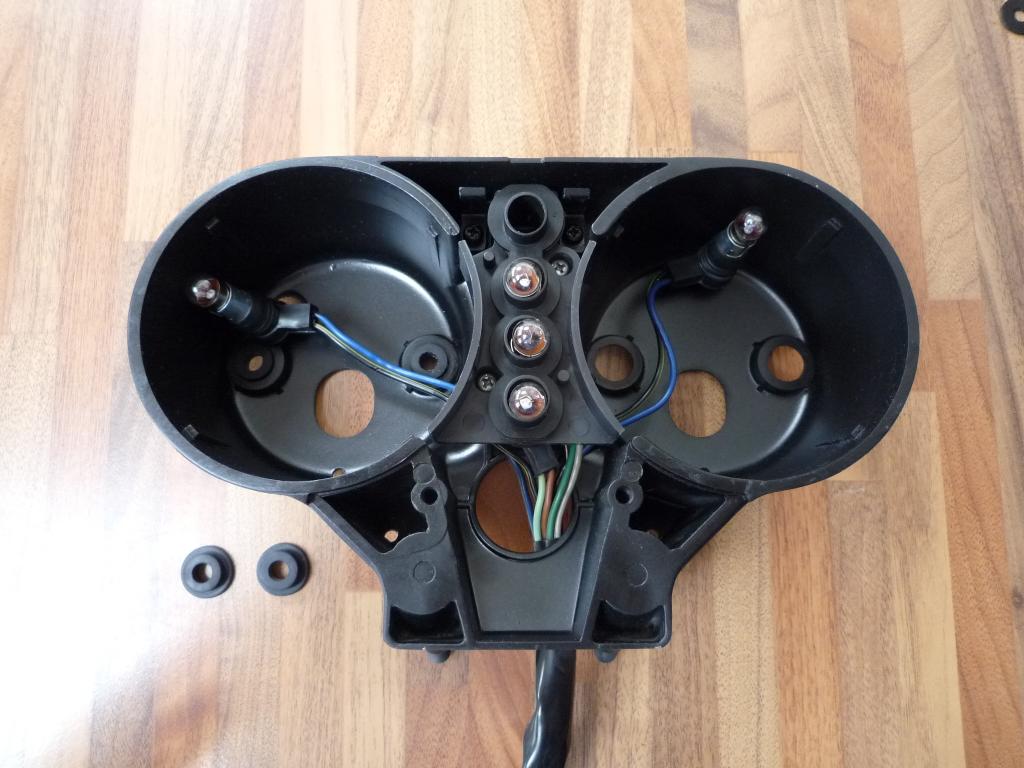
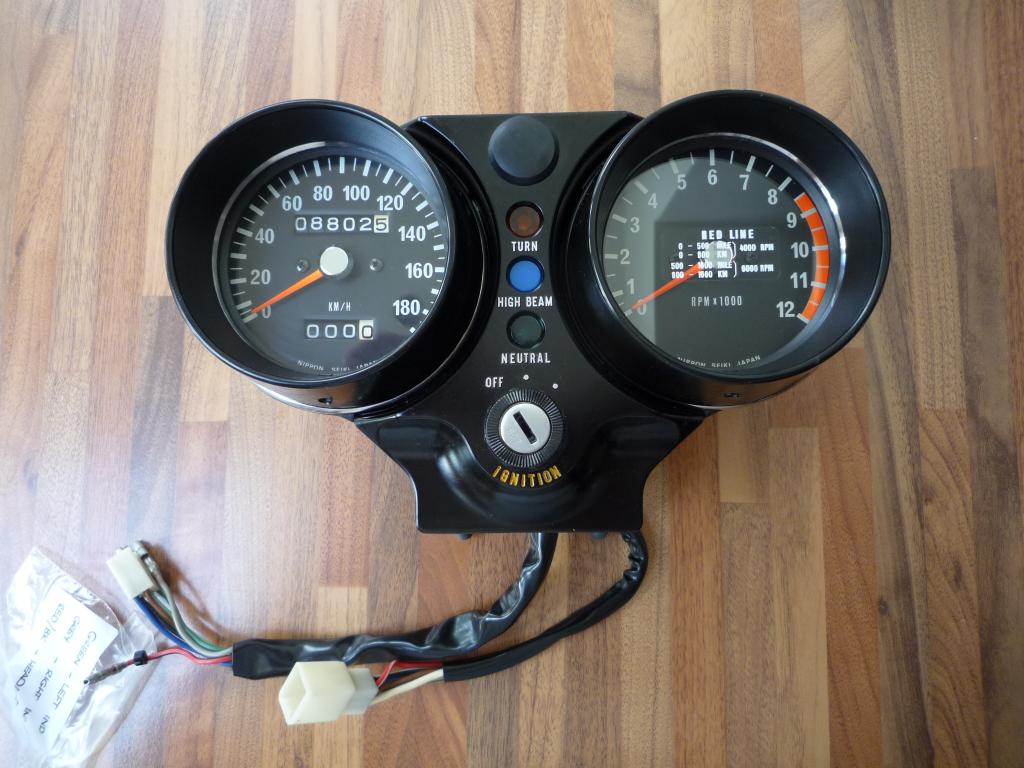
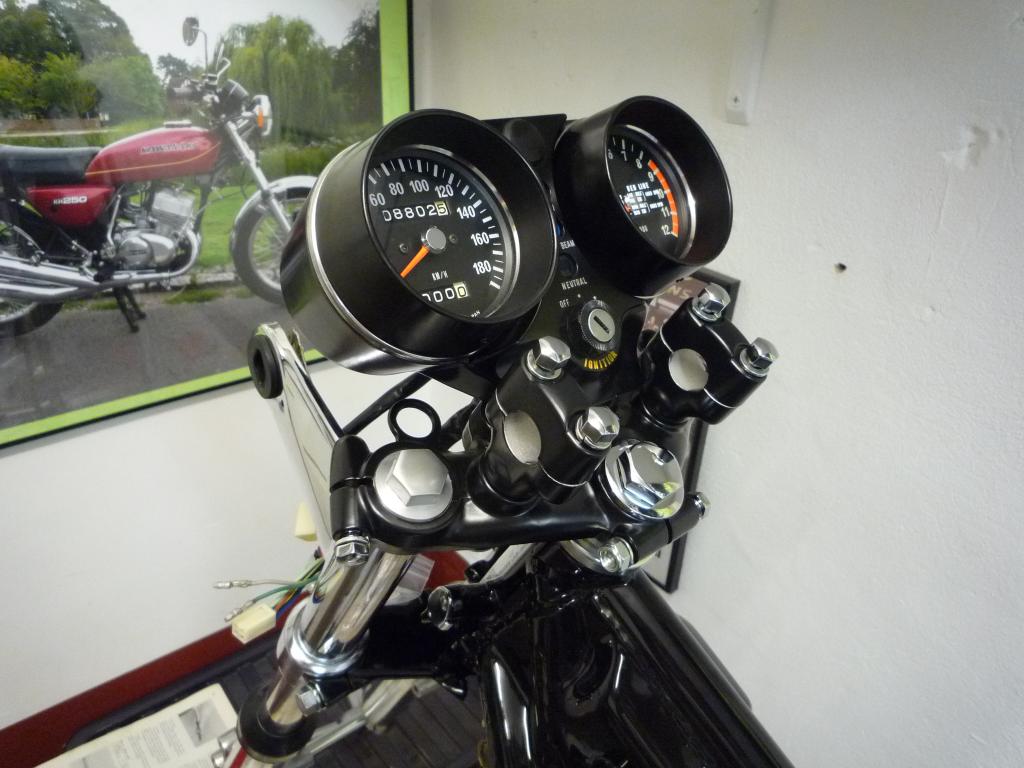
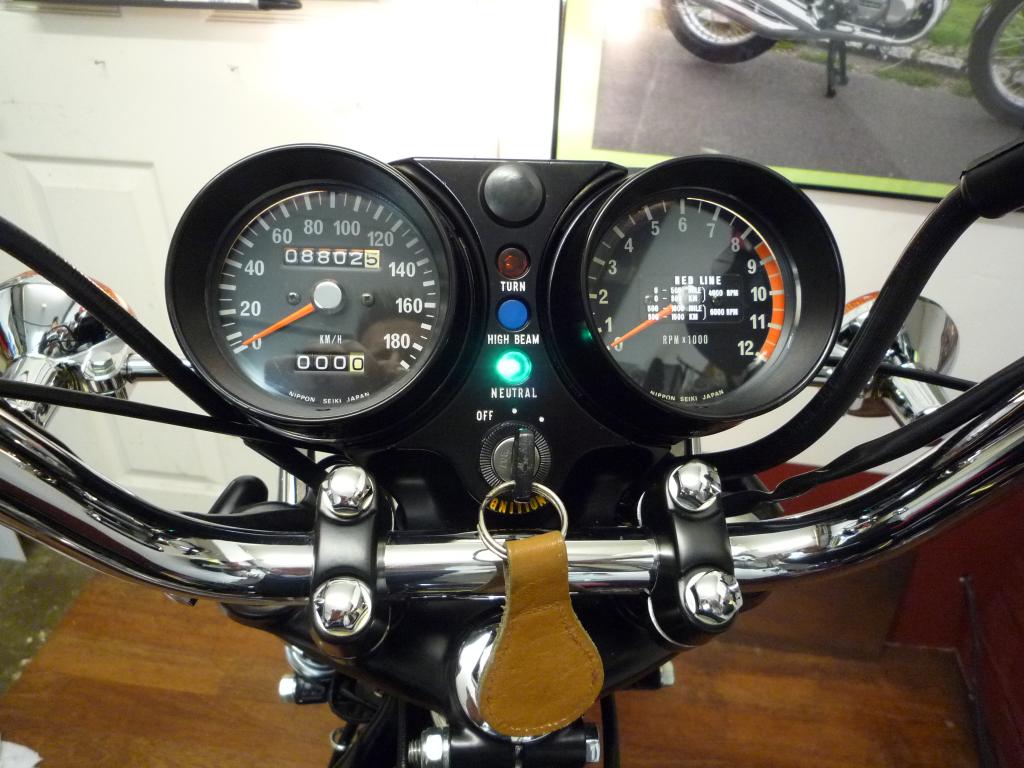
On a similar
level are the Clocks with their distinctive style and colouring you never seem
to tire of looking at.
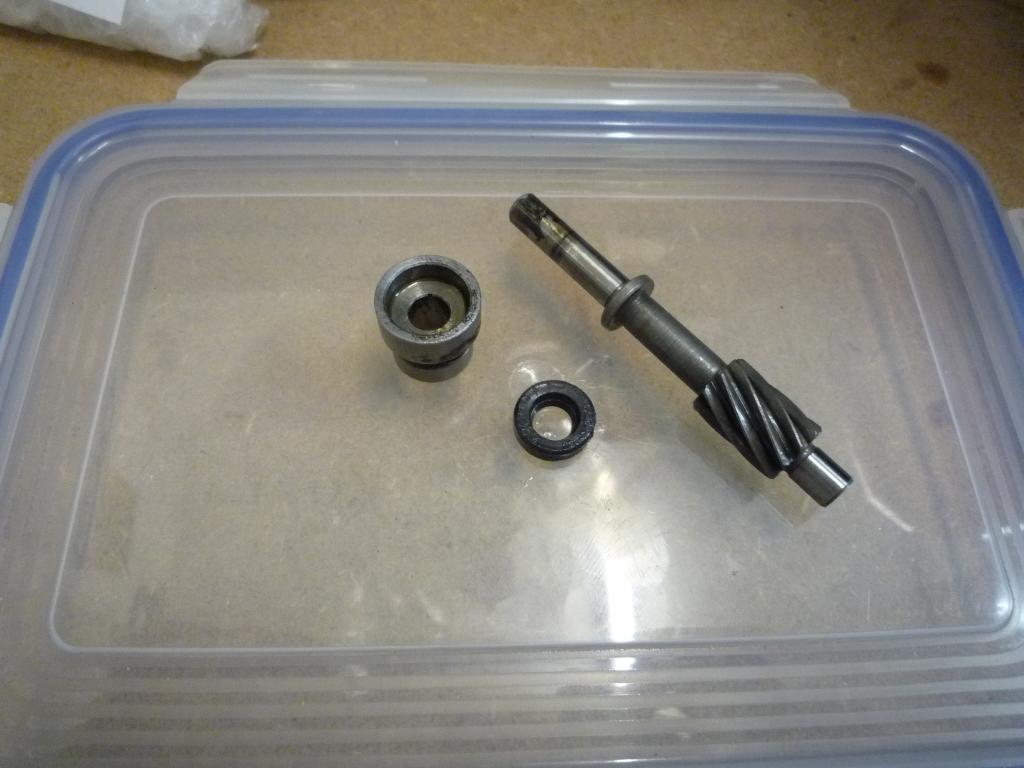
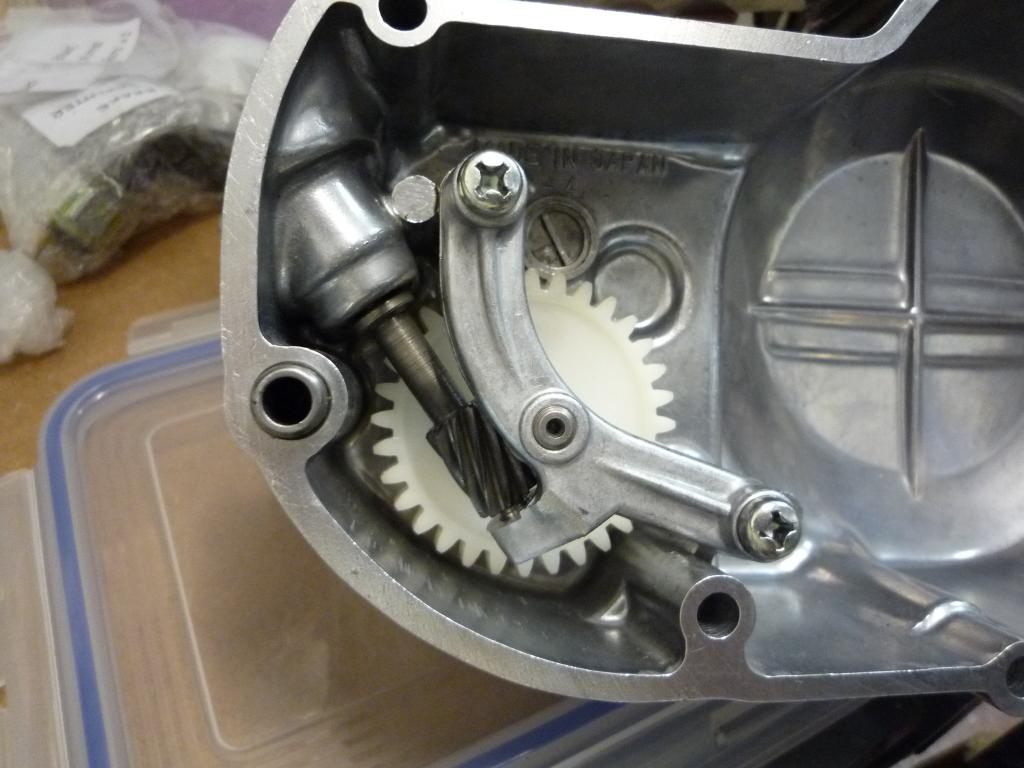
Now taking a
step back and returning to the engine,......I had to source a new lockwasher for
the primary gear and this could now be fitted and locked up.
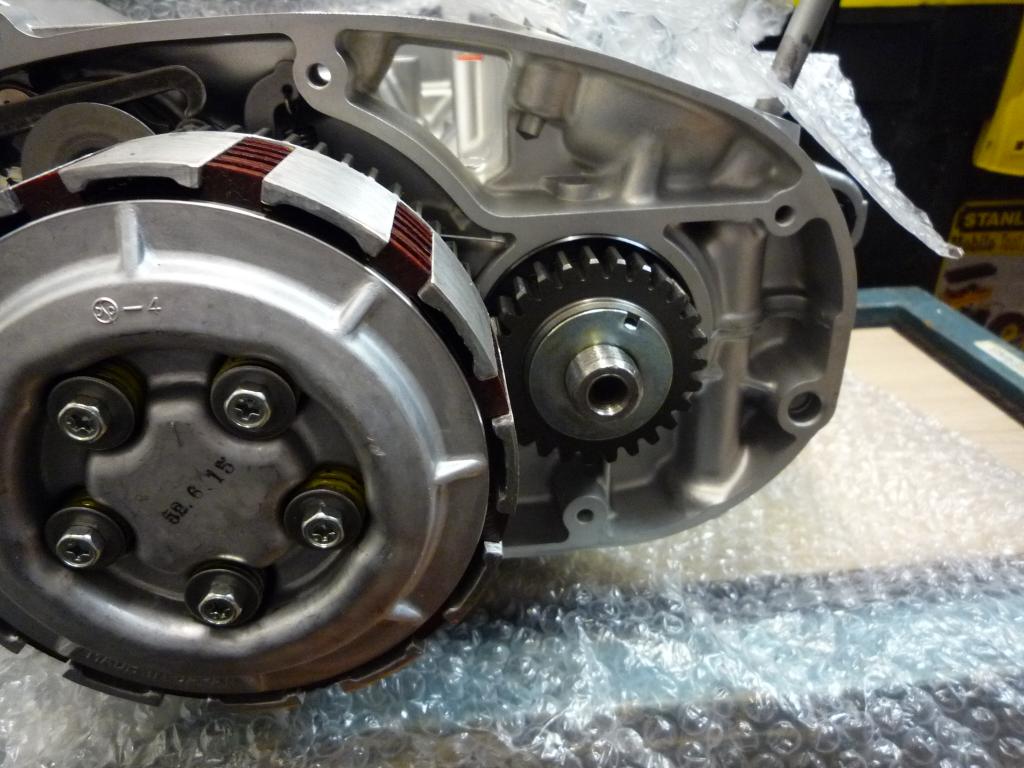
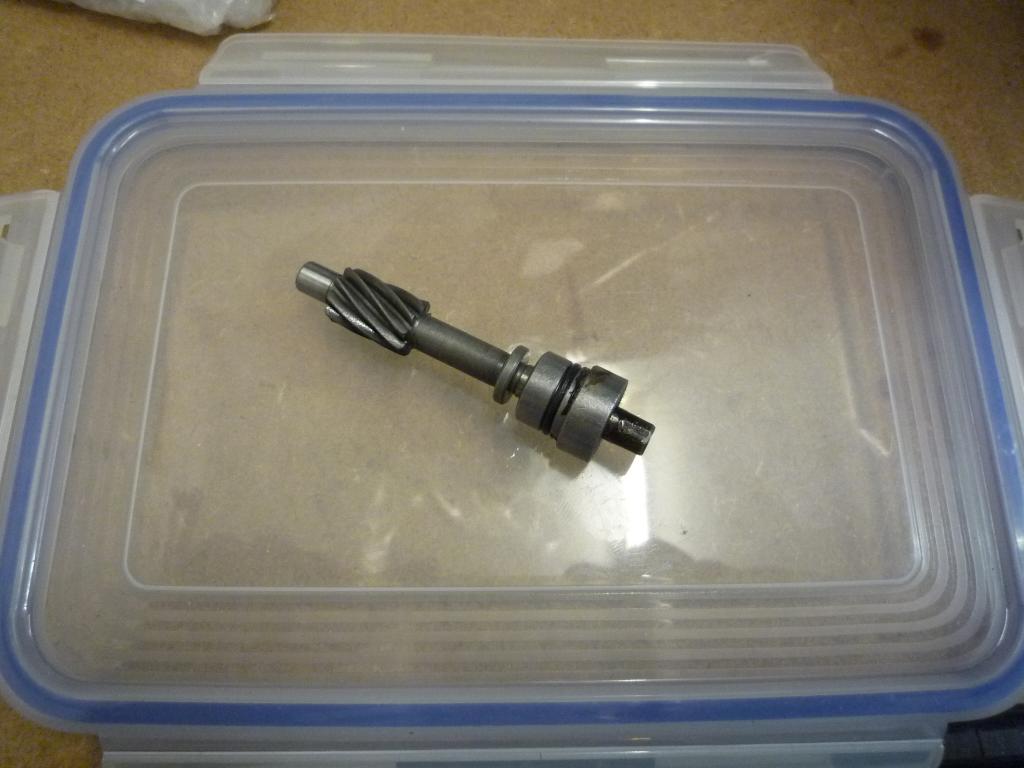
Which just left the oil pump pinion,
and lock washer to fit.
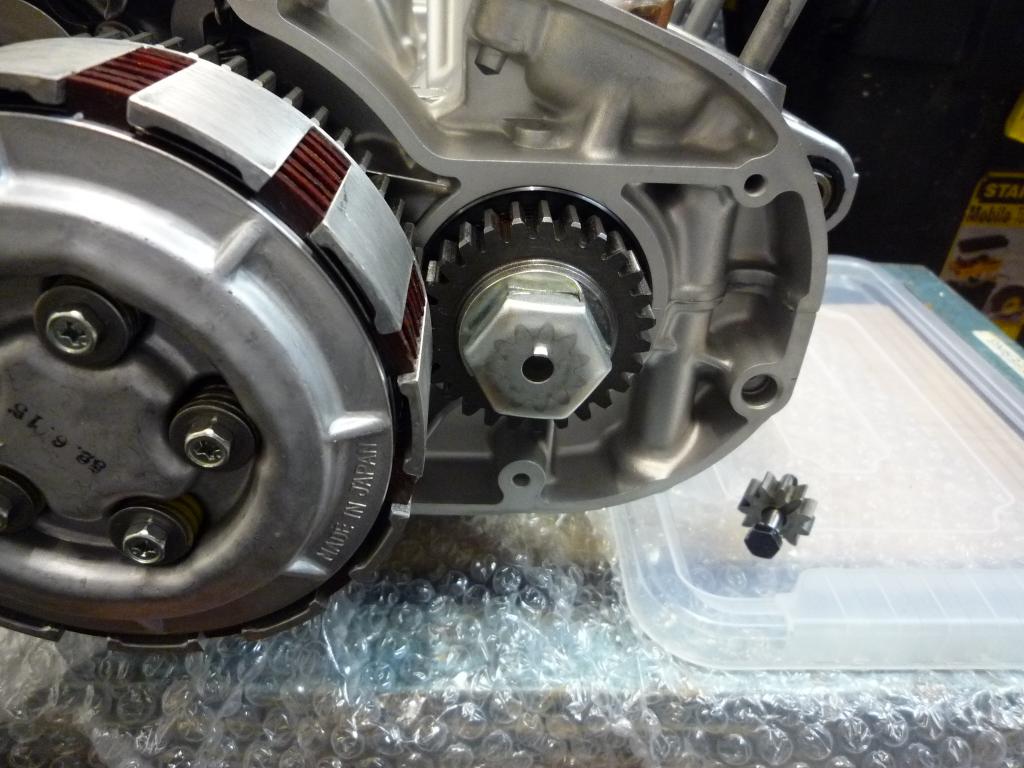
before gently lowering her back into
the frame
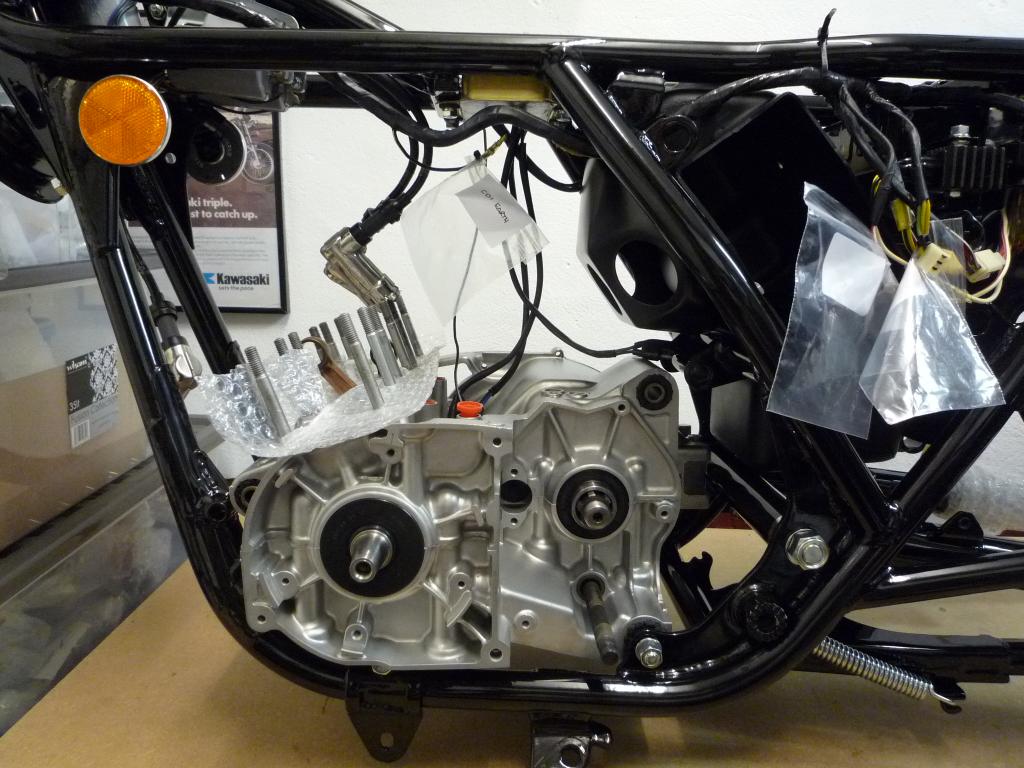
With the engine now in
place, the front and rear engine mounts and the all important earth strap are
fitted and checked. As before you can't take it for granted that it is going to
work just because its fitted and any powder coating is removed to confirm a good
earth.
Engine breather pipe was also pressed home though this would be better to do
with the engine out. Just made it a little more fiddly.
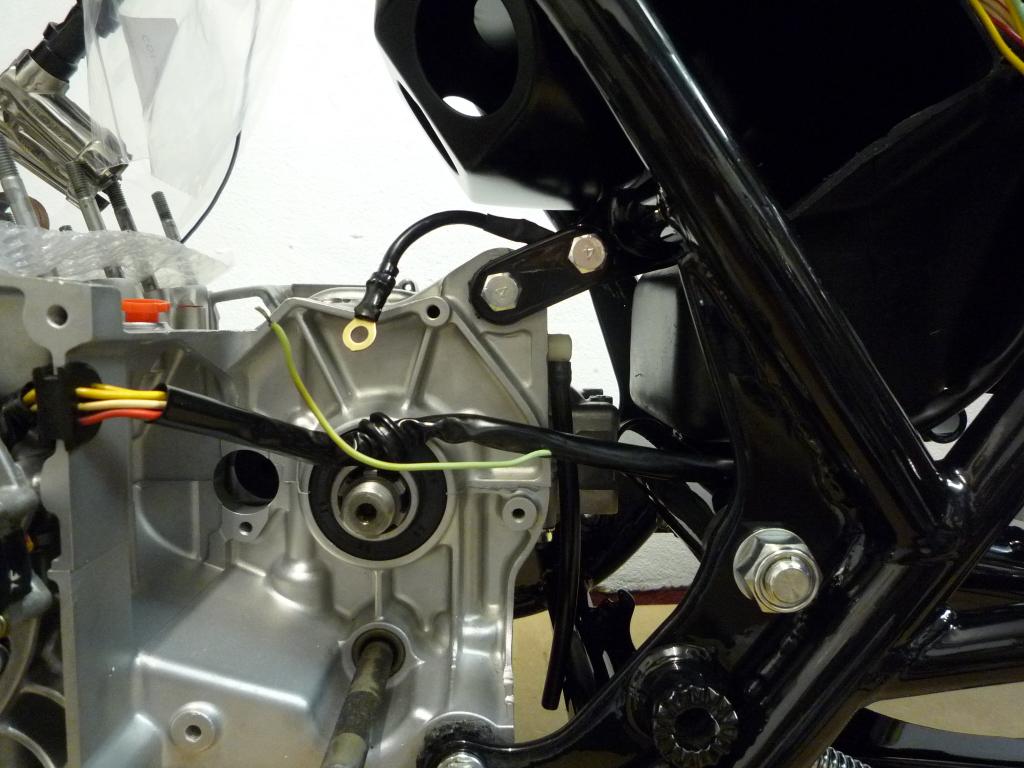
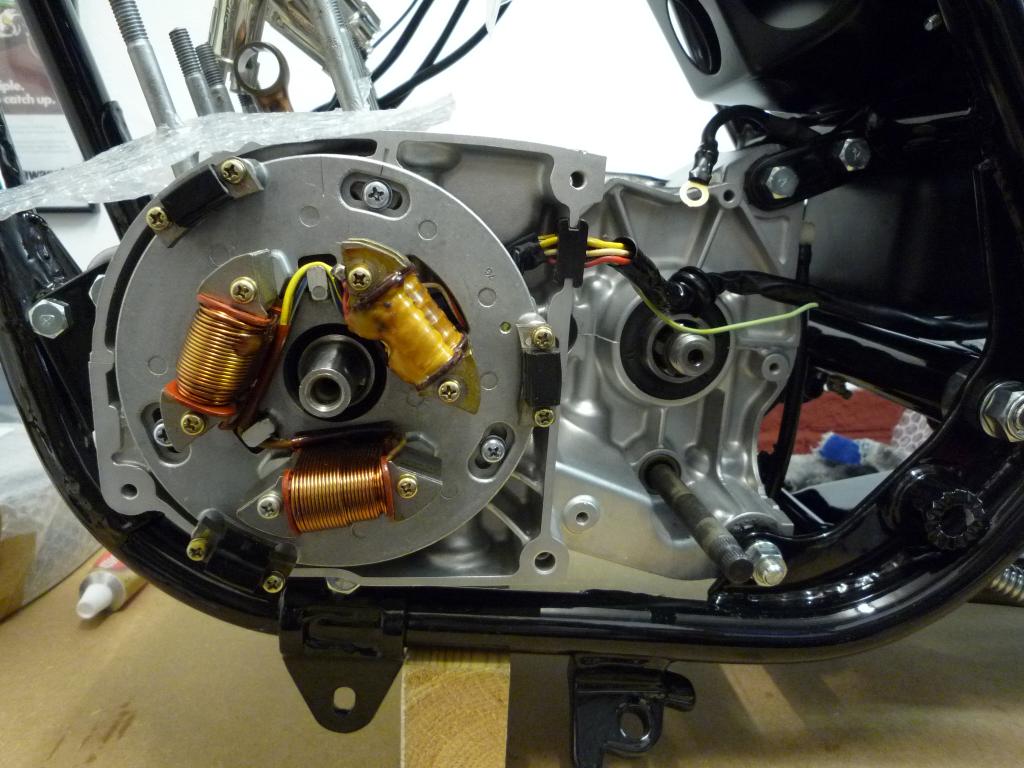
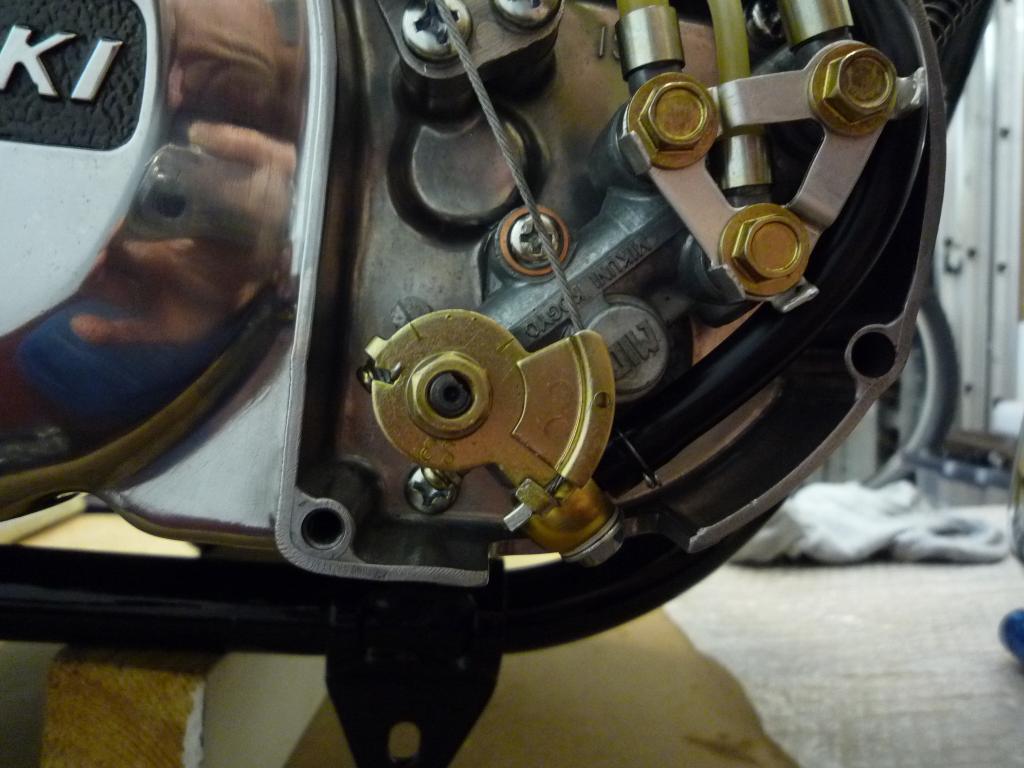
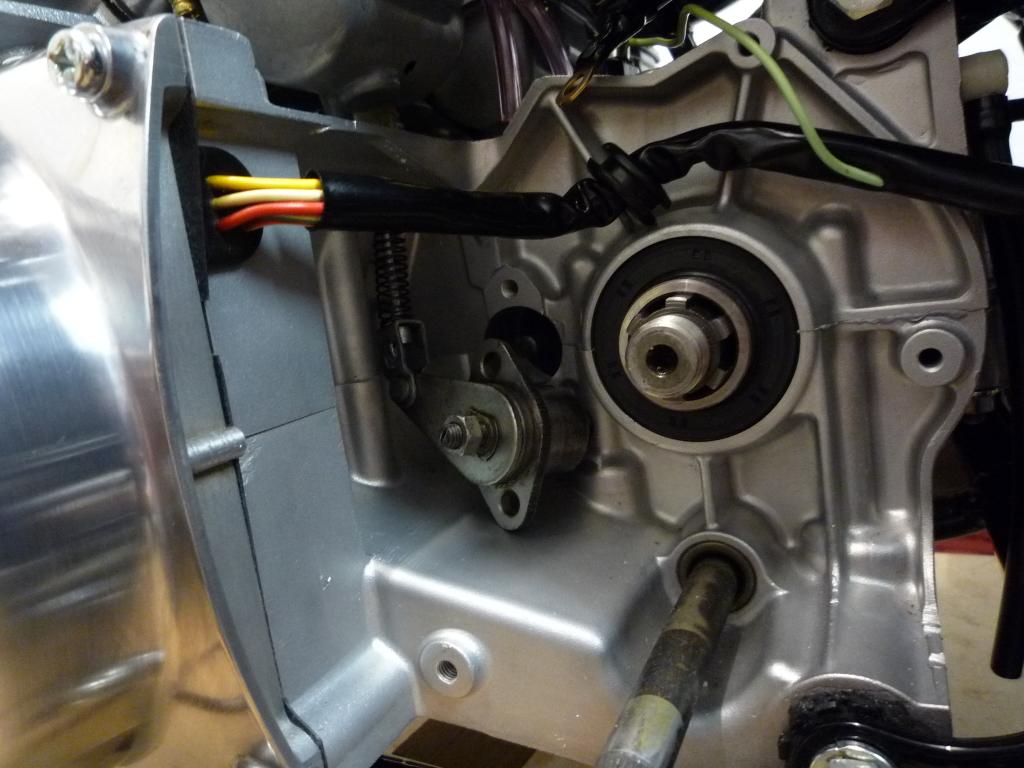
The ignition stator plate is now in
place with marks aligned and plug connections made.
Also fitted are the battery earth
and positive leads which should now finish up the wiring under the side panel
bar the final fixing.
The coils have been connected and joints wrapped as they were
found.

And the neutral switch has been fitted and wired.
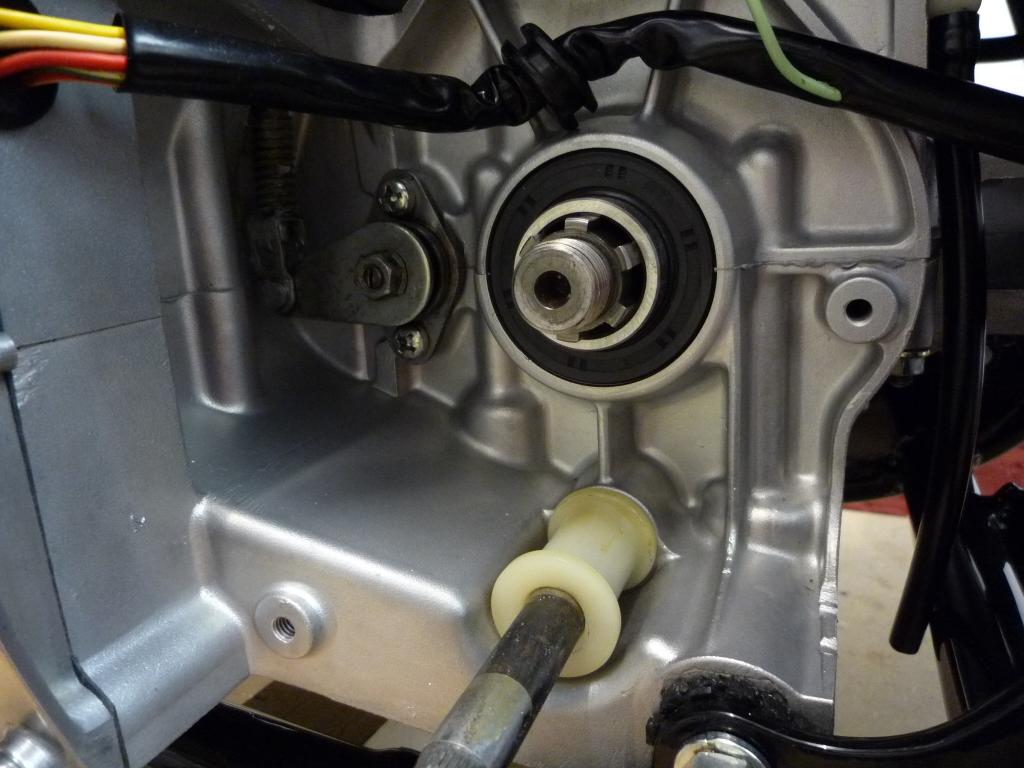
Next in was the key for the
flywheel.


And the flywheel itself........ man those magnets are strong
Reading up on setting the ignition I gather that you set it
statically with the marks on the stator and crankcase then strobe it at 4000 rpm
to check the alignment of the mark on the Flywheel with the other mark on the
crankcase.
If it is then out you adjust the stator (right so far I hope) that is all fine
but from what I can see that would mean removing the flywheel again to get to
the stator screws
they could have made that a touch easier .
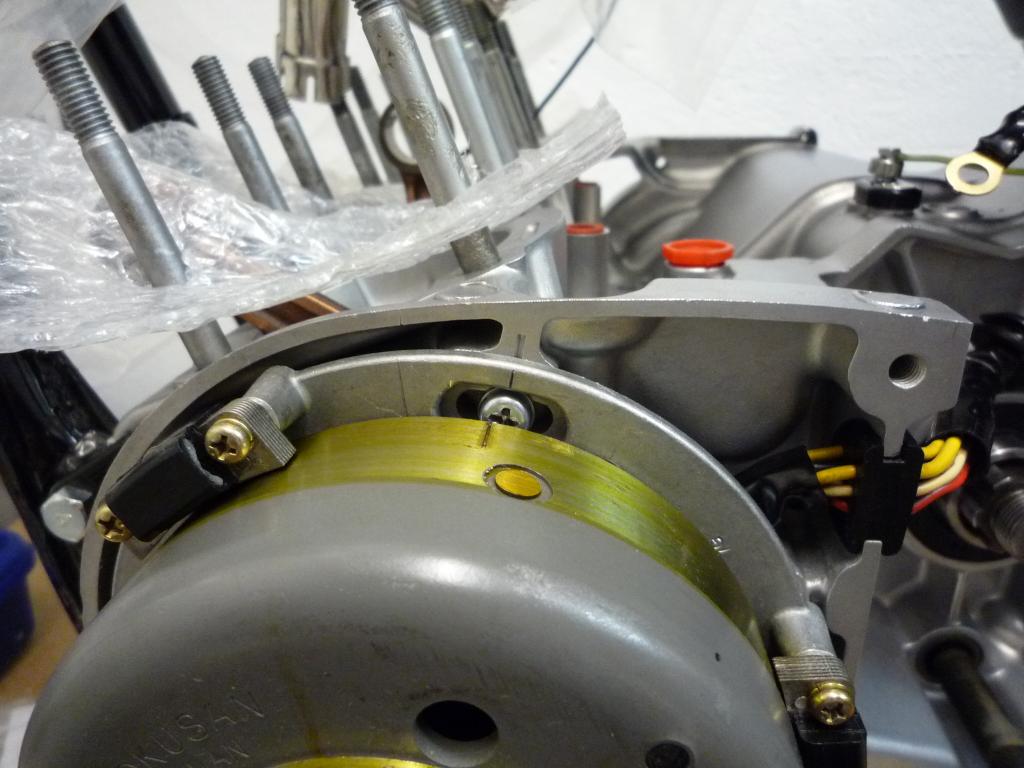
Hope I have explained that correctly
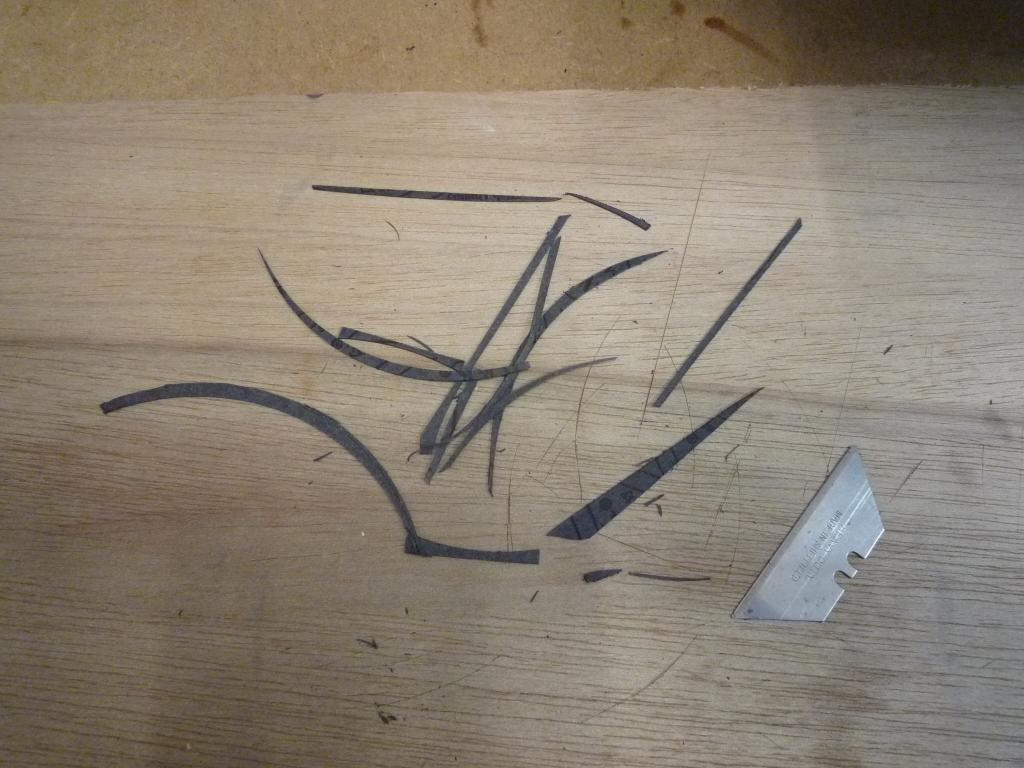
The left engine case is loosely fitted to protect the workings, a simple job but
the gasket didn't fit at all well and needed trimming to allow it to fit


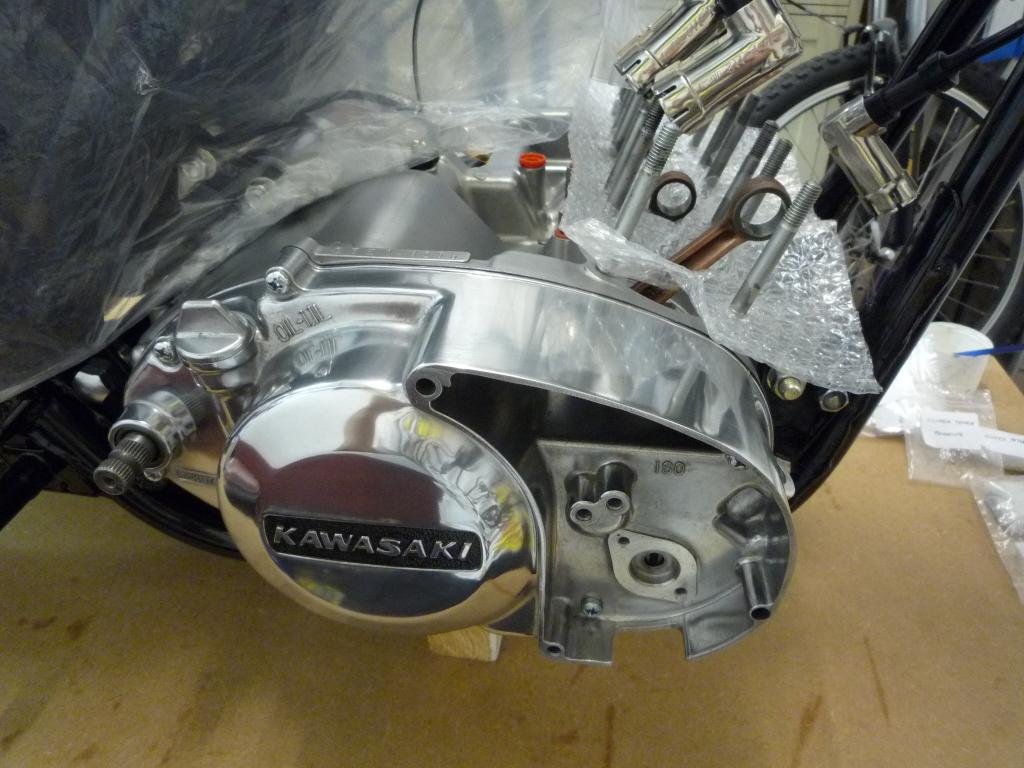
Round to the other side, after fitting a new Kickstart oil
seal and NOS tacho seal and with a final check over before closing up, the
clutch casing went on with a new and this time nicely fitting gasket.
One thing I forgot to mention, prior to
fitting the Stator plate I checked the mounting holes were clear from
obstruction as usual and found quite a bit of vapour blasting residue stuck
within the threads.
I was able to get them out with a little bit of patience but it just shows that
there is always a chance some will be left behind after the cleaning process, so
be aware and check all those oil ways and threads are clear before closing up.
Later on this was again to become an issue to resolve.
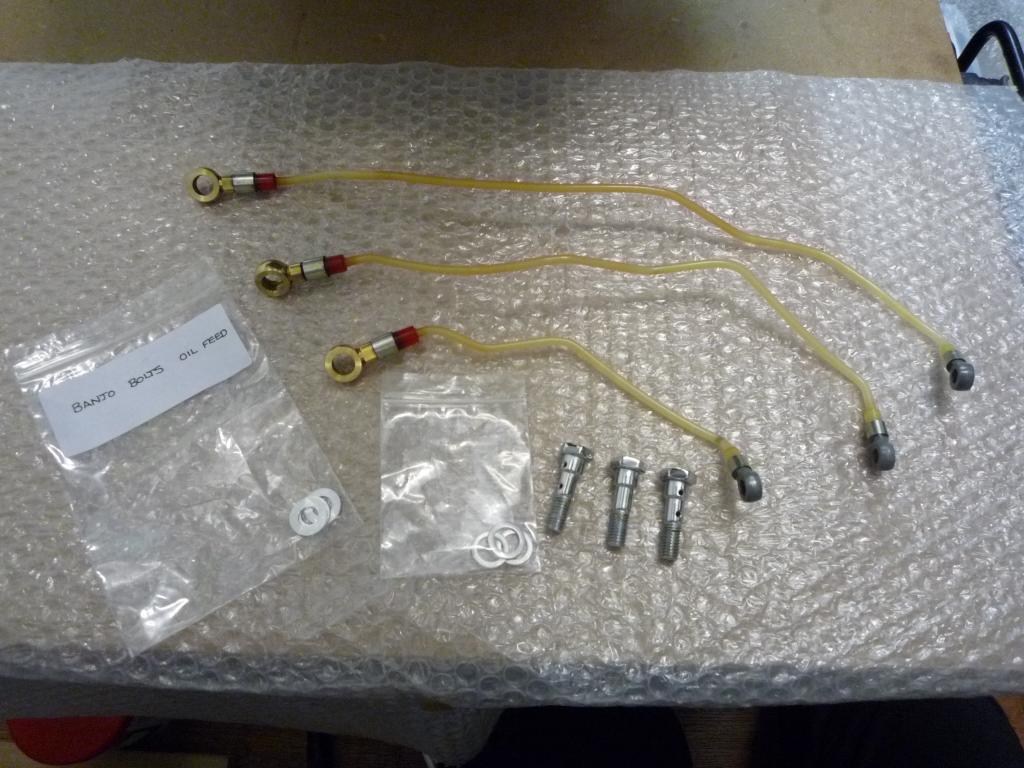
Anyway after fitting a new gasket to the oil pump it
was back where it belonged. The Oil lines, banjo bolts and new
sealing washers were gathered ready to fit.
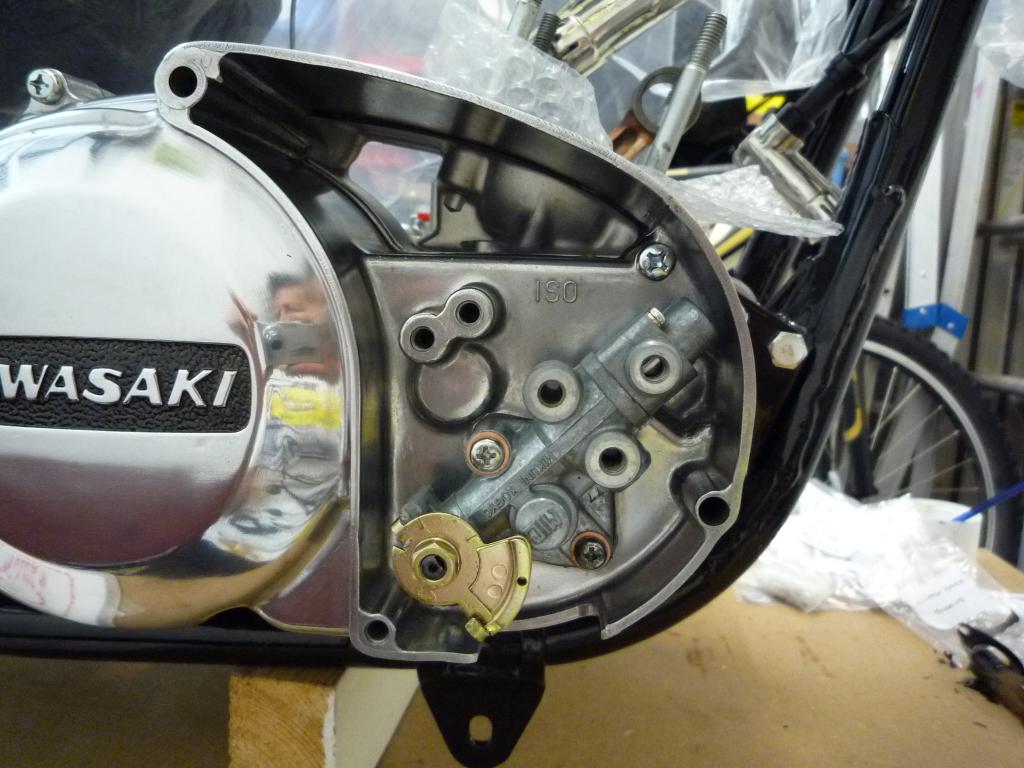
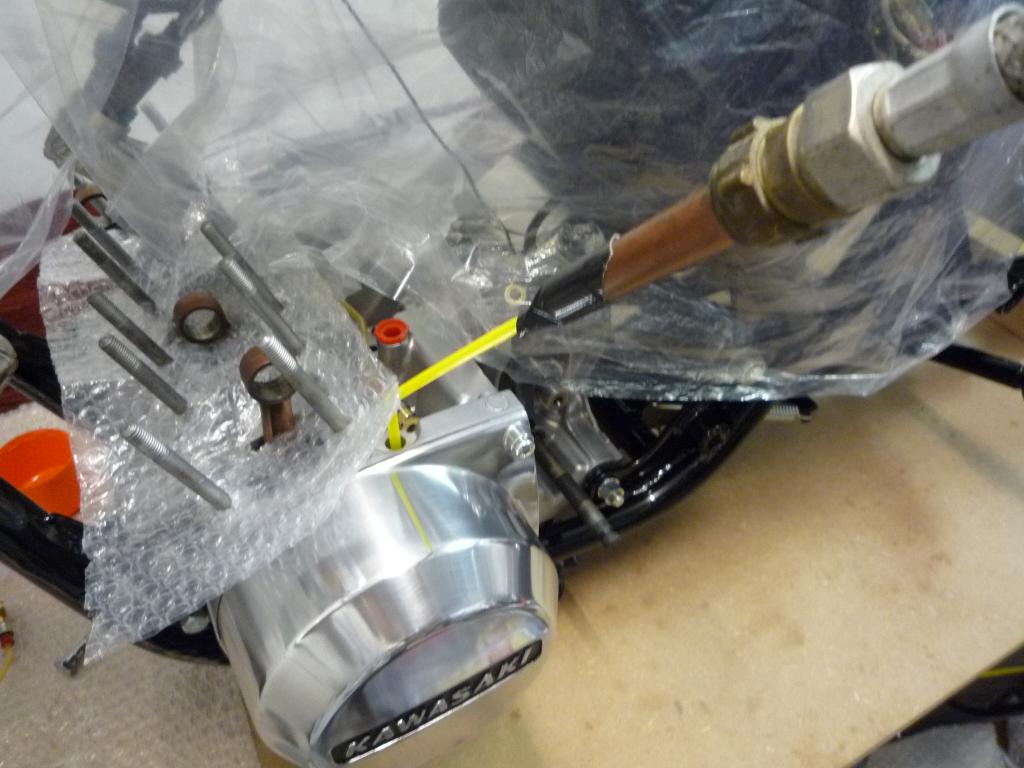
The oil ways had already been cleaned
and blown through prior to assembly but at the bottom of the banjo bolt holes
was lying another compact layer of beads, good job I checked again
With my box of hoses and tubes around a mates along with my ezi bleed kit I had
to be resourceful and made up a suction pipe from my plumbing box and a flexi
straw attached to the hoover, worked a treat and the holes were cleared.
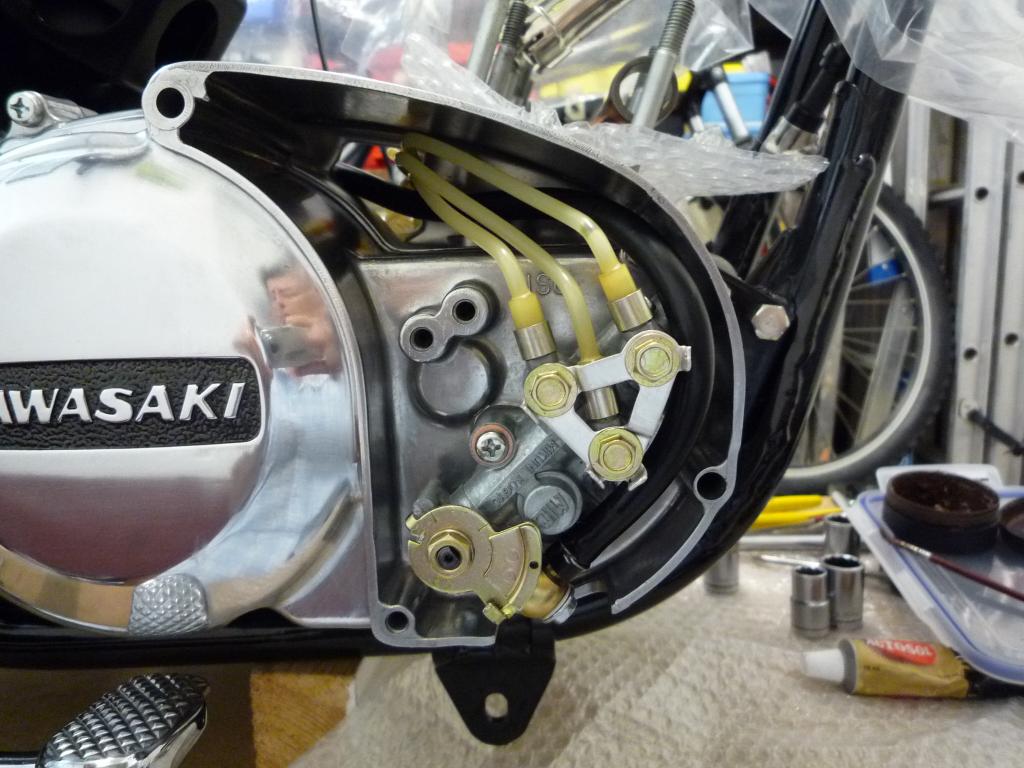
With that done the pipes were fitted. And connected to the pump.


A New 2t supply pipe was fitted but was found to be too short and would be
changed once a replacement had been found.
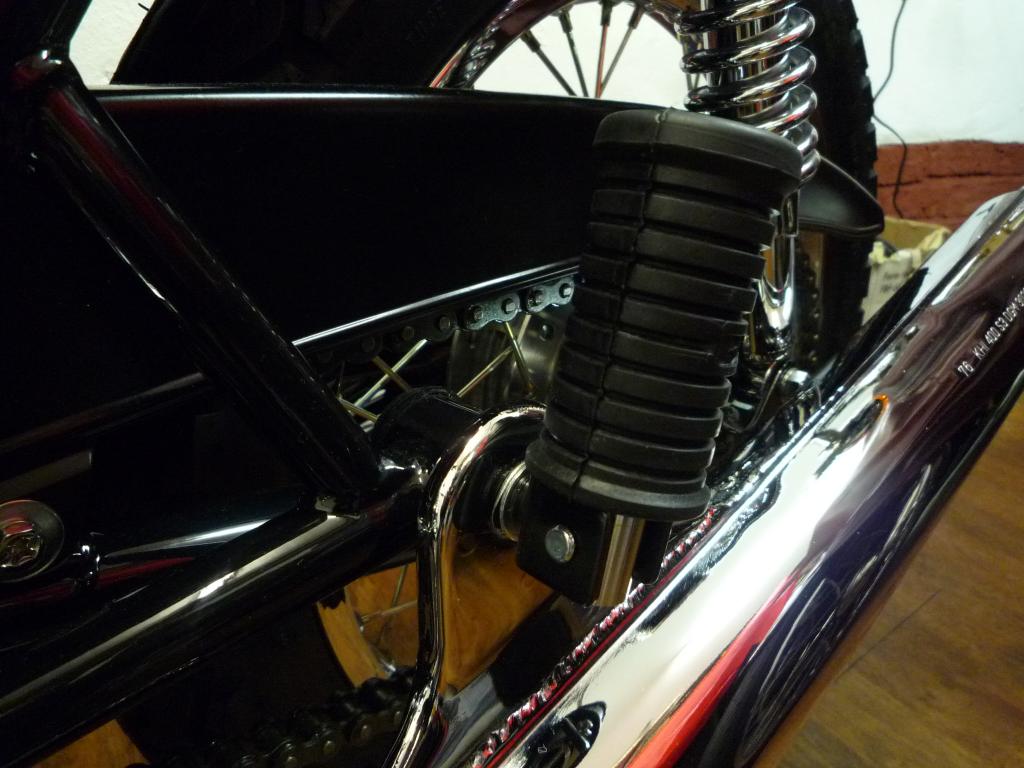
So while we wait for that we can assemble the rear brake light switch, the front
footpeg and mount and the rear brake pedal, spring and adjuster bolt.

So after a short break in proceedings
(Wedding anniversary and Decorating duties) I was able to get back in the
workplace today.
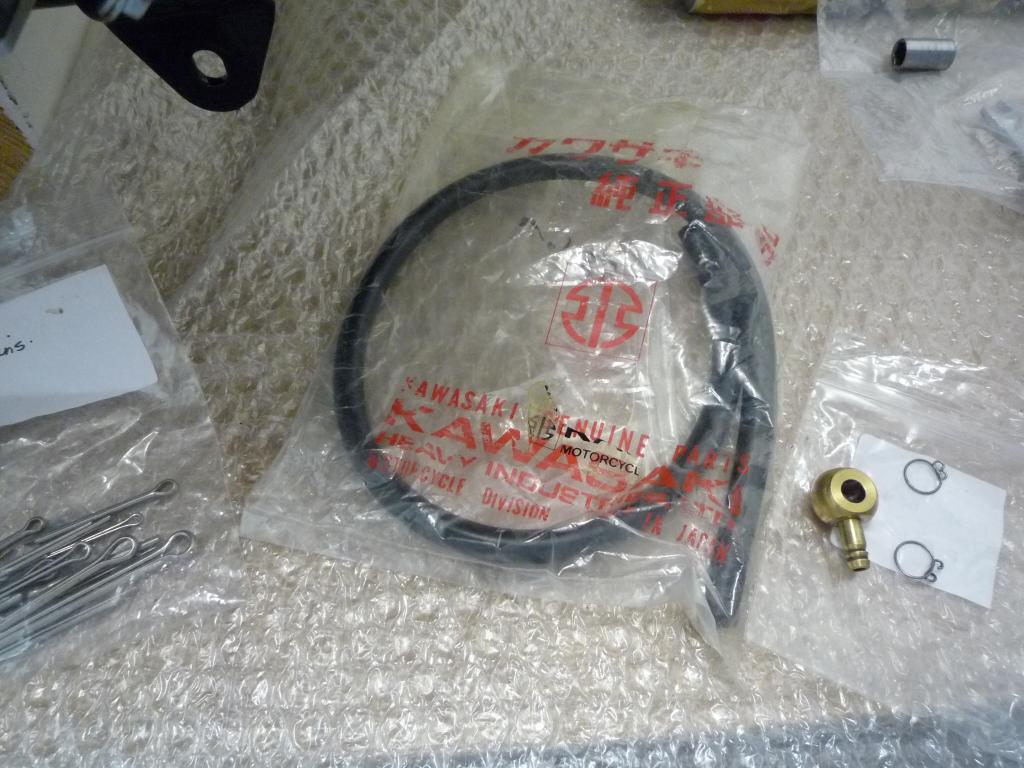
After being unhappy with the 2T supply pipe I have replaced it with a NOS
genuine item which has now been fitted and sits as it should do.

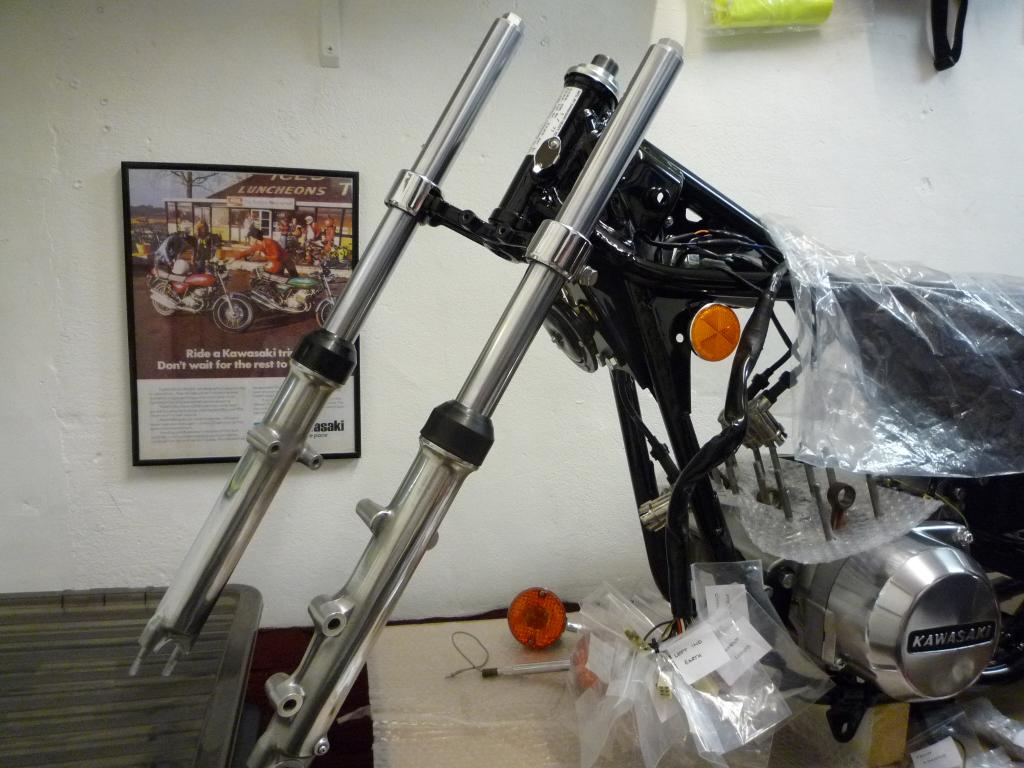
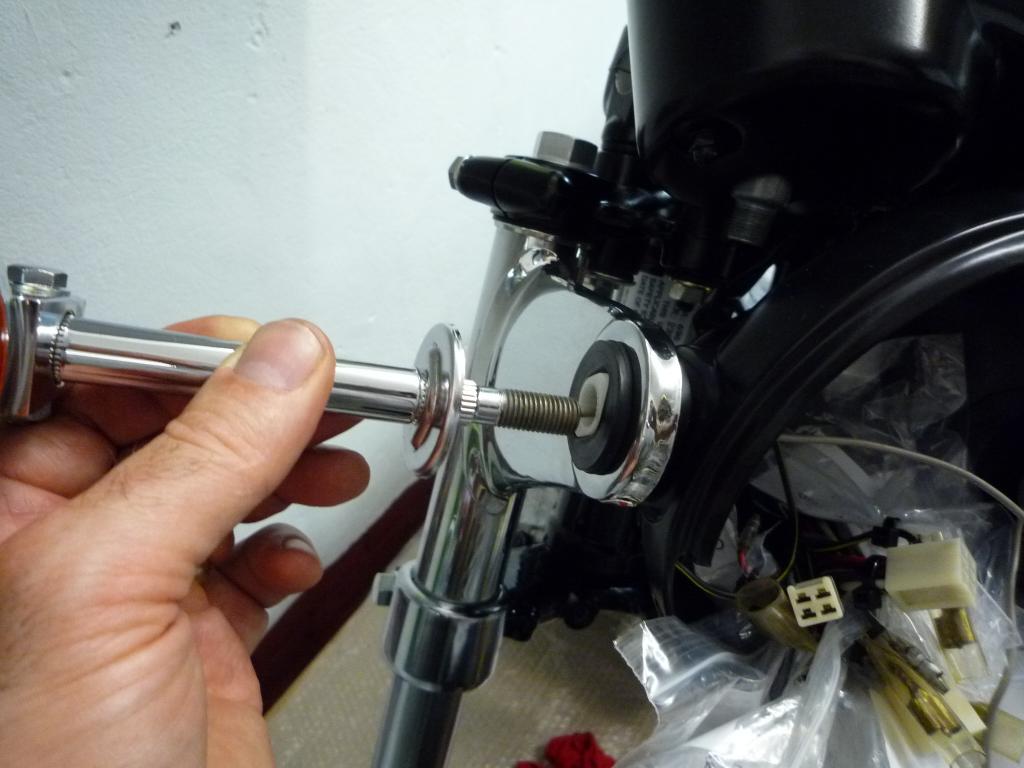
Simon had sent me some fork dust covers during the week (many thanks)
so we could now start on the front end.
First some pre-assembly preparation with the front
indicators.
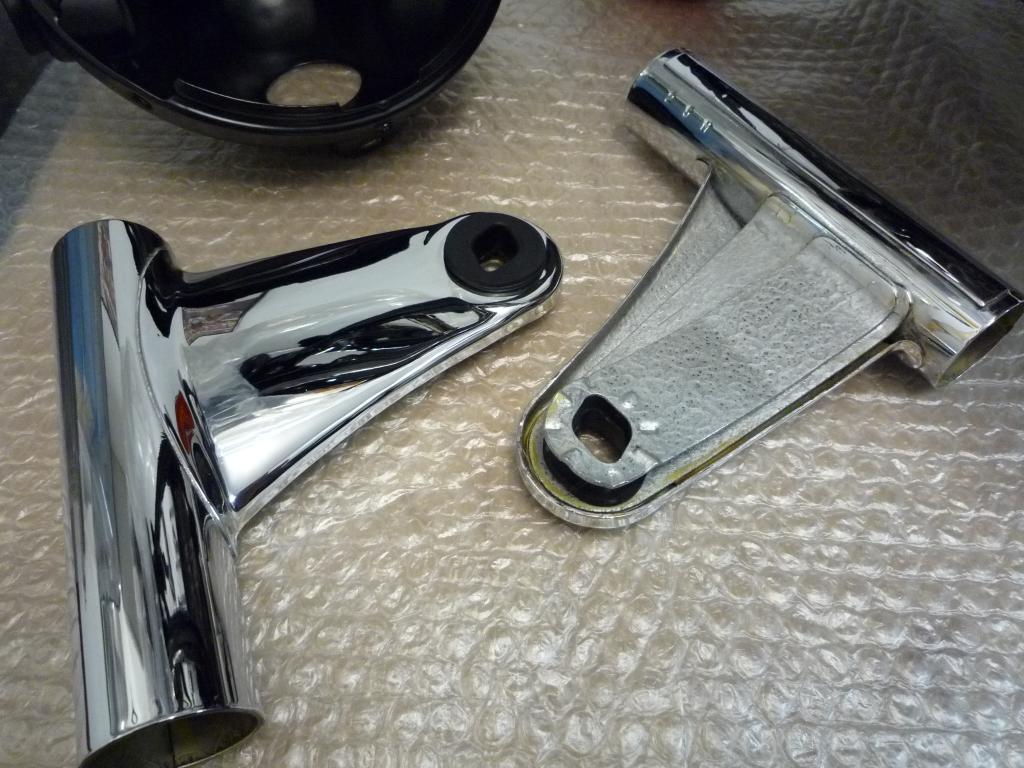
The Headlamp ears, the yellow marks being a liquid wax that I apply to the
inside and all joint areas for added corrosion protection.
The Silver Hammerite which I didn't ask for was added by the platers and I have
decided to leave it, after tidying it up a little of course.
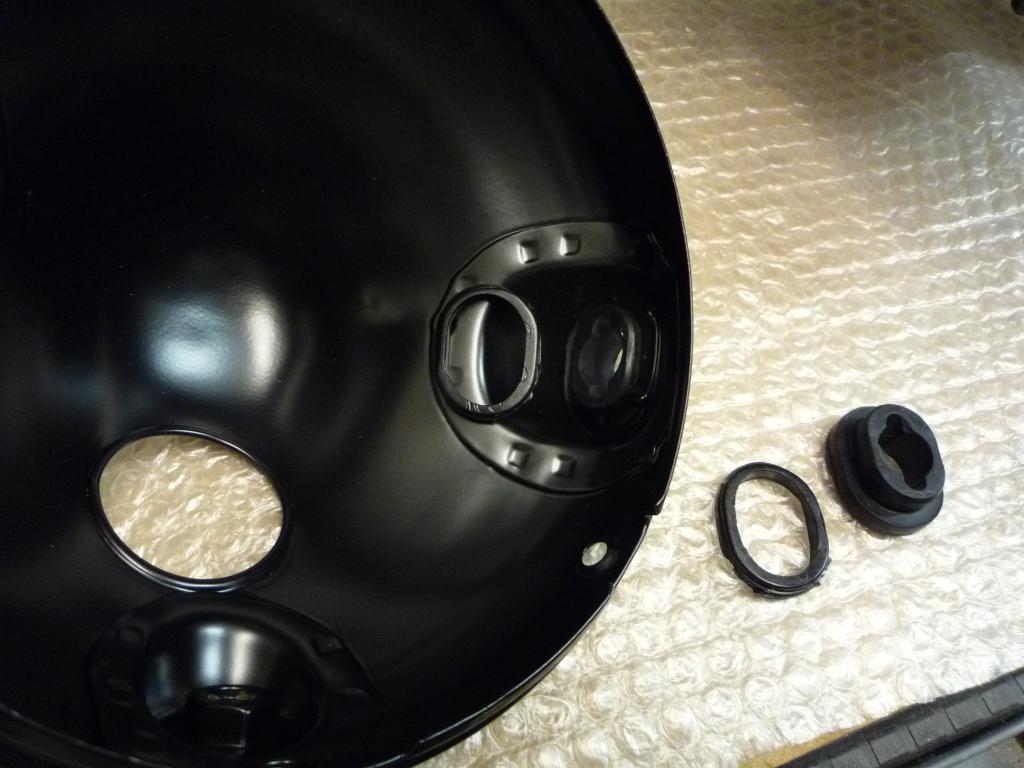
And finally the headlamp shell and its rubbers.
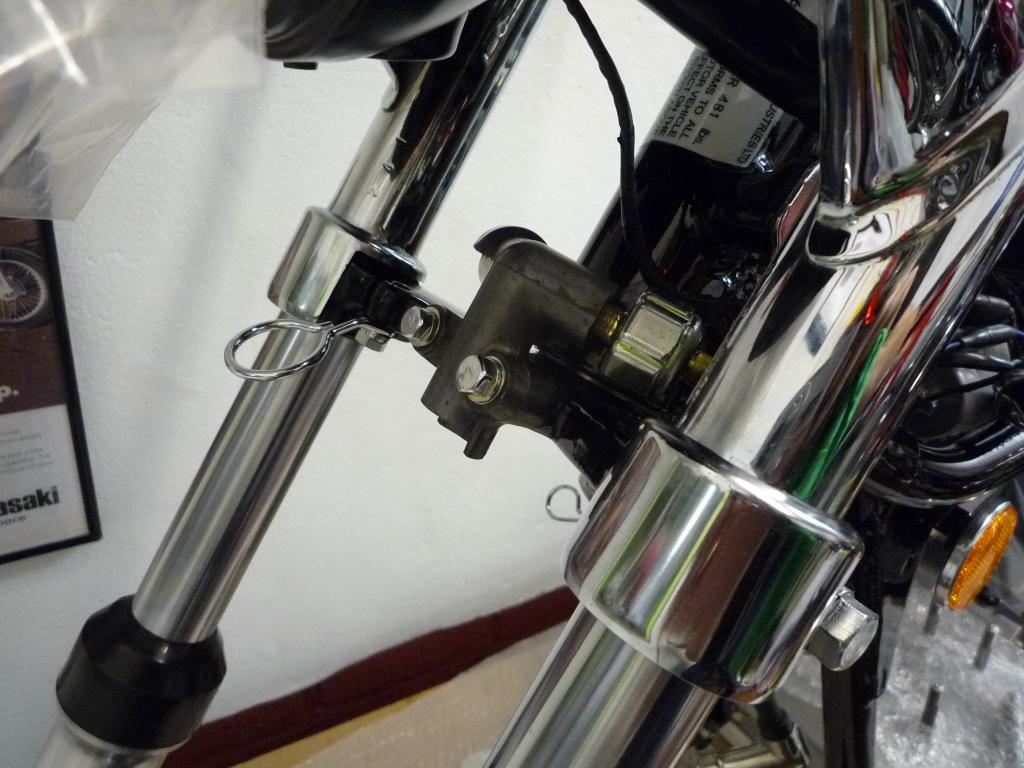
Just for reference the assembly of the leg is shown
here with some pictures taken from my 250 resto, its handy to know what goes
where and what you have missing.

With that taken care off its time to fit the lower shrouds.
Then I slid the fork legs into place and lightly secure with the lower yoke
bolts.
The new dust covers had previously been fitted and the legs serviced with fresh
10W grade fork oil of the correct amount.
Headlamp ears and top rings and rubbers were next.
I like to temporarily fit the front axle to help line everything up before
fitting the top yoke and tightening the steering head and the yoke bolts.
Headlamp shell goes in next after gently coaxing
the mass of wires and labels through the hole.
The front indicators are then fed in, earthing
points attached and nuts fitted to secure them in place.
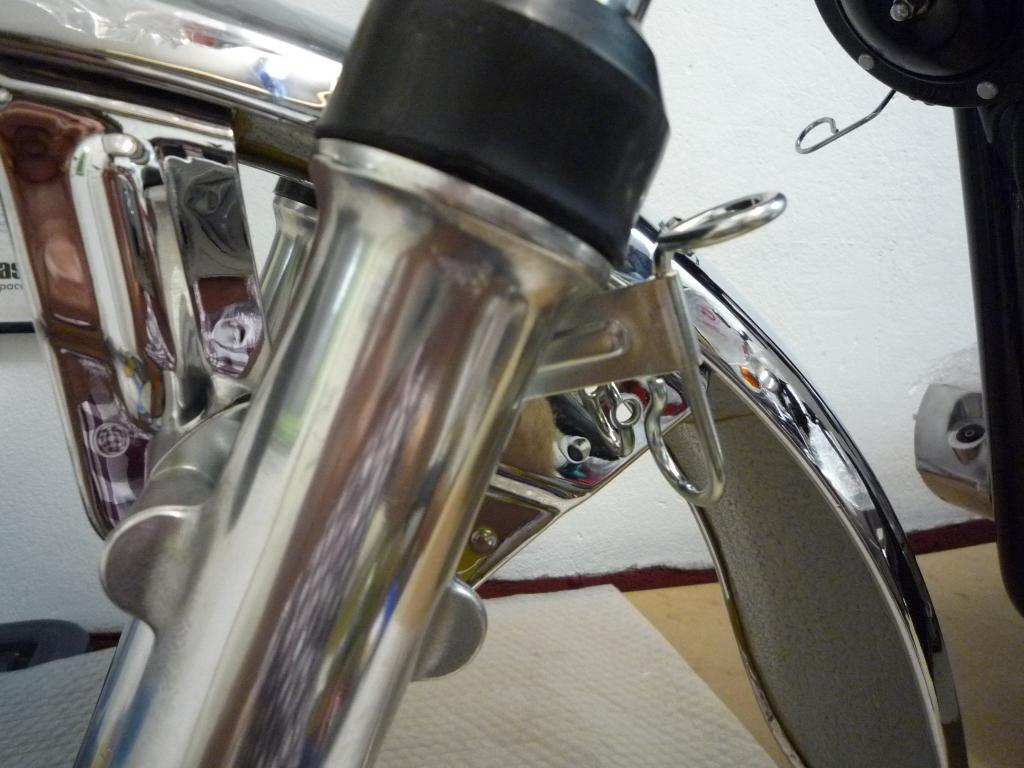
Looking a bit more like a Motorcycle again
So to finish off the bottom yoke the
brake splitter and the cable guide have been fitted and the brake switch
connected up electrically, I have also fitted the smaller cable guide onto the
frame.
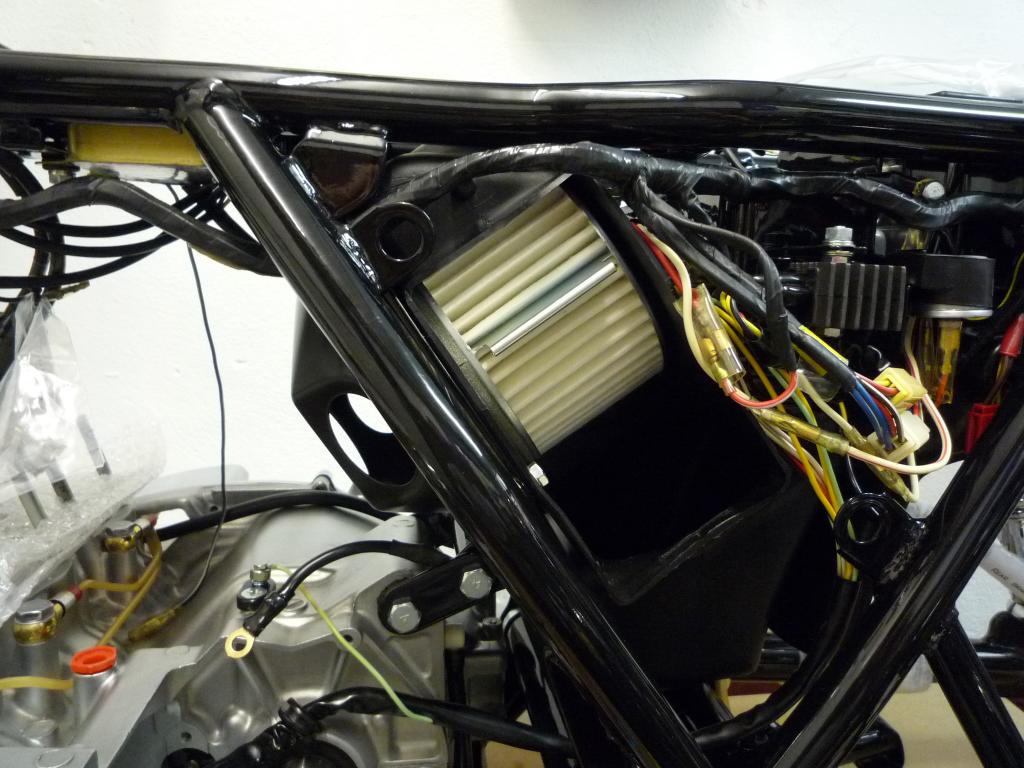
Having
purchased an air filter at the mini southern (thanks Alistair) this could now be
fitted along with the airbox cover, however there was a small issue with the
lower catch which had been bent slightly and the powder coating had bonded it to
the outer frame.

After a little bit of fine fettling it
was released and adjusted and after fitting a new rubber and a layer of foam it
was ready for fitting.

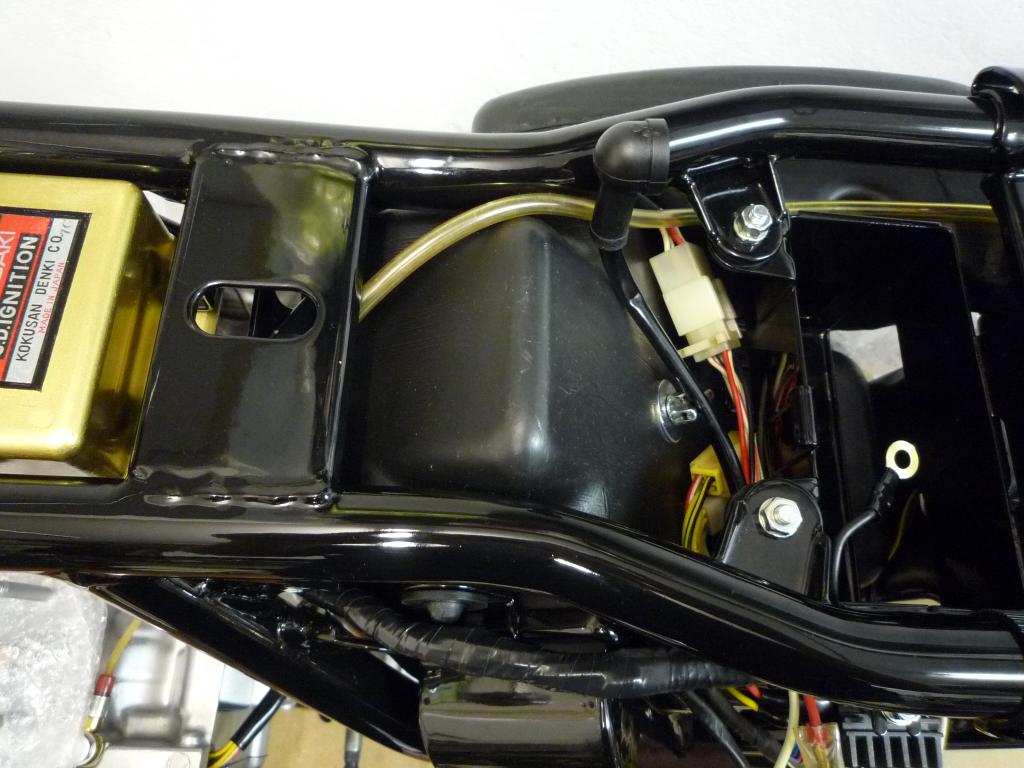
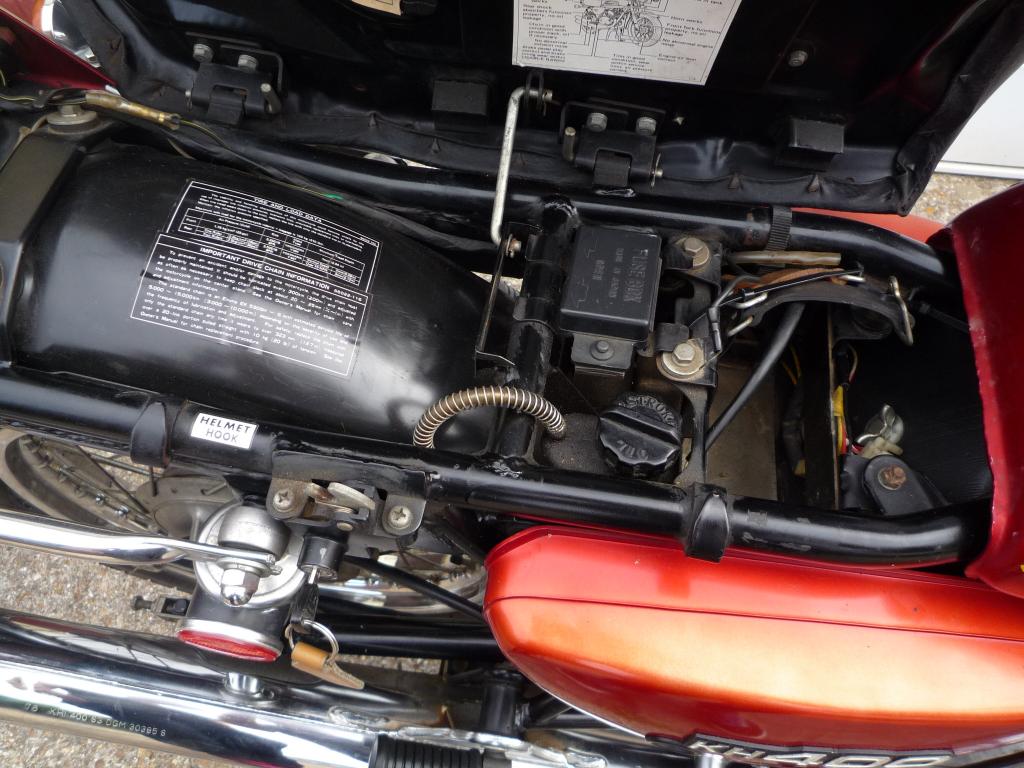
A little
while back I was asked about the routing of the Oil tank breather hose, this is
how I found it routed on the strip down and so have added these photo's for
reference.
Due to the fiddly nature of the routing I am fairly confident of its originality
on this bike.

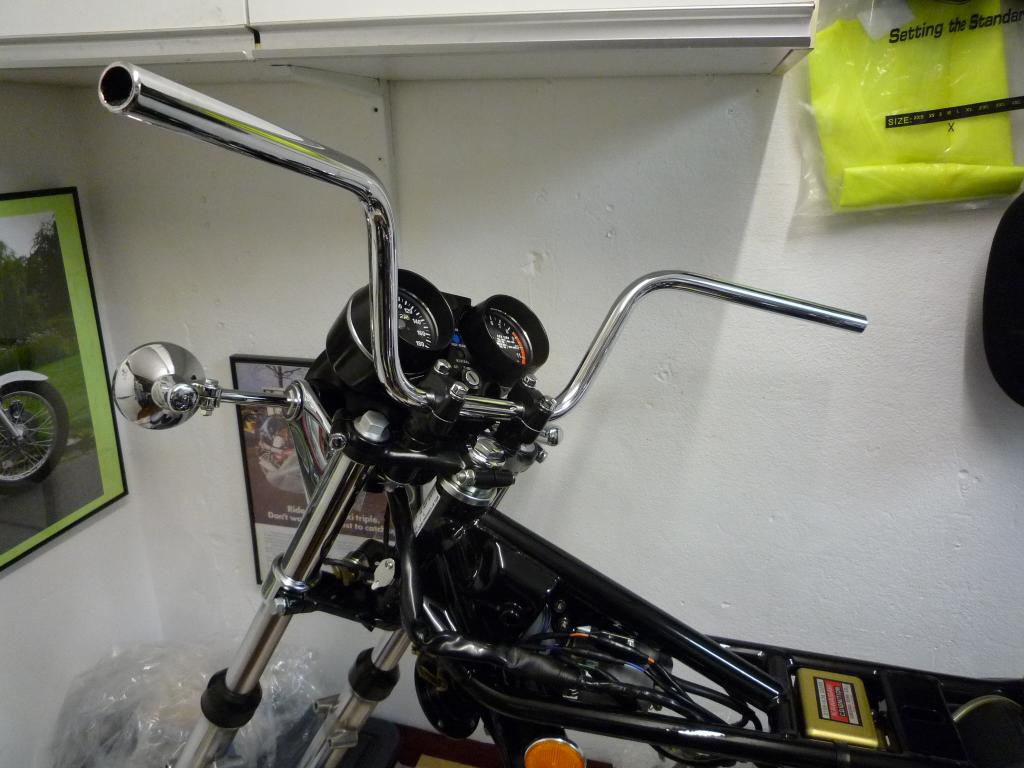
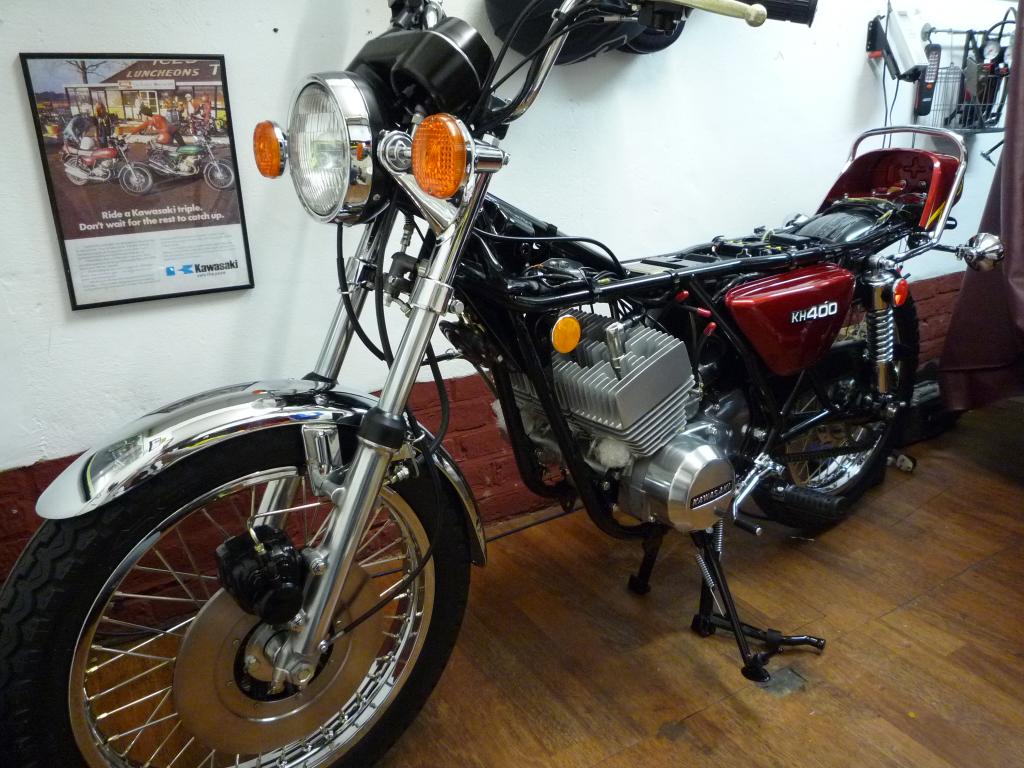
Now comes the only cosmetic issue I
personally have to overcome on this project and that is with the US bars and
they do stand out.
 It is one of personal taste and I do think the lower bars look better but as I
am keeping to the Canadian spec they will be staying.
I hope that once they are dressed up and angled correctly they will tie in
nicely.
It is one of personal taste and I do think the lower bars look better but as I
am keeping to the Canadian spec they will be staying.
I hope that once they are dressed up and angled correctly they will tie in
nicely.
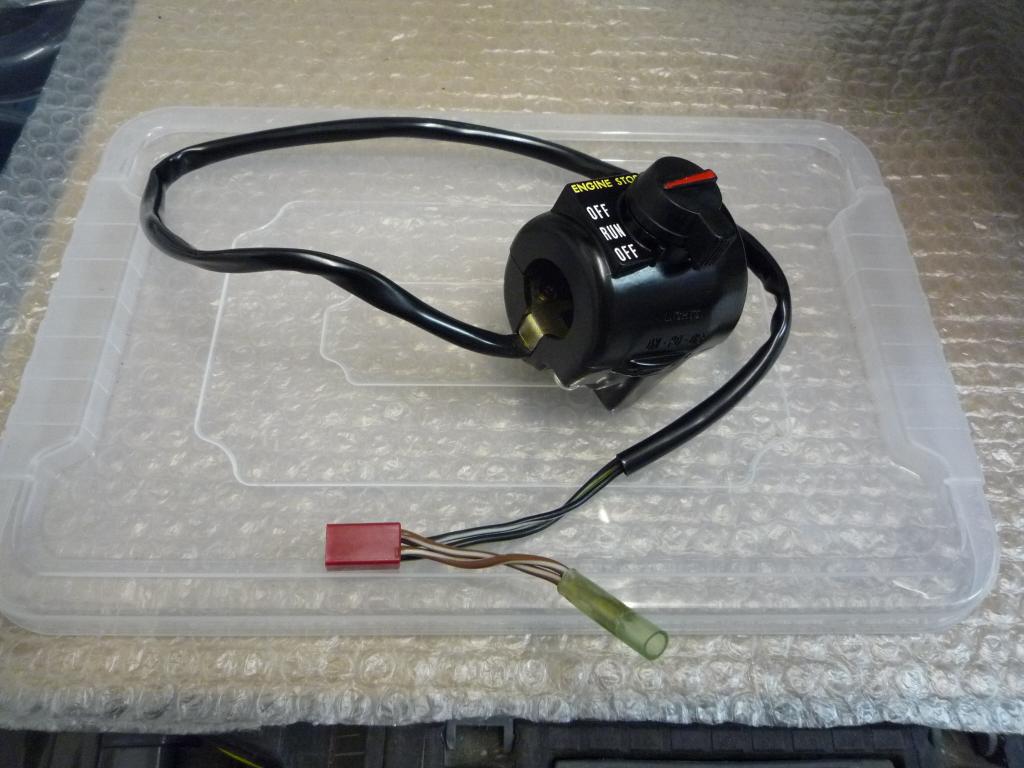
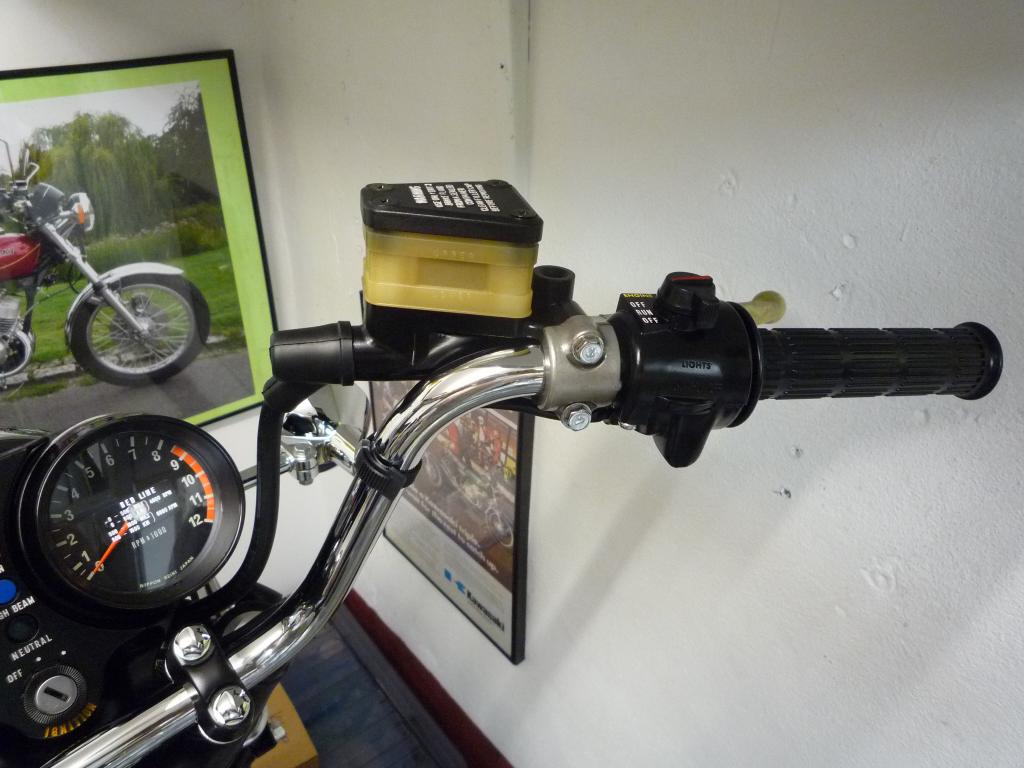
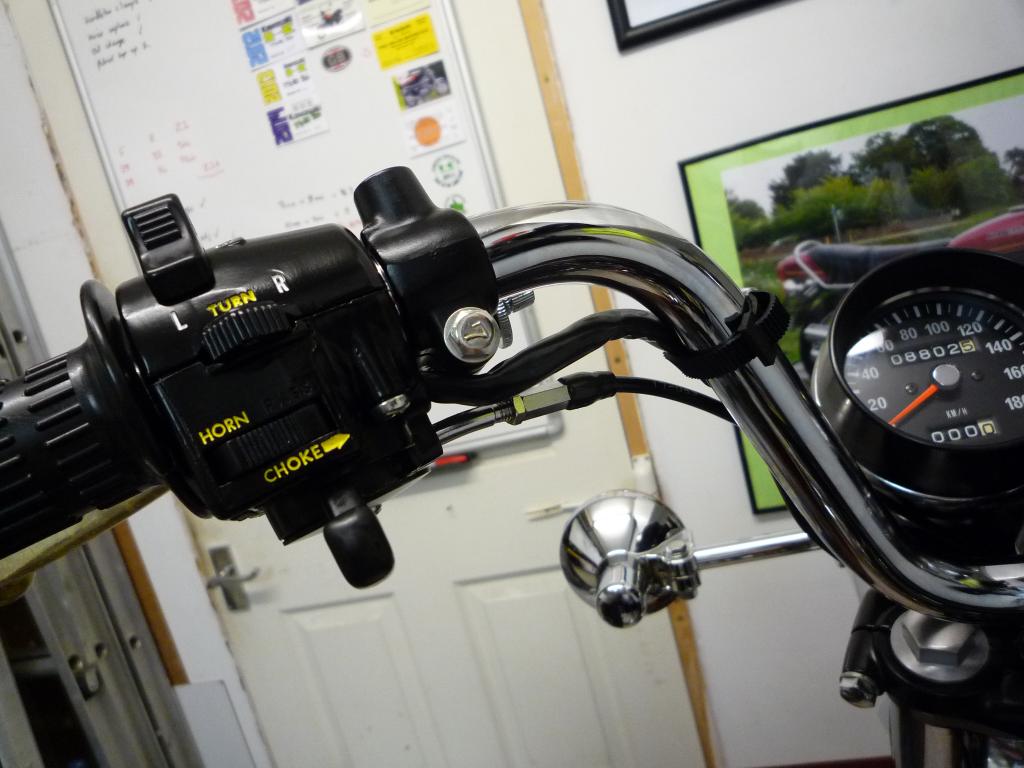
With the handlebars fitted it was time to
rebuild the switchgear, because of some fine cracking around the Kill switch
base I made a small reinforcing plate to bond onto it, which fitted perfectly
within the casing.

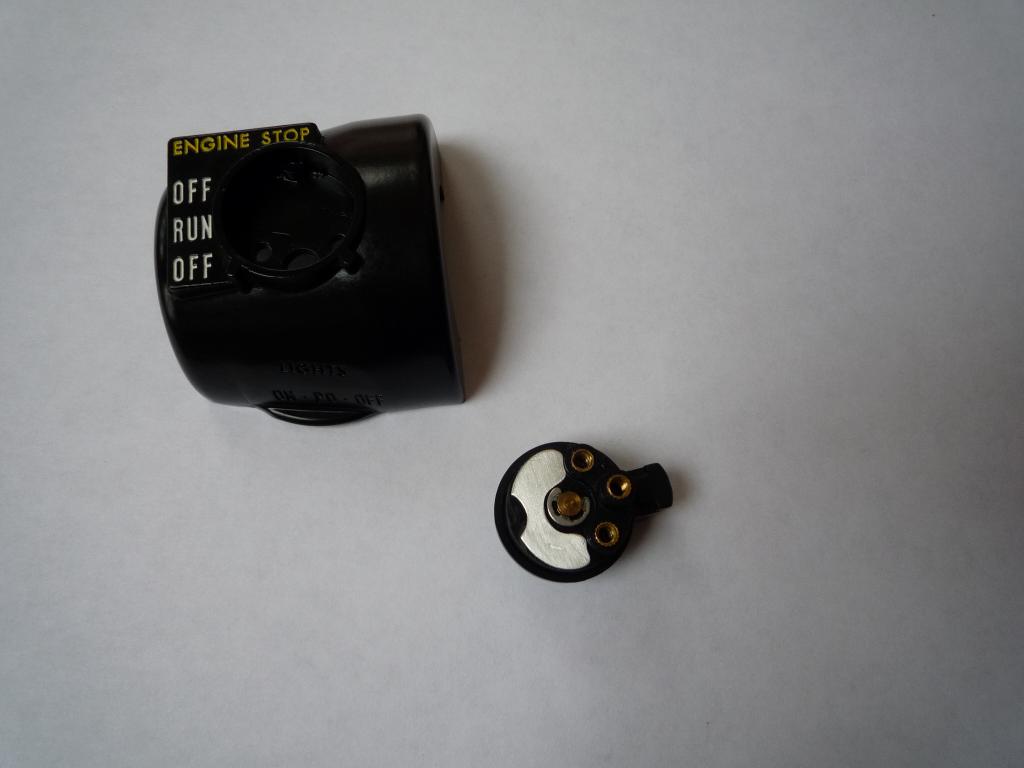
After a quick rewire the right hand switchgear was done.
Followed by the left hand.

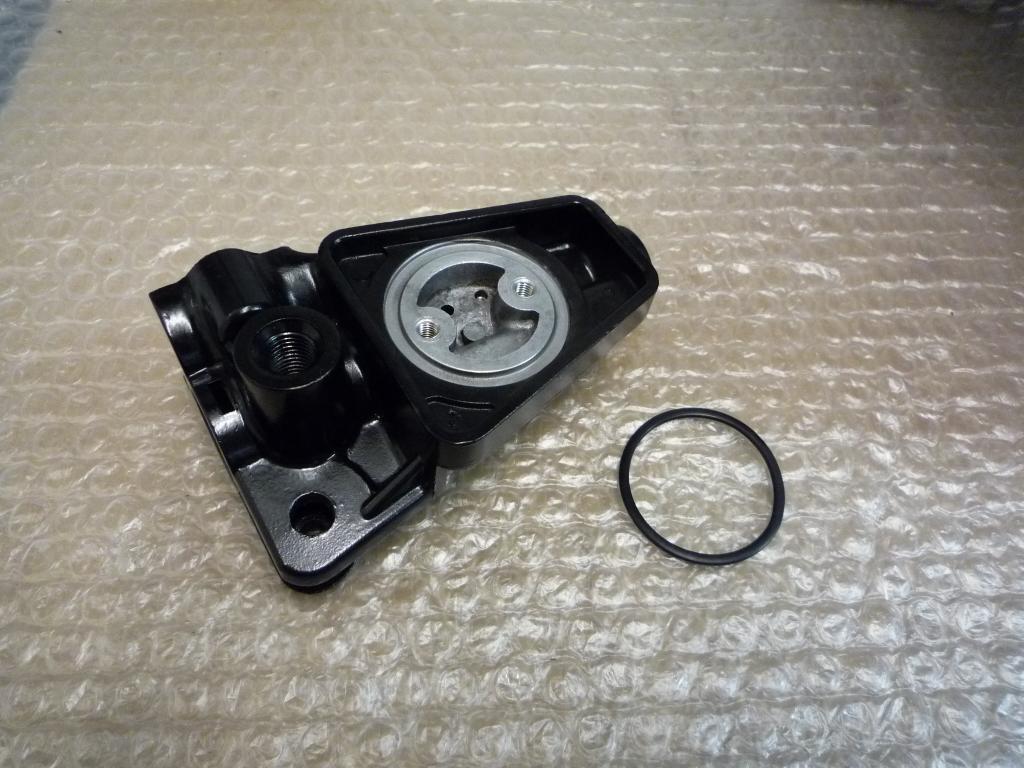
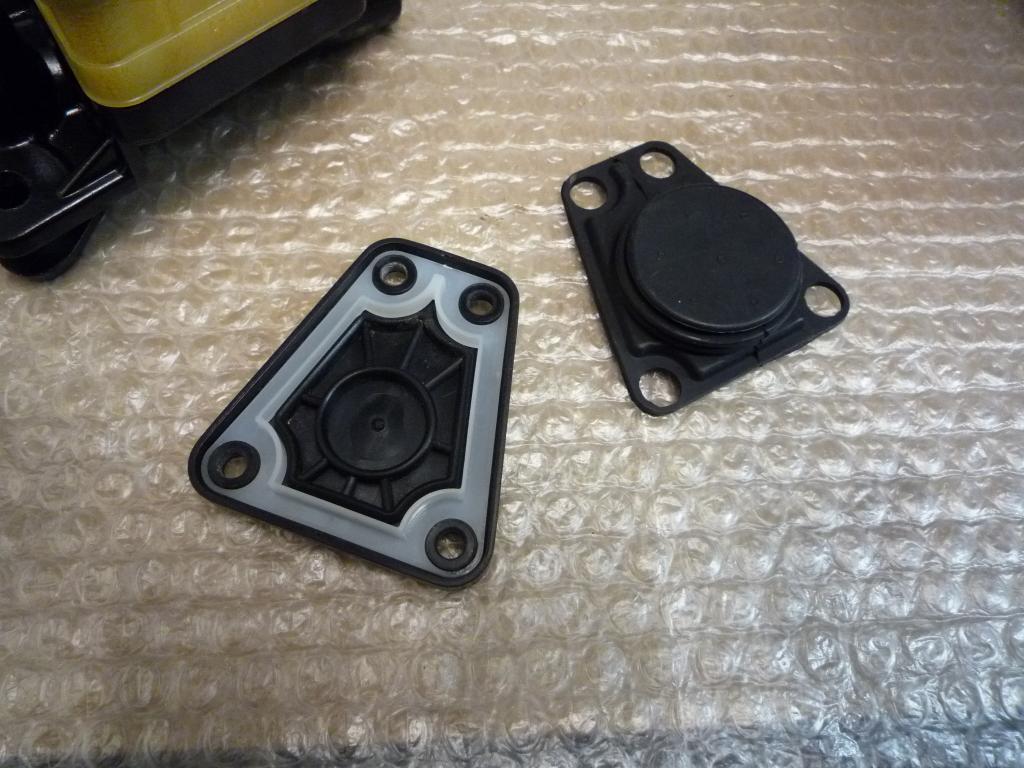
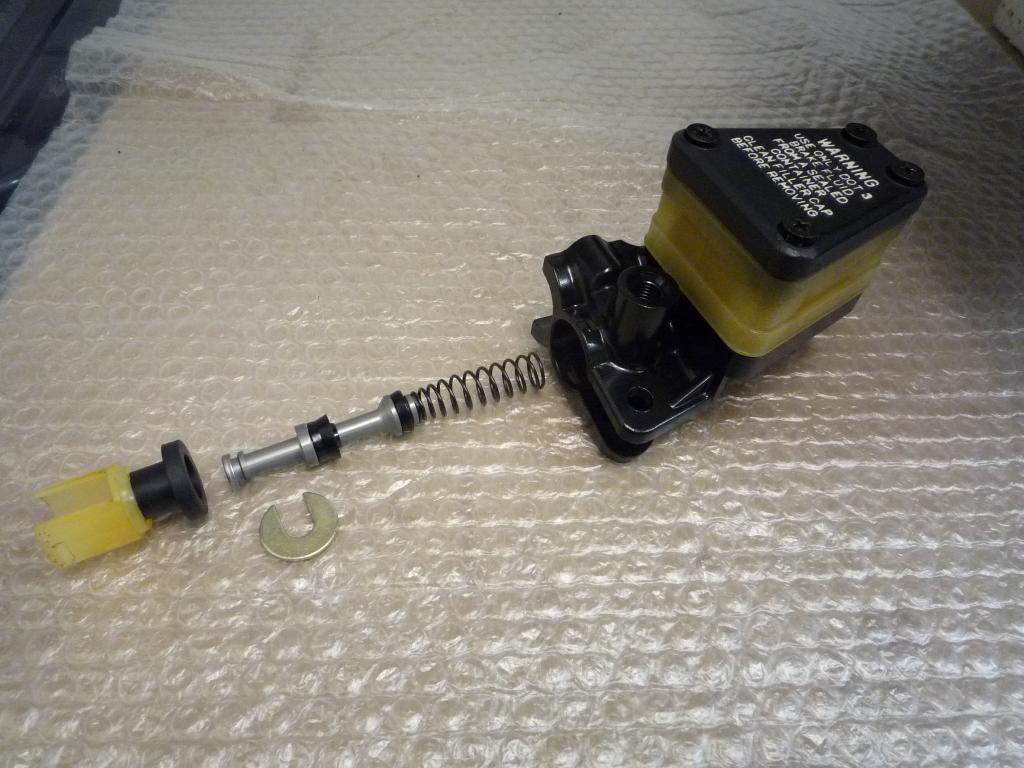
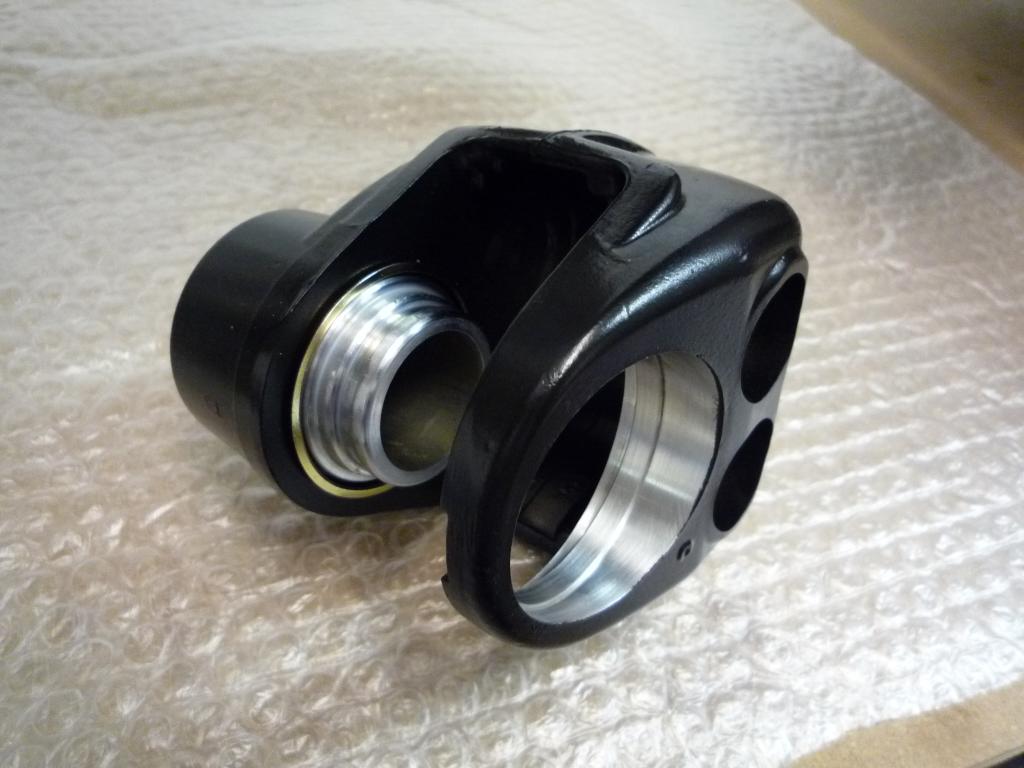
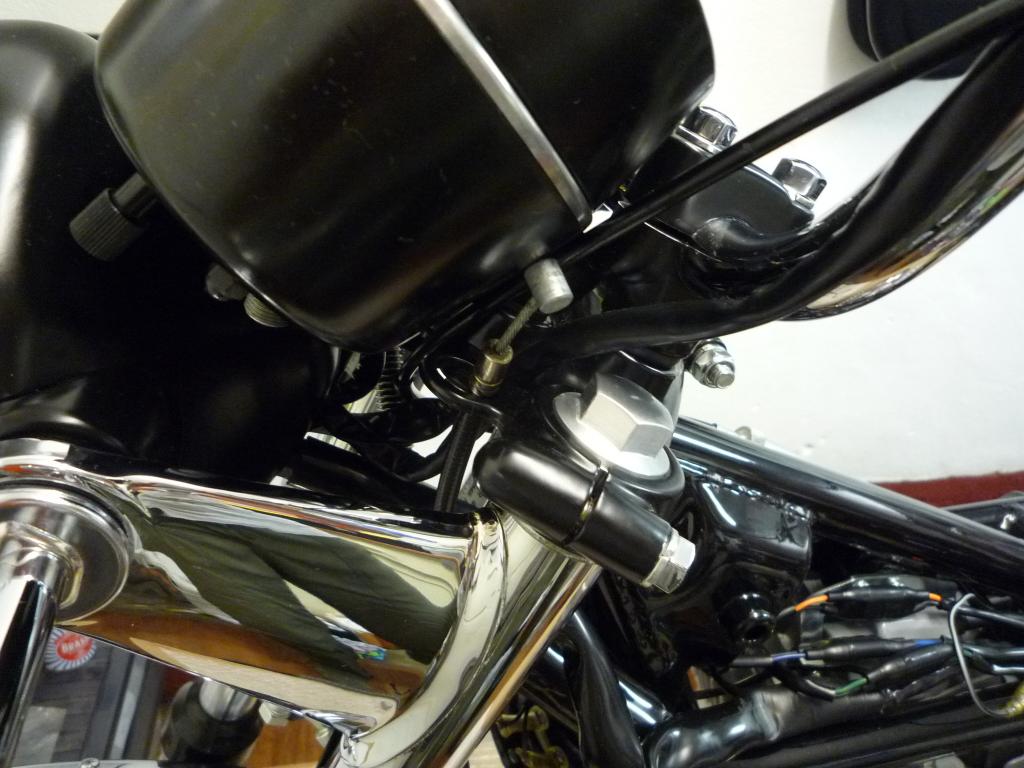
Next comes the master cylinder.
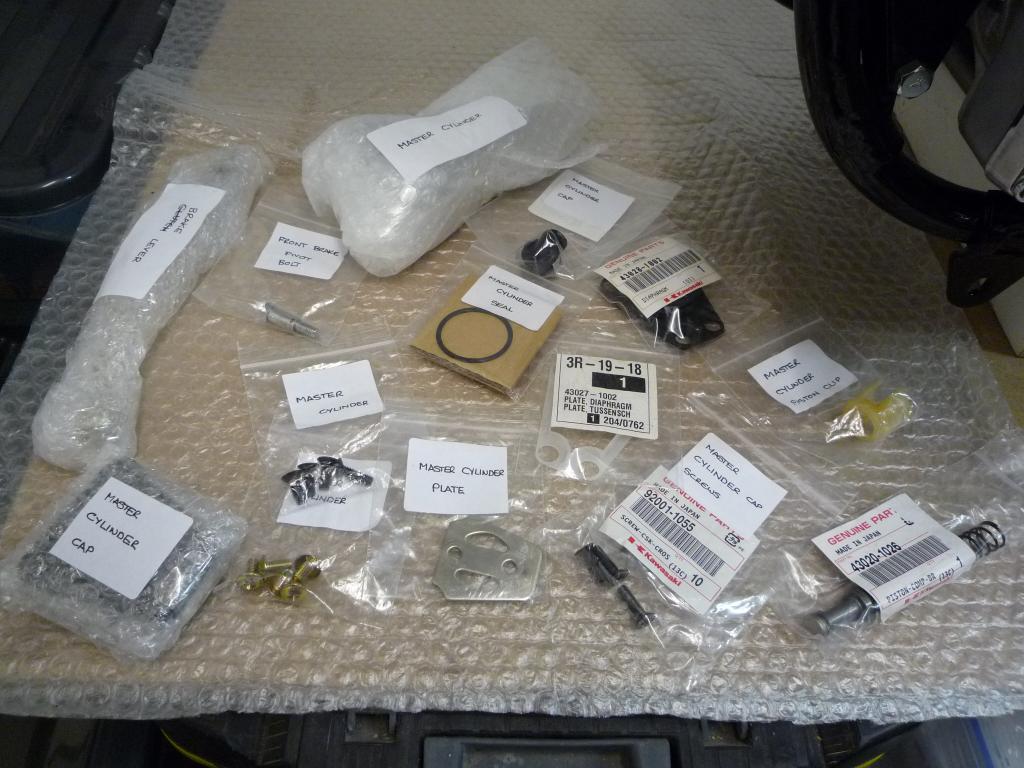
First to fit is the seal.
Then the reservoir.
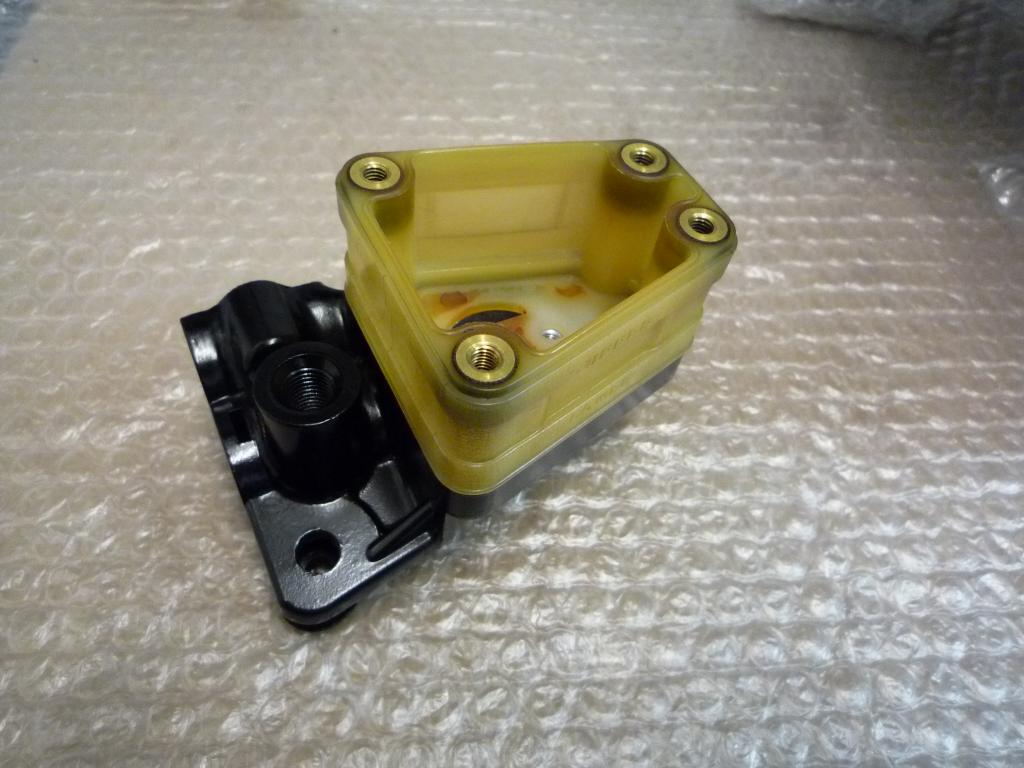
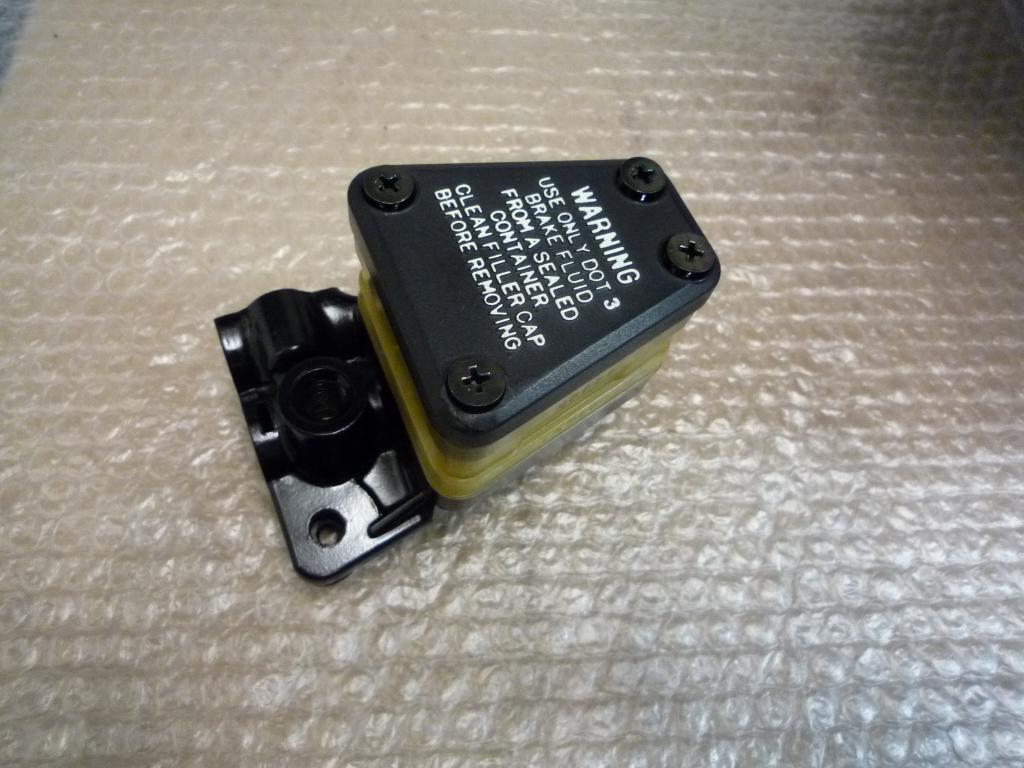
And its securing plate and screws...
Followed by assembly of the cap.
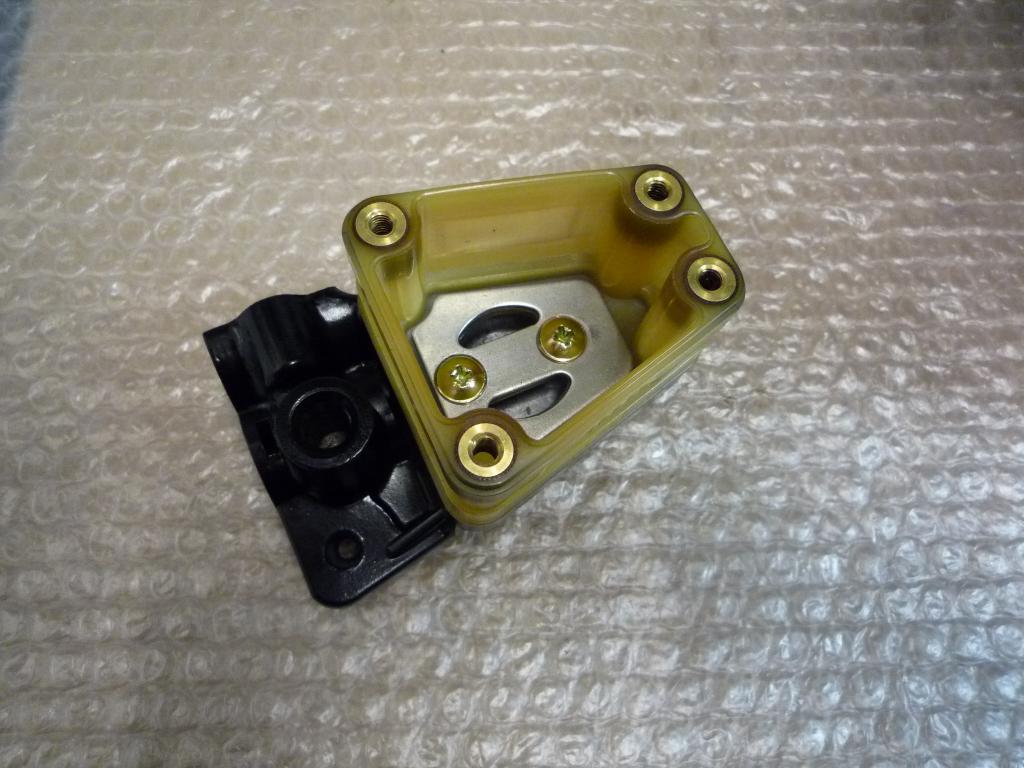
Piston assembly to fit next time
Once I find the retainer
Well I found the piston retainer and it
was hidden in the "oh you really should have got this bit plated as well box"
....
so to save time I had to source a new one which luckily was fairly easy and
cheap to do.
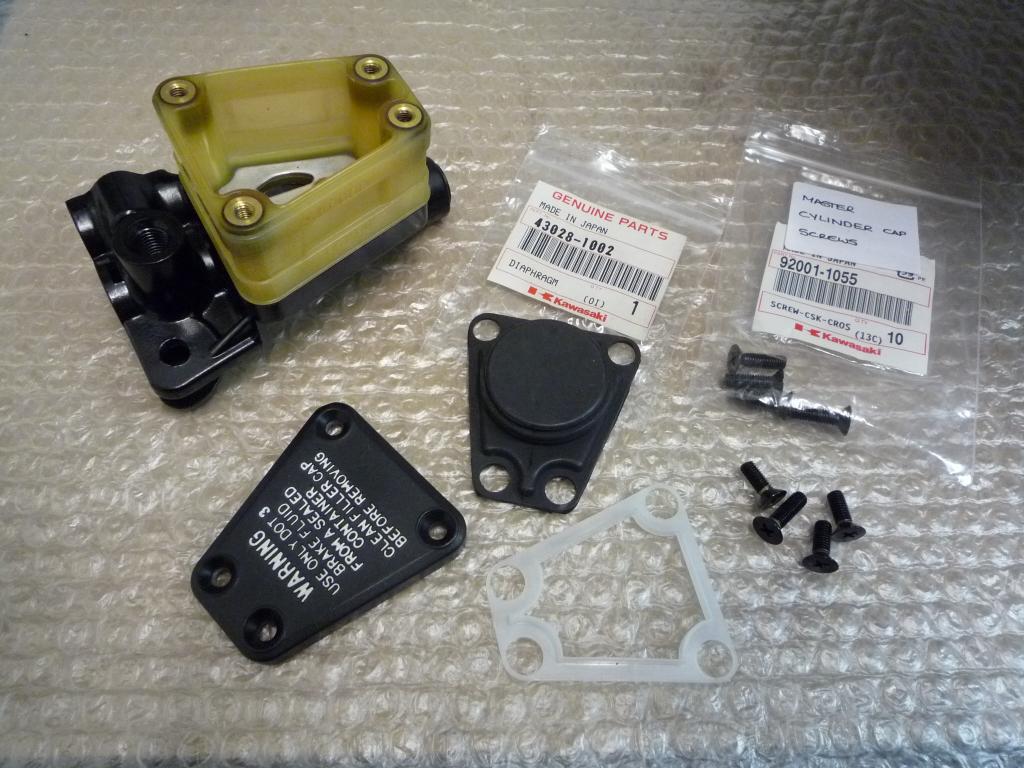
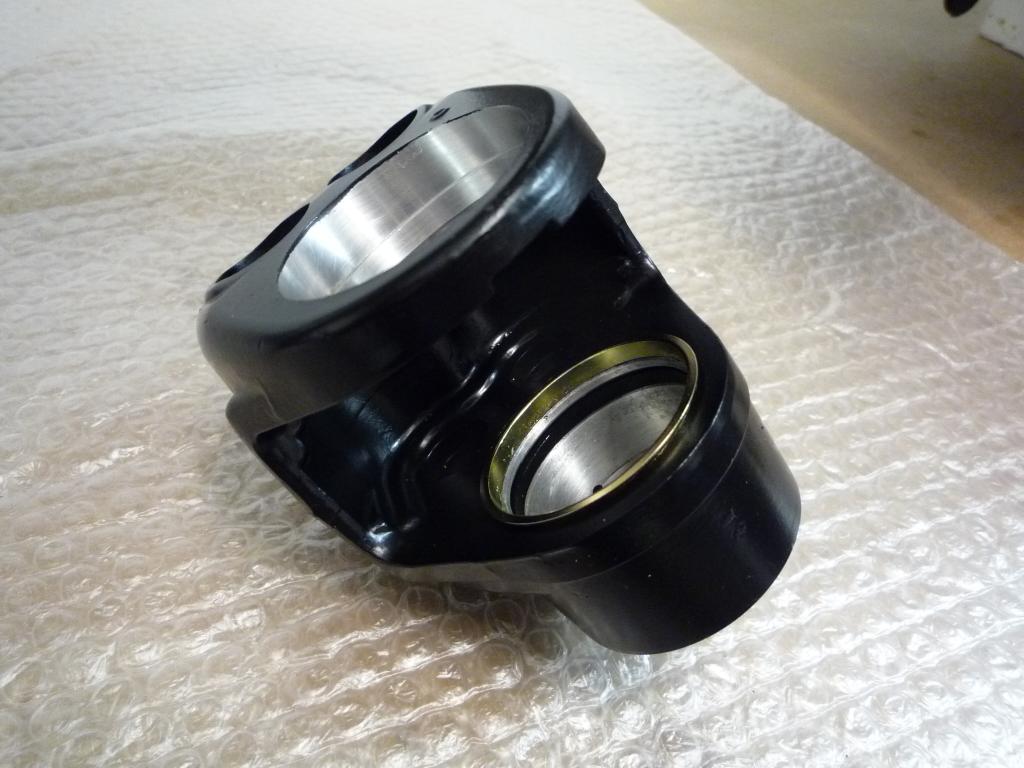
So after another of Posties regular visits we continued assembling the master
cylinder, thankfully there is no nasty circlip to fit, the whole piston assembly
slides in and is held in place with the retainer and then by the white plastic
liner clipping into the body a much simpler system thank you MR Kawasaki
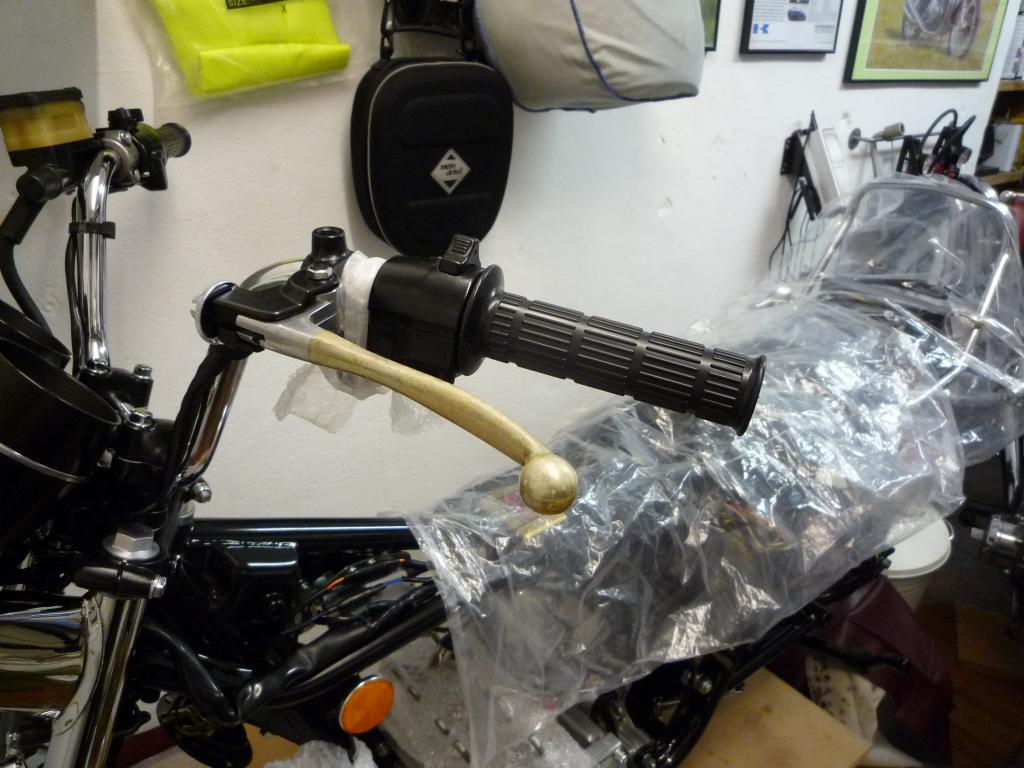
With that done it just left the lever
to fit. Before mounting it alongside the
switchgear and a NOS throttle body and grip.


The clutch lever and perch and left
hand switchgear are a temporary fit for now awaiting a washer.

But we can make a start on re fitting
the original brake hoses which have been given a thorough going over and I am
happy to fit them, if there was any sign of cracking or stress I would have
replaced them.

With the
switchgear in place they could now be connected up to the loom which just left
the headlight to assemble and fit and we could close up the shell.
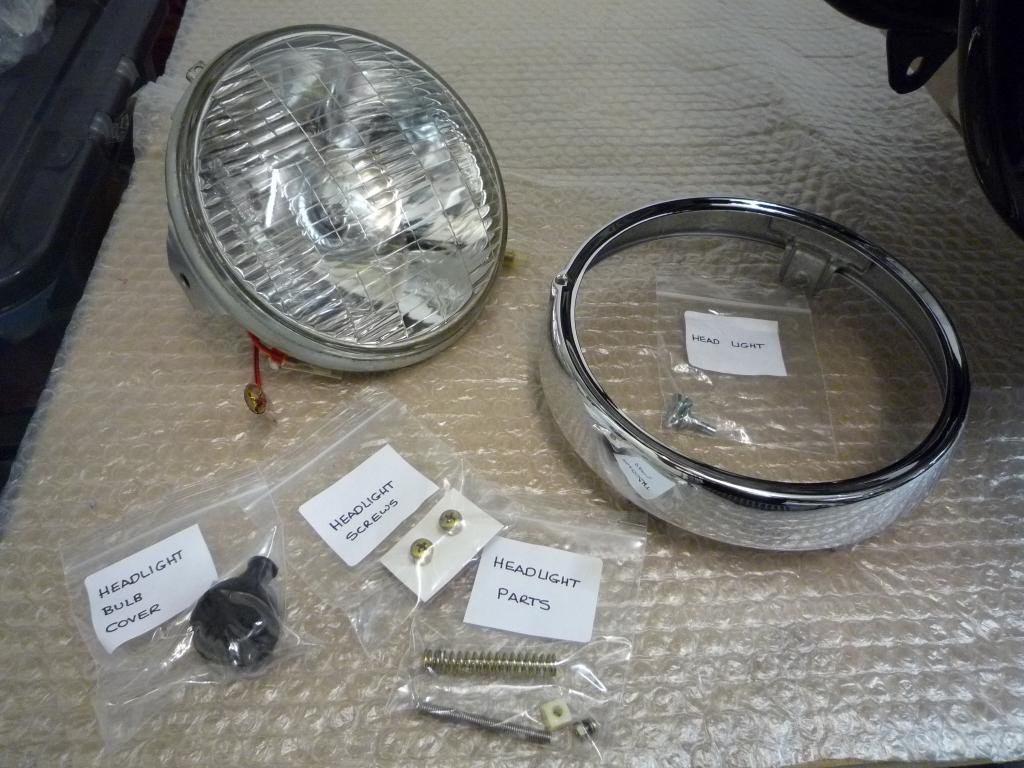
This model uses the sealed beam unit and has the beam adjuster screw fitted to
the rim. I wonder how bright it is going to be:?:

The original rubber cover was perished but a replacement was donated by GPZ592
(Thanks again Mark
) and the delicate task of threading double bullet connectors through a 40 year
old piece of rubber was definitely not for the faint hearted
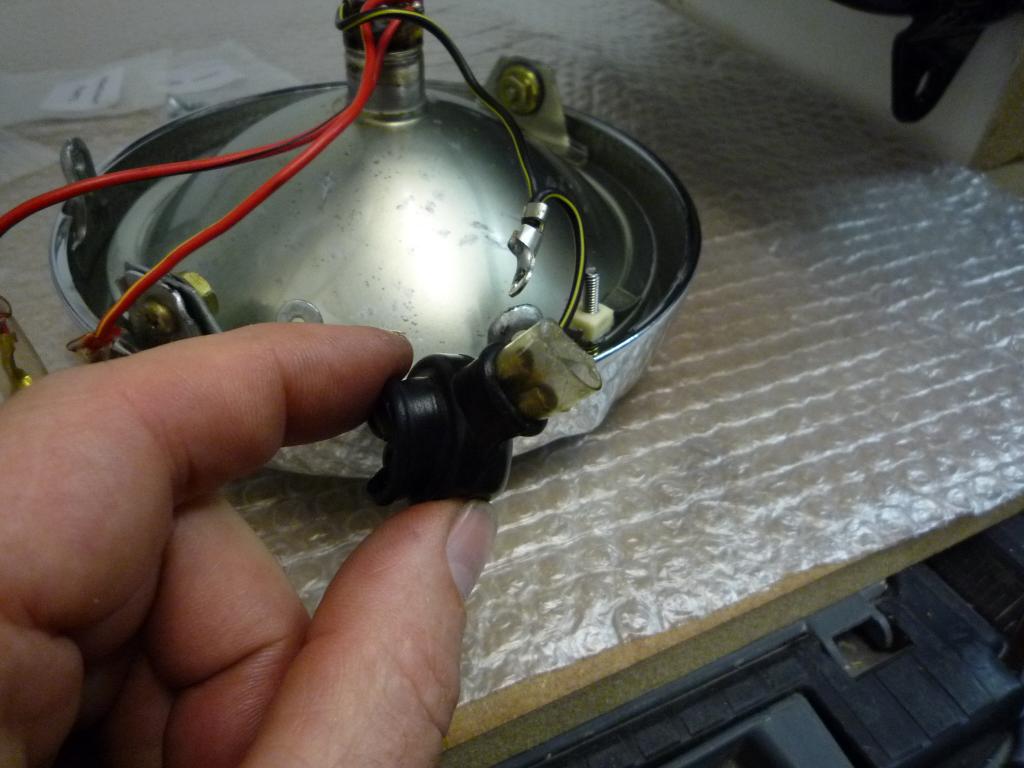
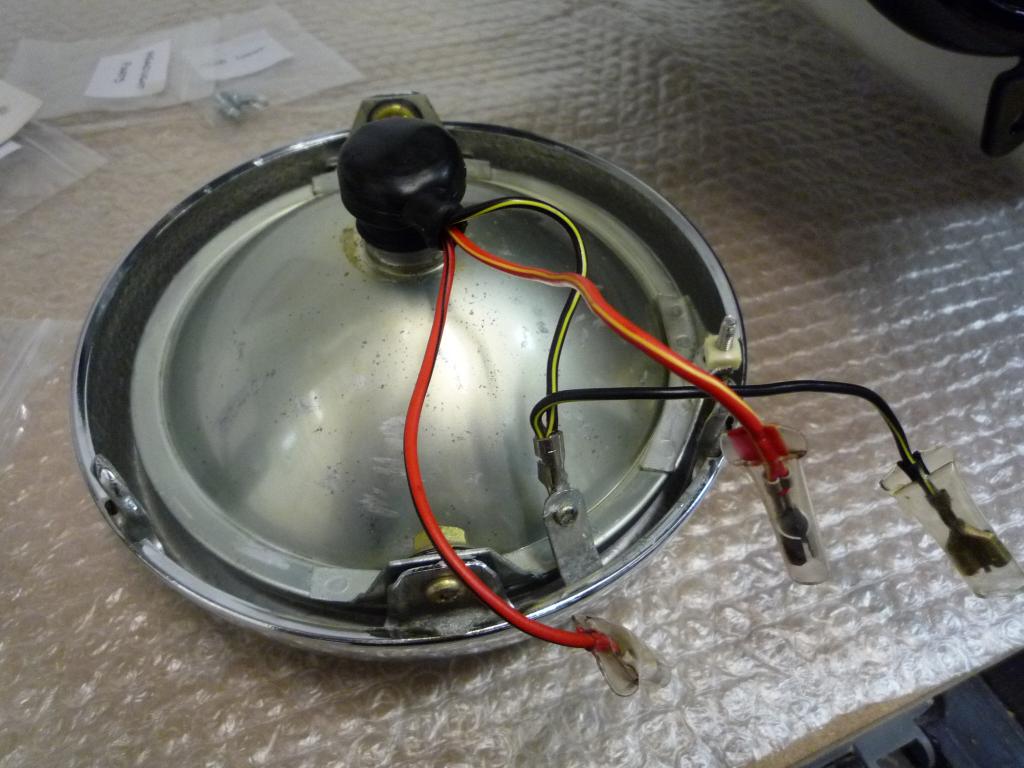
But with perseverance and a little bit of lube we got there.
And with the headlight connections made and a final check over we could close
up.


Nice
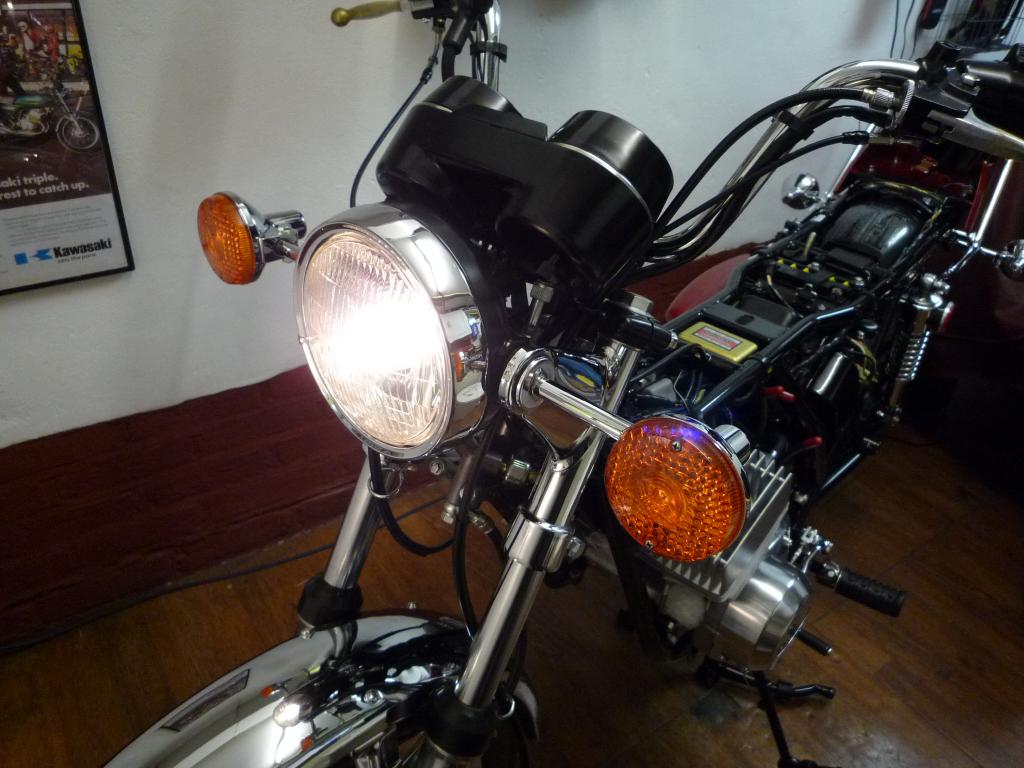
Have to say, some things make a huge difference and after some reservations I am
loving the headlight, and the bars now they are being dressed are coming
together nicely and I'm feeling rather happy with it
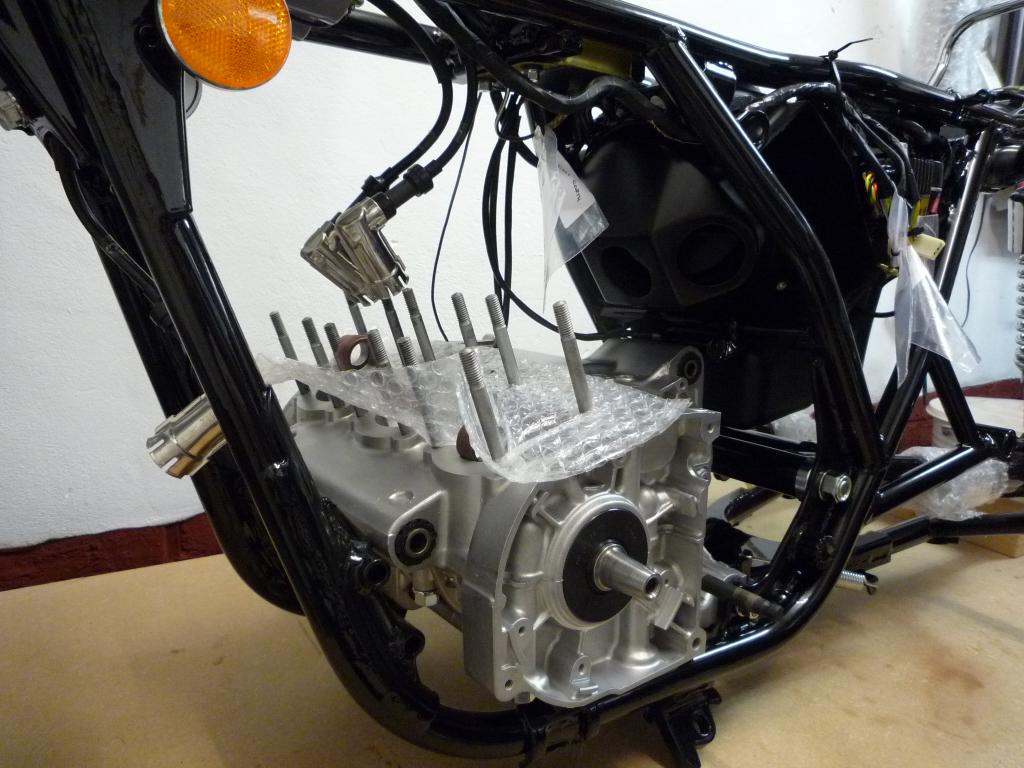
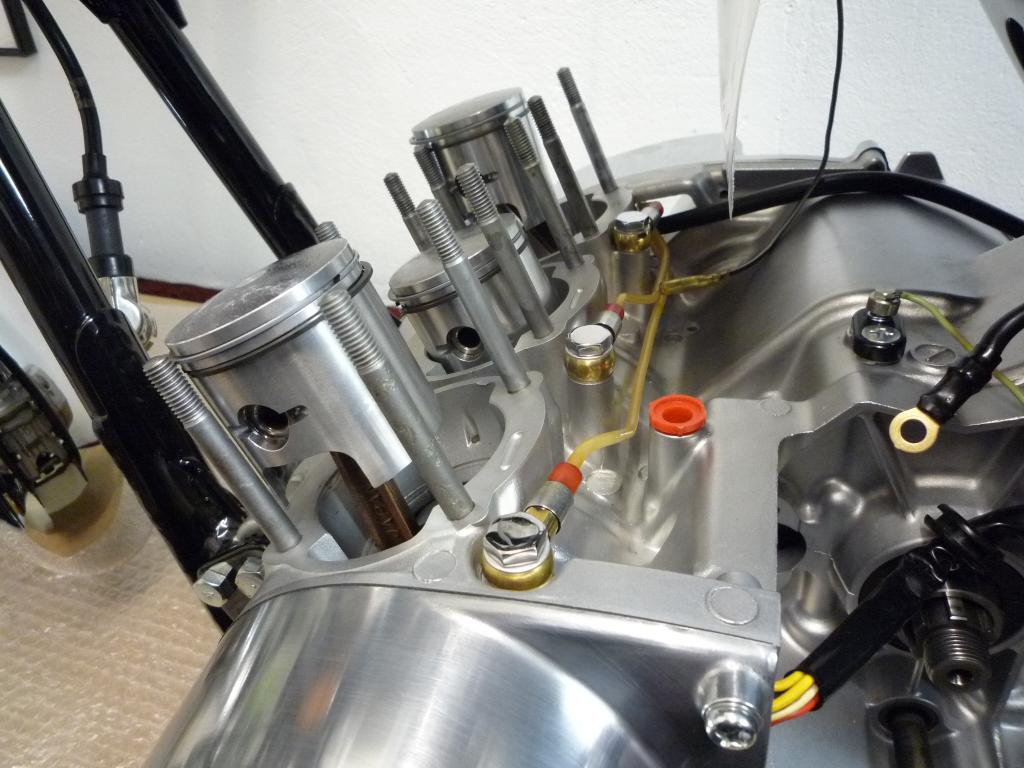
Thought it
was time to put a bit more focus on the engine and hopefully assemble the top
end. The barrels and heads had been packed away after vapour blasting to keep
them safe and I wanted to measure them all up before fitting them.
Following the manual guide they all came up within limits were on standard bore
as expected and were in good condition apart from the left hand which had
suffered the crank bearing issue.
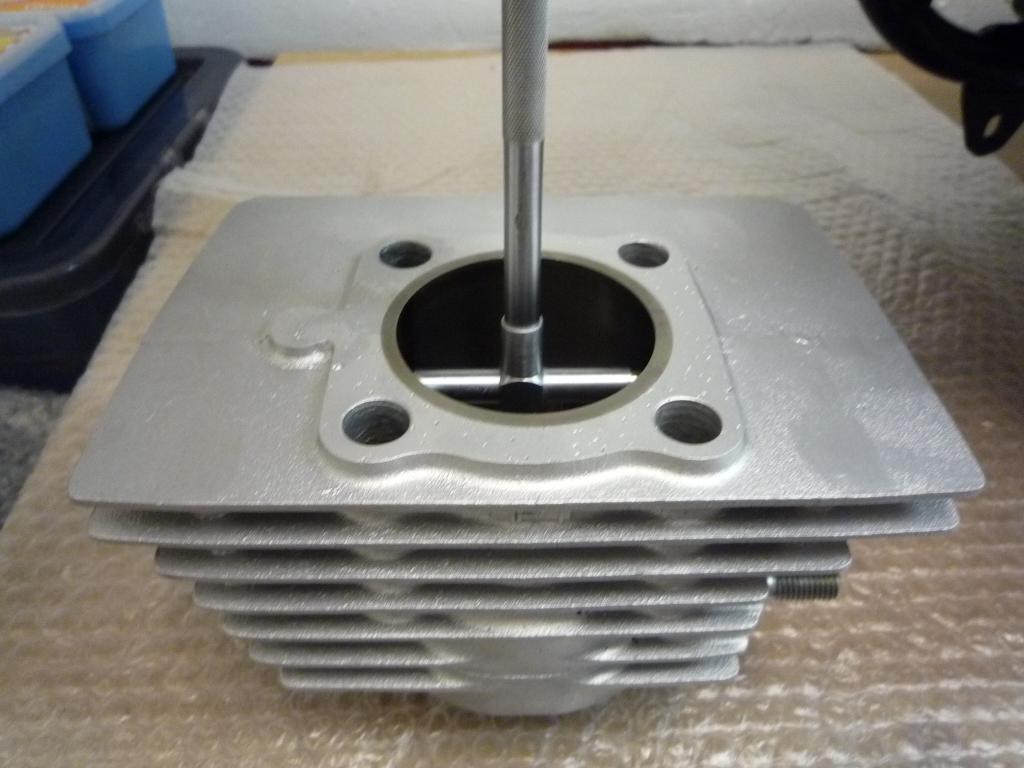
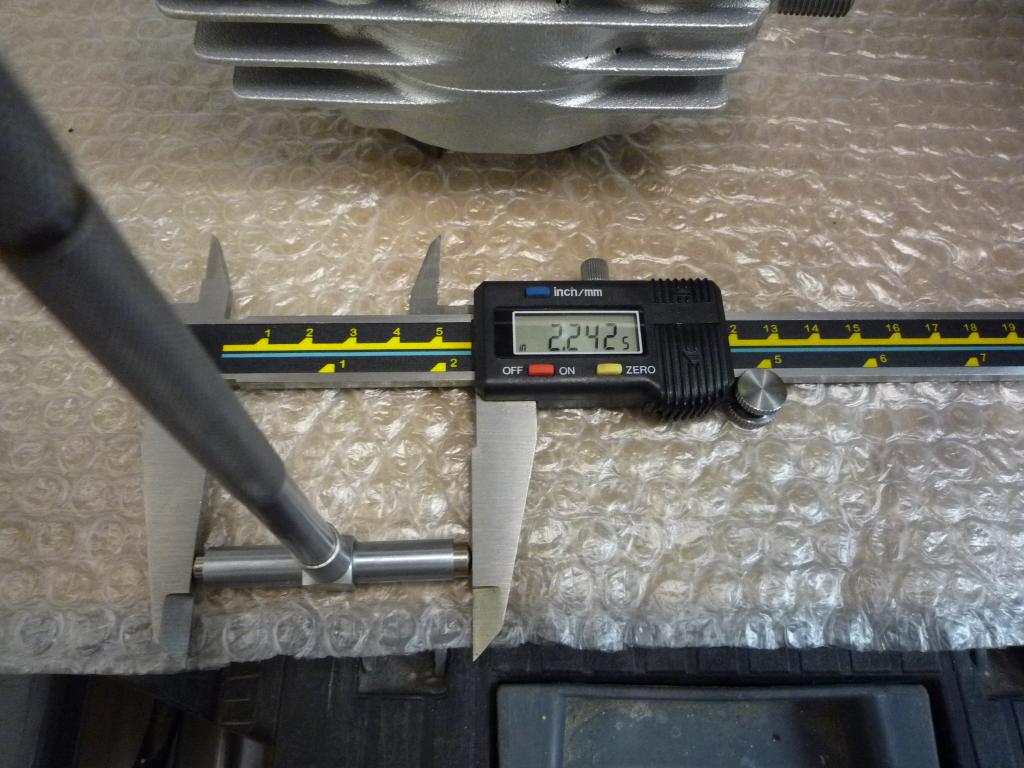
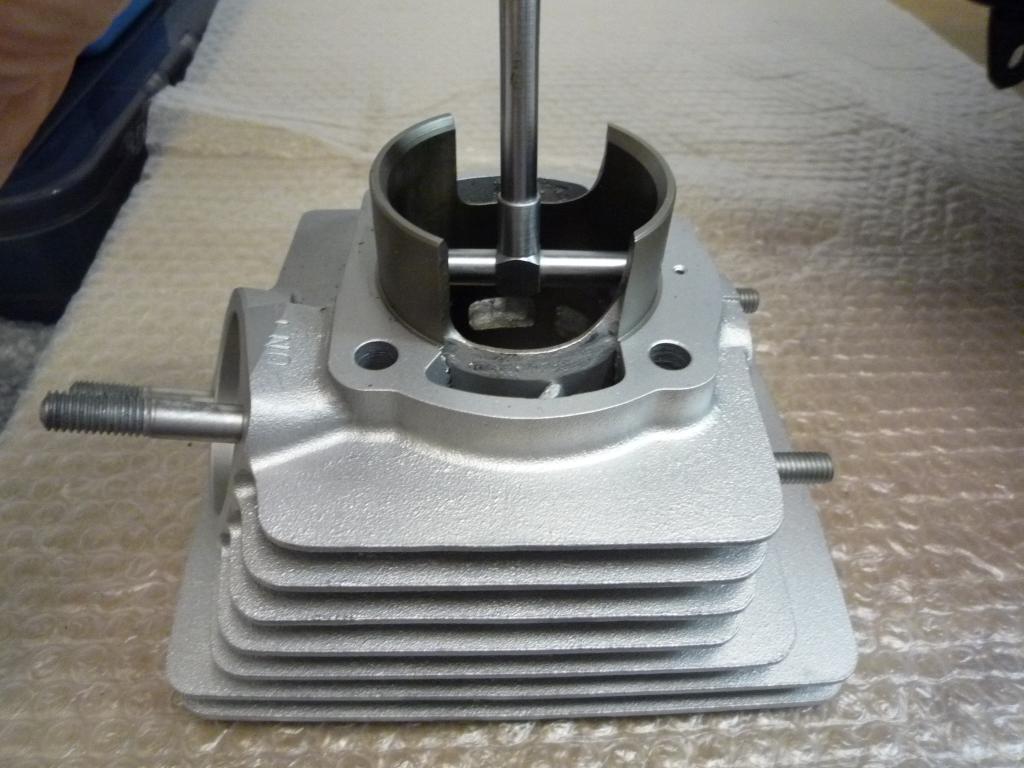
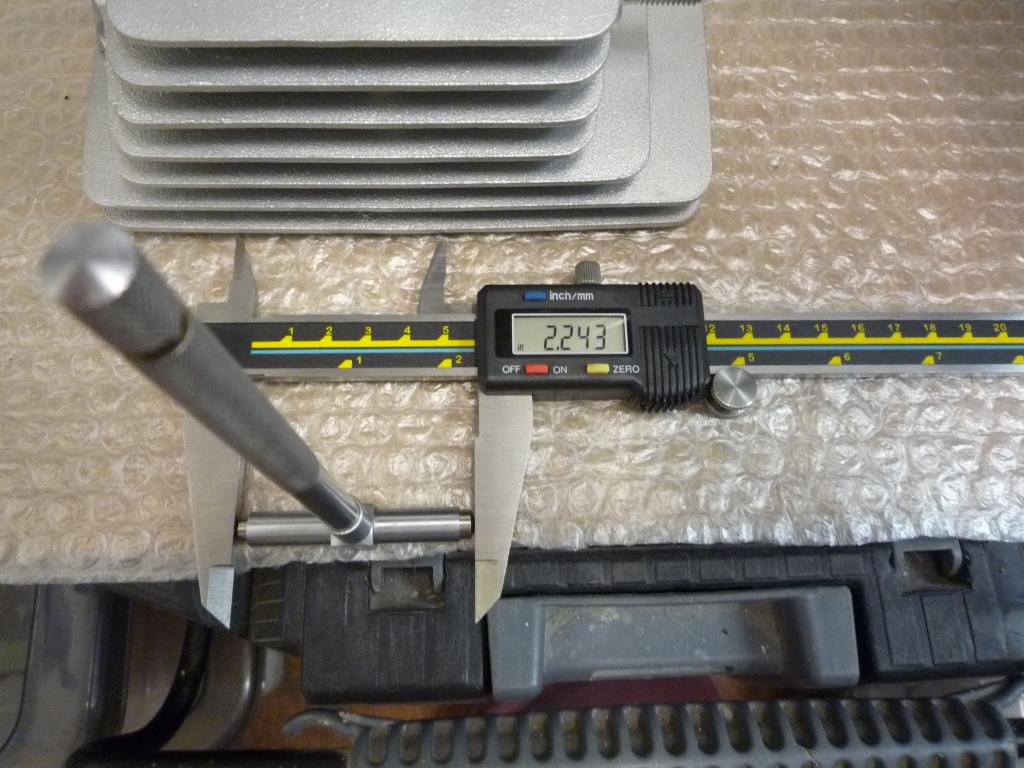
Size was good and within limits but
there is an area of pitting on one side

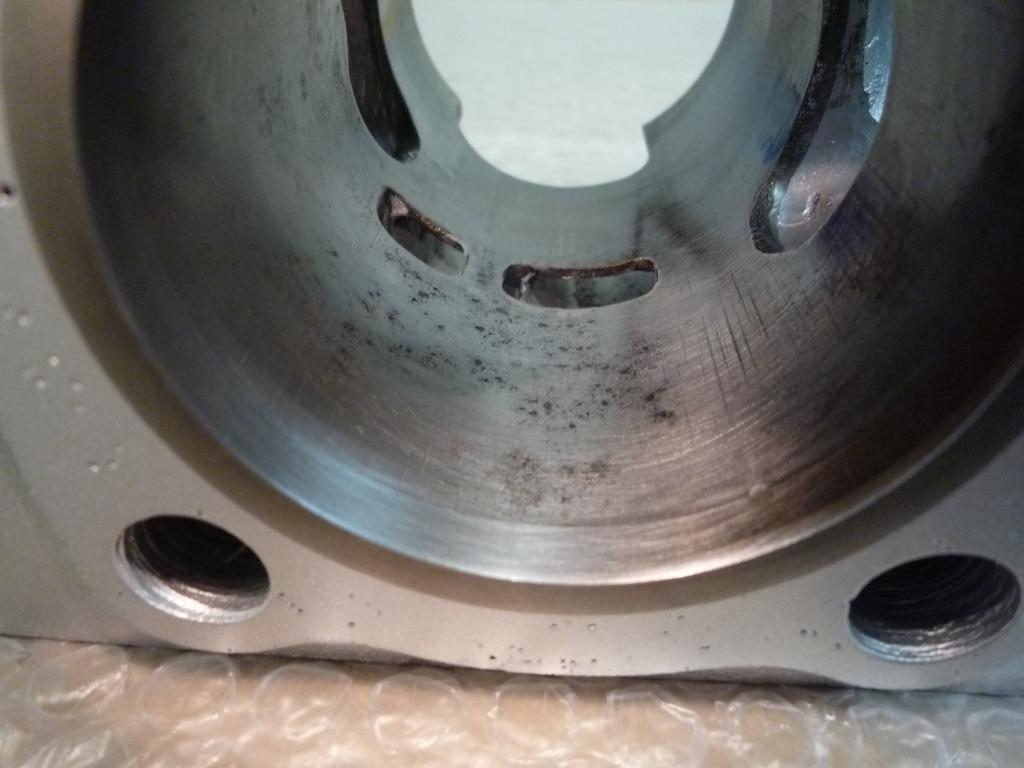

So now I have to think about my
options?.........
Guess I will be fitting the front mudguard and rebuilding the wheels instead;-)
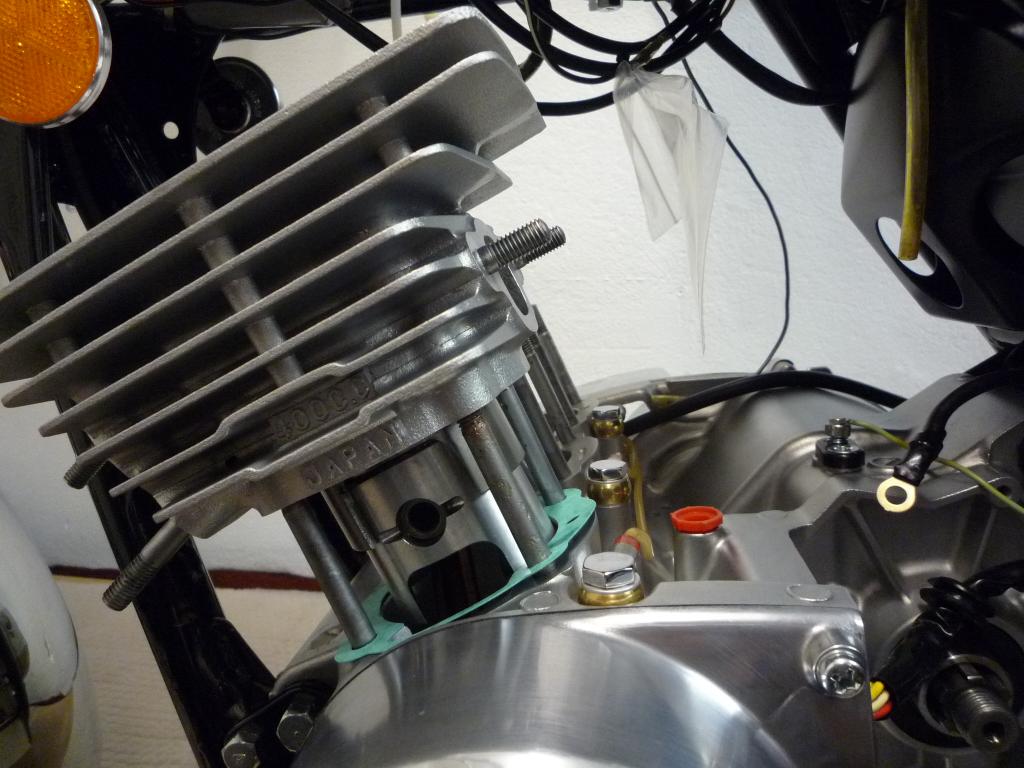
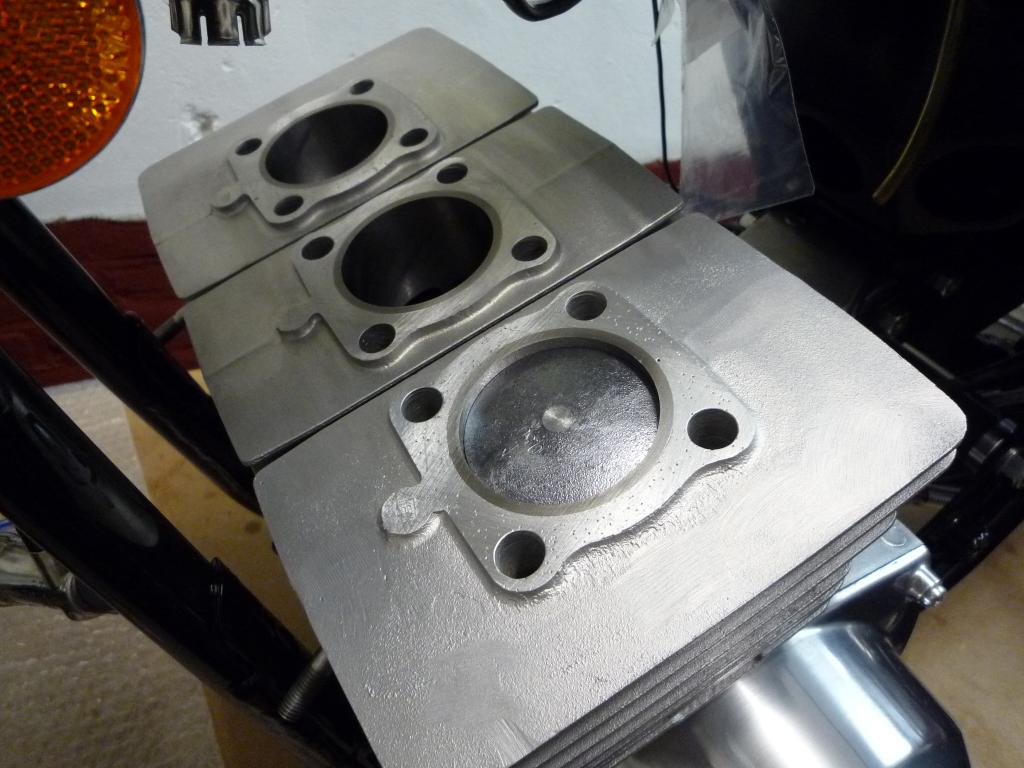
Well the decision to rebore has been
taken its a bit of a shame but the best way forward and the right thing to do
for both man and machine though the pocket may say otherwise? After visiting an
Old school rebore workshop yesterday which was filled with old lathes, barrels,
crankcases and diverting pistons (very strange) the hone was lightly run through
all the barrels and highlighted any issues, though still marginal and within the
limits it did show up areas of wear and chemical markings in a couple of the
bores that would be better off taken out.
So I need to put that plan into action now, thanks for all the advice given on
this guys
So in the meantime we crack on where we can.
The NOS left grip has now been fitted but I am still a washer short for the
clutch perch, seems its taking the long way round the world to get to me
so it will just sit there for now.
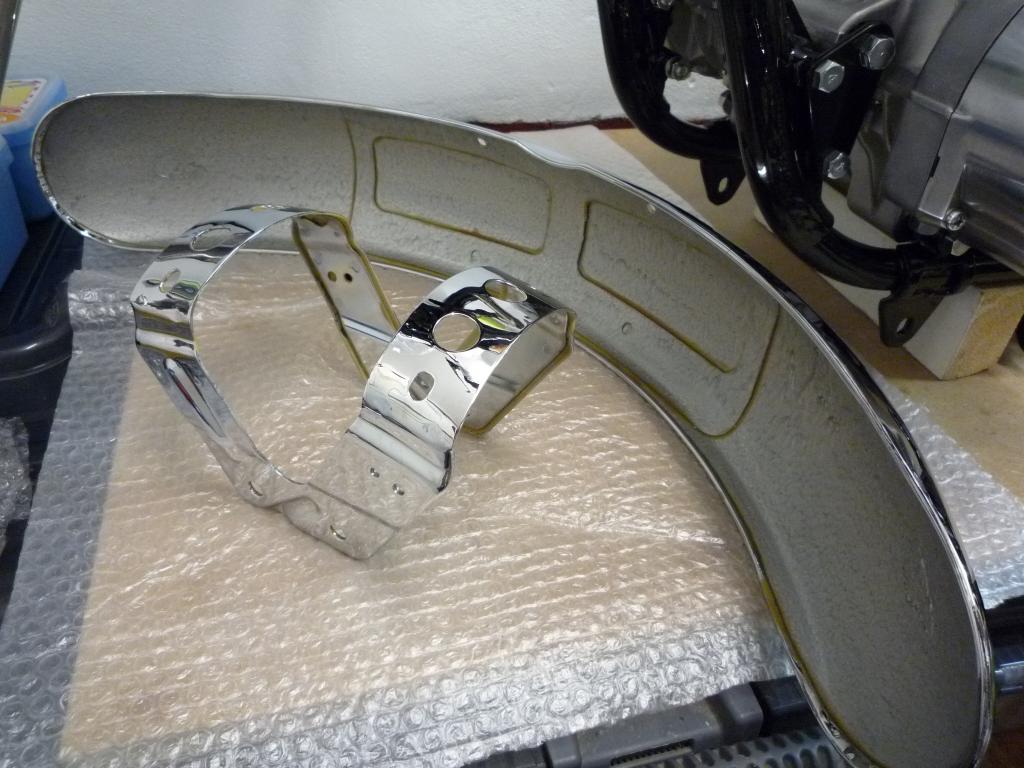
The
front mudguard has been assembled and protected from the elements, for when I
ride home from the Southern!
The Hammerite being applied by the Chromers and the wax protection will help at
the seams.
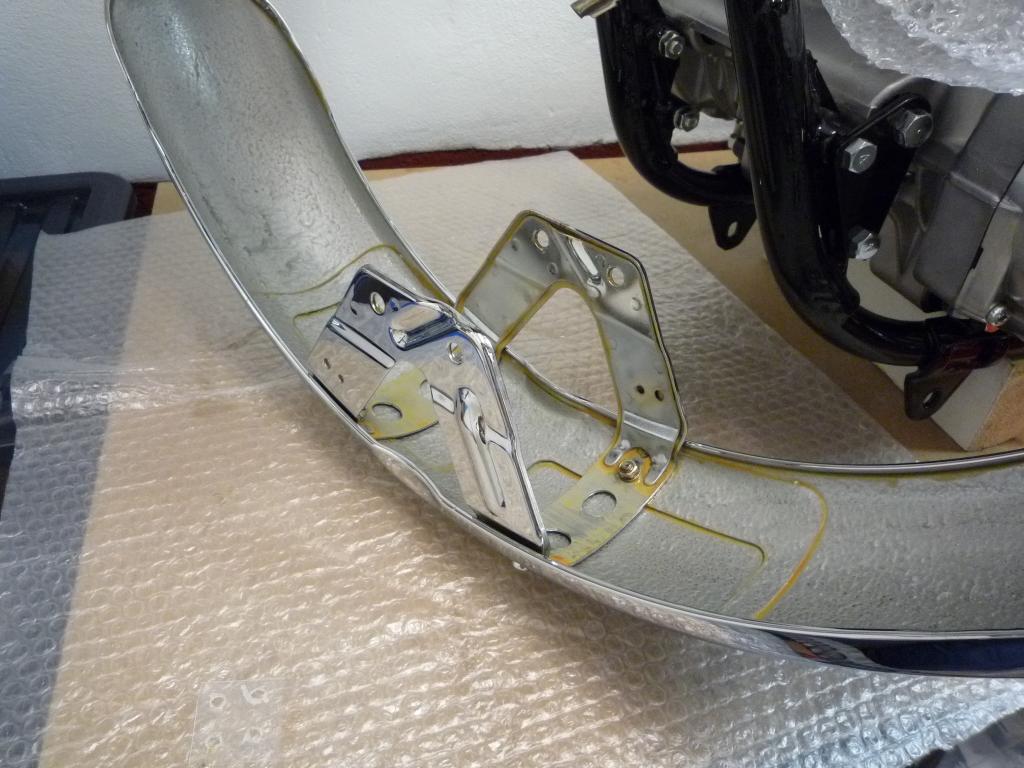
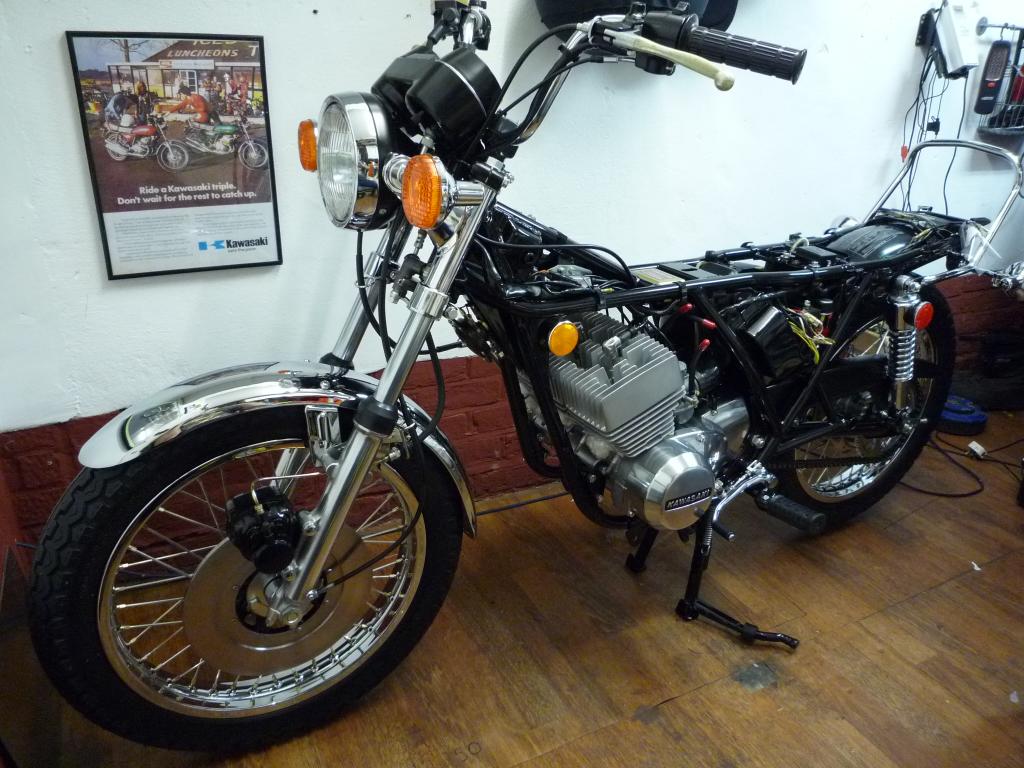
Before I fit it I am drawn to the
Kawasaki advert on the garage wall and look at the front mudguard with the two
holes on the right hand side,.......who said mine was on the wrong way round
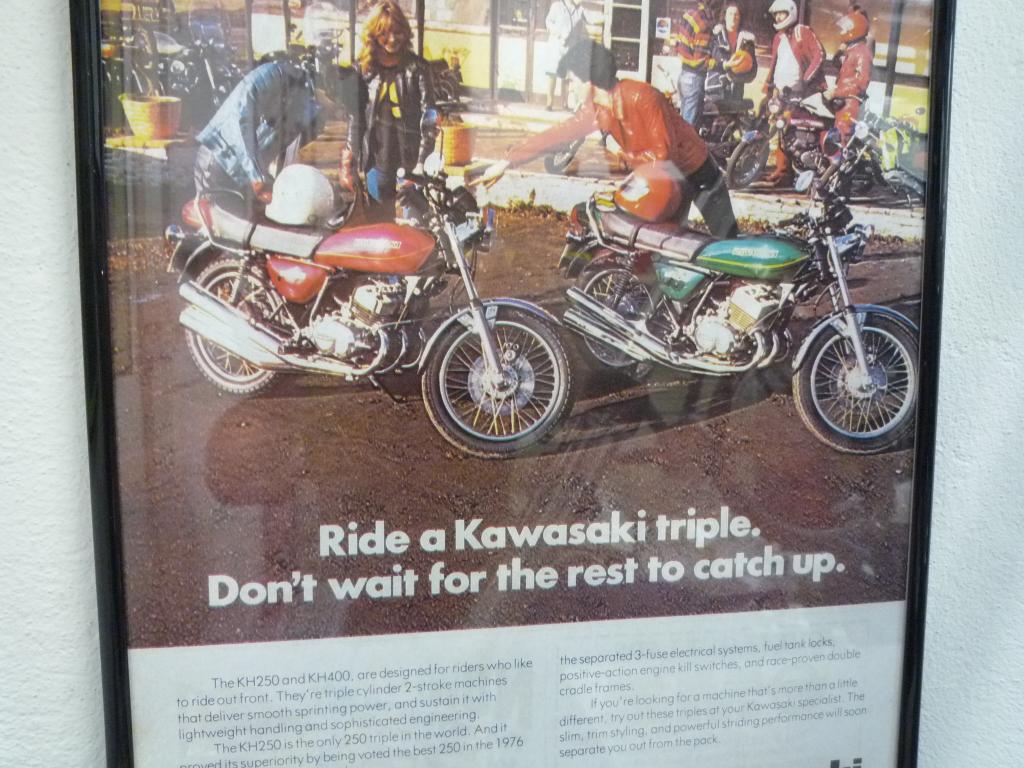

A quick check through the album shows
the 400's arriving with it fitted the other way round so that's the way its
going back on.
Along with the guide bracket.
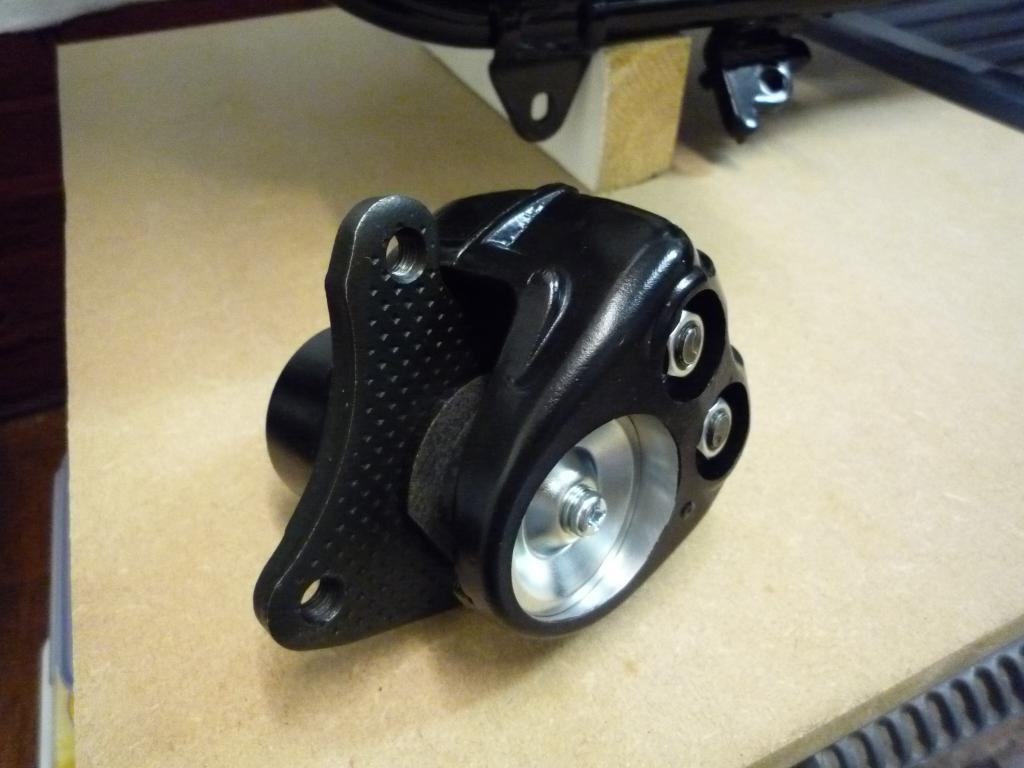
Brake caliper comes next and when I find the piston
it can be assembled.
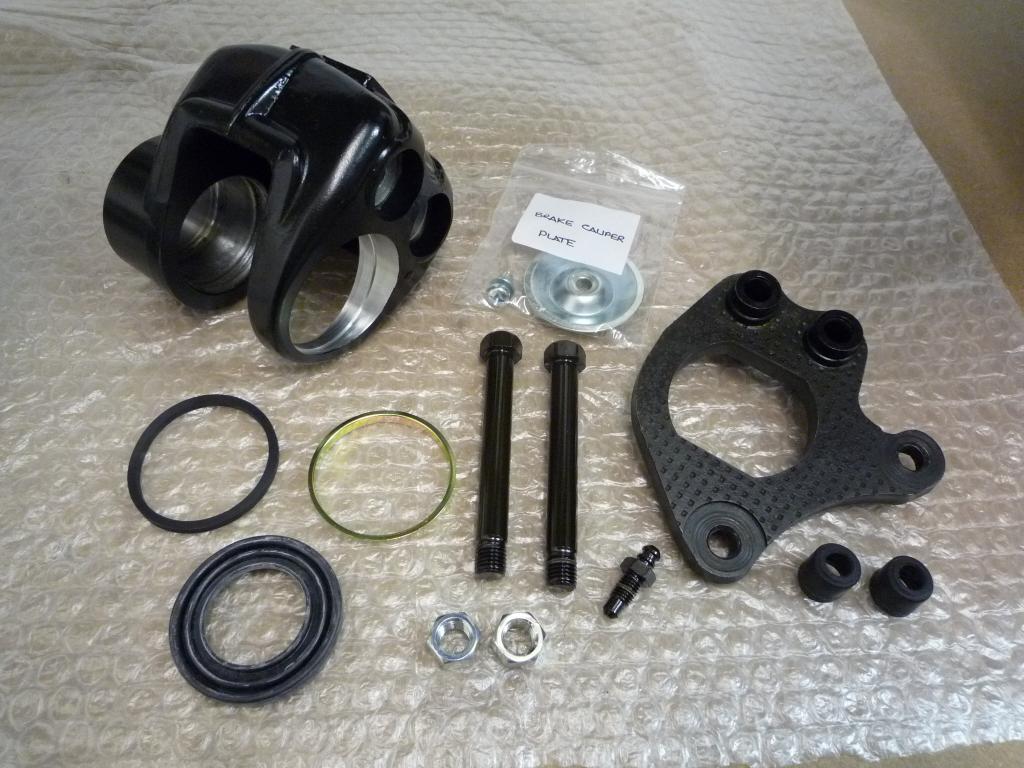
And
loosely fitted, typical for the day the rigid pipe was reluctant to join to the
flexi hose as it should though the caliper end screwed in beautifully, so that
became a bit of an issue to overcome though now happily sorted.
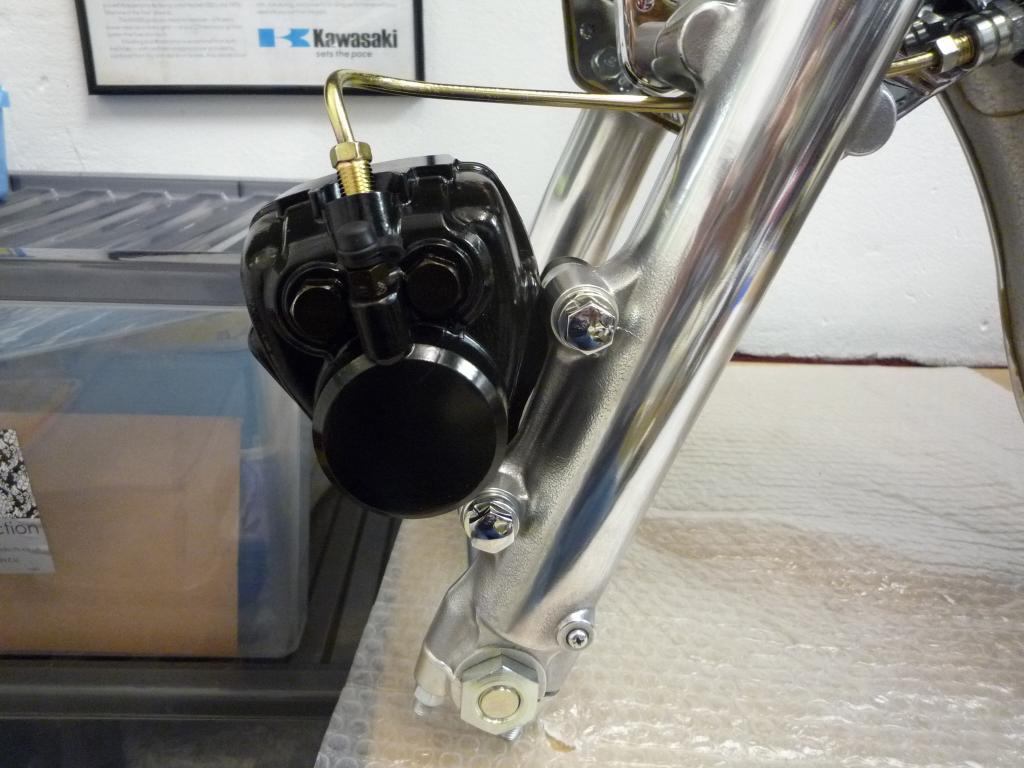
Still have to order some brake pads, and a couple of banjo washers for the lower
hose are also doing the long way round so this will all be tightened up later.
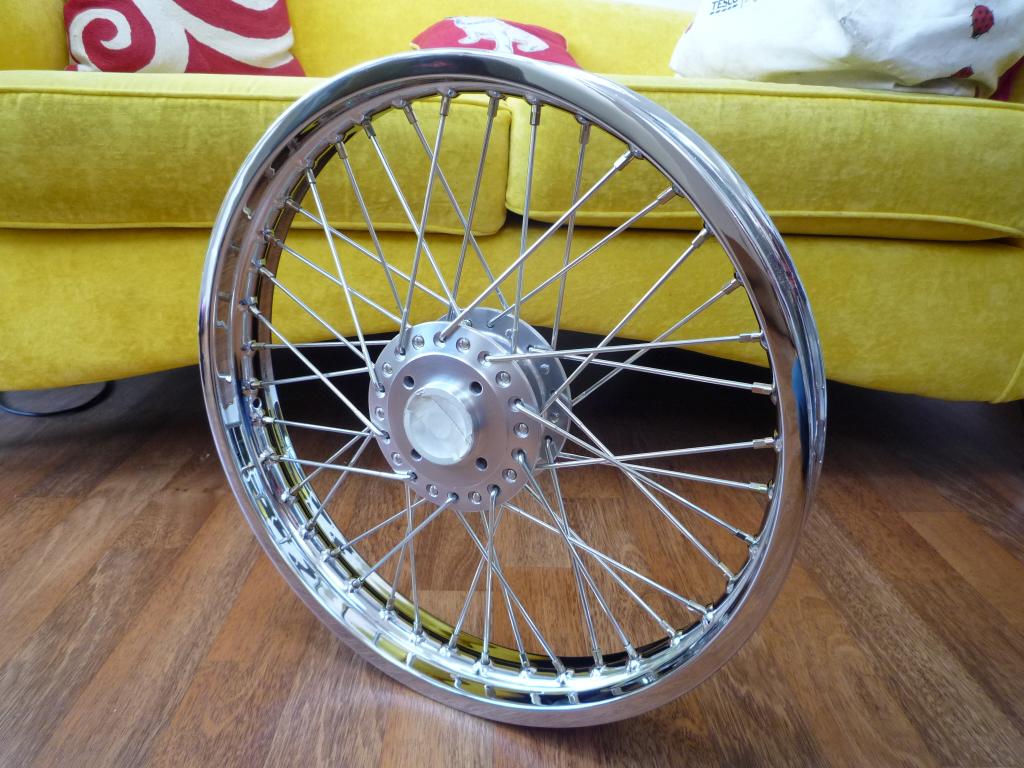
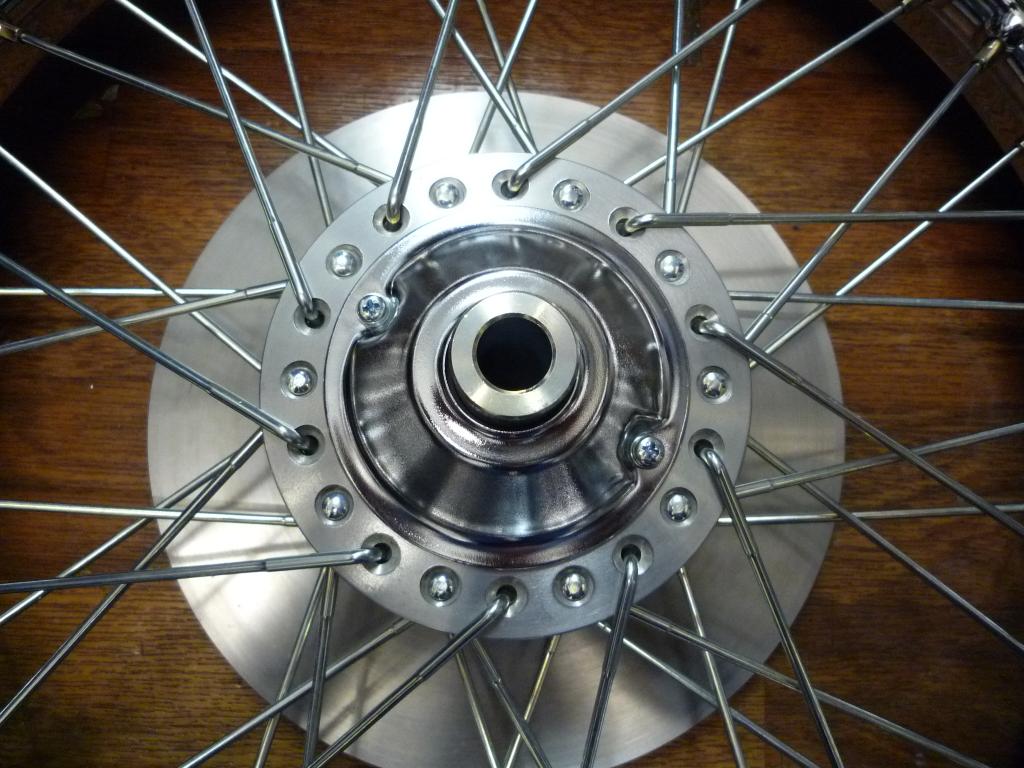
Front wheel has also moved along, going from
this..........
to this in a few simple steps
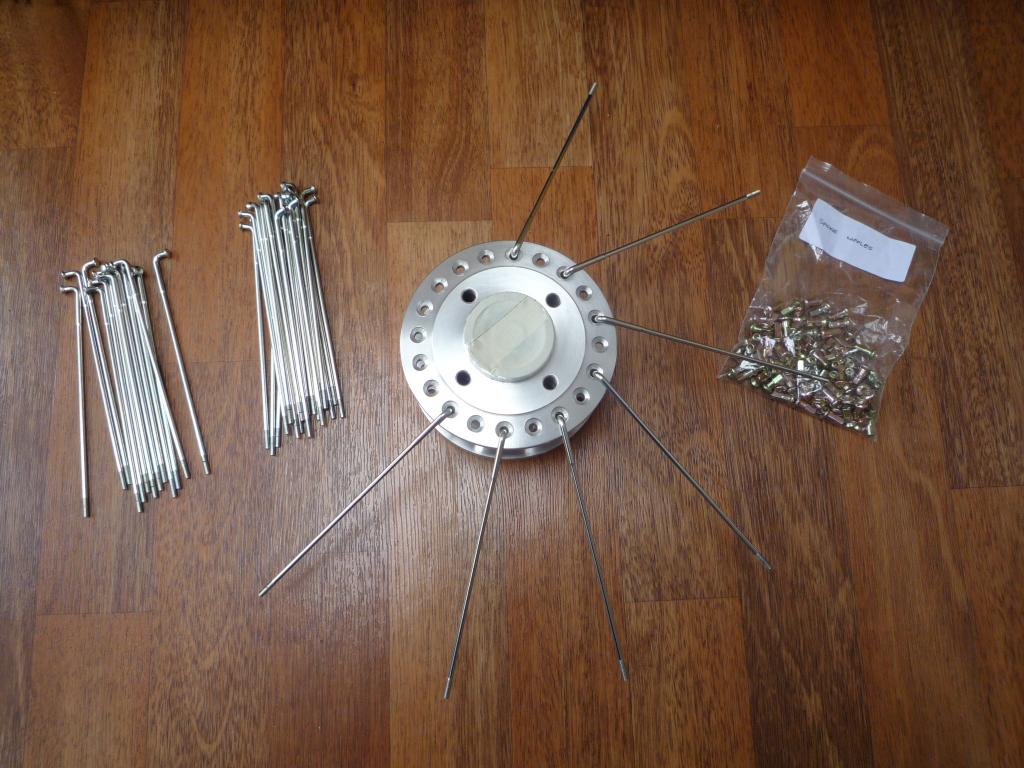

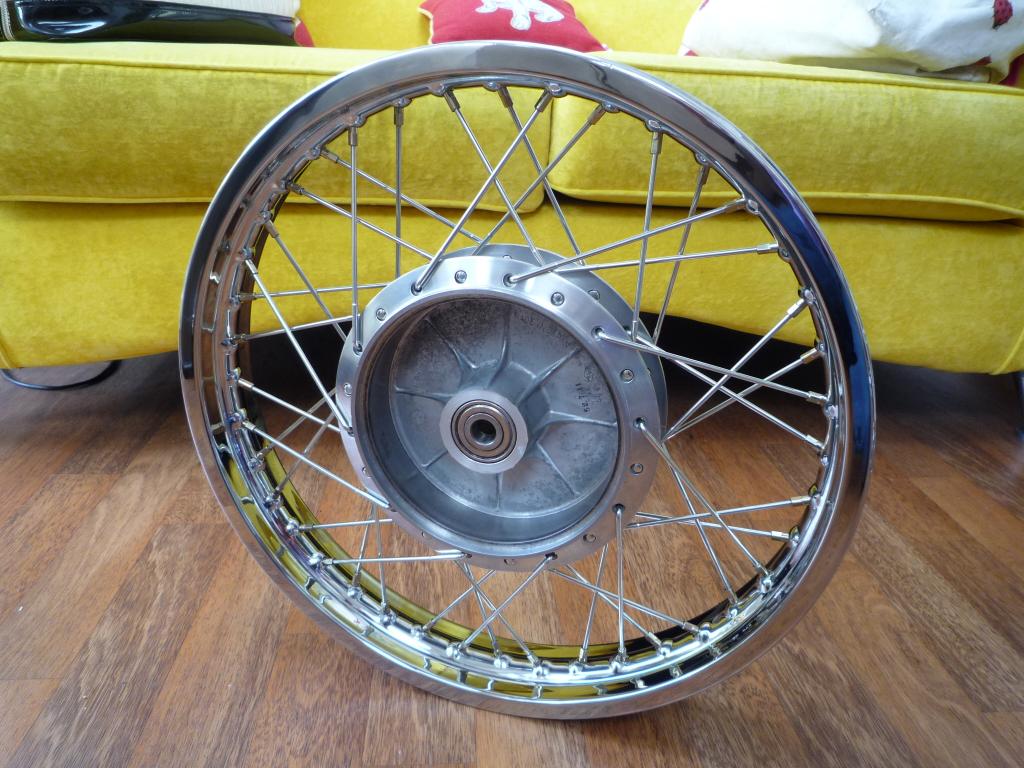
Back wheel next .......and chase up those washers
Back wheel assembled now too...................
Inner spokes in first.

The final outer.

Smashing
Trying to push this project forward a notch or two now so
though a couple of months behind my planned delivery date, today I dropped the
paintwork off at Kasracepaint for a touchup.
Apart from the paint and a small area of rust at the back lower corner of the
tank they are all in pretty good shape though the Sun certainly taking its toll
on the colour.

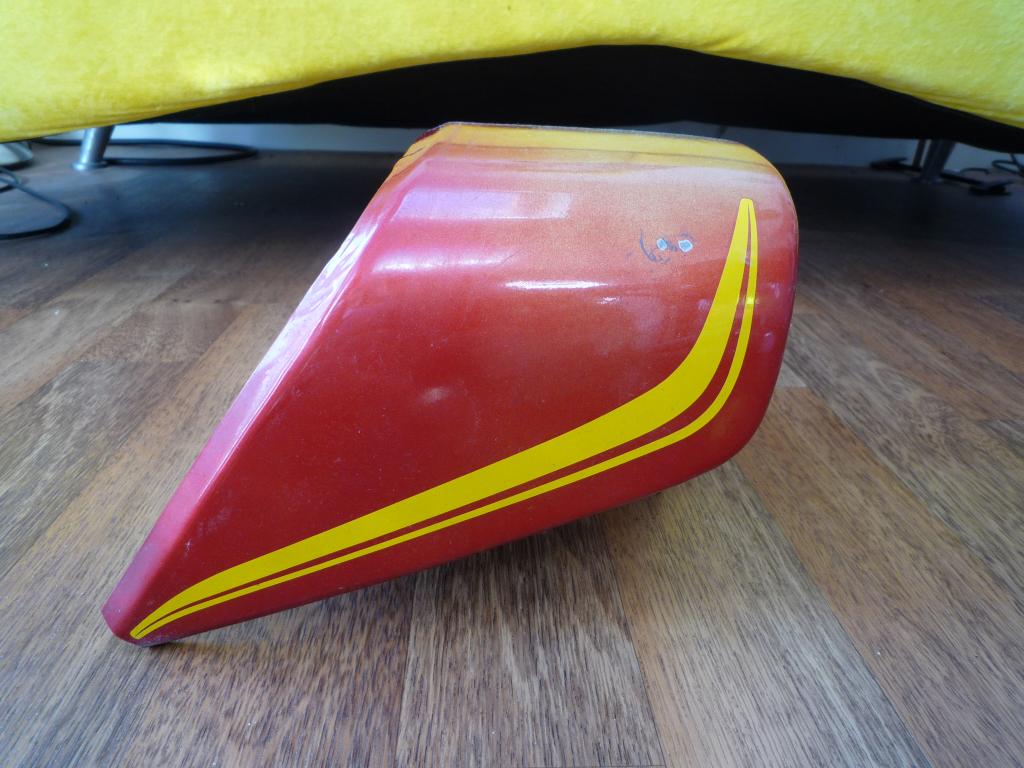
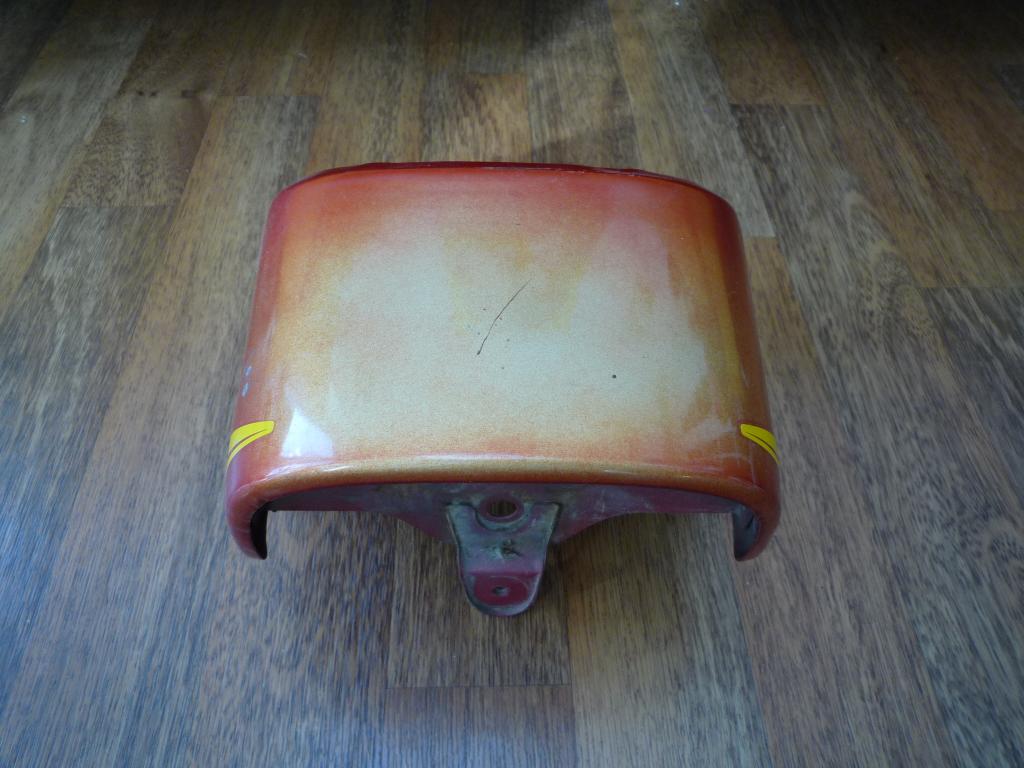
Though I did spot one crack in the usual place on the oil tank
cover panel.

Happy to have it booked in and away now and another big
tickoff on the list.
With the
cylinders now on 1st oversize and given a clean bill of health I thought it was
best to check the ring clearances first just to be safe.

I set them up as per the manual guide
and all the measurements were as they should be.


Happy with that it was time to assemble
the pistons, still using the expander on the bottom ring.

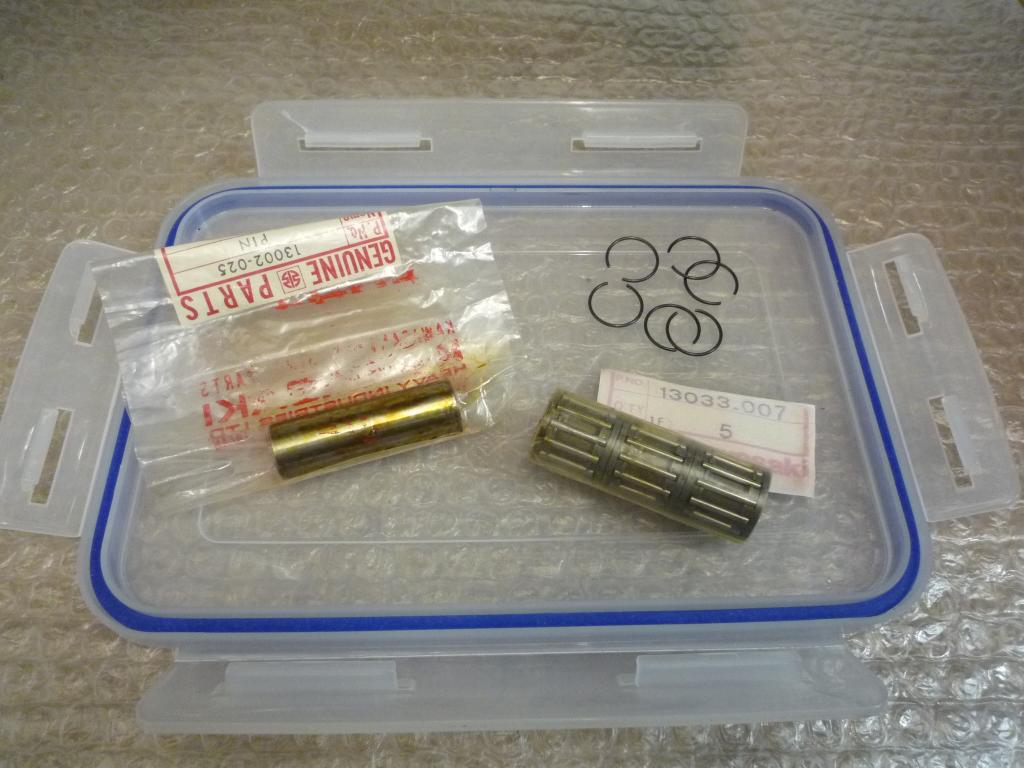
I had already obtained new piston pins,
circlips and needle rollers so assembly could start.
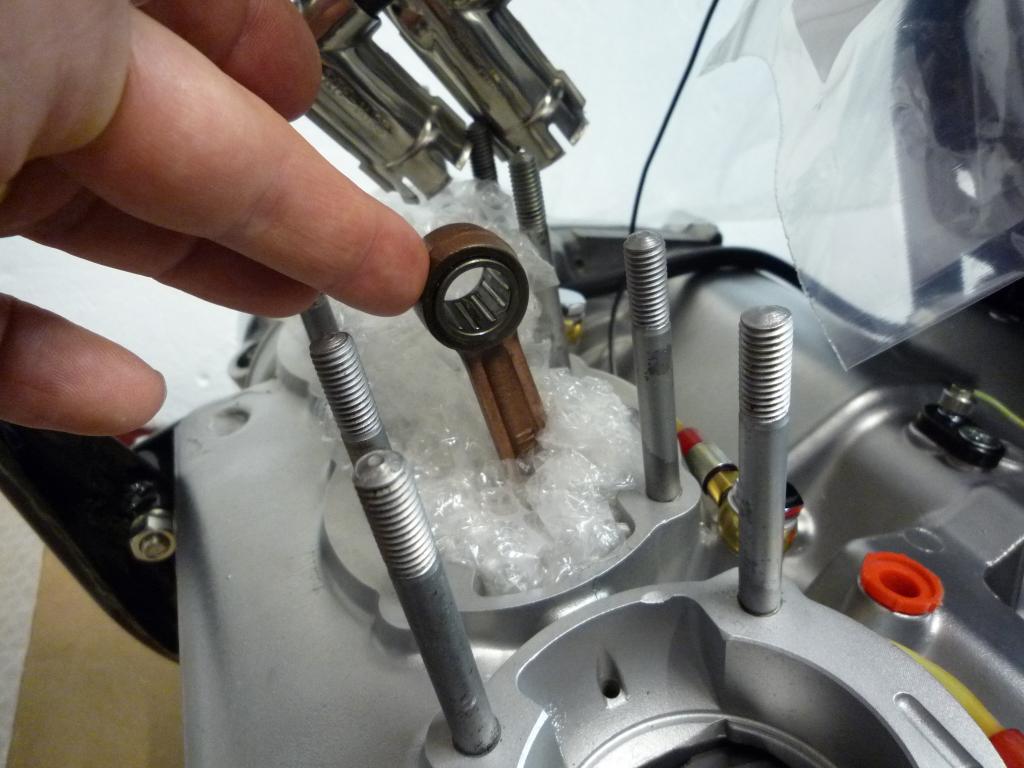
1 down two to go.....
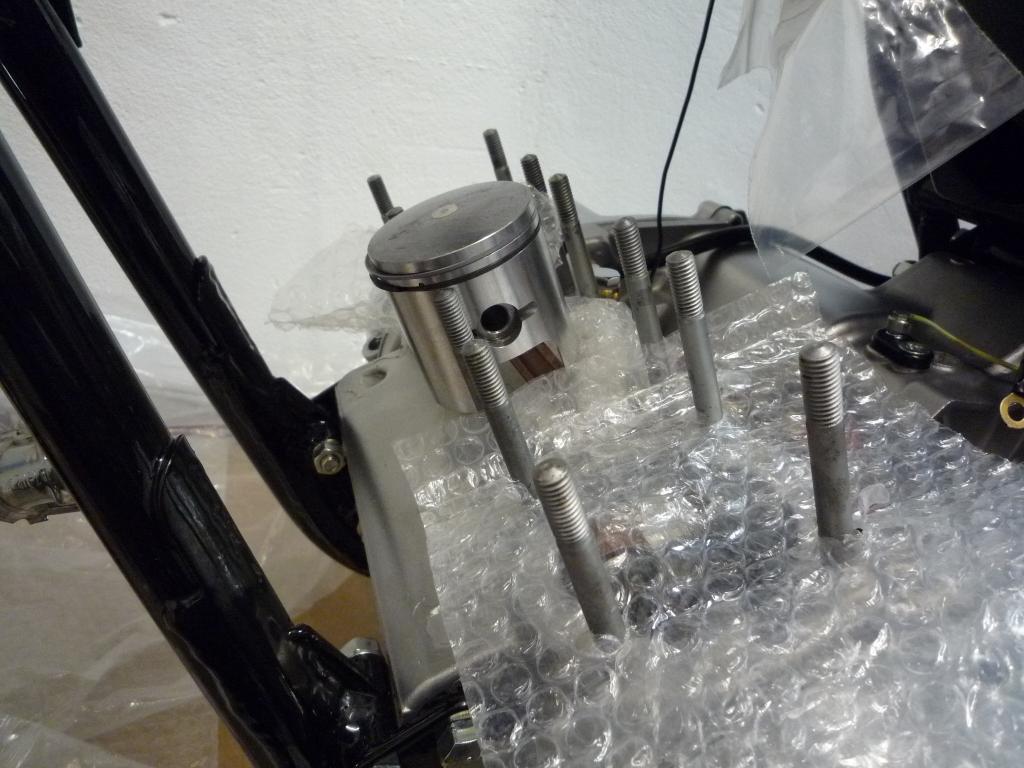
With the pistons fitted it was barrels
next, a slightly more fiddly operation especially with the new rings..........

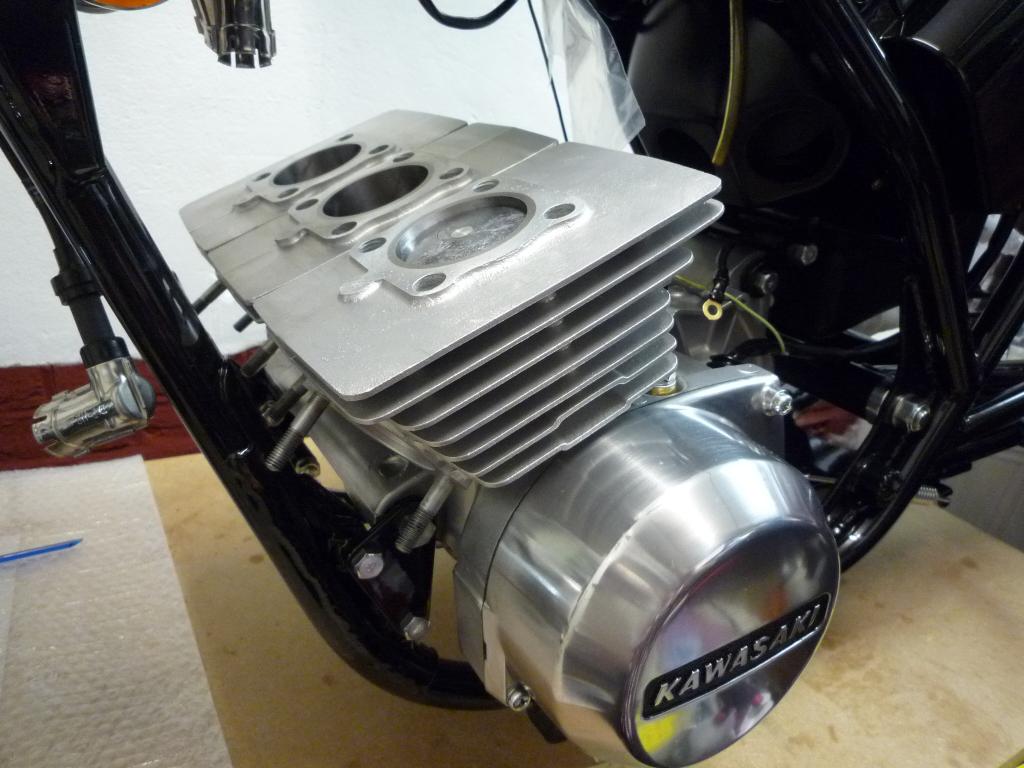
With that little job thankfully out of
the way it was time to unwrap the heads and the fitting
kit..........................
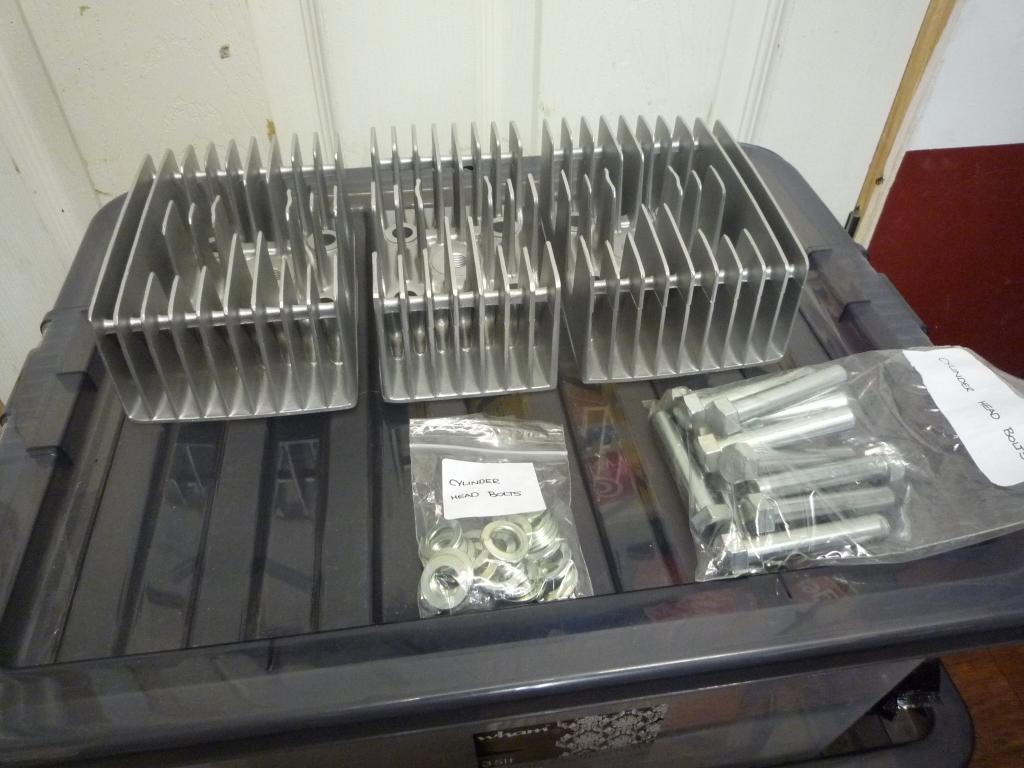
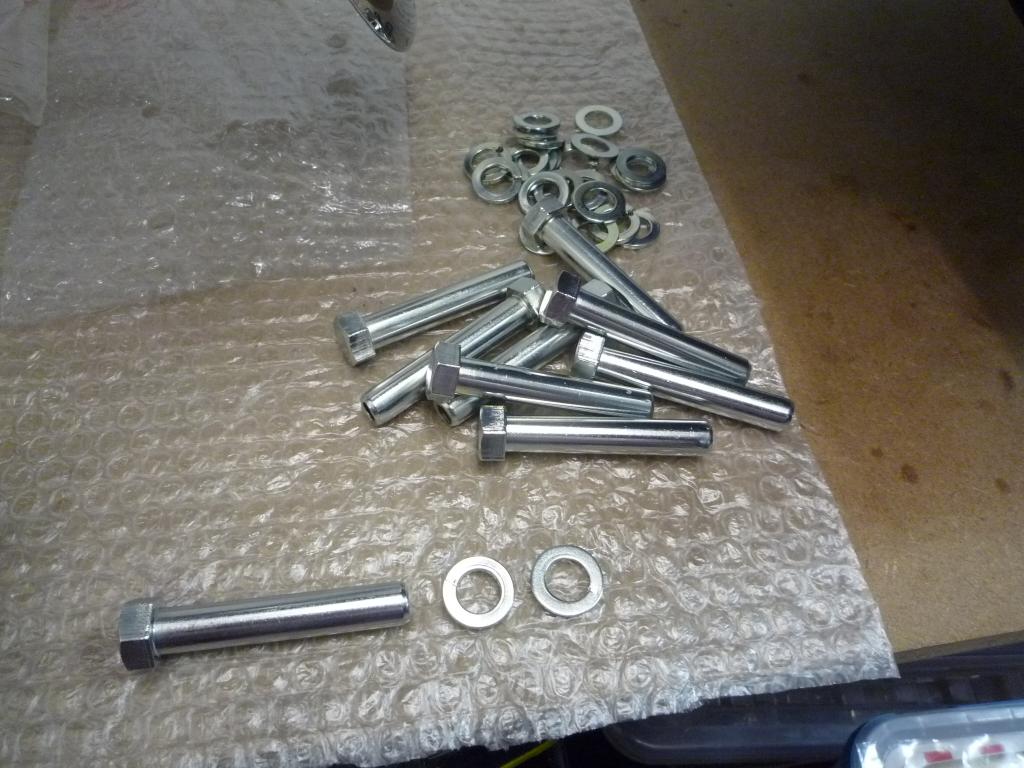
With new gaskets in place (there is
three honest) it was on with the centre head first.
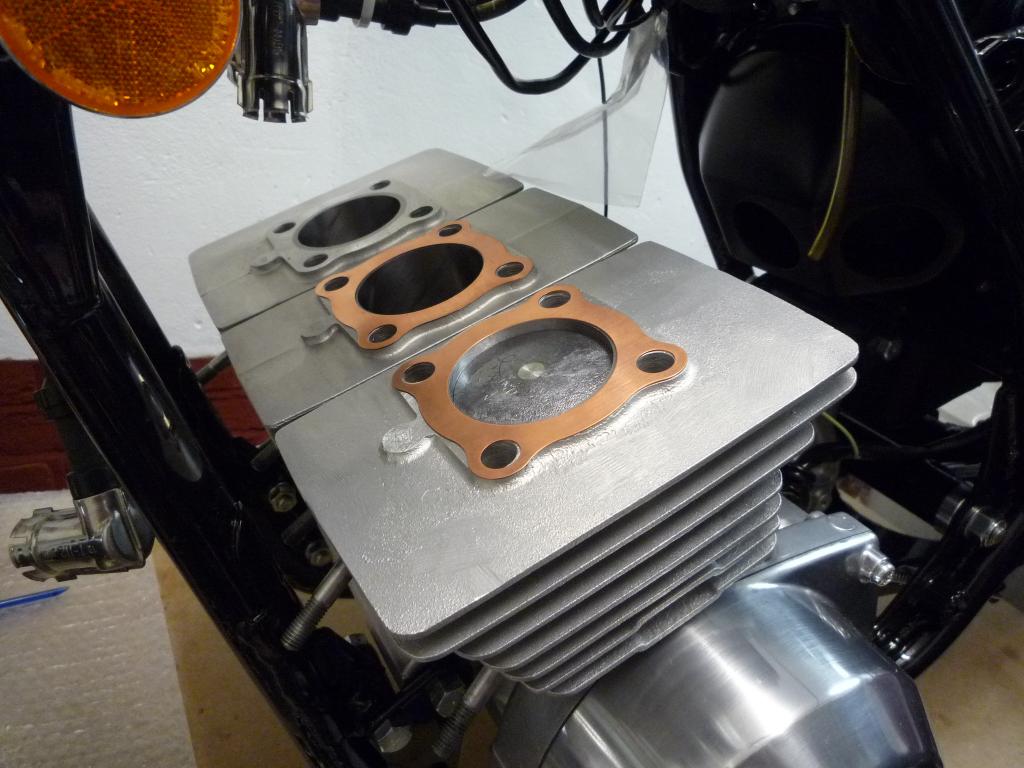
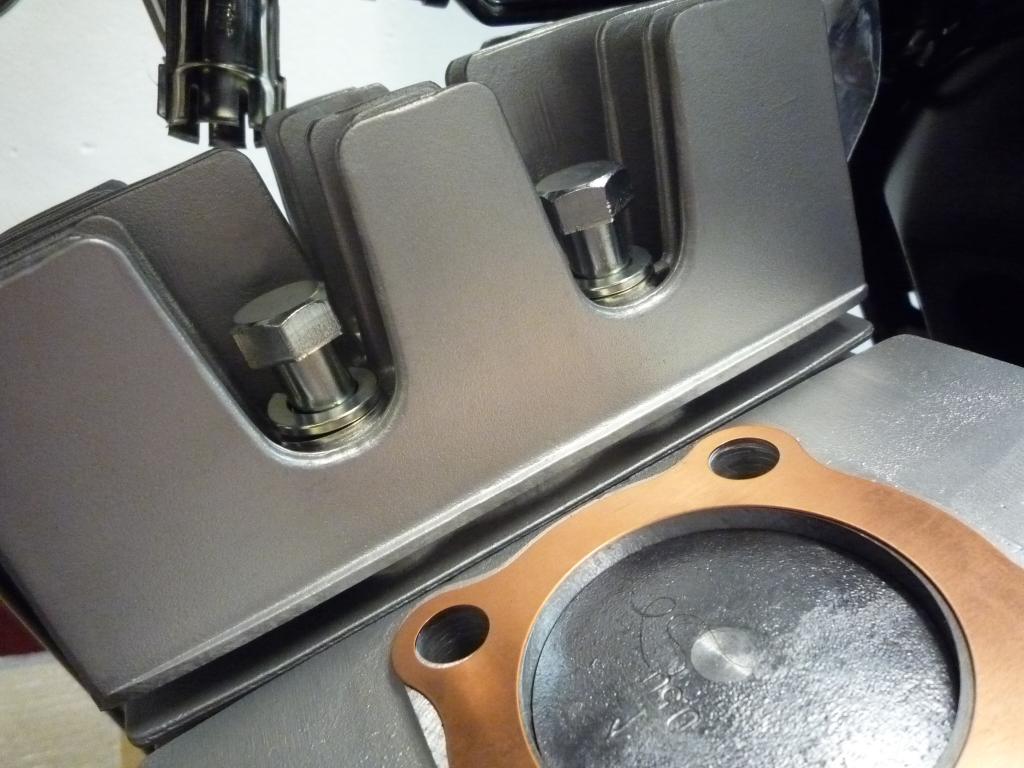
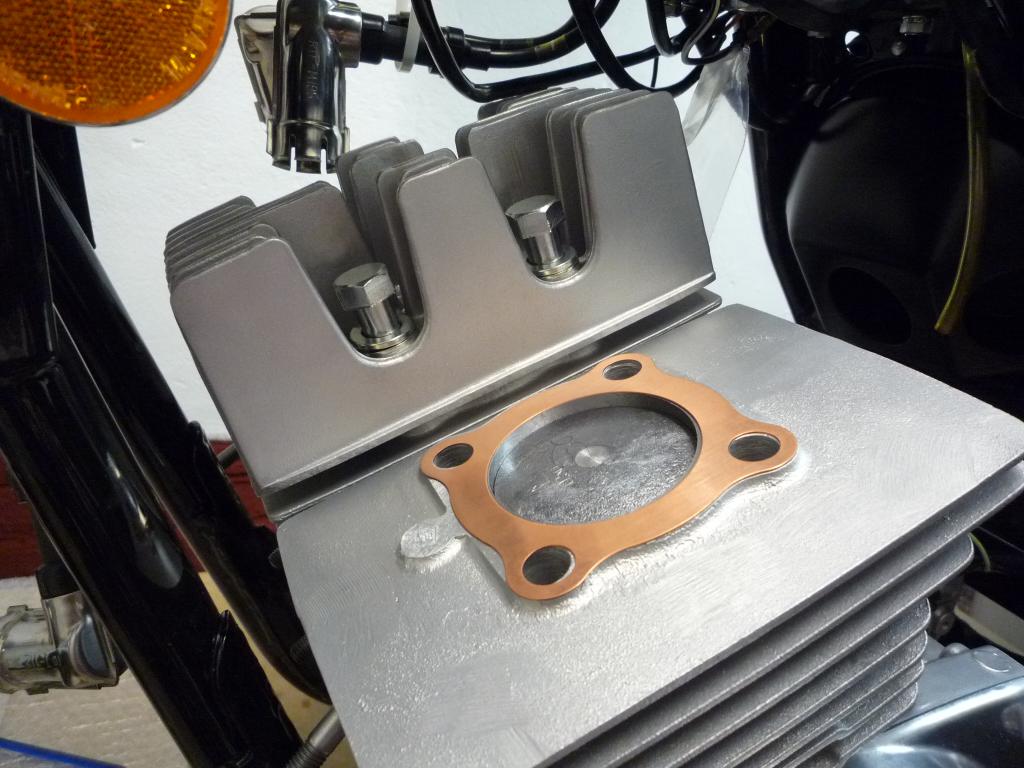
Followed by the other two.......how
very satisfying too
Then they were all torqued down.

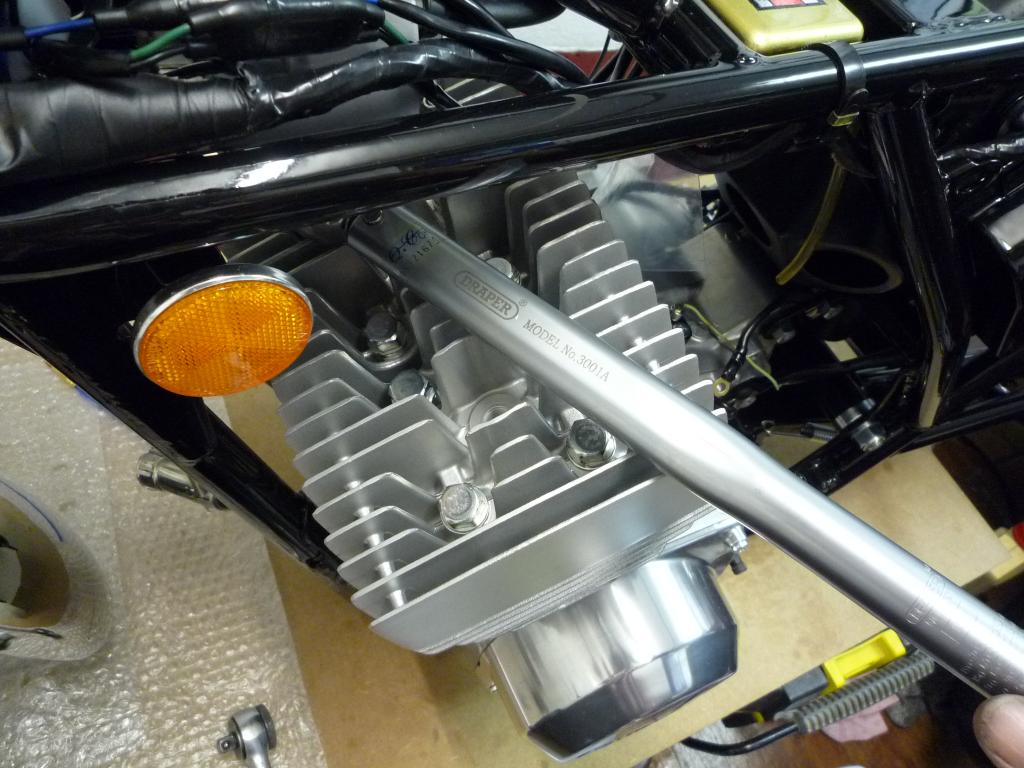
more to follow............
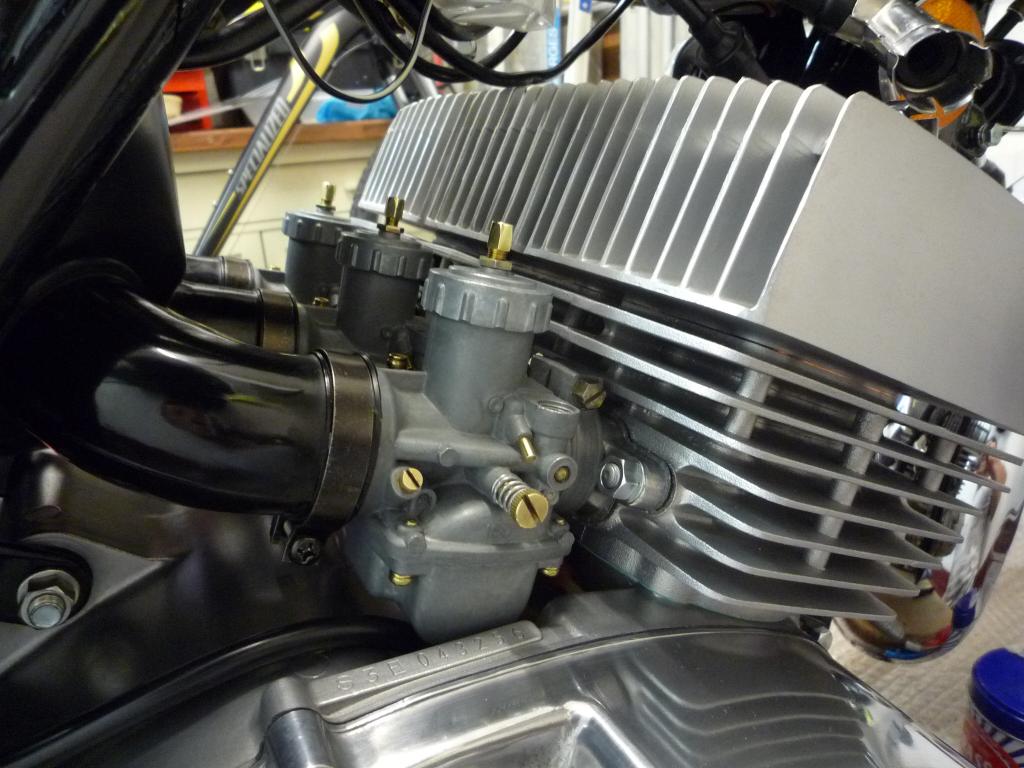
With the heads and barrels torqued down we could move on to
the intake side, new gaskets were fitted either side of the original heat
insulator.

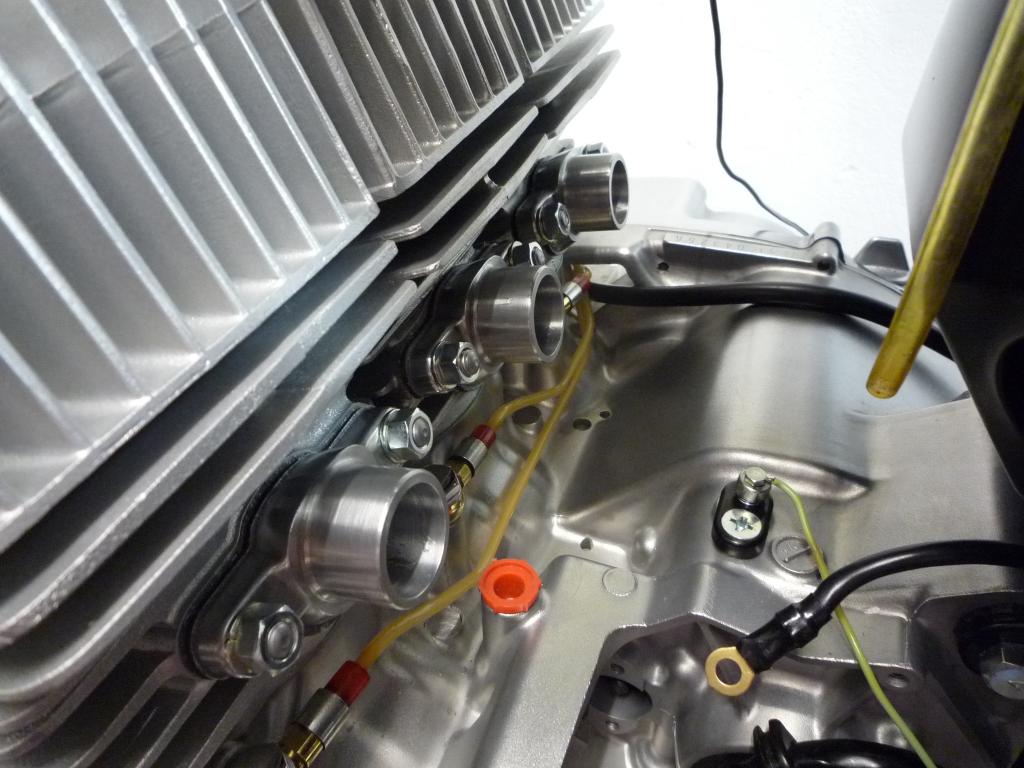
Then the intake manifolds were fitted and secured, here thin
8mm spring washers are used along with the plain nuts.
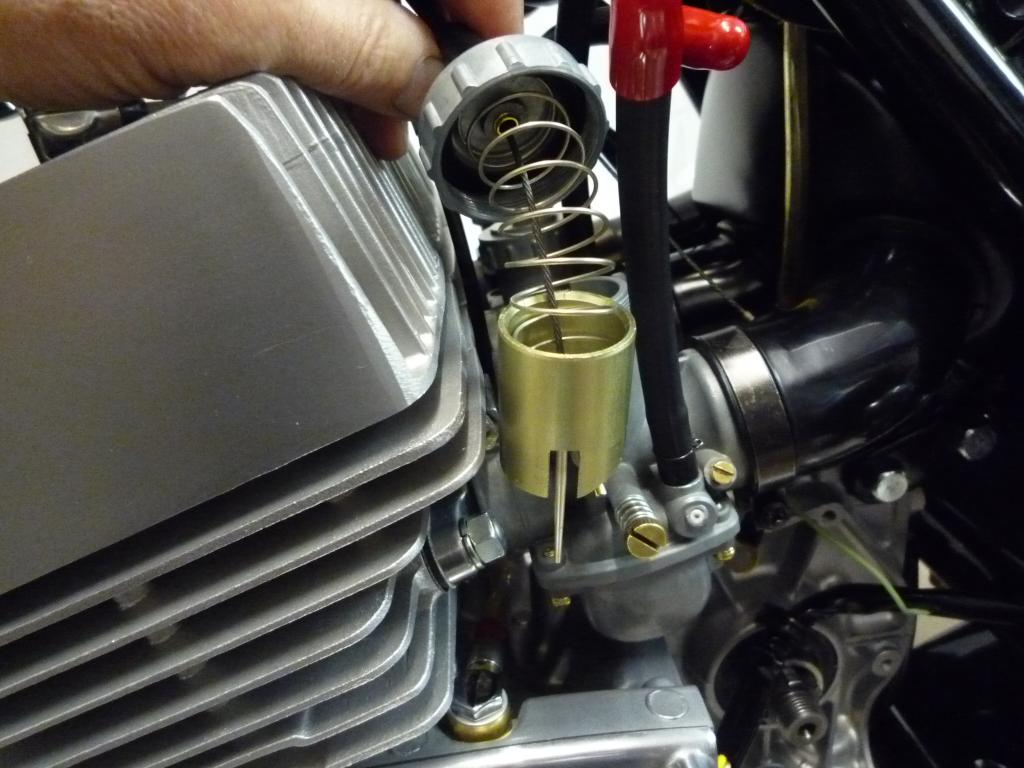
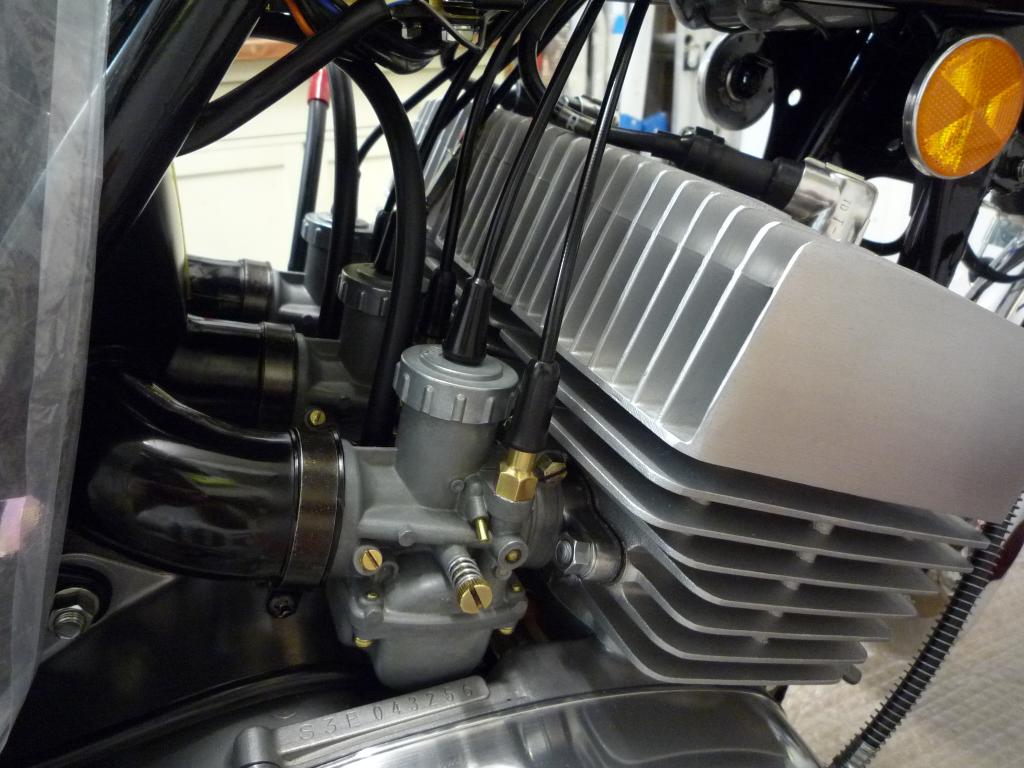
The carbs were then removed from hibernation, I had almost
forgotten what they had looked like and there was a lot of pre assembling to do.

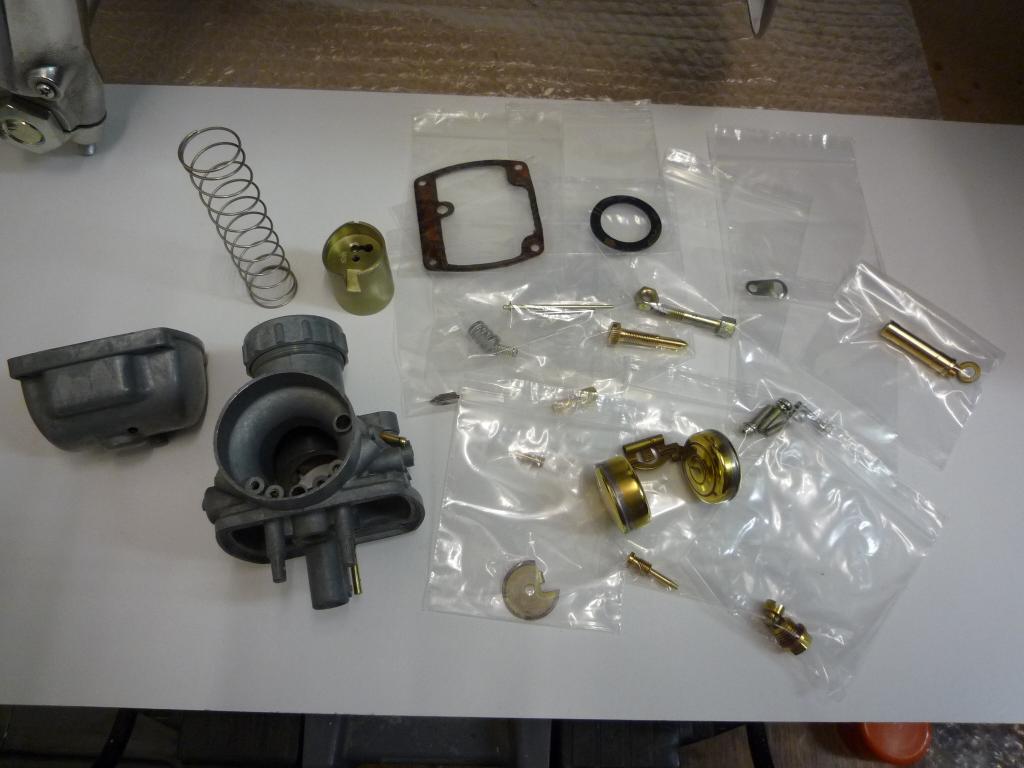
But once again very therapeutic work

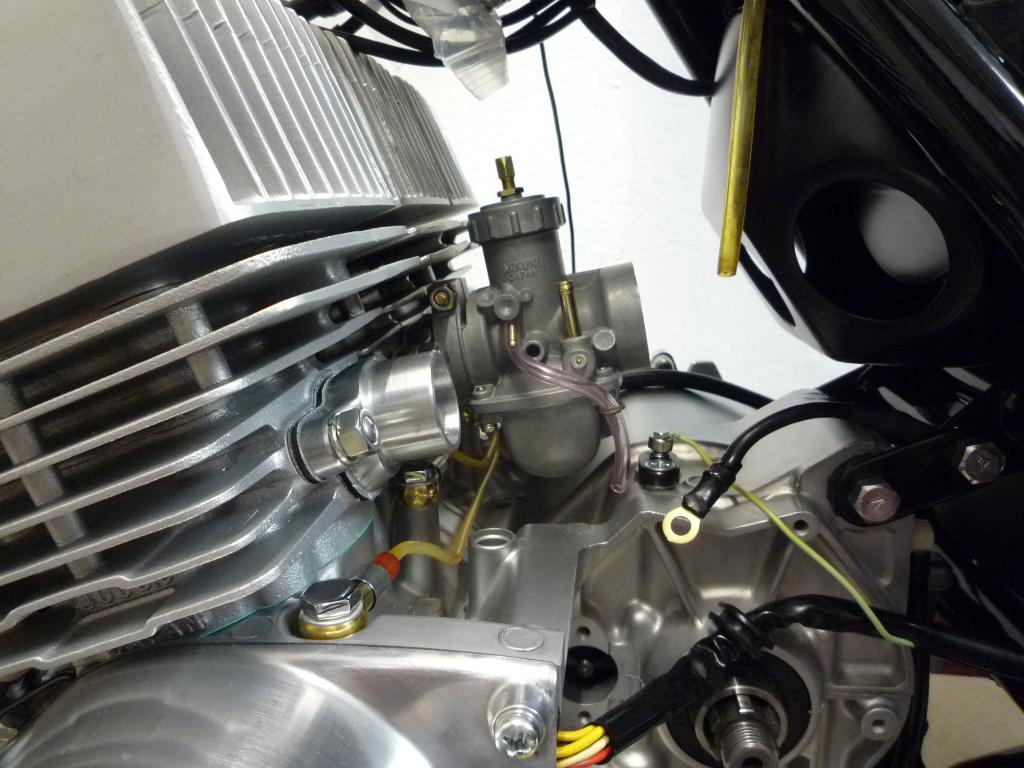
Once assembled they were mounted on the intake manifolds,
centre one first...
And married up with the original airbox rubbers and clamps.
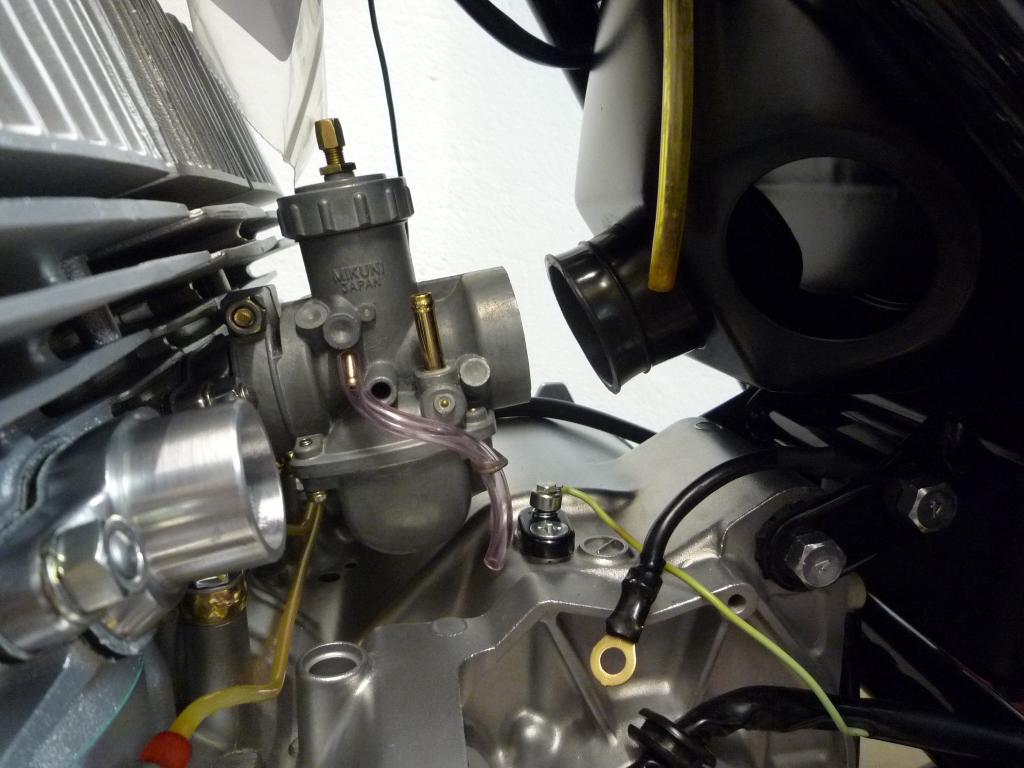
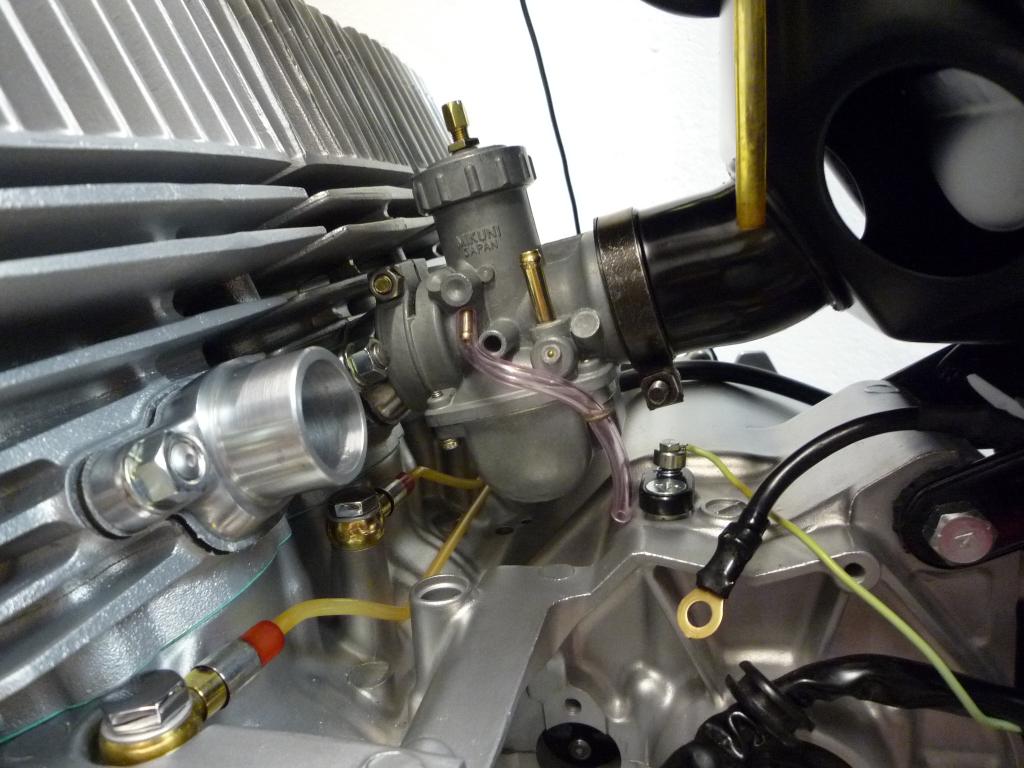
With the left and right carbs following on. I have re used the
original intake rubbers, they were still serviceable and fairly supple though
the right one was a little more stubborn to stay fitted at the intake box for
some reason, but I think we got over it for now.
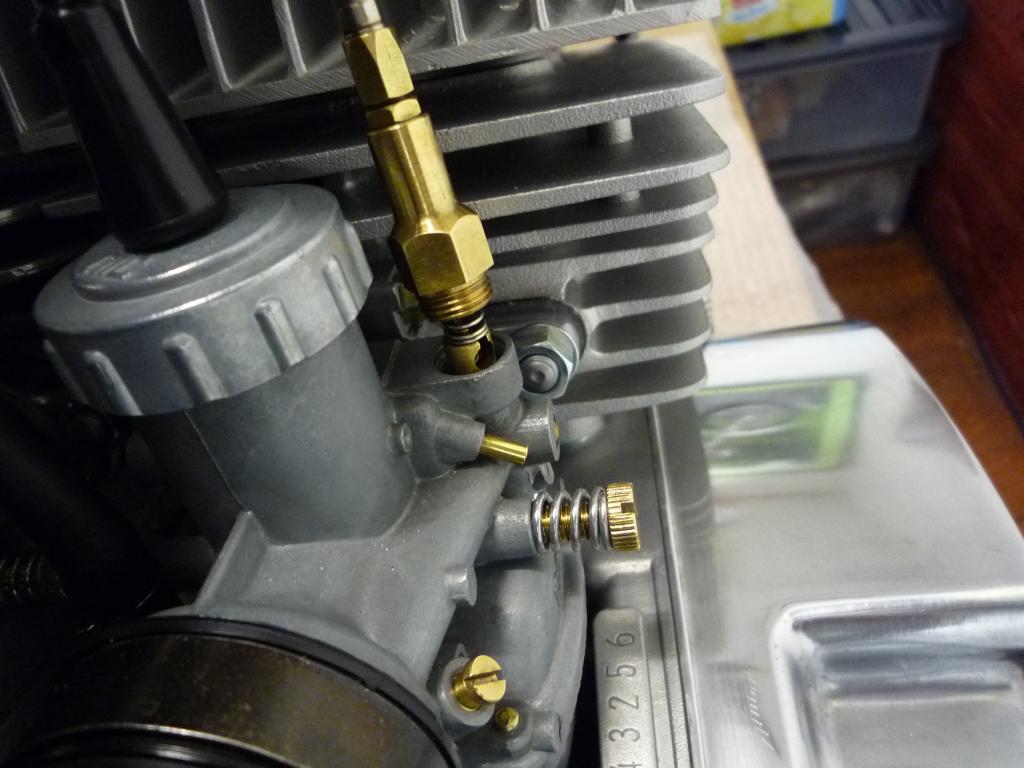
Tomorrow I will hope to start fitting the throttle and choke
cables, Very happy to see the engine almost completely back together again now,
I had also better fit the kickstart and check she turns over.
Concentrating
on cables, the throttle cable was next in line. My plan was to refit the
original one but after fitting it the throttle seemed heavy, so having purchased
a NOS item from a very nice chap at the micro rally that was the eventual fit.
Having checked the other cable over it seems fine and may have been down to a
crossed cable at the intersection join, either way NOS is staying put now.
Pictures for reference
Throttle end and Oil pump cable and support and throttle slide ends, noting the
different cable length's.
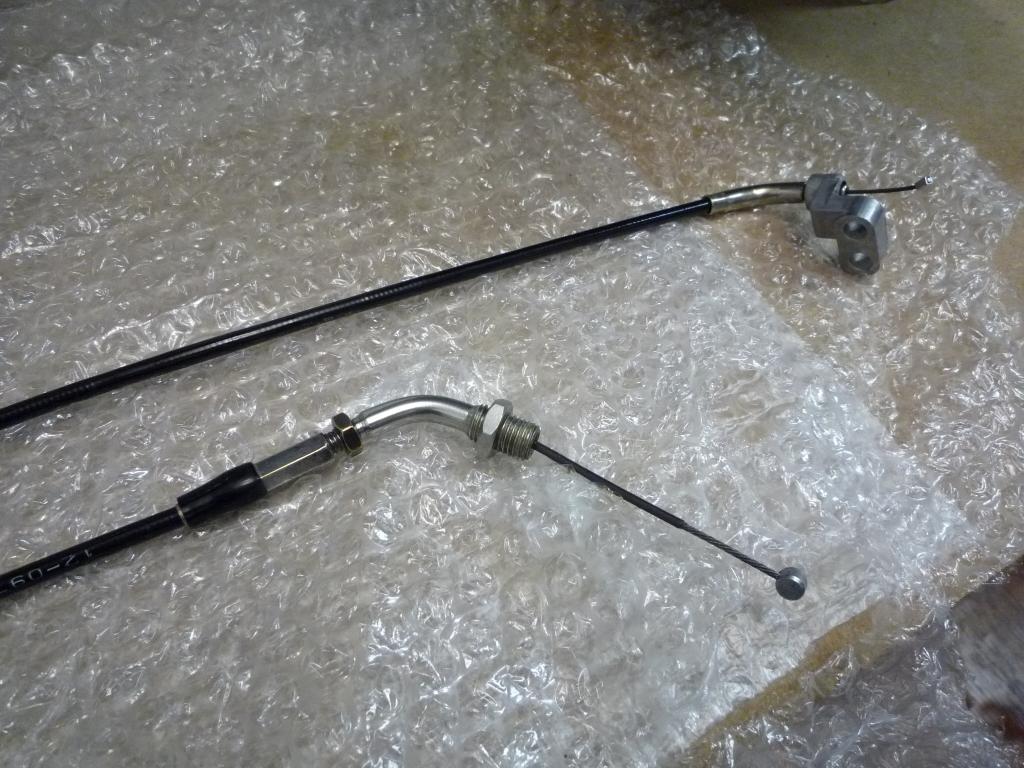
After attaching the throttle end first
and routing the cable correctly the throttle slides were assembled and fitted
and the cables adjusted as per the manual.

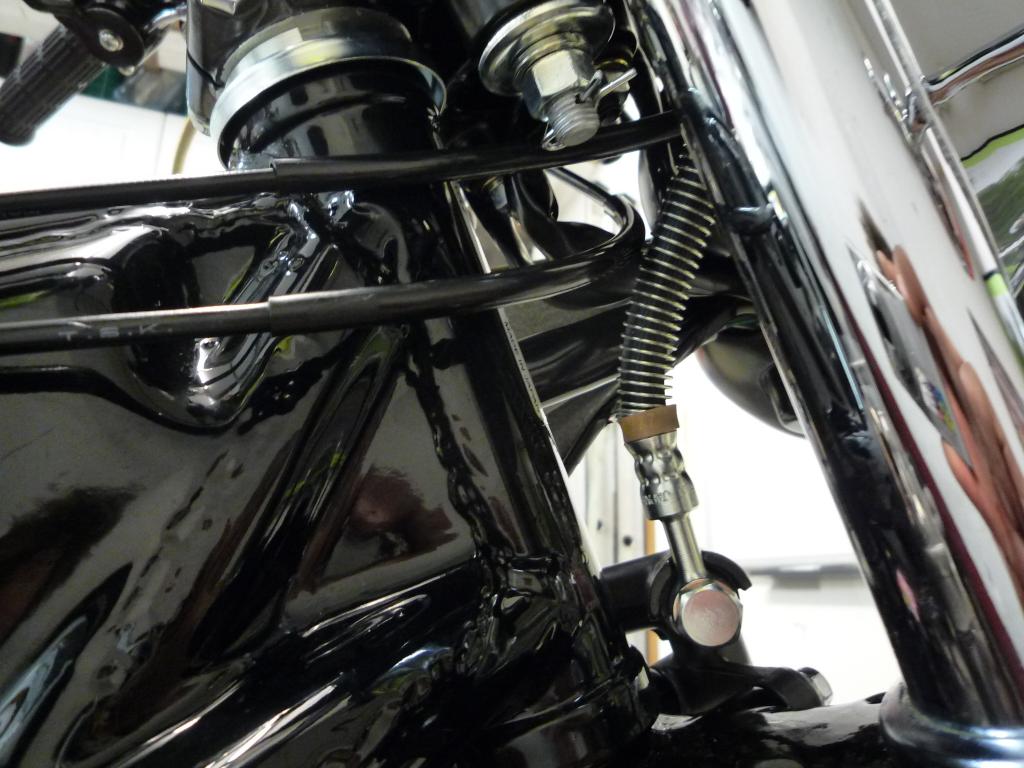
The oil pump cable and support were
routed through and fitted and the cable adjusted to line the marks up. NB.
trying to feed the oil pump cable and support through past the 2toil supply
pipes is fiddly enough but not as much as trying to remove the little wire ring
that holds the support onto the cable, would be best to route this through
before the 2t supply hose is fitted at least.
With the throttle cable done and
operating sweetly next came the starter (choke) cable
Original one this time and no issues routed and fitted nicely and adjusted as
per the manual


I wanted to fit the kickstart next so that I could check turn the motor over,
all the parts were assembled, I replaced the ball bearing as the old one was
rusty.

Once greased up and assembled it was fitted, along with the loose fit of the oil
pump cover and a new grommet.

Pleased to say the engine turns over nicely.
Clutch cable fit was next and was slightly more difficult to route, I don't know
if it it is due to the higher bars but it seemed harder to find the natural fit
and wanted to run hard up on the clocks. Small adjustments of the bars may help
later on when I can sit on the bike and adjust them up to suit.
Either way it felt happy running in either of two locations though it was
originally running in the upper position and this was the chosen one.
The clutch mechanism was fitted and adjusted along with the cable and upper
lever adjustment, clutch working smoothly.......gear shaft bobbin also fitted.
After a steering check on the cables and wiring, a couple of harness bands were
put in place.
Wheels and
tyres delivered for truing and fitting this morning, hopefully be back on her
wheels soon.
Tyres........
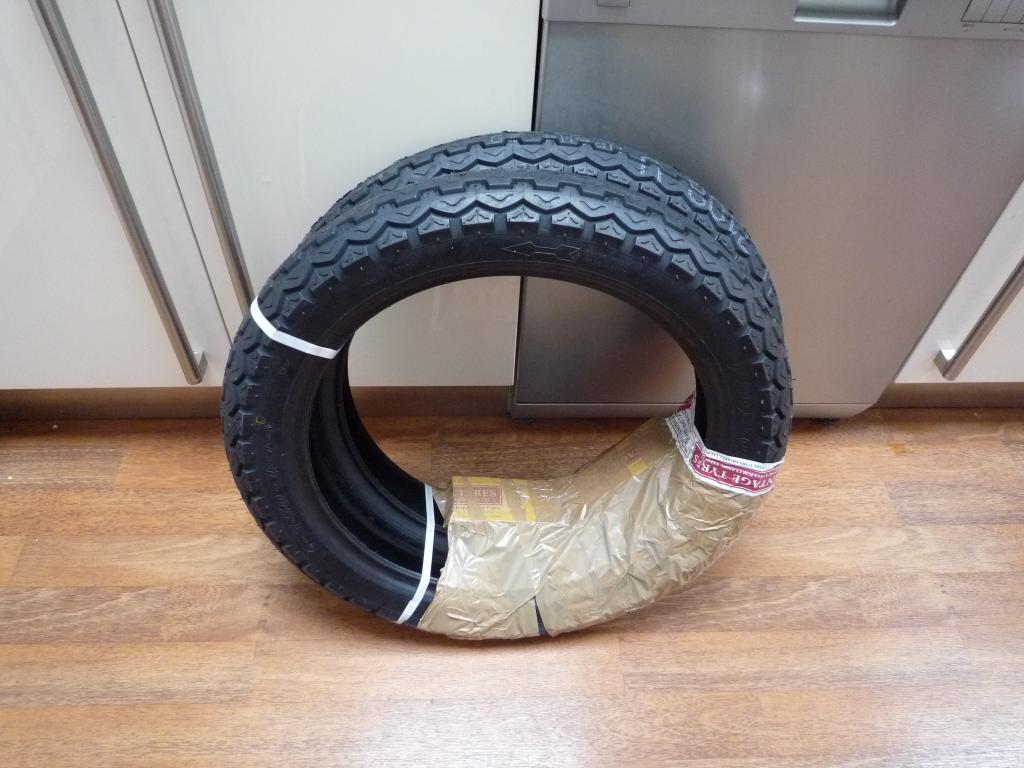
Plus wheels.............
Equals.................
Ready to roll
With memories of Stafford still stirring up the blood it was
time to press on with the 400 and a couple of jobs, now that the wheels were
built there should be no reason to stop me getting her back on her wheels......mmm
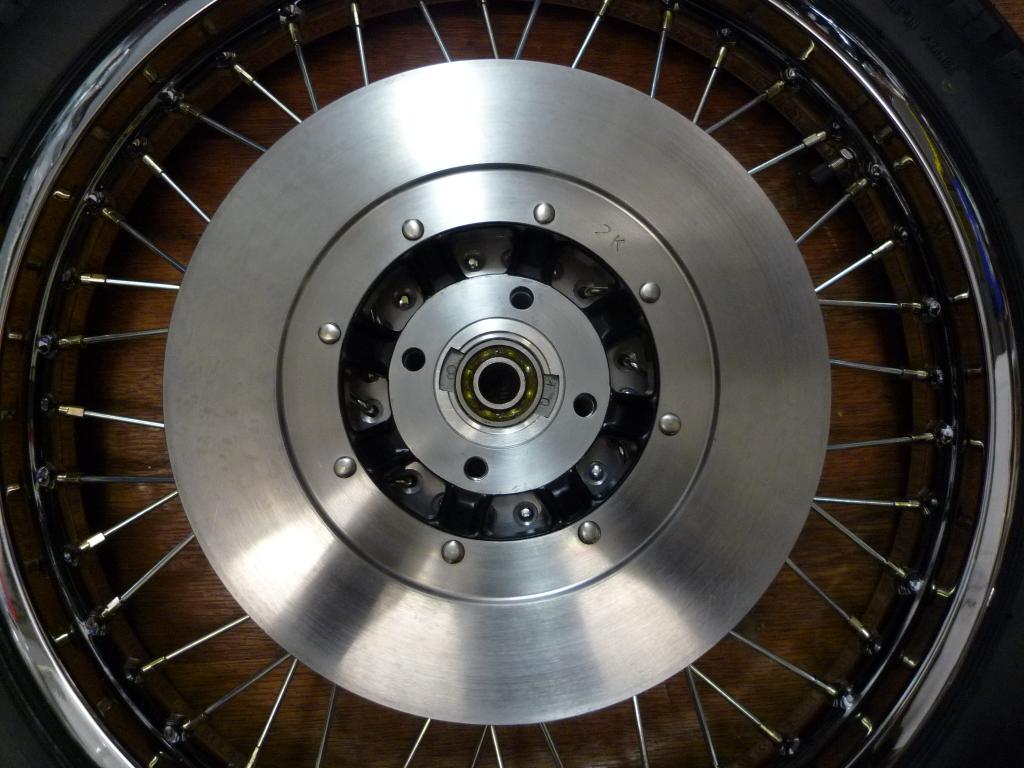
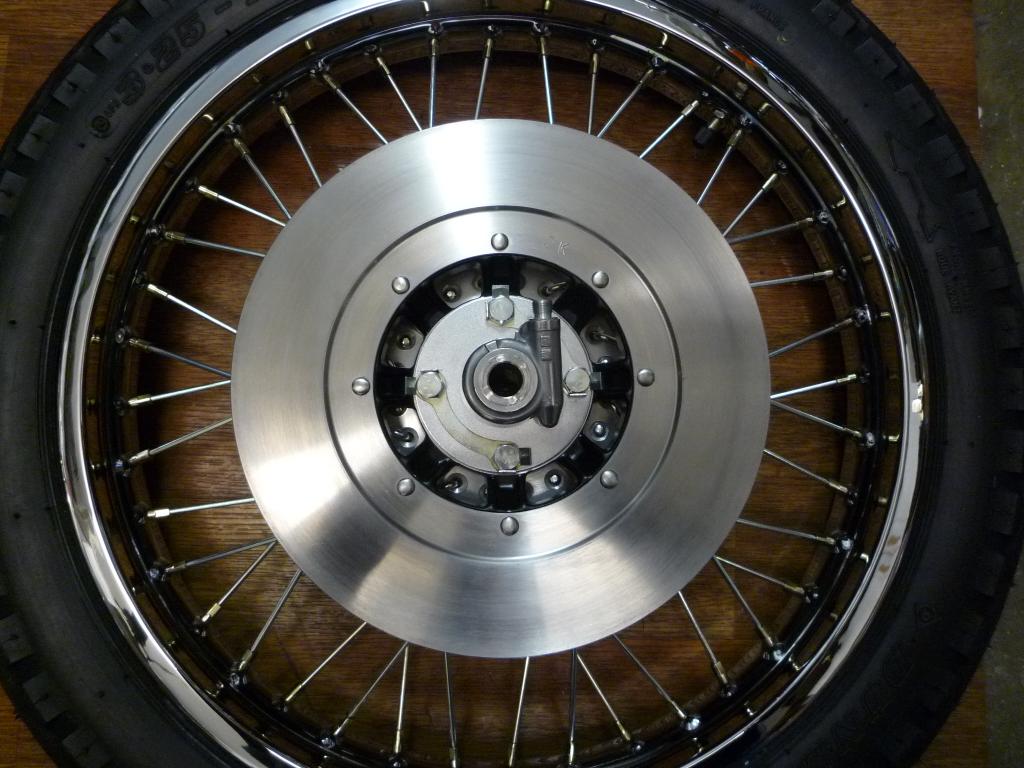
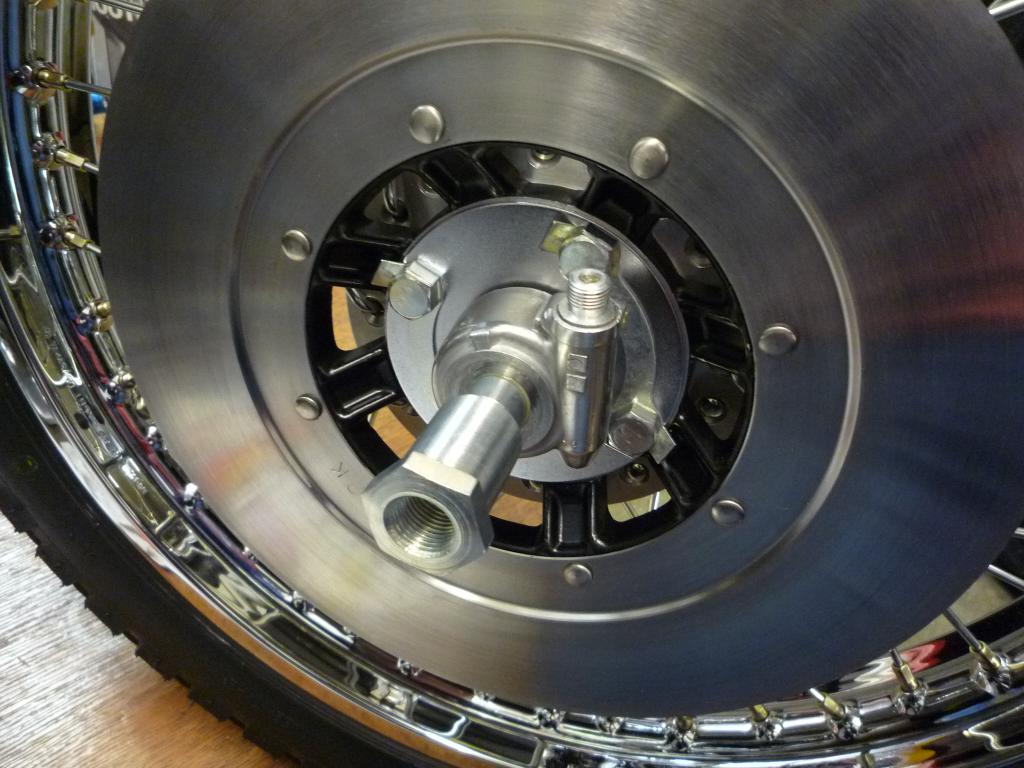
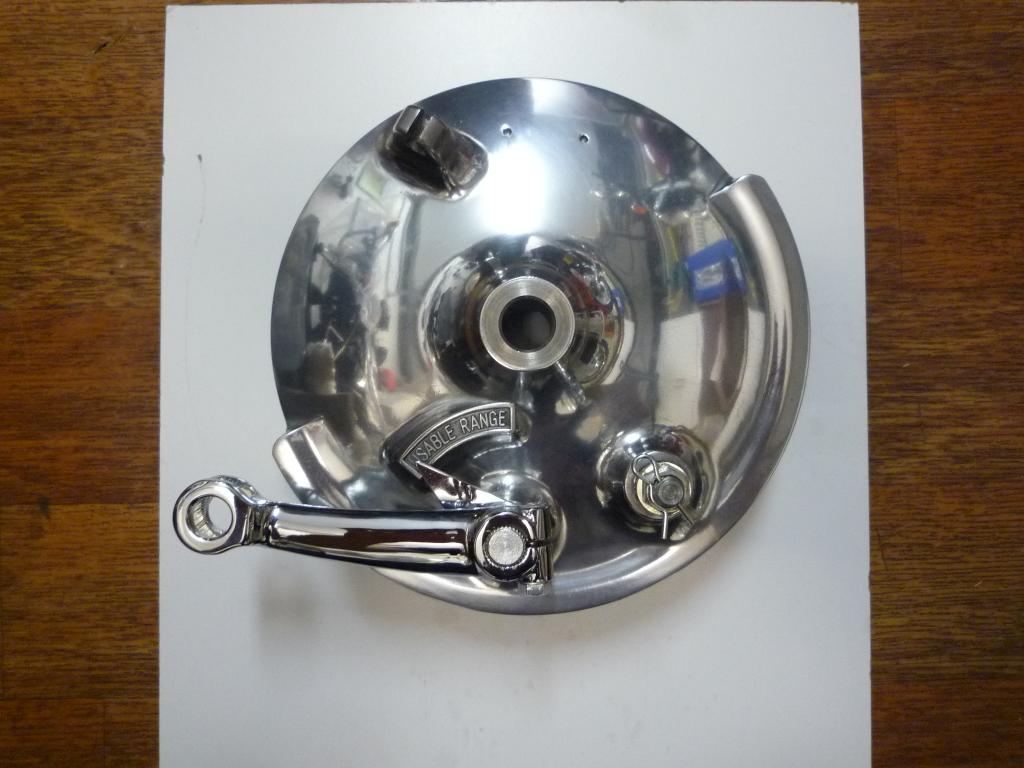
First job was to complete the front wheel, the newly refurbished disc was
located...along with the speedo drive and cover plate.

I had somehow managed to order the wrong lock washers, the S3
seemingly having smaller attachment bolts so there was a small delay waiting for
the correct ones to arrive.
Top man Postie duly delivered and the bolts were locked up, speedo mechanism
finished that side off.
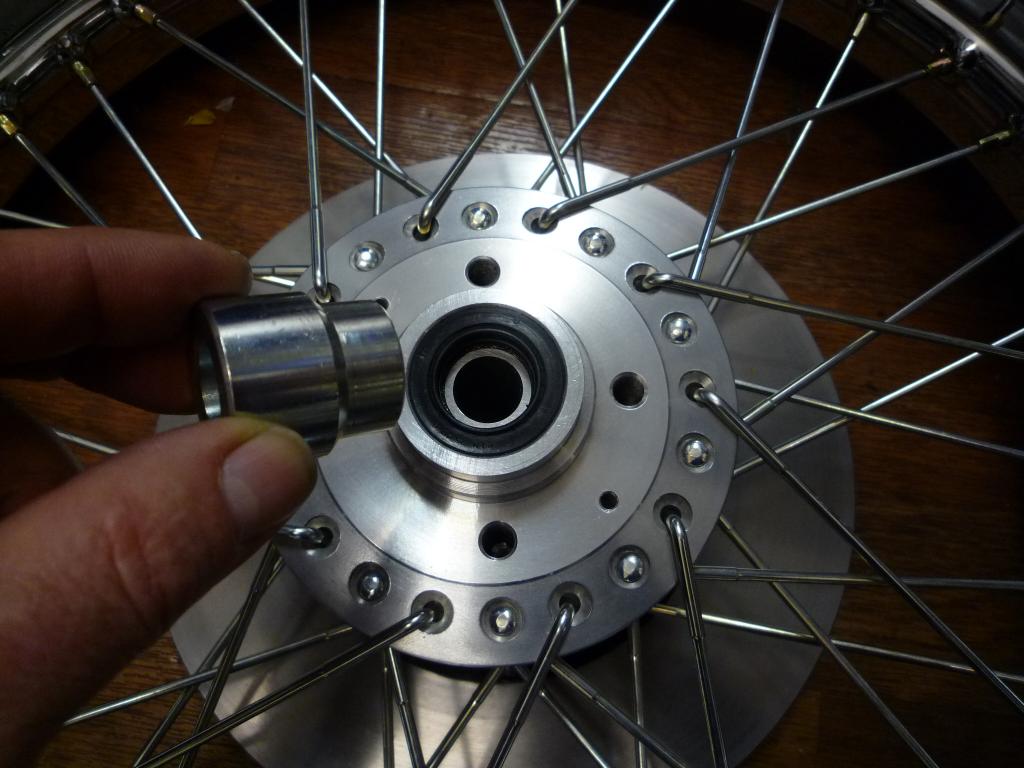
Round at the other side the spacer was located and the cleaned
up cover plate positioned and secured.
With the front axle parts assembled and torqued up and after a
bit of jiggling with my work board the front wheel was in.
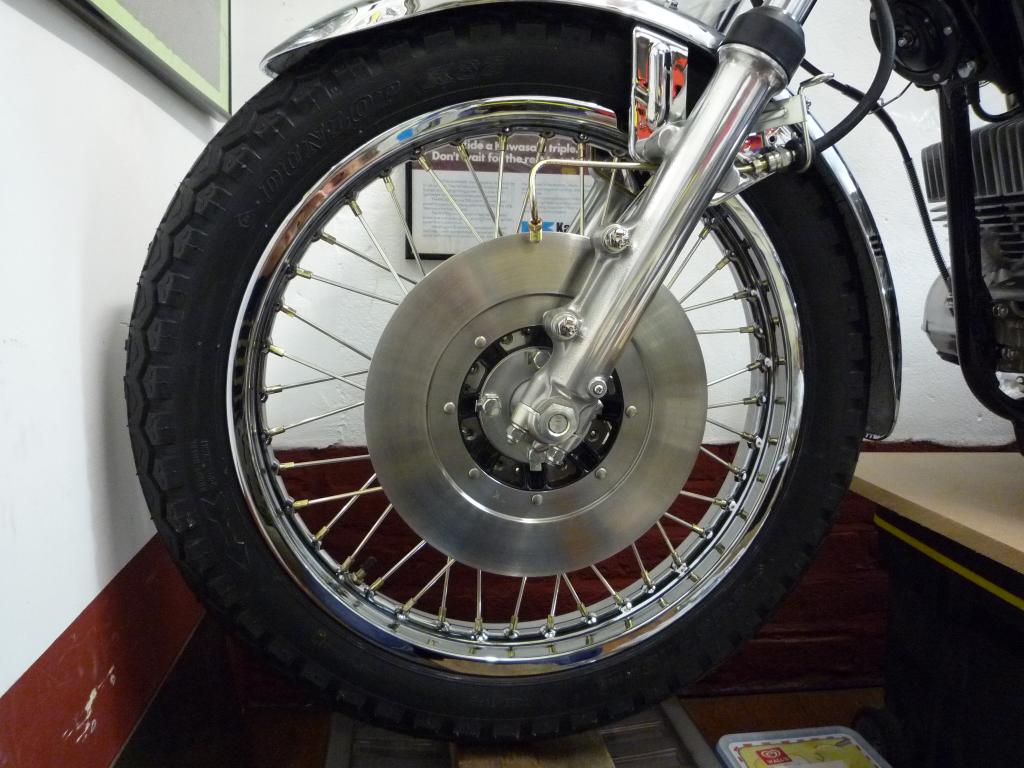
and with a new set of brake pads the refurbished caliper was next.
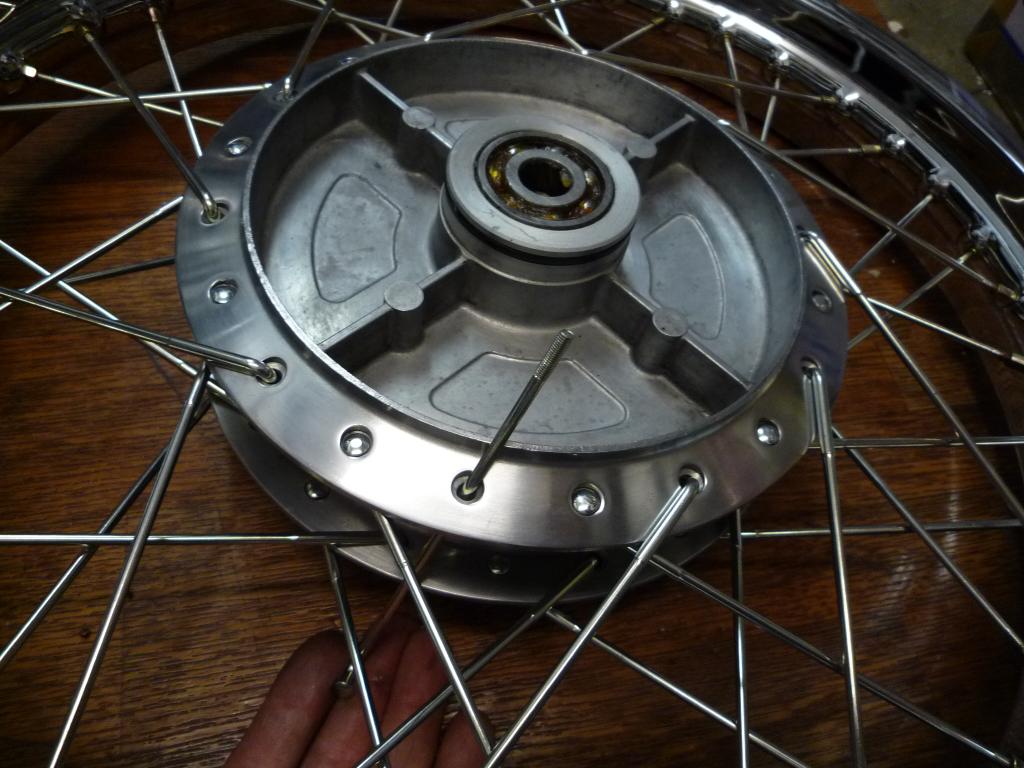
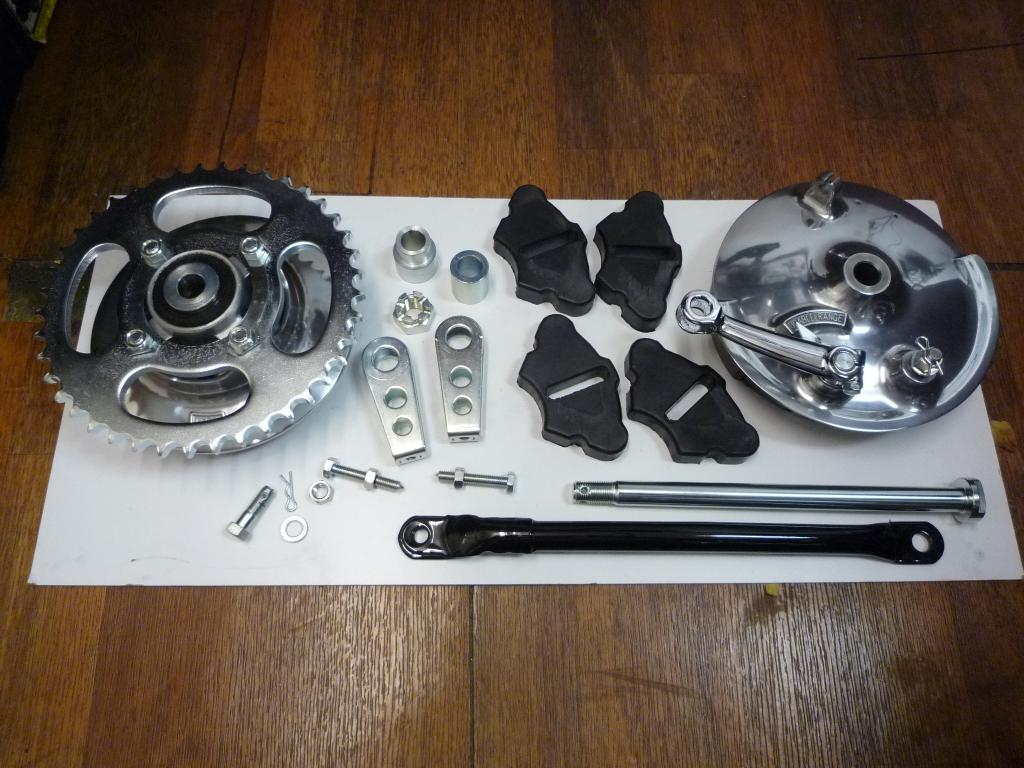
On to the rear brake and the hub to reassemble,
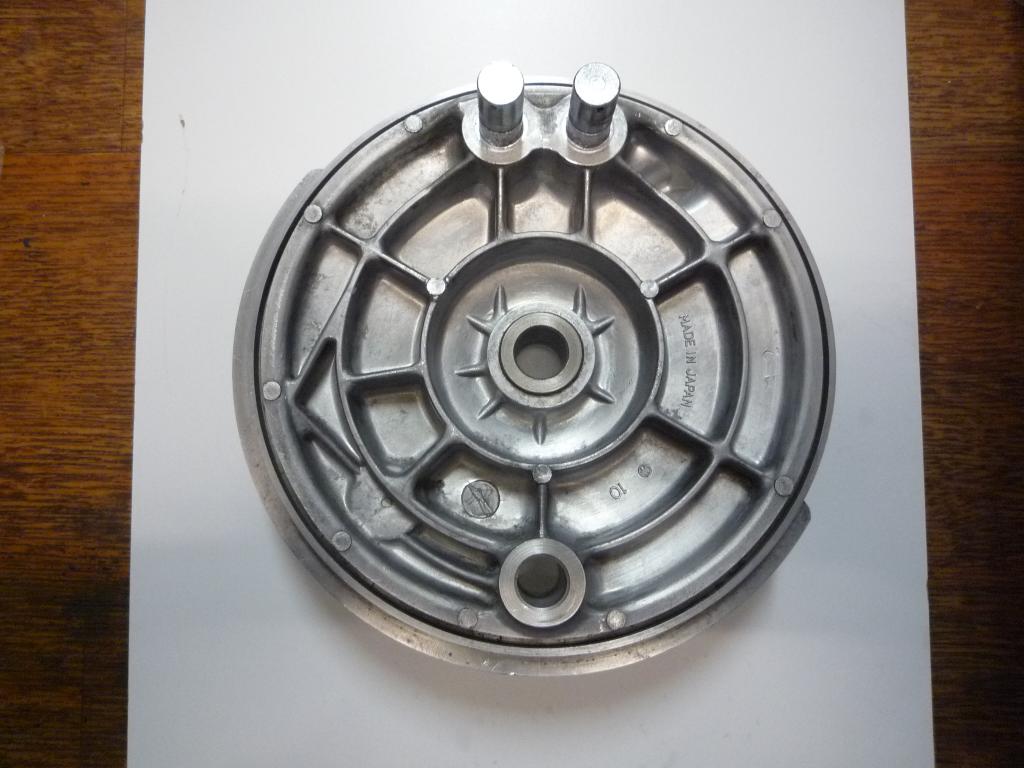
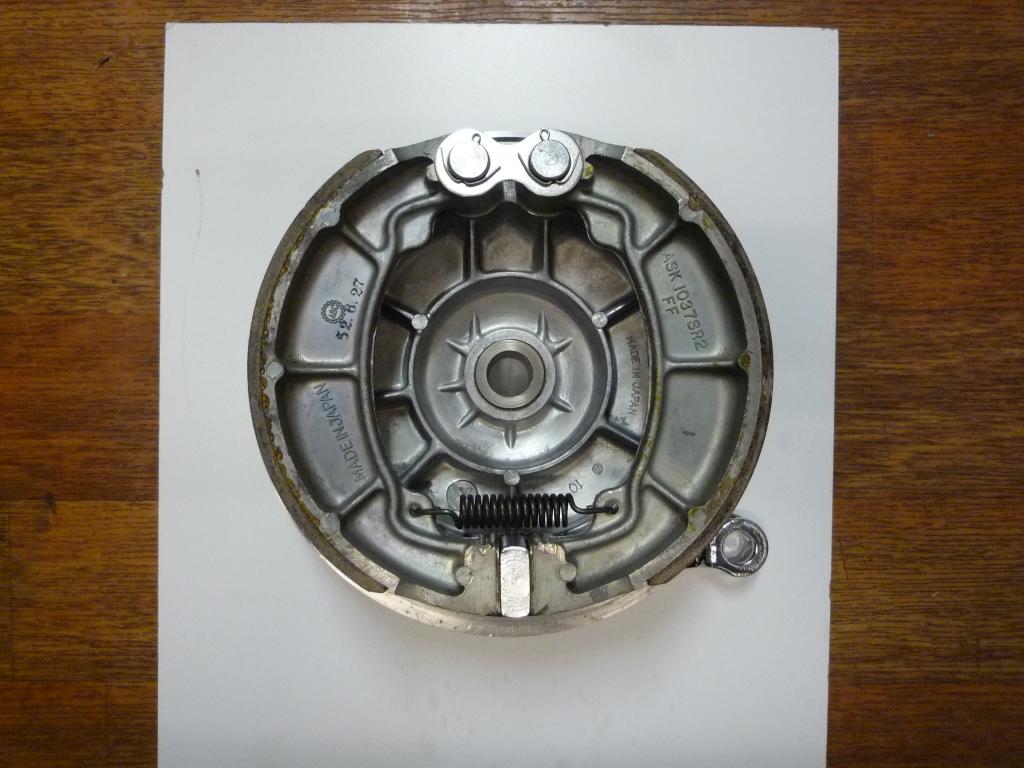
The original shoes were inspected, deglazed and refitted along
with a new spring as the original one was dirty (sorry rusty).
Some may frown at using old brake shoes but I don't have an issue with it as
long as there are no visible defects, though I do tend to always change old
brake pads.
And then finished off with the brake arm and pointer.
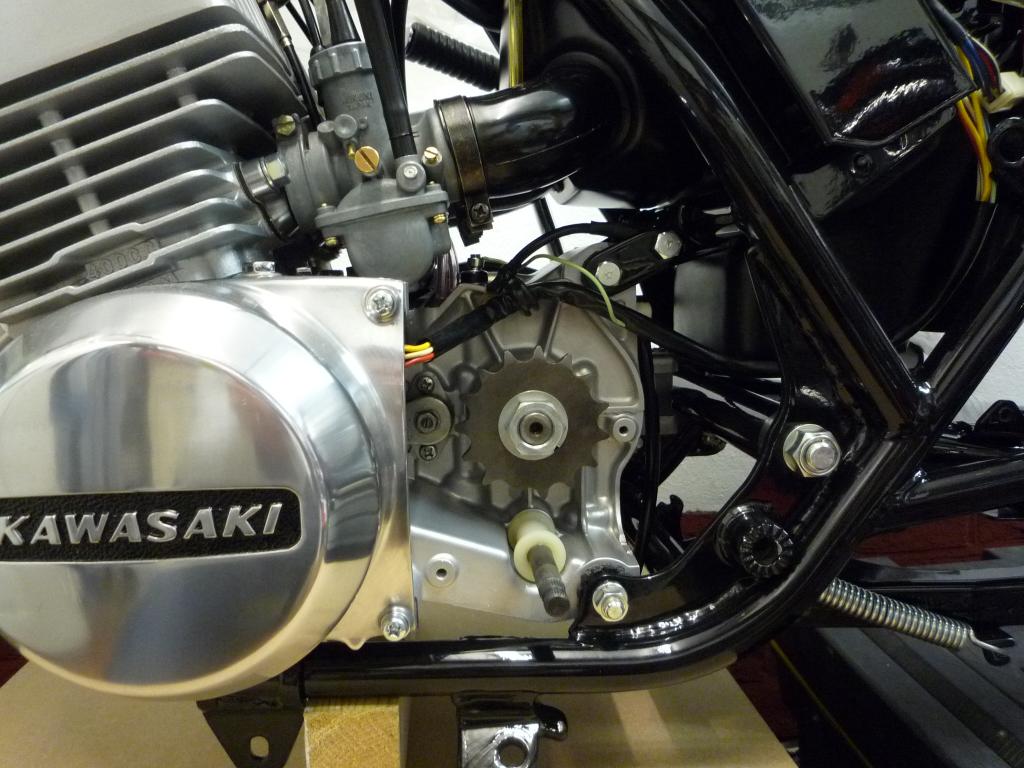
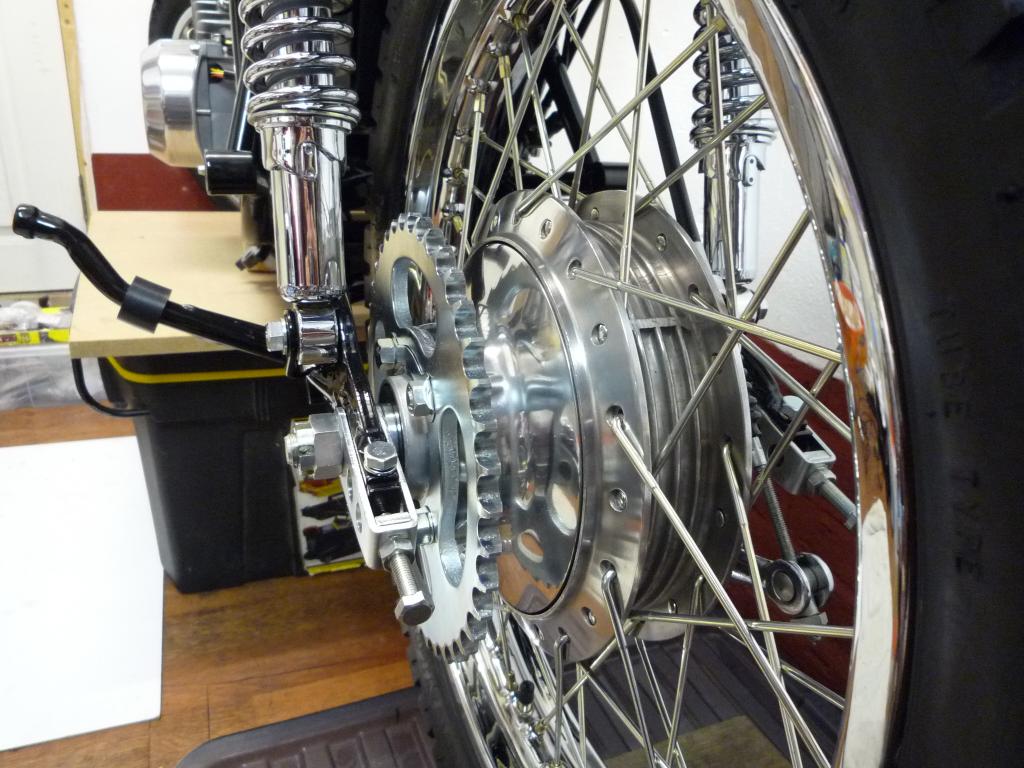
New front sprocket was fitted next and will be locked and
tightened later.
Then I hit a little roadblock ........Sometimes the voices in
your head just get in the way of progress and it was to be so with the rear
sprocket and a rather frustrating anal moment.
So what a great day today was
........I
woke up fired up and on a mission, first job was to sort out the roadblock.
So here was my predicament and my head just wouldn't budge, I had a brand new
super dooper shiny new sprocket all ready to fit but the hole cutouts were
shouting at me, and no matter how many times I told myself it is just a rear
sprocket, the head wasn't interested.
I did think about getting the new one machined to match but after digging out
the original sprocket and inspecting it in accordance with the 10% wear over
width ratio they use it was found to have loads of life left in it and i didn't
need a new one after all.......however it wasn't very shiny.
So after a quick bit of fettling yesterday it was off to the platers this
morning.
Now I said it was a good day and it was because I had also decided it was time
to sort the exhausts out (the final pieces) and after unwrapping them from their
covers and checking them over I was feeling pleasantly optimistic on their
condition. One of them I could actually do myself but the other two needing some
specialist attention but not looking so bad.
After a quick drive down the A31 and a bit of groveling and the promise of
Doughnuts the parts were dropped off with the plater with him agreeing to have
them done by 12,this gave me plenty of time to pop the exhausts over to a
specialist restorers for assessment.
Quick discussions led to a simple plan of action and even more optimism about
their repair, glad to say there are still craftsman to be found in our fair and
pleasant land.
Another quick dash to Tesco's to buy some Doughnuts........then back along the
motorway to the Chromer's where the Exhausts were duly delivered for
stripping.....happy days.
Back in the car return to the platers to pick up my sprocket, deliver the
Doughnuts and home
Head is very happy now
and I need a drink.
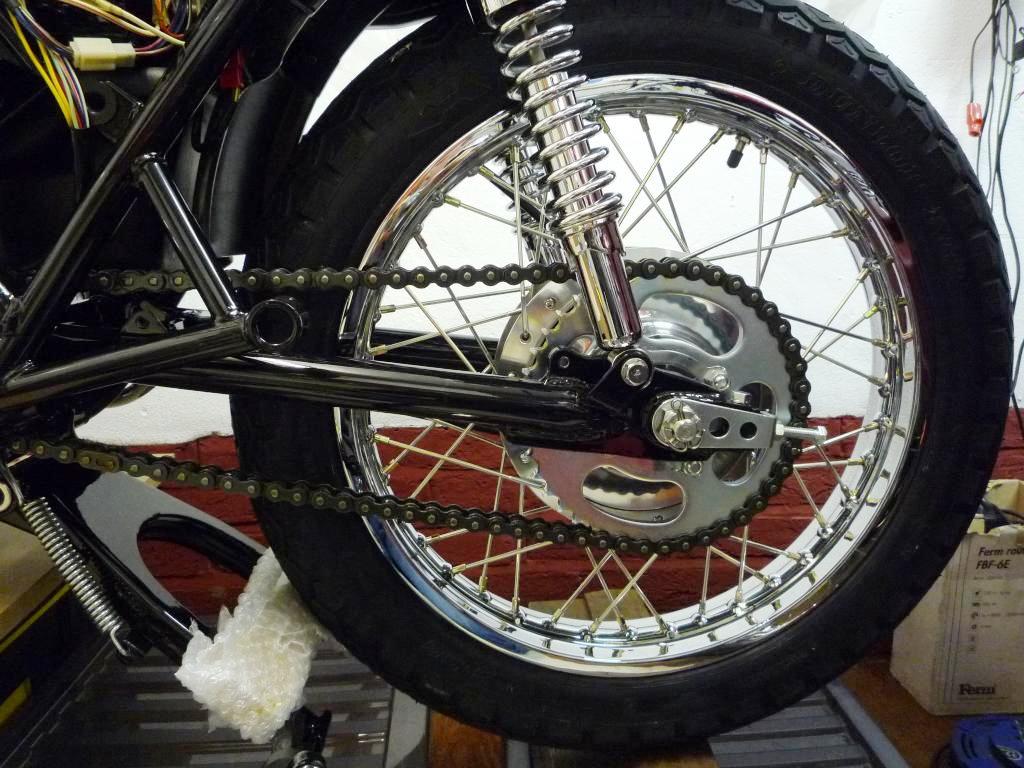
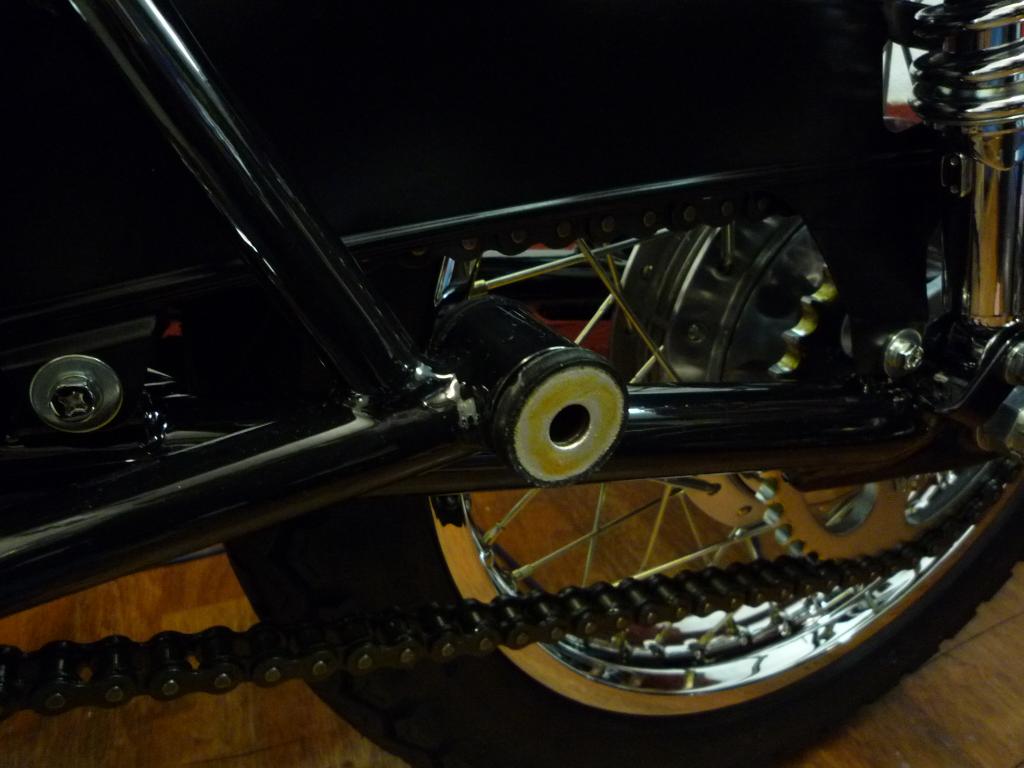
So with the rear sprocket now mounted
on the hub carrier and securely locked in place, I started by fitting the rear
axle collar and then gathered together another collection of bits,......glad to
see the storage boxes now beginning to empty.
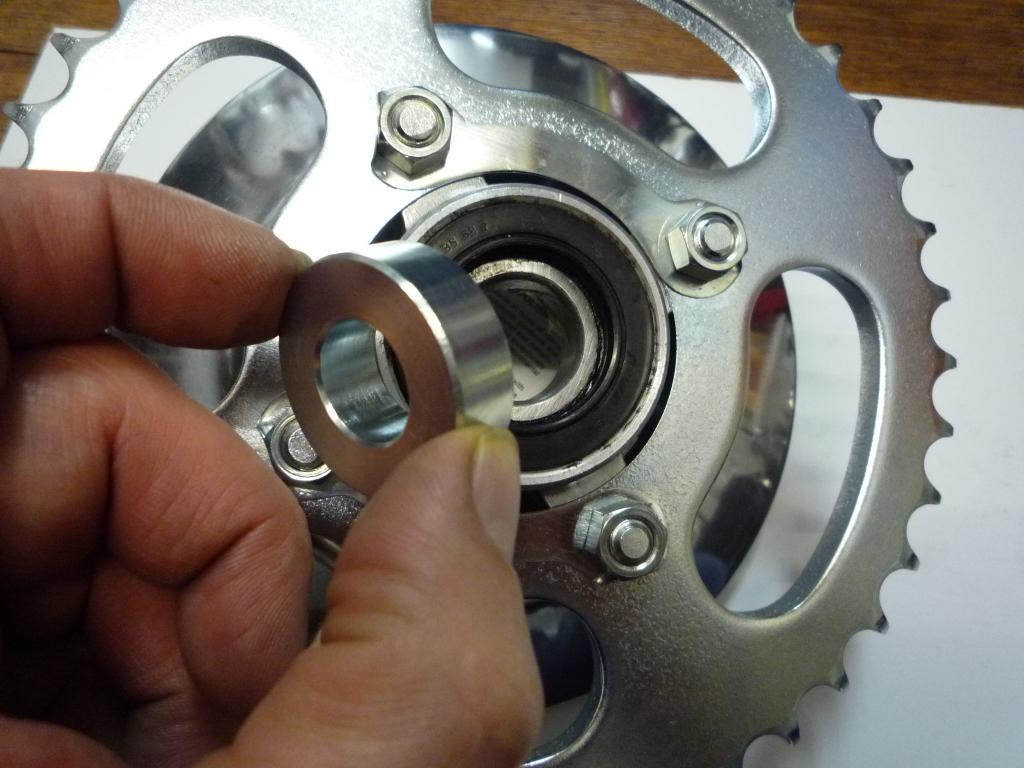
The rear axle sleeve was fitted in the
rear of the carrier
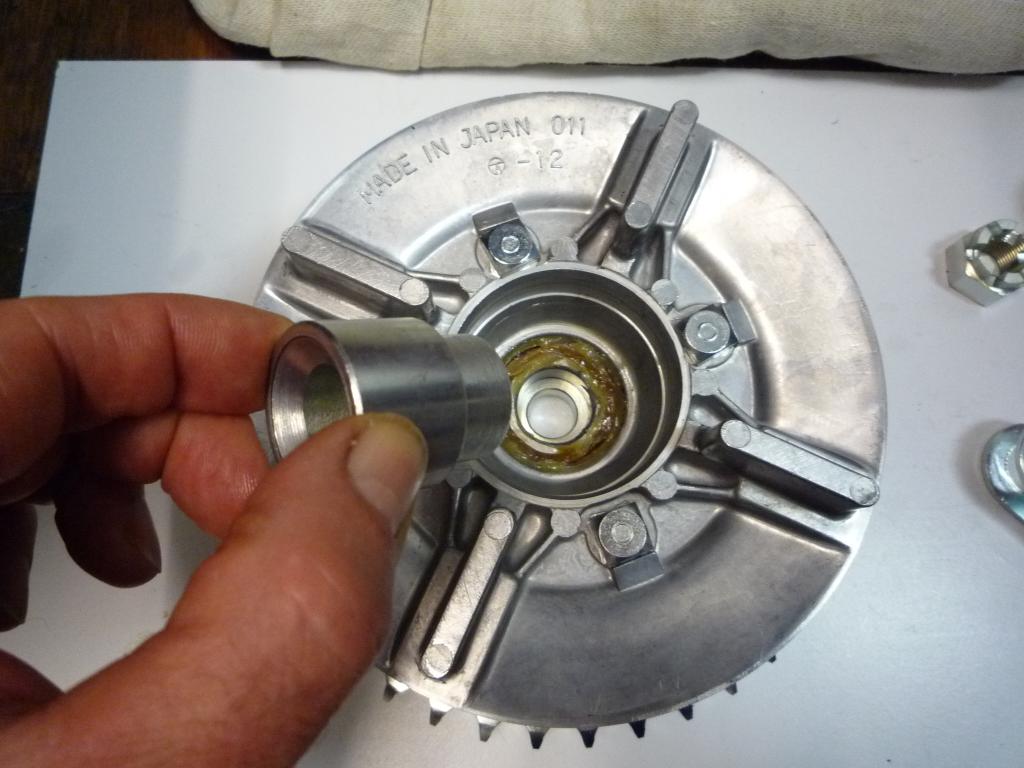
and with the cush drives set in place
and the brake and sprocket assemblies fitted I moved the wheel into position

and lifted it into place,.....this then made the bike rear heavy and called for
some rapid stretching and balancing gymnastics to take place in order to get it
some support
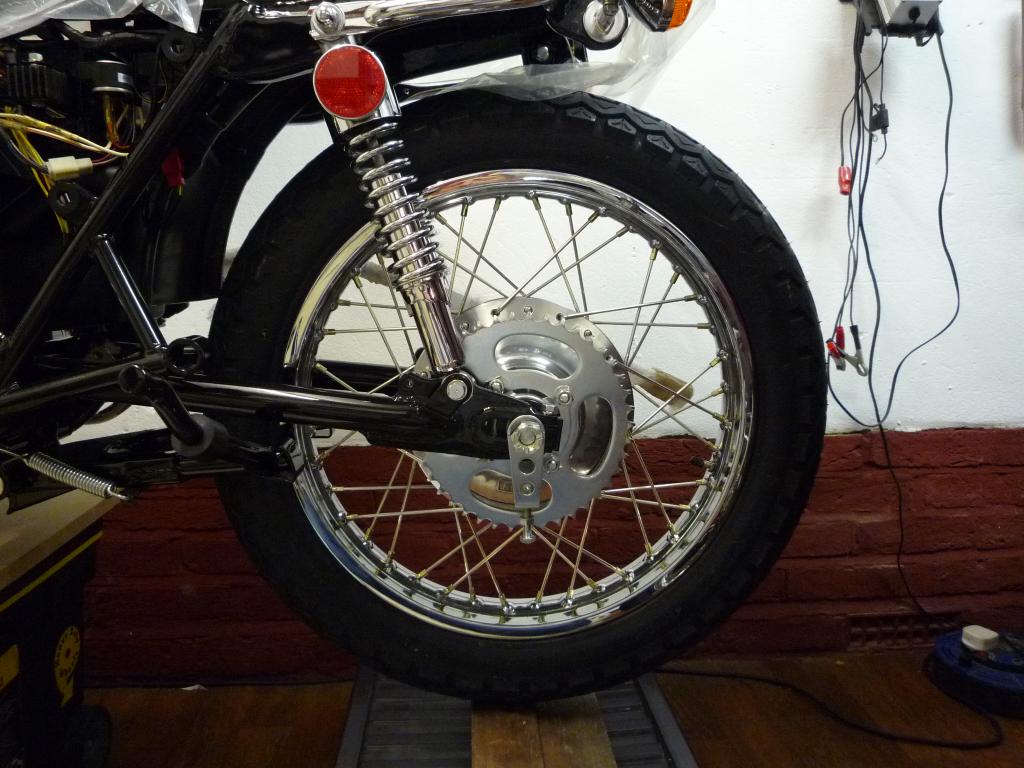
The torque arm was connected at both ends to be finished off later

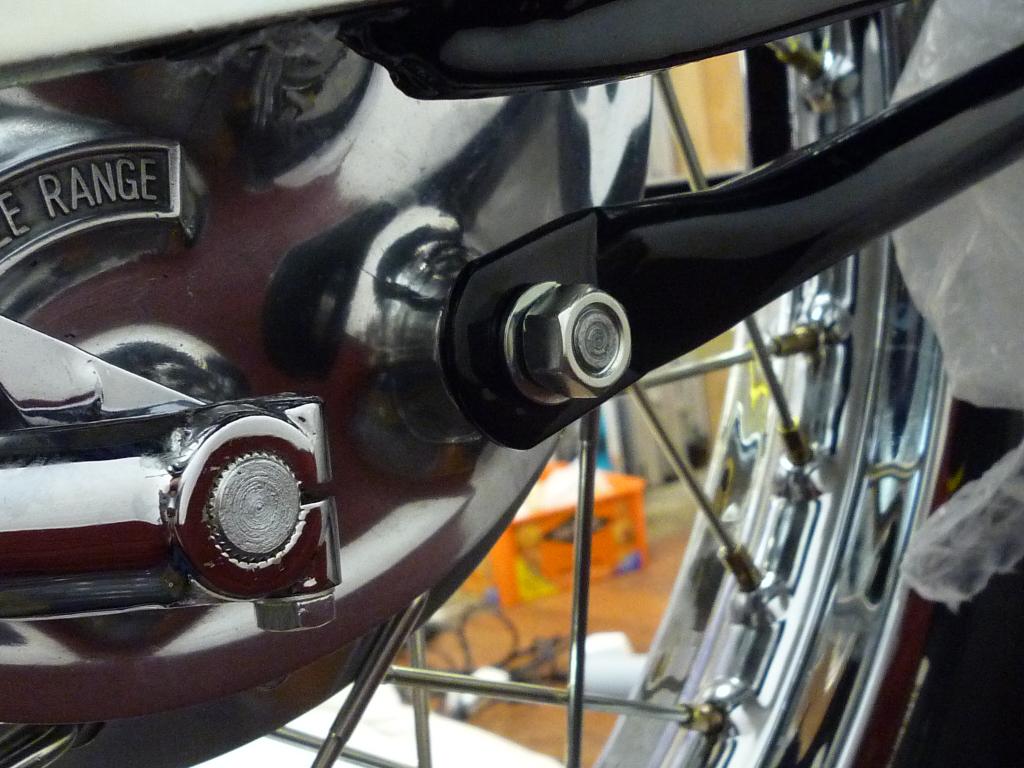
and the the rear brake cable slid into place leaving just the chain to fit next.
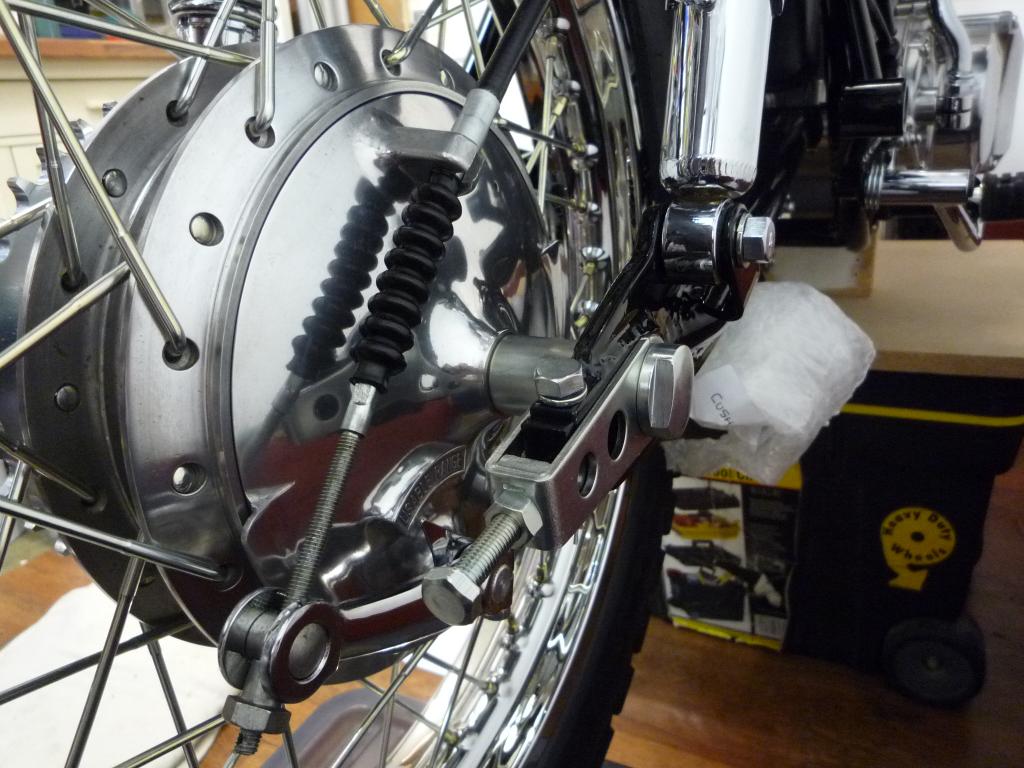
And
she's looking more like a bike again
So moving
on I am happy to say that the 400 now has a new chain fitted (many thanks to
Simon) and very nice it is too.
This allows me to finally tighten and lock up the front sprocket nut.
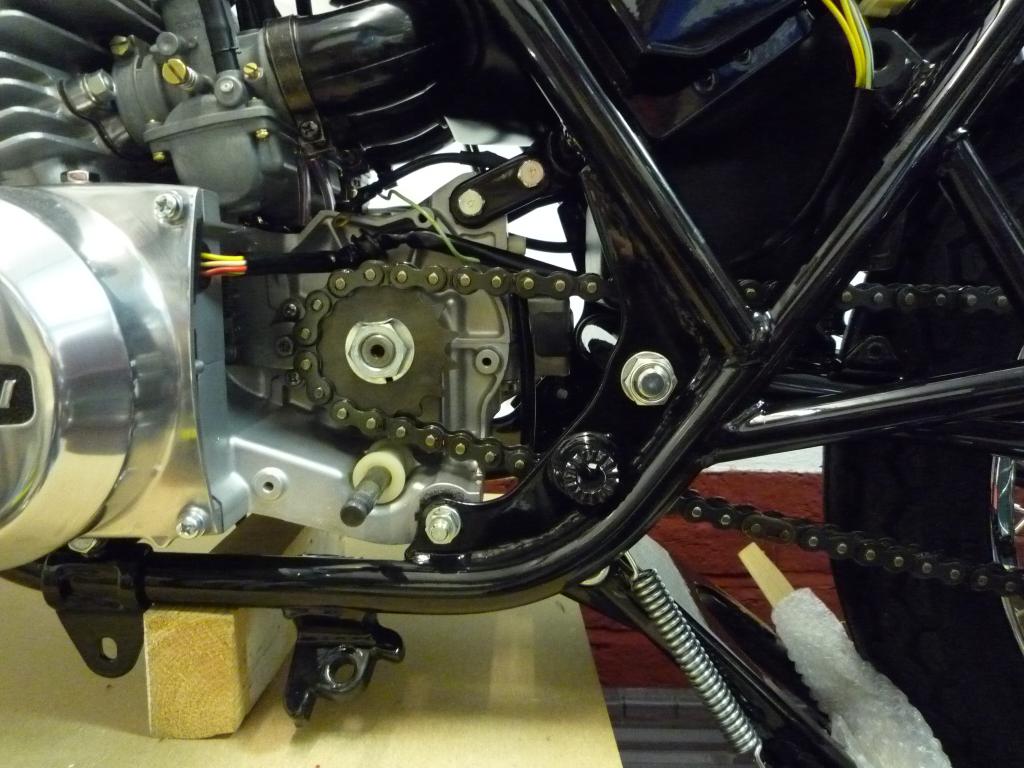
Then fit the chainguard


and the sprocket cover casing,
attaching the all important engine earth lead to the upper attachment screw.
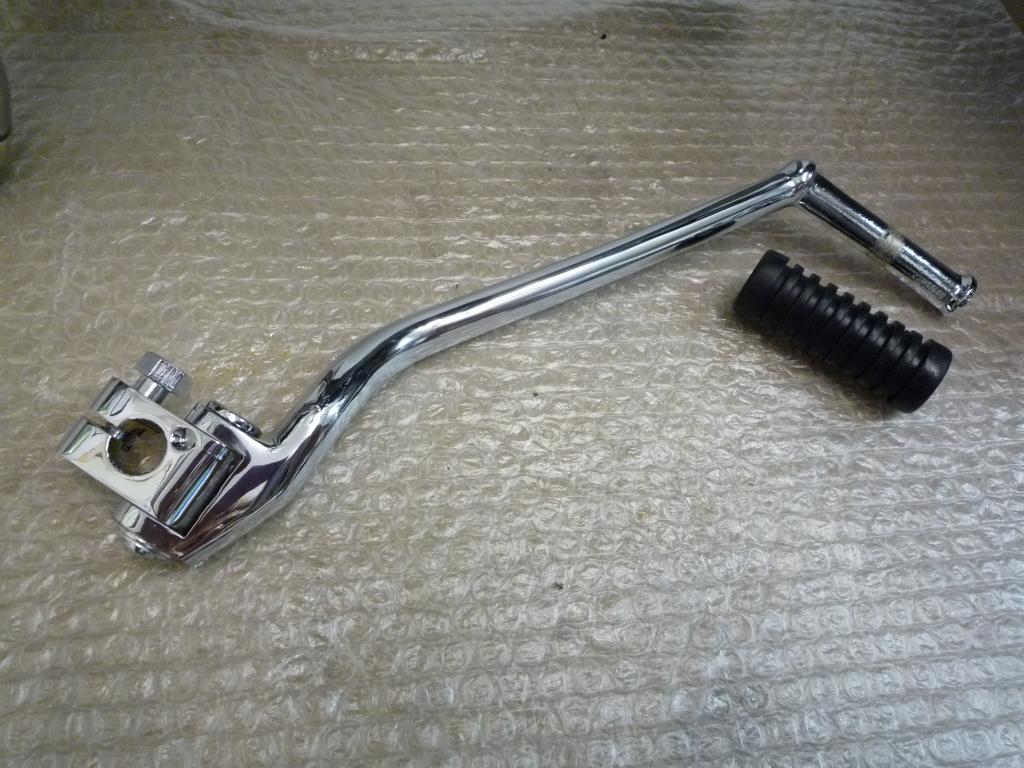
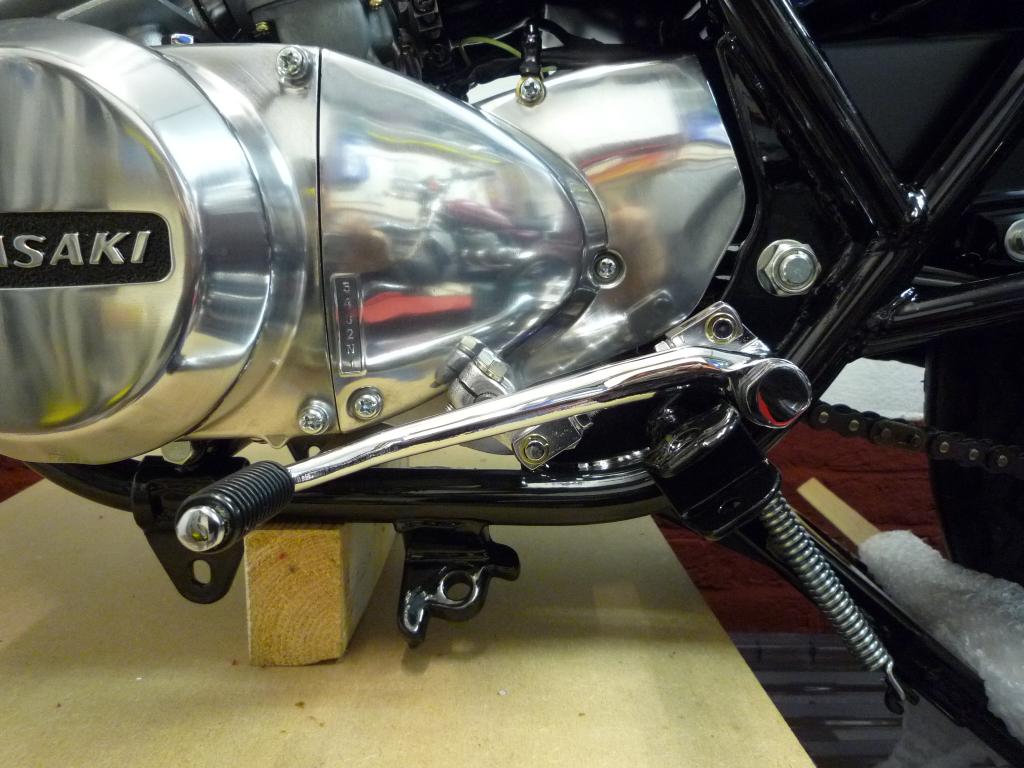
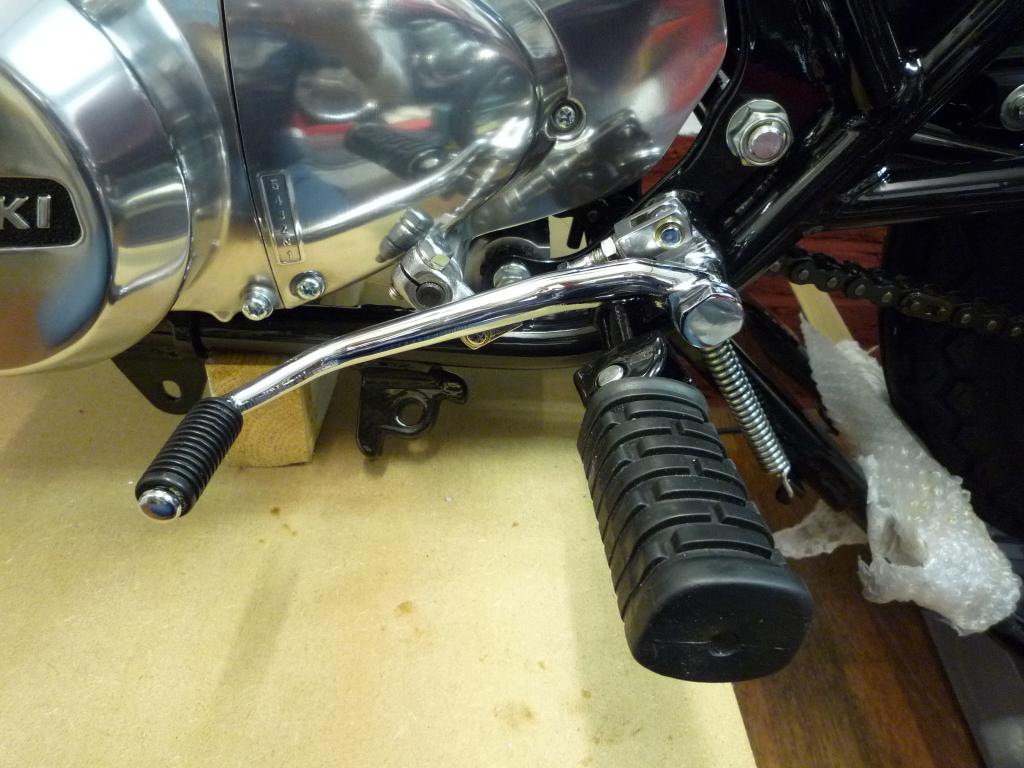
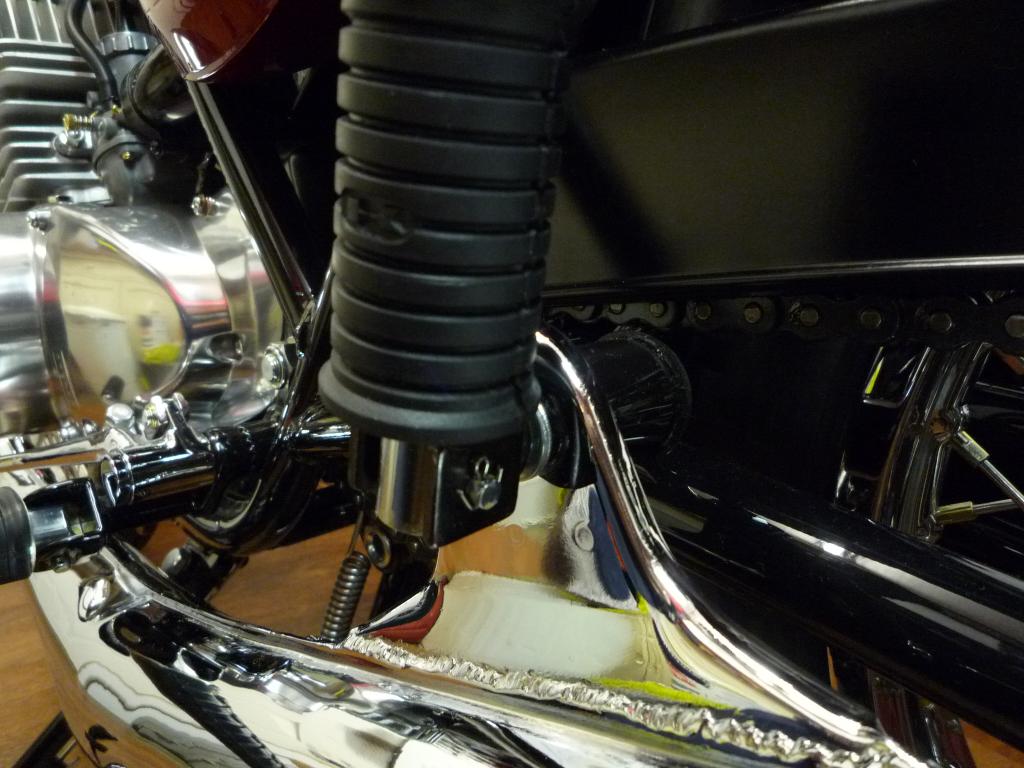
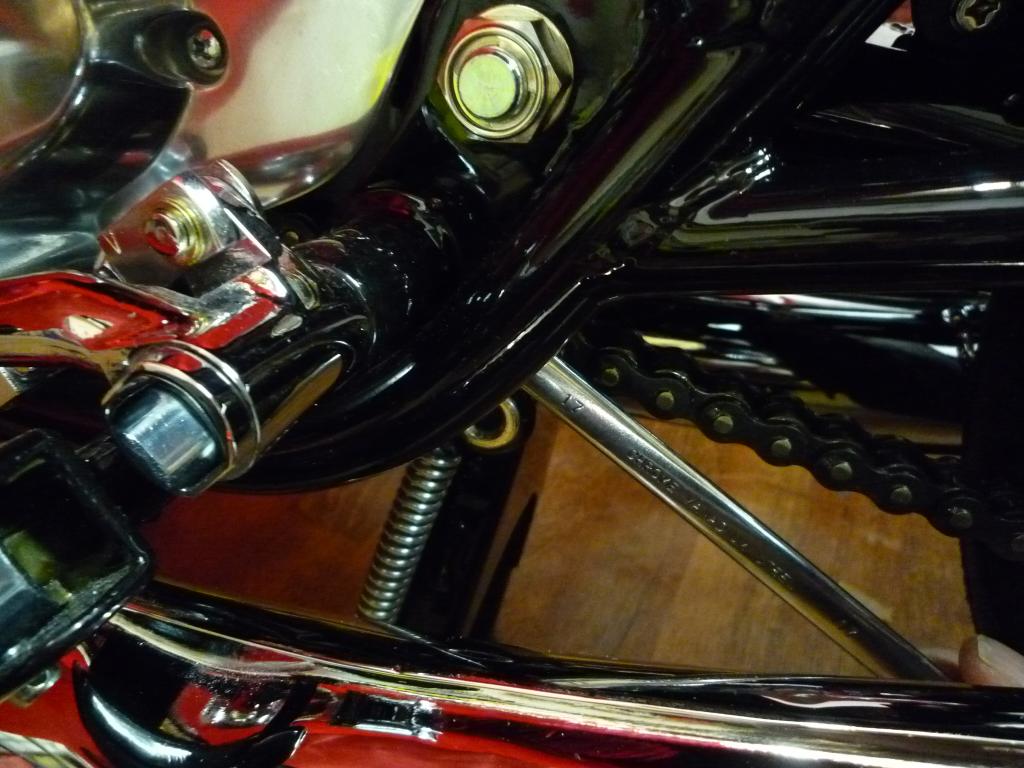
Now I
can also sort out the left hand footpeg mount and the gear change lever.
Which is soon assembled and fitted , the final adjustments will be made once the
exhausts are on.
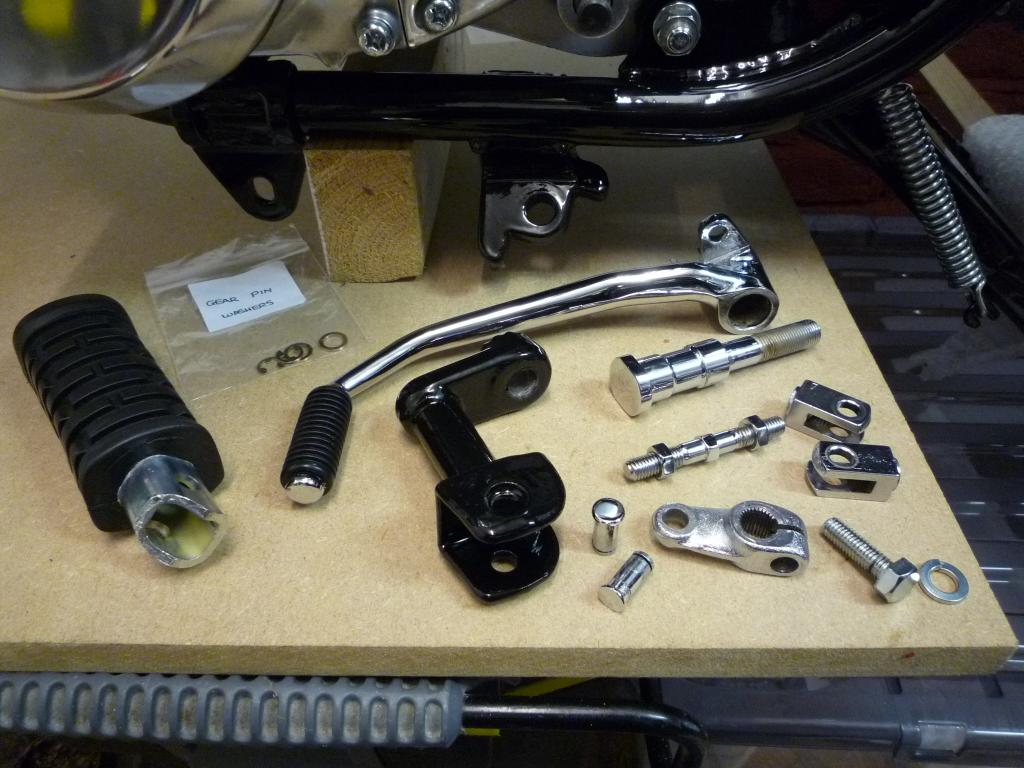
Front footpeg finishes it off (picture
making it look huge for some reason)
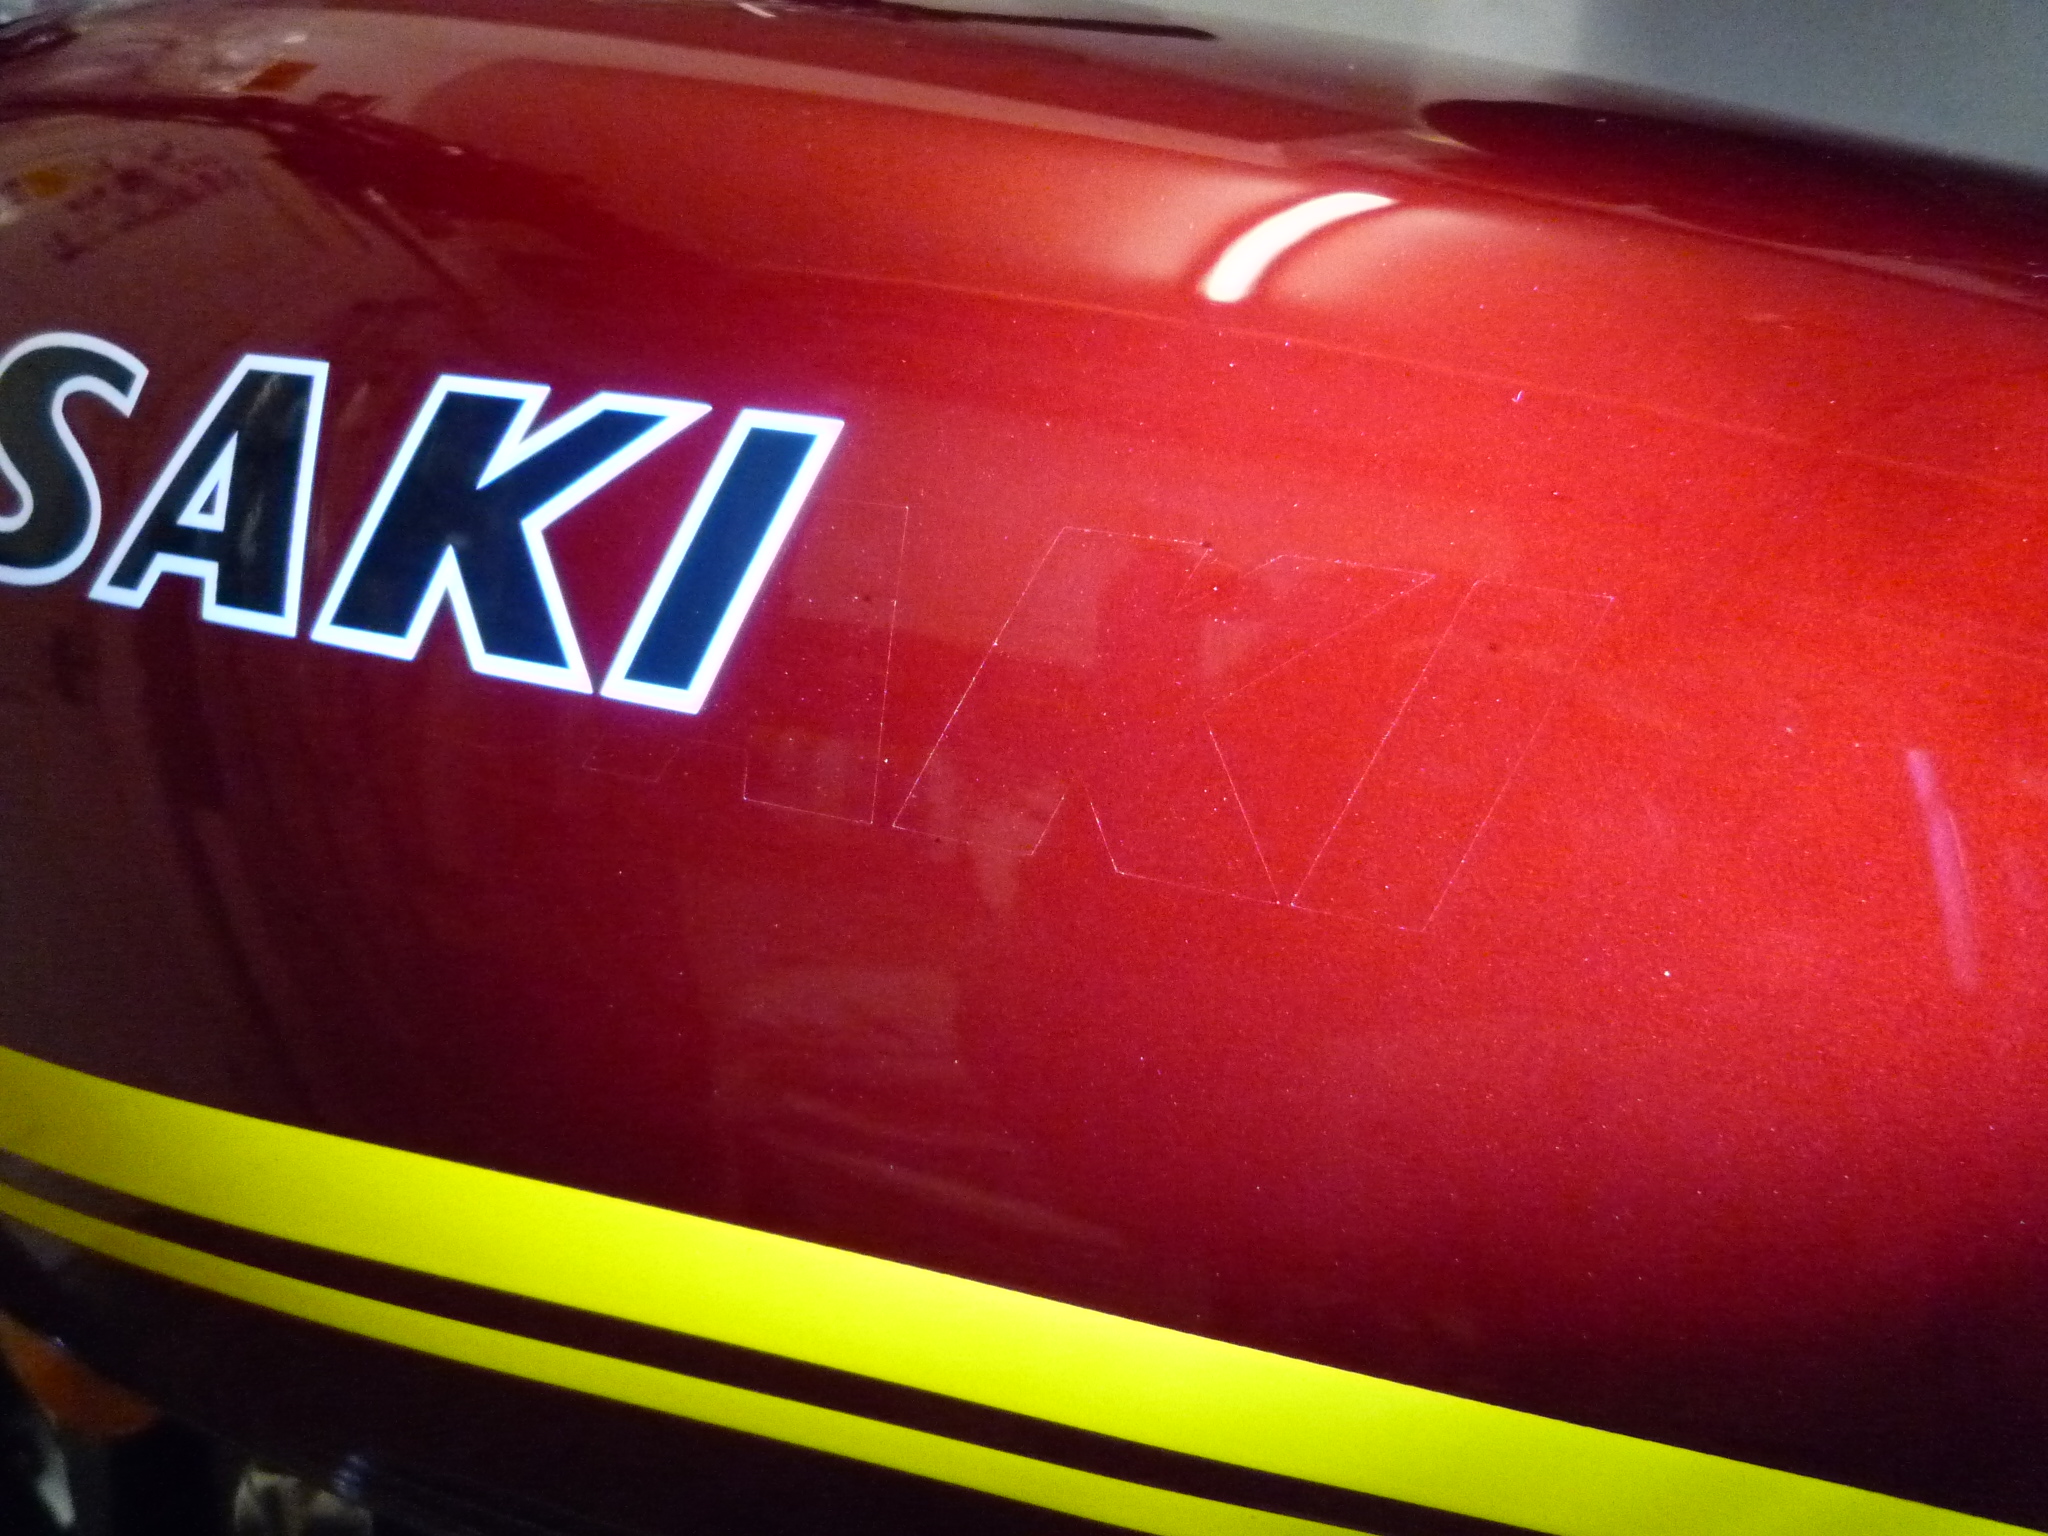
The infamous Helmet hook decals have
been fitted as crooked as my head will allow,

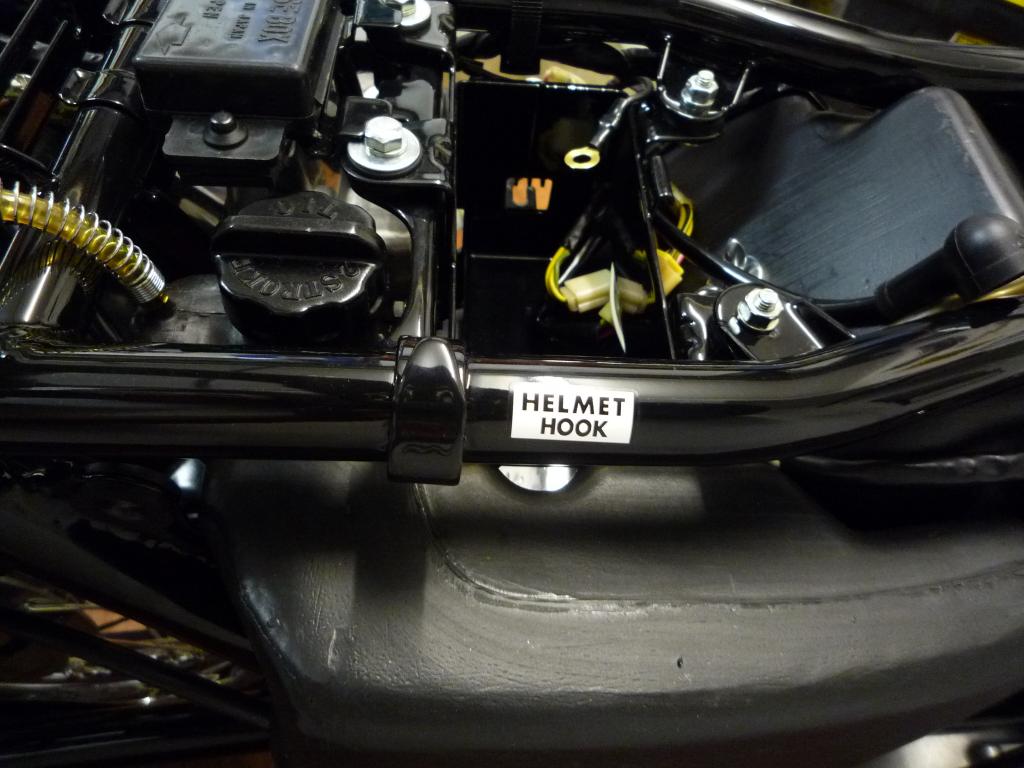
though strangely and fortunately for me
it seems mine were originally positioned by a Japanese teetotaler who hated Saki
........the pictures don't lie
The swing arm block bolts have been
painted black as they were originally
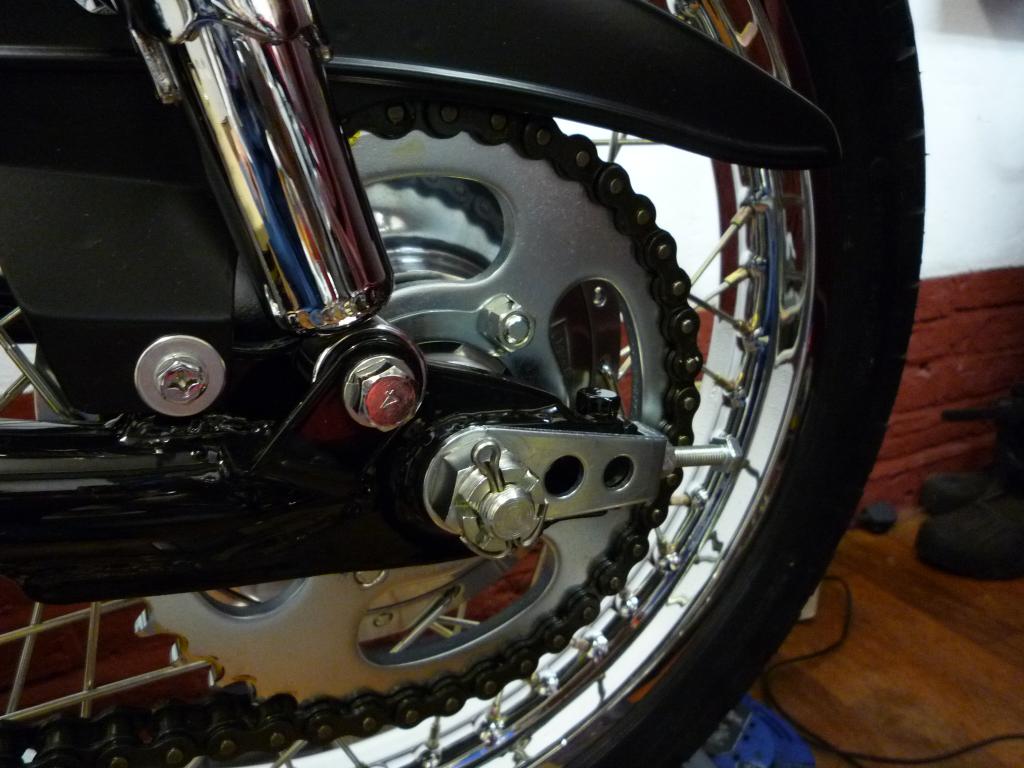
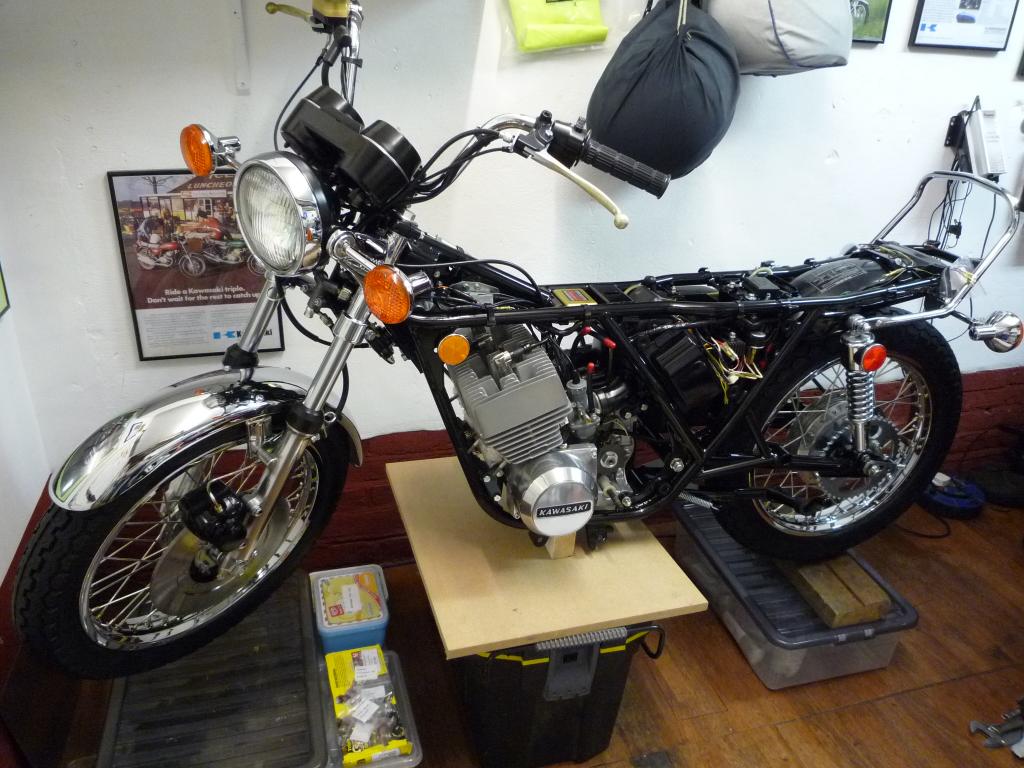
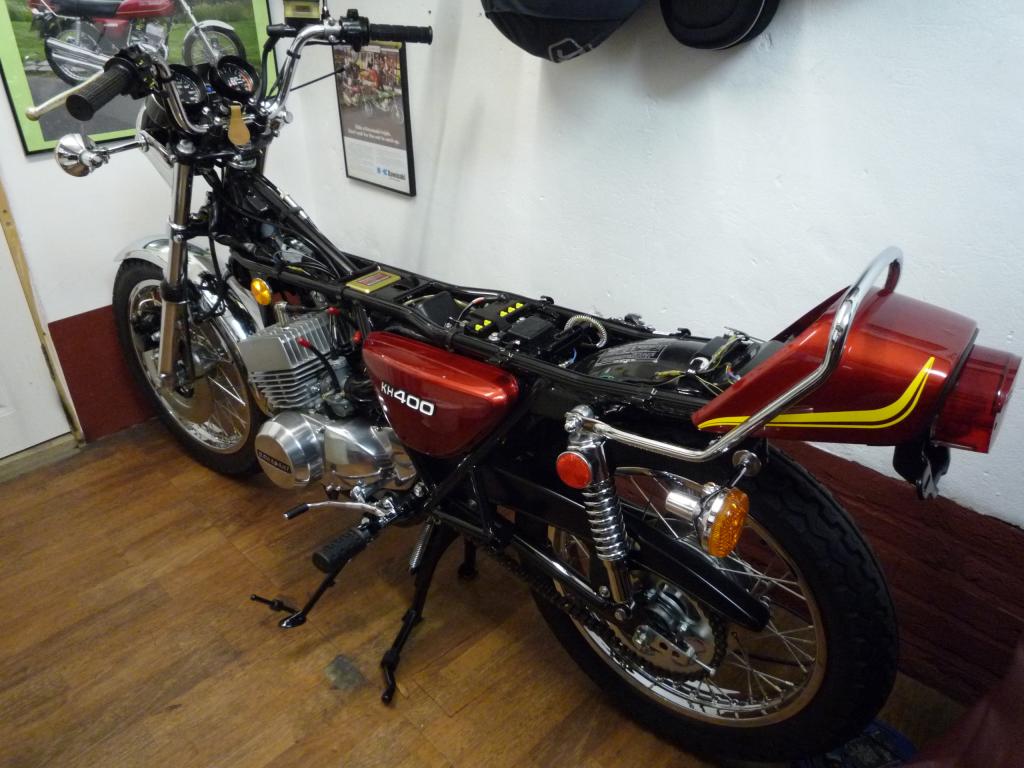
and she now sits proudly back on her
wheels again.
Well I'm beginning to run out of jobs
now and winter is only just starting so that's not good...
I am still waiting on the paintwork Zzzz but one must be patient.......and there
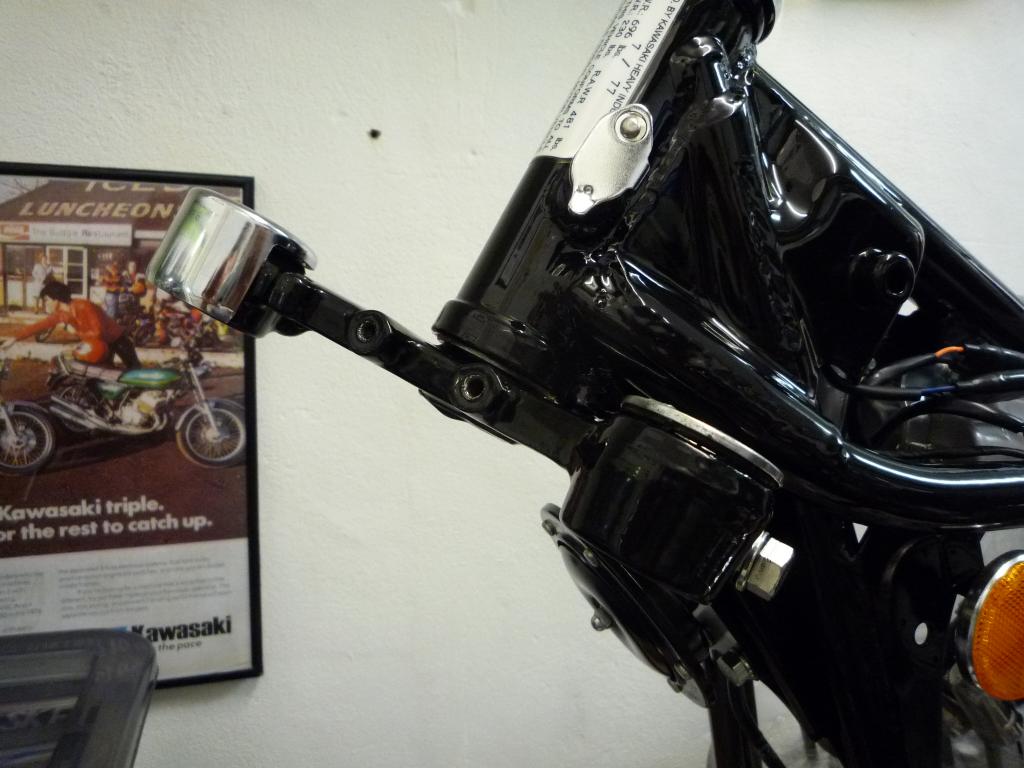
is always some polishing to do.
Side stand has now been fitted... Along with a shiny new mirror.
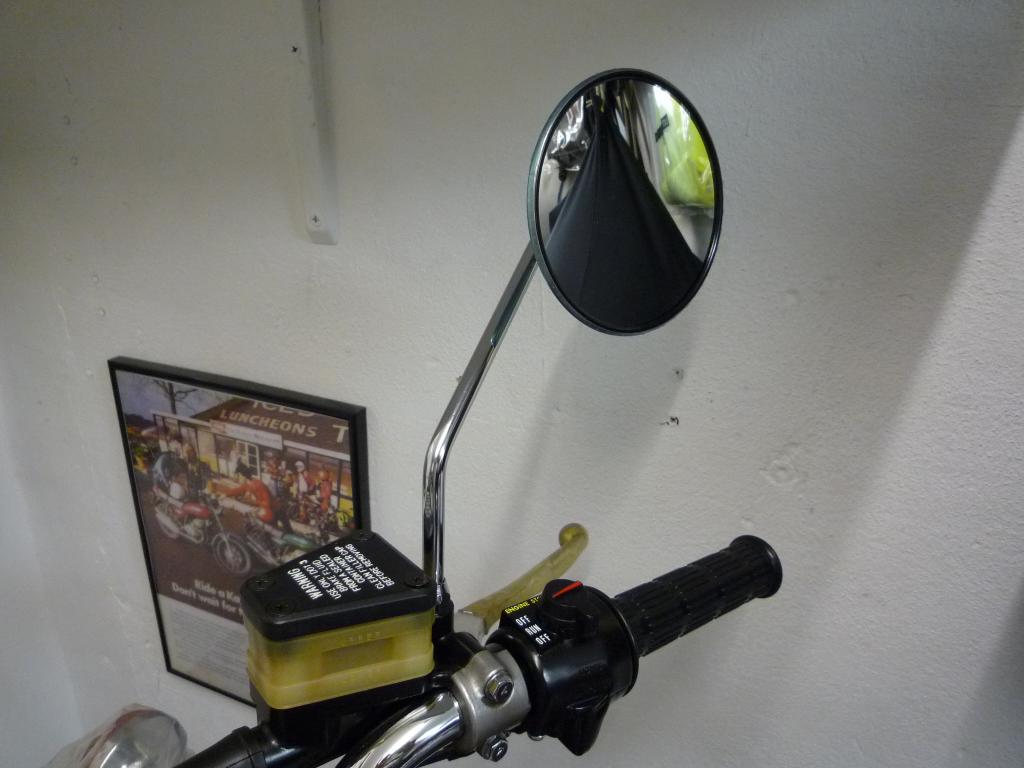
I don't know if its because of the bars
but I think I will be a rebel and only fit the one at the moment. So no
overtaking me on the inside!
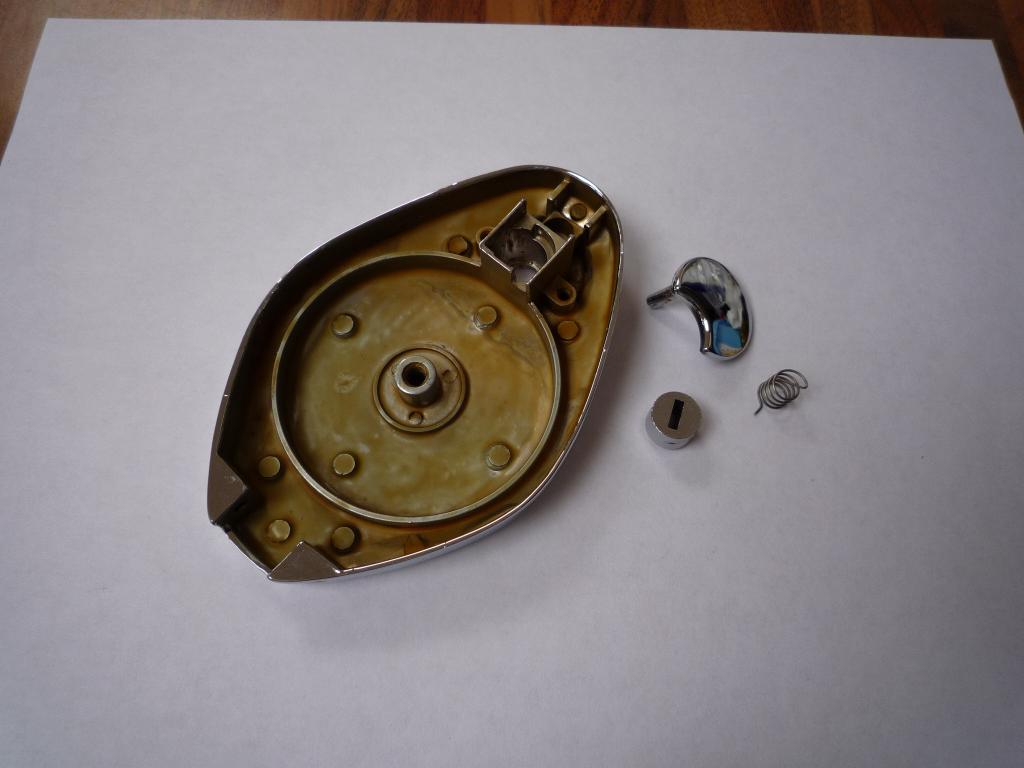
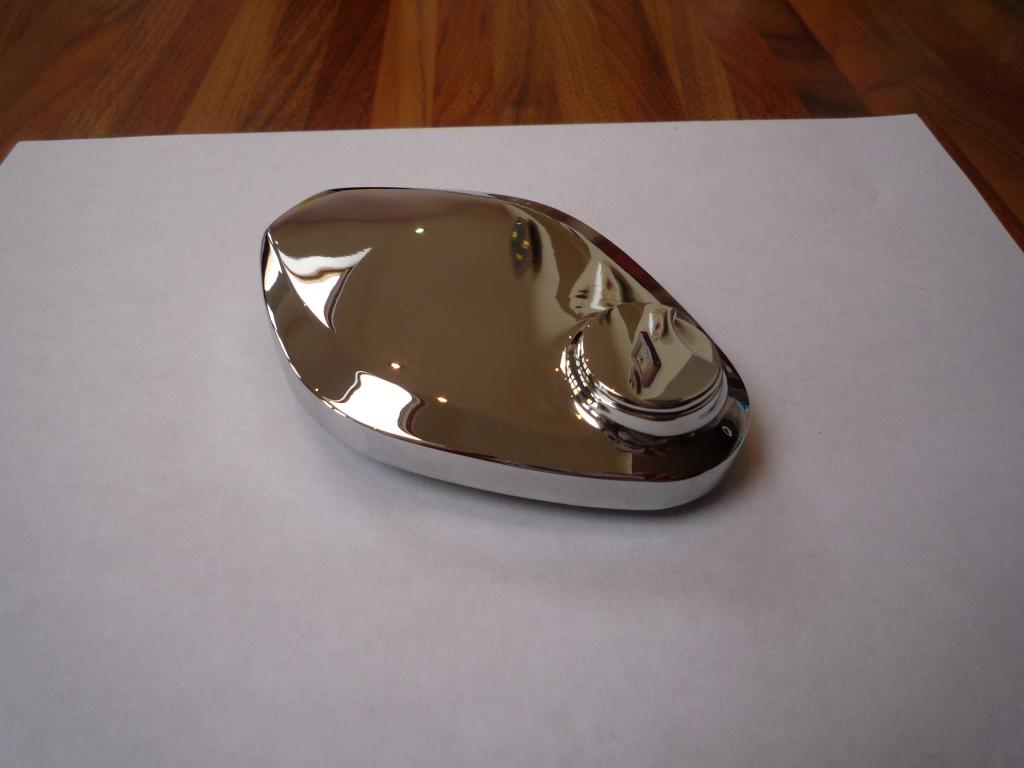
And in preparation for the paintwork
I reassembled the fuel cap,...the inside has been wax protected and I greased up
as I went.
Pictures added for reference:


Now we sit and wait Zzzzzzz
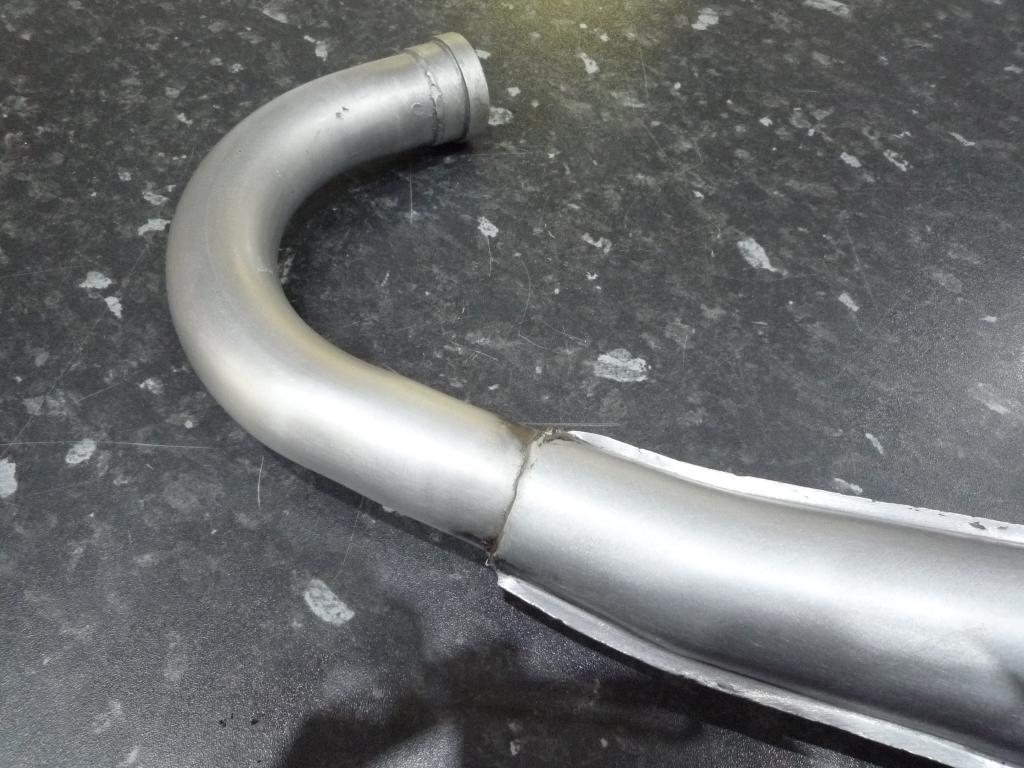
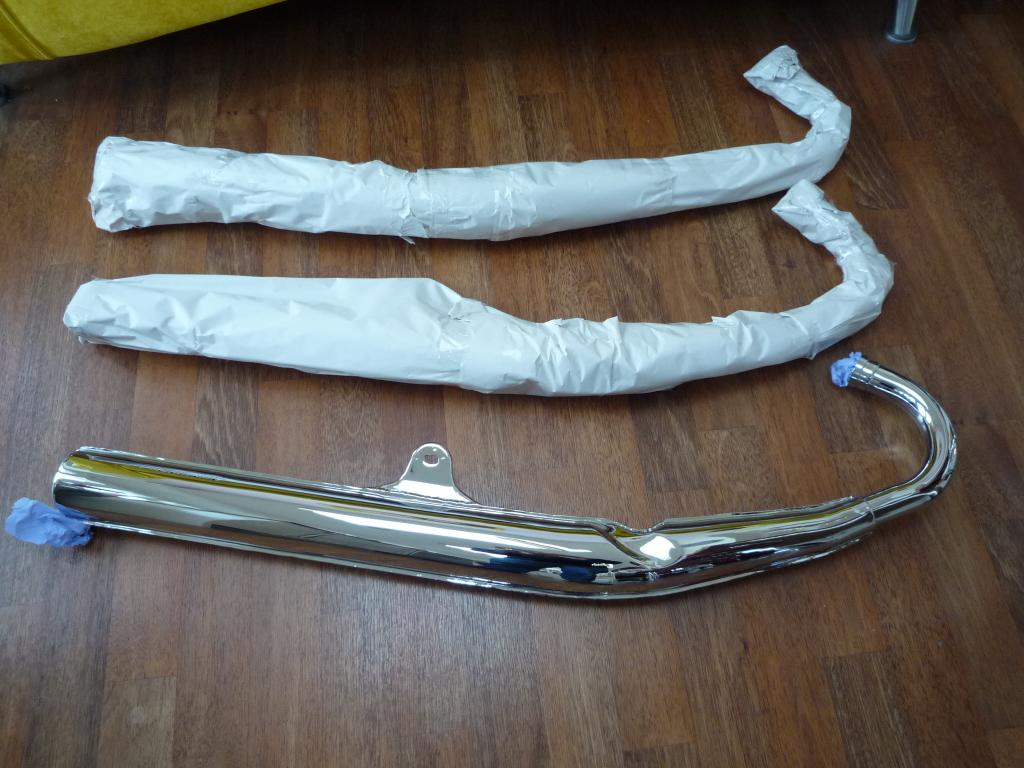
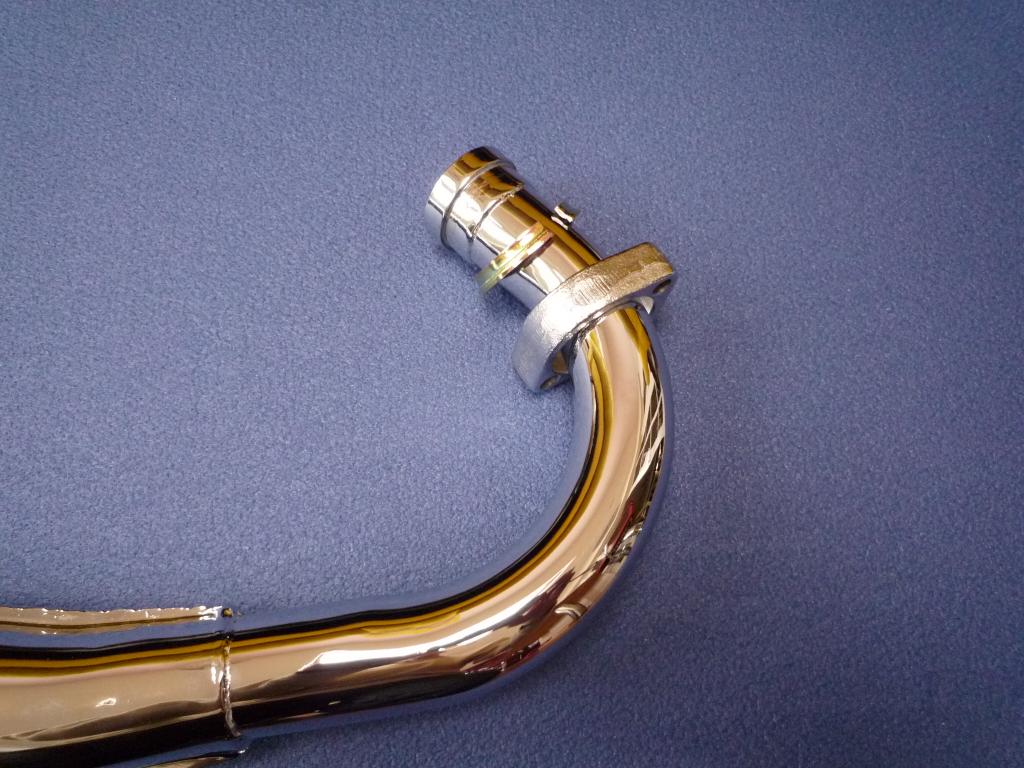
So a
little recap on the exhaust situation, all three were in a fairly good condition
considering the age of the bike and compared to what you do generally see on the
open market and on most project bikes for sale. Luckily most of the damage was
located at the front portion of the exhausts where it tapers down and in an area
which I have found to be a little more amicable to the process of working.
Unfortunately unlike the 250 the 400's downpipes prevent you from getting to
that area easily with dressing bars, or a jack handle as previously used.
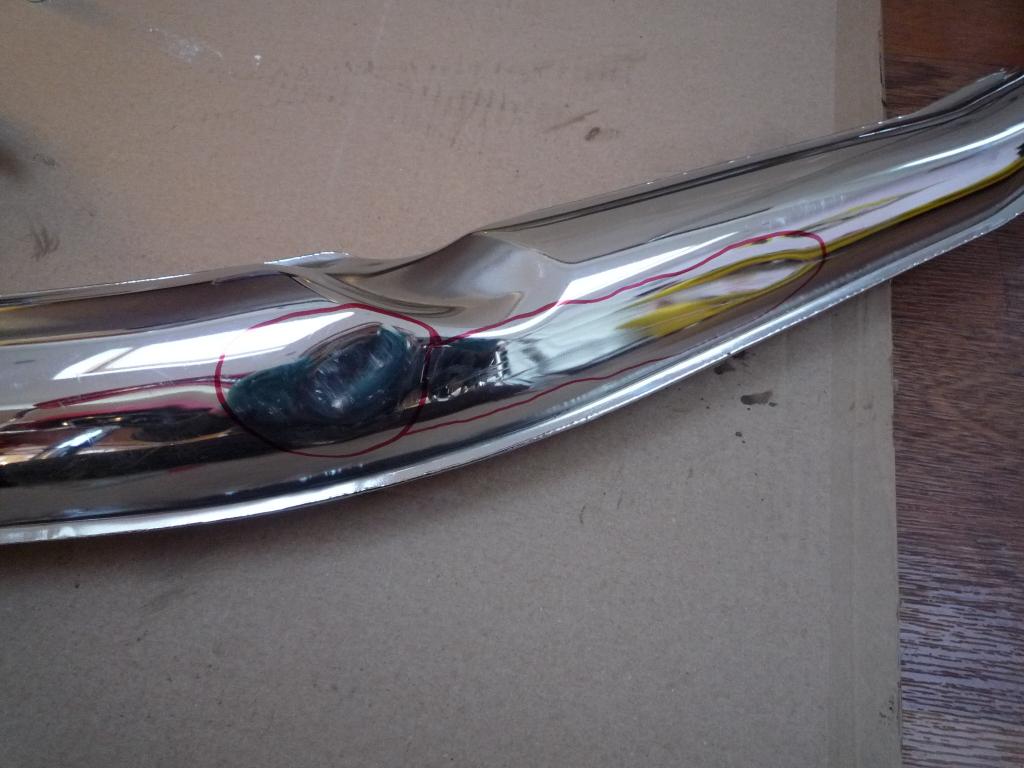
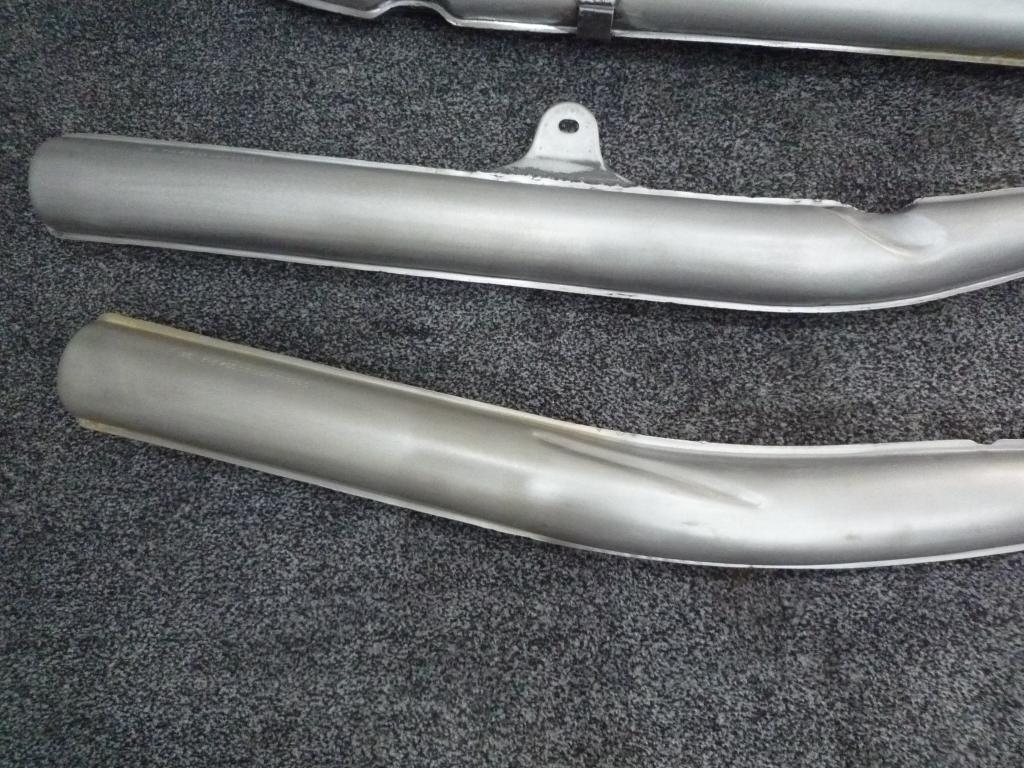
The left hand pipe has a series of
small dents at the front.
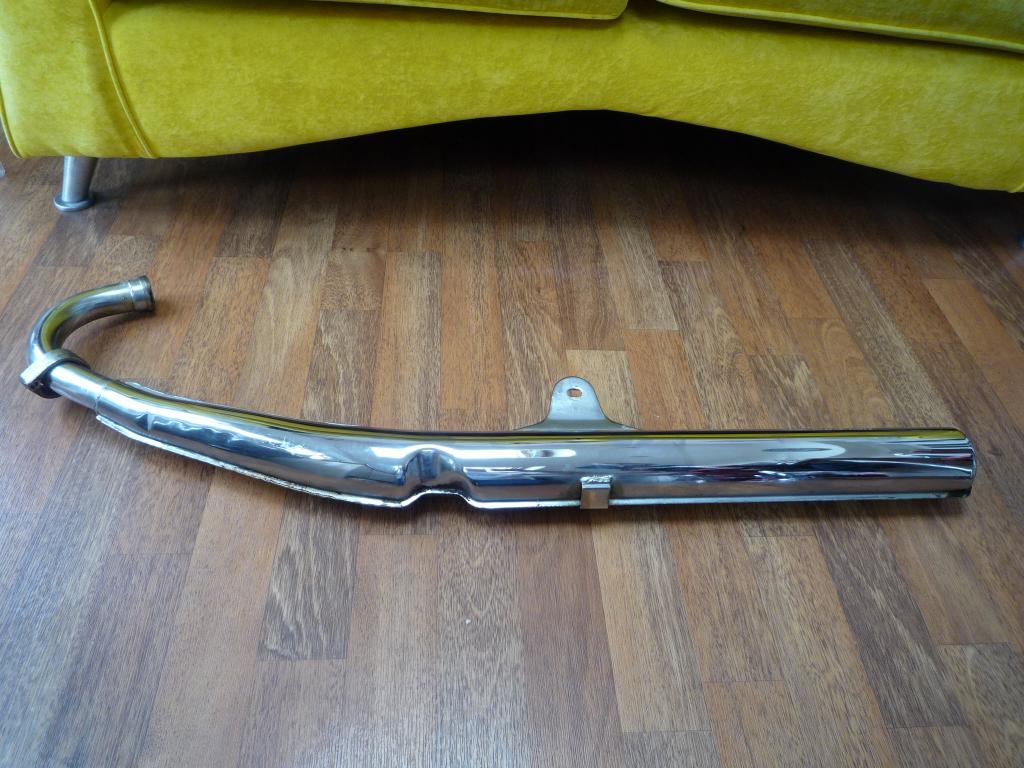

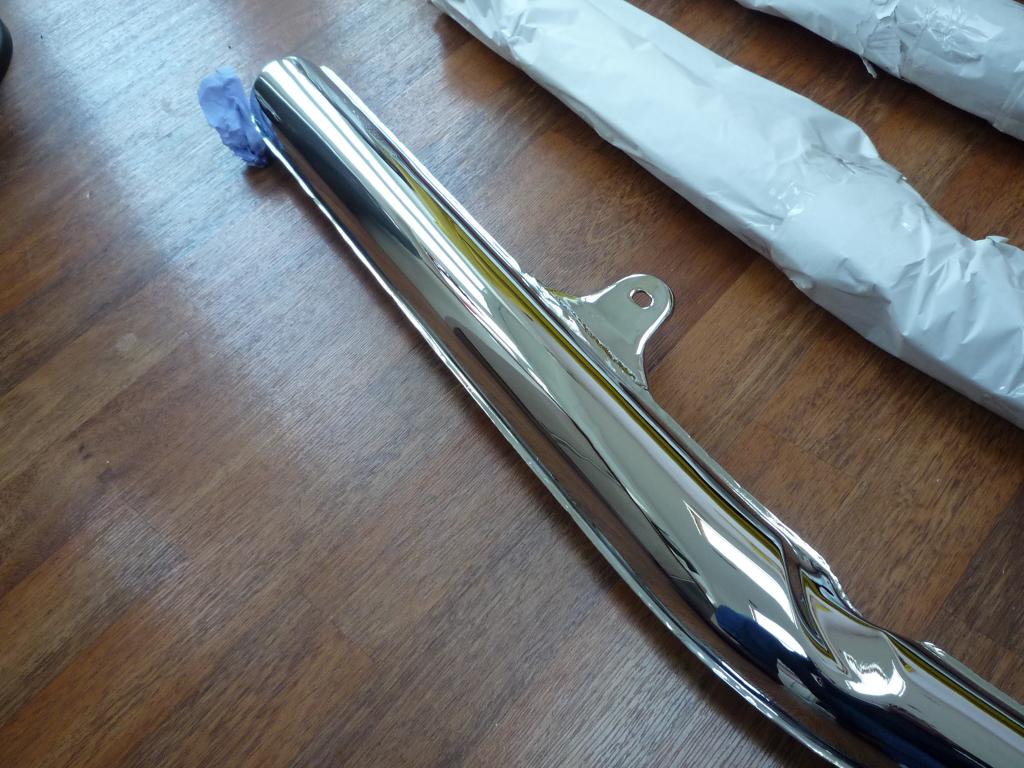
The right hand lower (upper in photo)
is the best one with only a very minor graze to the bottom which I would have
been quite happy to dress out myself but will be included in the repair job lot.
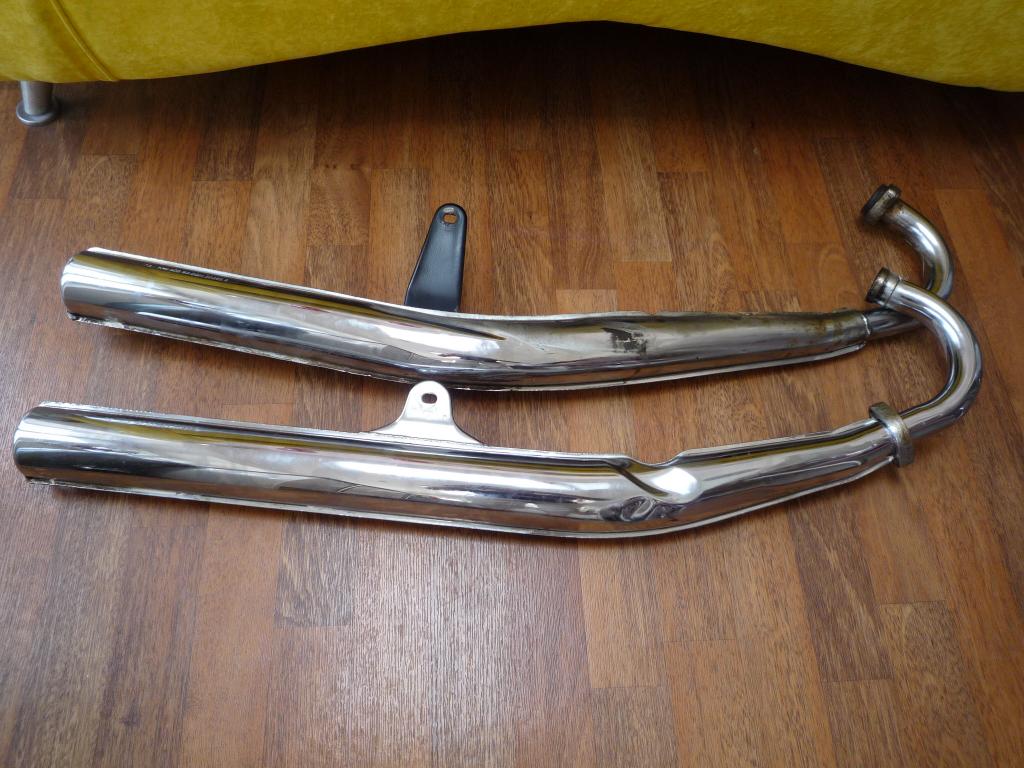
The remaining exhaust has the worst of the damage with a small dent and a longer
creased dent in front of it.
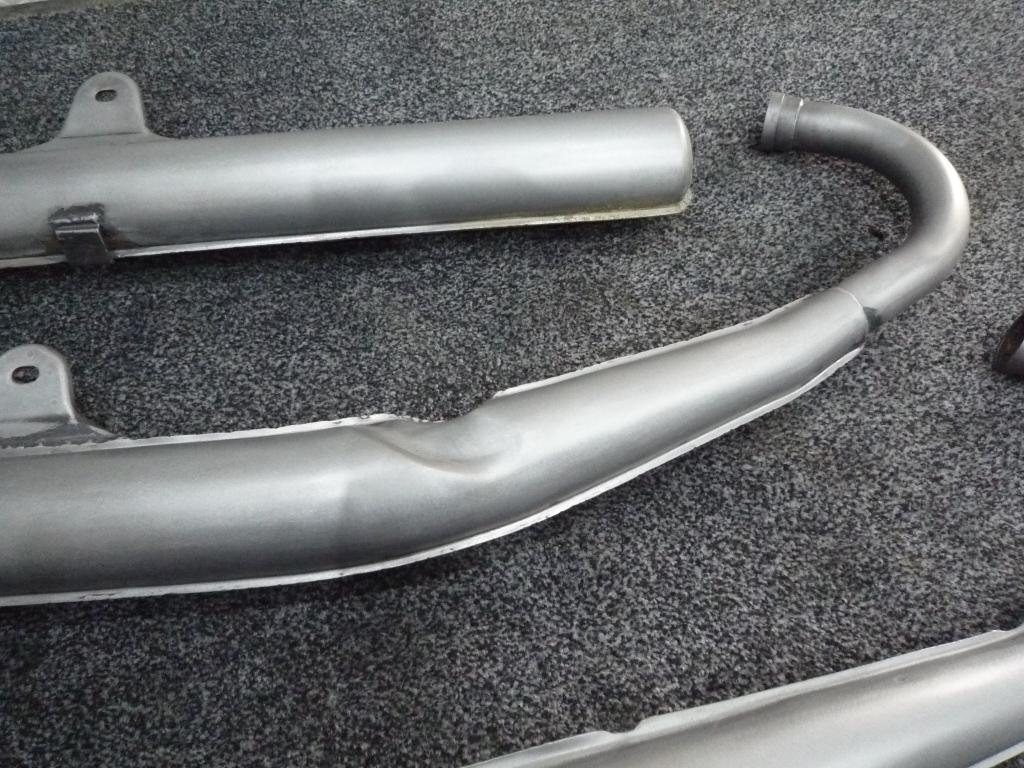
The plan for the repairs is to either gain access from the back to work them or
to split the front half off leaving the down pipe in place and rejoining them
back together after dressing.
I will keep you posted as always
I have been told 6 weeks but with Xmas is in the middle times scales generally
extend, however good news is that if all goes well the Chromer's would hope to
have them done by February.
But for now here are the pipes as they were this morning after stripping.

Some good news this morning, had a call
to say my pipes are ready for collection, they have been repaired and I will be
very happy with them. From what I understand they have split 2 to carry out the
repairs properly and they are also in very good order inside. Hope to be able to
get them booked into Chrome before Christmas.
So today after another 100 + a tickle
mile restoration road trip I was reunited with my pipes and I couldn't be
happier. Having dropped them off just under three weeks ago they are now all
repaired and back at the platers.
Its refreshing to know there are still craftsmen out there and nice and genuine
chaps with it too, impressive stuff. Here's a few piccies, its a shame I didn't
get any taken during the work but I didn't think to ask, maybe next time.
As I said previously two of the pipes were split leaving the down pipe attached
and the third one with the gravel rash was weld filled and cleaned. All the
pipes were said to be in perfect order inside.

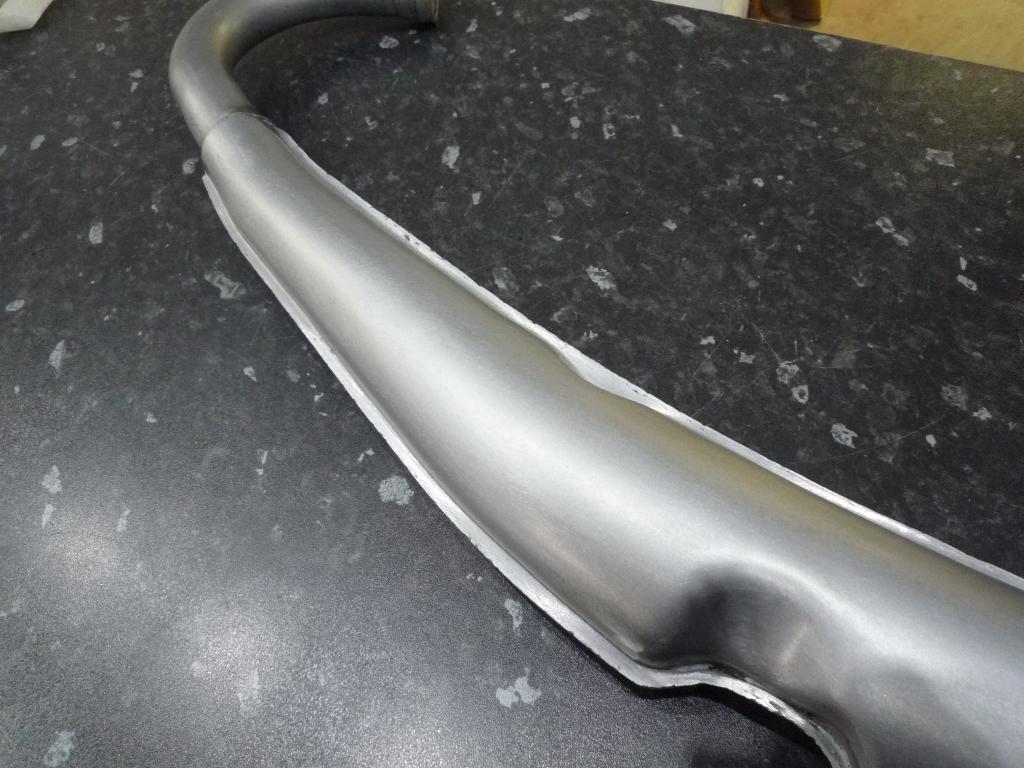

All being well they should be ready for
collection end of January
Finally had the call.......... the
paintwork's ready ...................Happy to hear it but feeling just a tad
nervous now.... no pictures yet...............but pick up on Monday.........its
so nerve racking, how the hell am I going to get through the weekend............
So Unfortunately we have issues with
the paintwork which has left me a little fed up. I wont go into details yet as I
am waiting for the issues to be resolved and hopefully they will be and we can
move on.
I guess this is all part of the story but after 14 weeks its not really
acceptable and is very disappointing.....so now we wait again.
We all have to recognize the reality
that some processes to take longer to get done and that is understandable but
what is frustrating now is that I have a tail piece and side panels that I dare
not fit until the tank is sorted...... and if its not sorted correctly the whole
lot will have to be redone........which means more waiting......... suppose I
could always look for the next project
or drown myself in Tikka Masala sauce!
Well after getting a tad emotional with
my painter it seems to have stirred them up a bit and some progress has been
made. I am still waiting for the final word on a minor adjustment but I am
assured to have it back before Xmas.......which is only next week so we shall
see.
I guess until its finished It could still go pear shape and may not be hard
enough to transport in time which will mean further delays and somewhat
frustration.........That being the case the Turkey will be getting a right old
stuffing this year.
So after
the disappointments of Xmas and with the start of the New year I decided to
delve back into the boxes looking for something to do...........I dug out the
rear light mounting bracket remembering that there was an original marking on it
that I had traced over before I had it powdercoated........that will do nicely.
The marking was just under the lower rubber and read 77K.
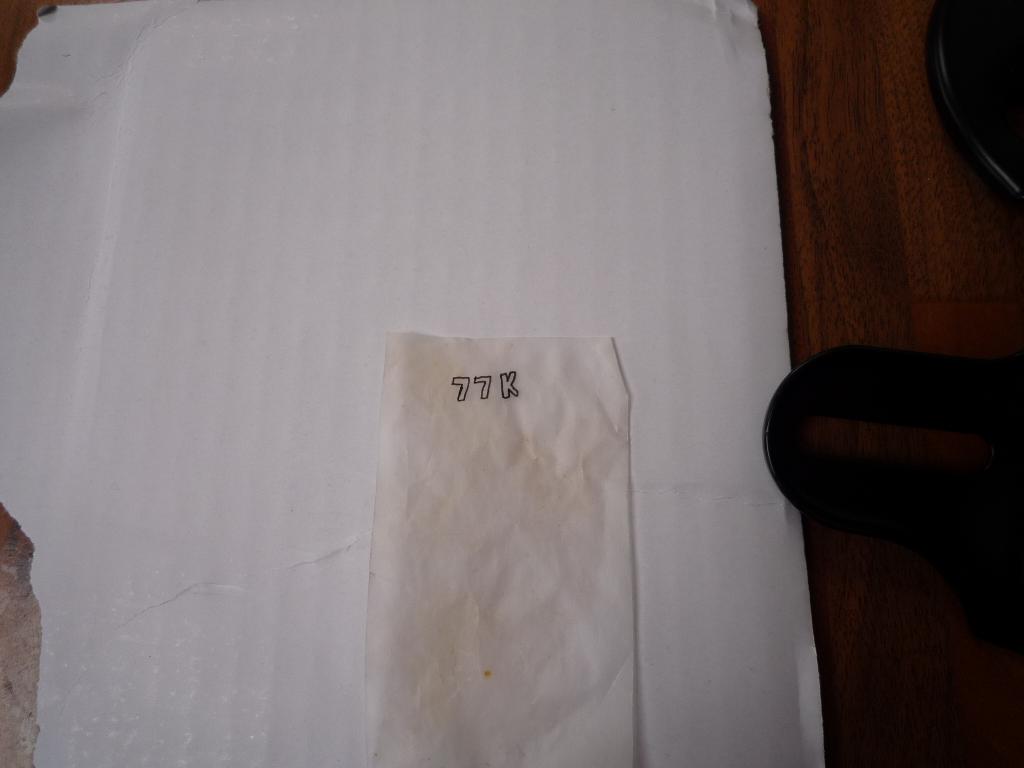
Armed with a fine brush and some white
paint we set to work.


With this done it created another job
of fitting the 3 original small mounting rubbers and a new centre rubber.

Covering up most of my artwork but not
quite
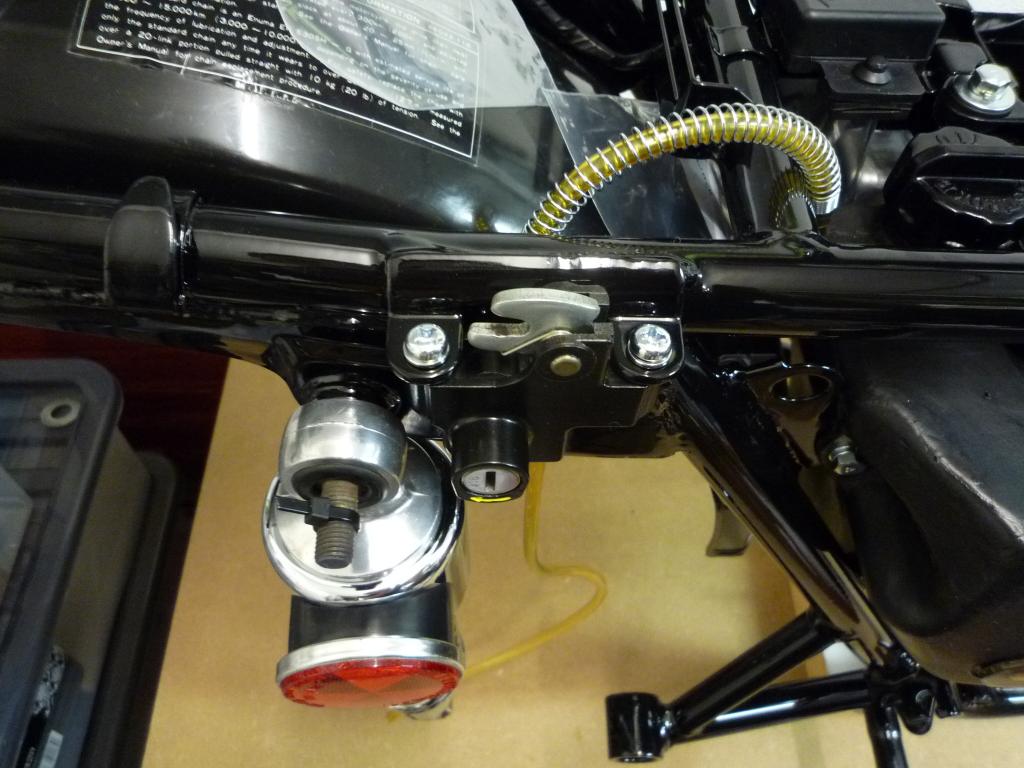
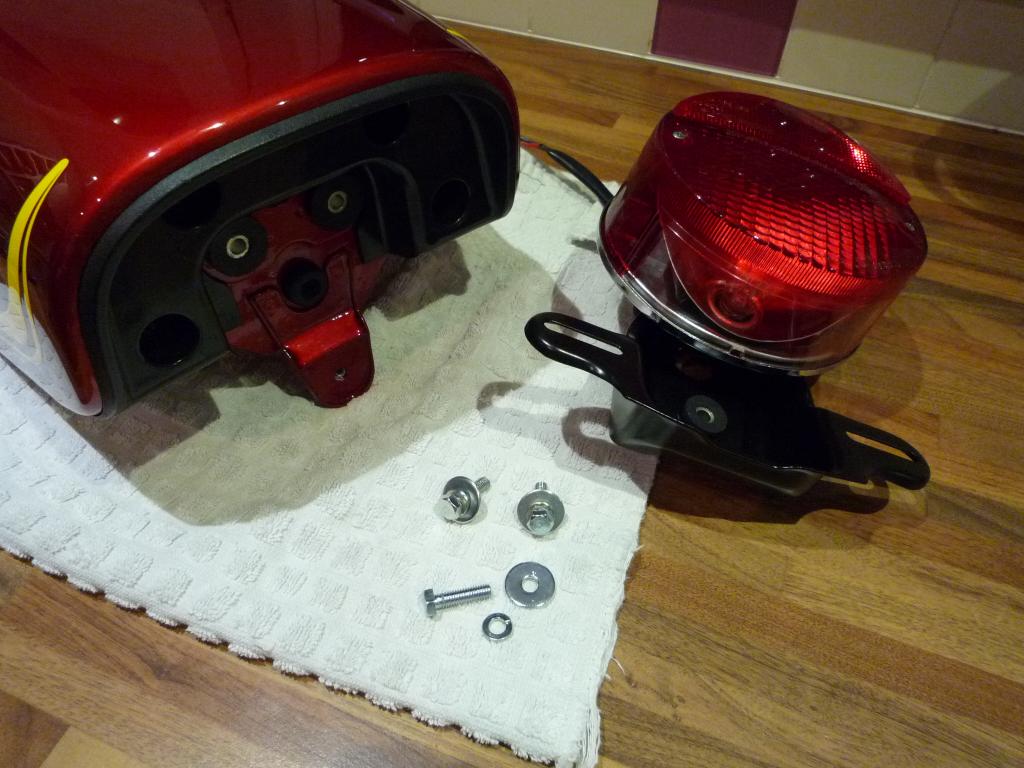
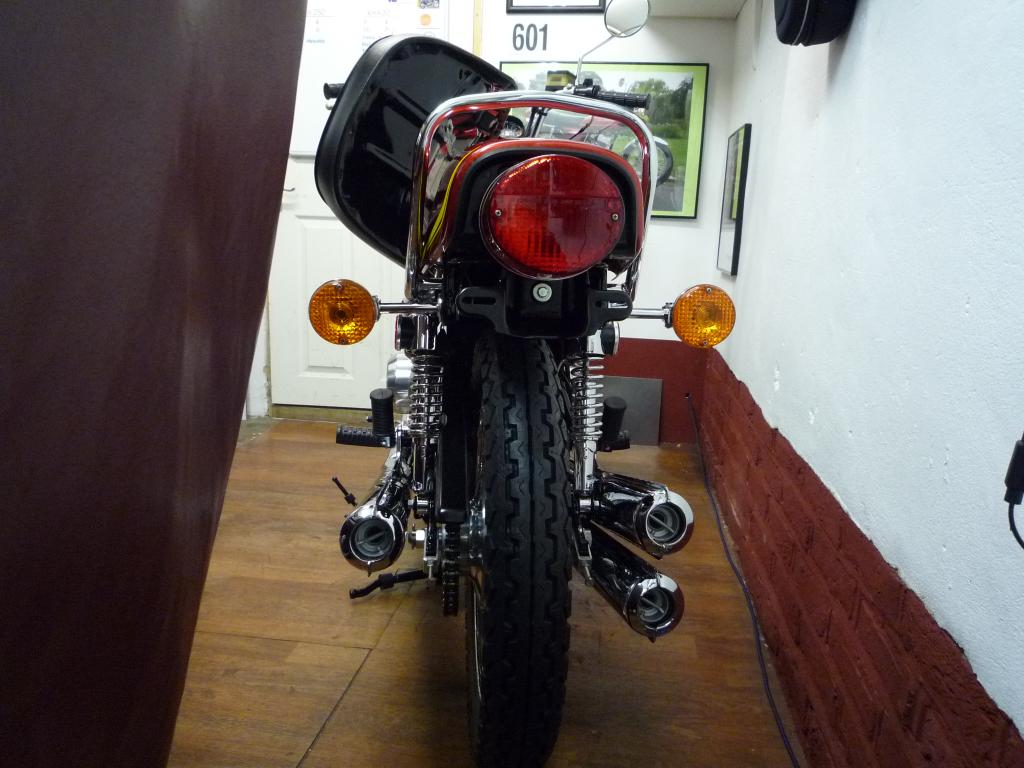
That lead nicely on to fitting the iconic rear light assembly which was bolted
into place.

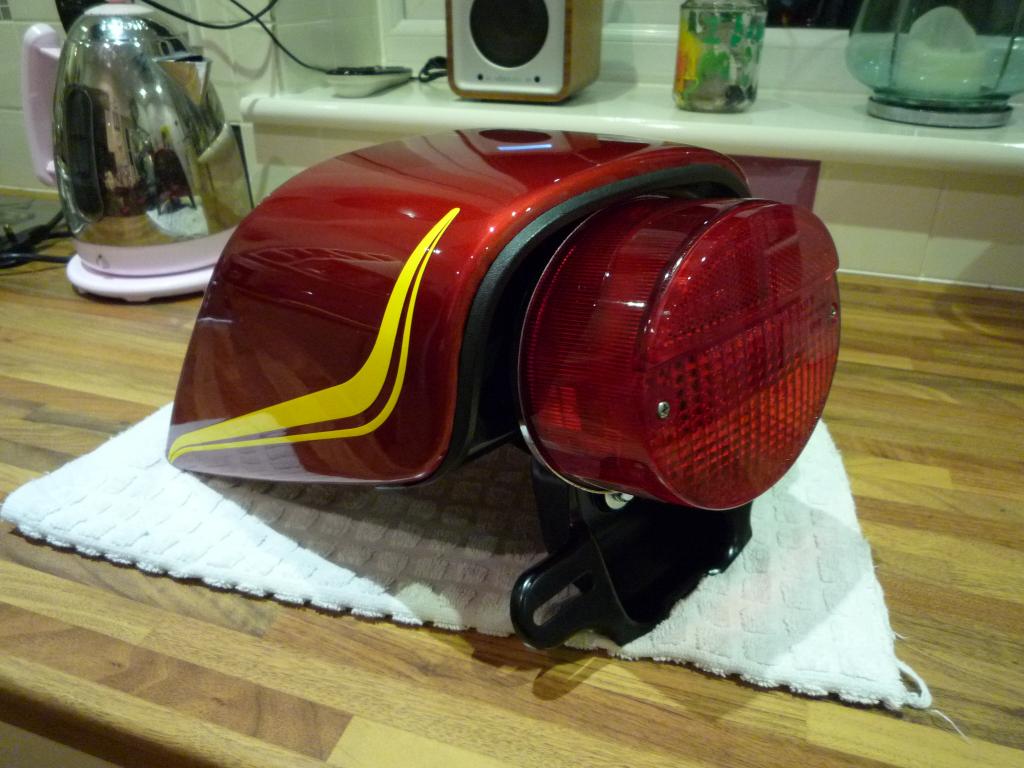
Spurred on by this I made the decision
to dig the tail piece out from the wardrobe and offer the light up to
it,.....which resulted in me fitting it.
New and original rubbers combined were fitted first along with the two rubber
grommets (one not shown) and along with the cover mounting screws and rubbers.

This was fitted and secured to the
tail.
Which just left me the small job of
threading the wires through the grommets and the fitting of the three mounting
bolt and washer assemblies.
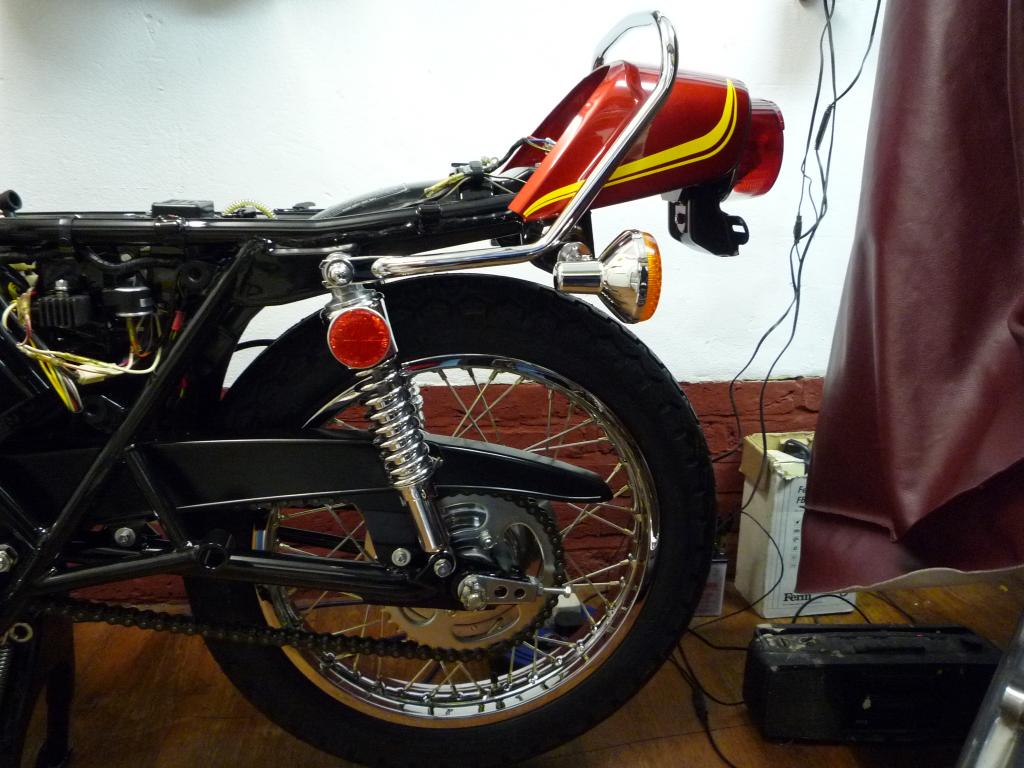
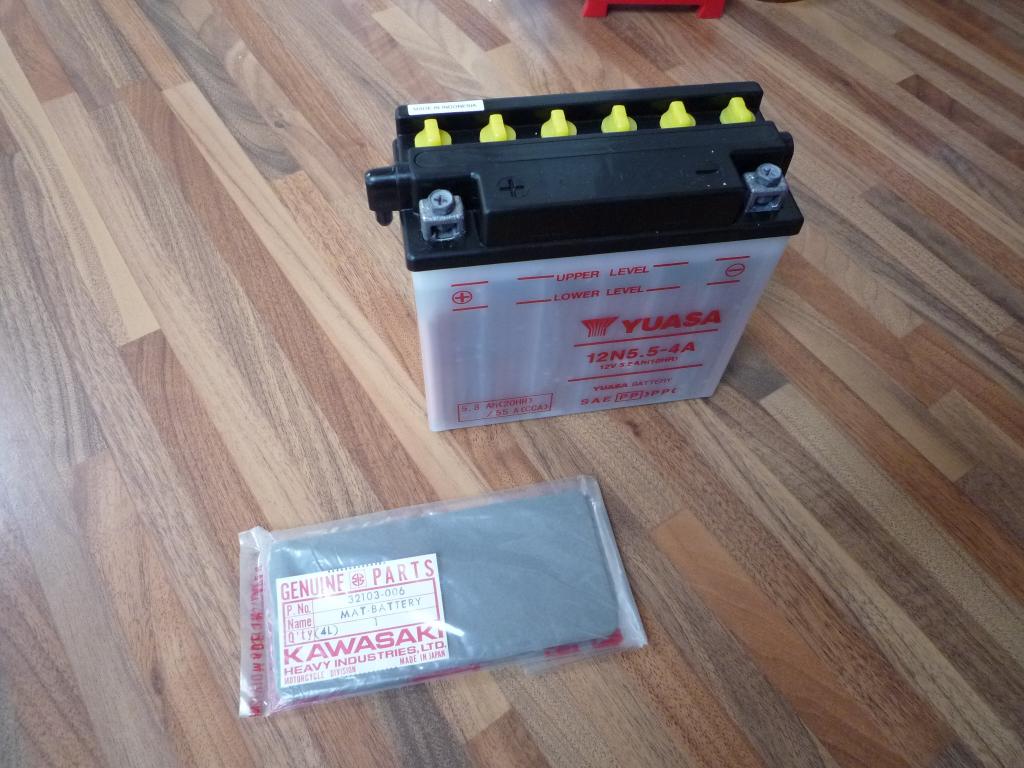
Another job done finally and maybe
tomorrow I can fit it to the fame and fit the new battery and the battery mat
and check the wiring and...........................mmm
Well another little update..... we are
finally making some good progress on the tank and I am just waiting for a
completion date now with a promise of early next week so fingers crossed.
So I guess we are really on the home stretch now with not a
lot left to fit and if all goes to plan she could be finished by early February
which would be great, then its just a case of setting her up, starting and
testing, and mot and registration to take care of so still a few jobs to do
before the sun starts to appear again.
In preparation, the front brake system has been filled and bled and works
nicely, there is oil in the Gearbox and the Two stroke tank is nearly
full.....its surprising how much that tank holds so its another trip to Halfords
tomorrow.
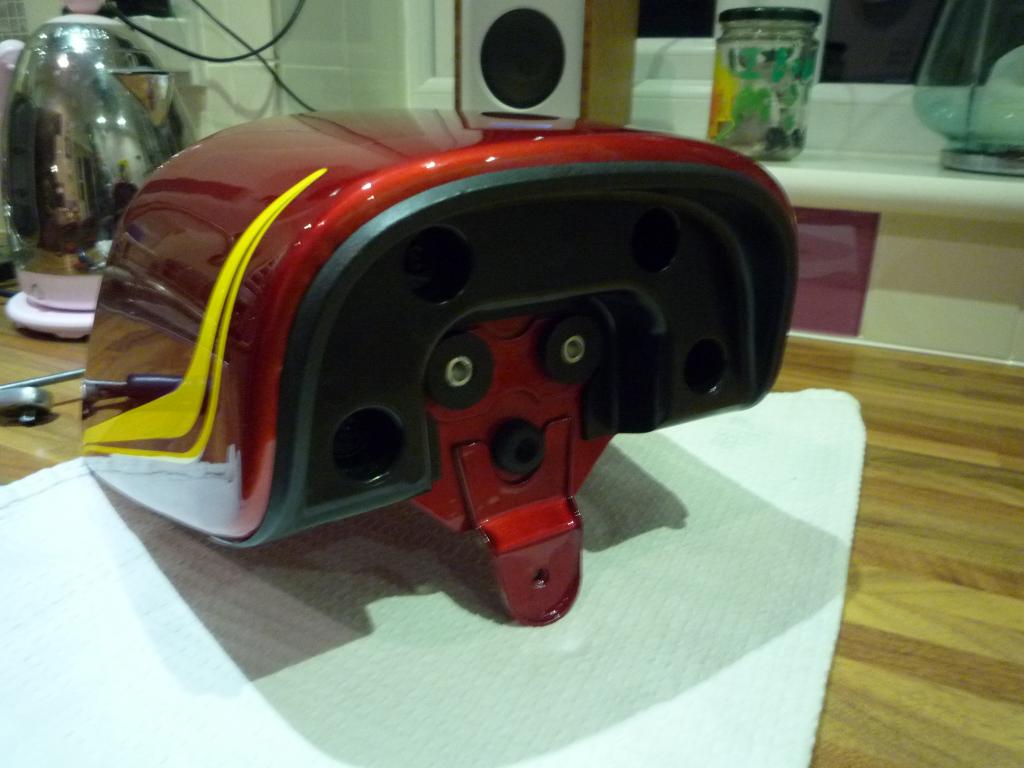
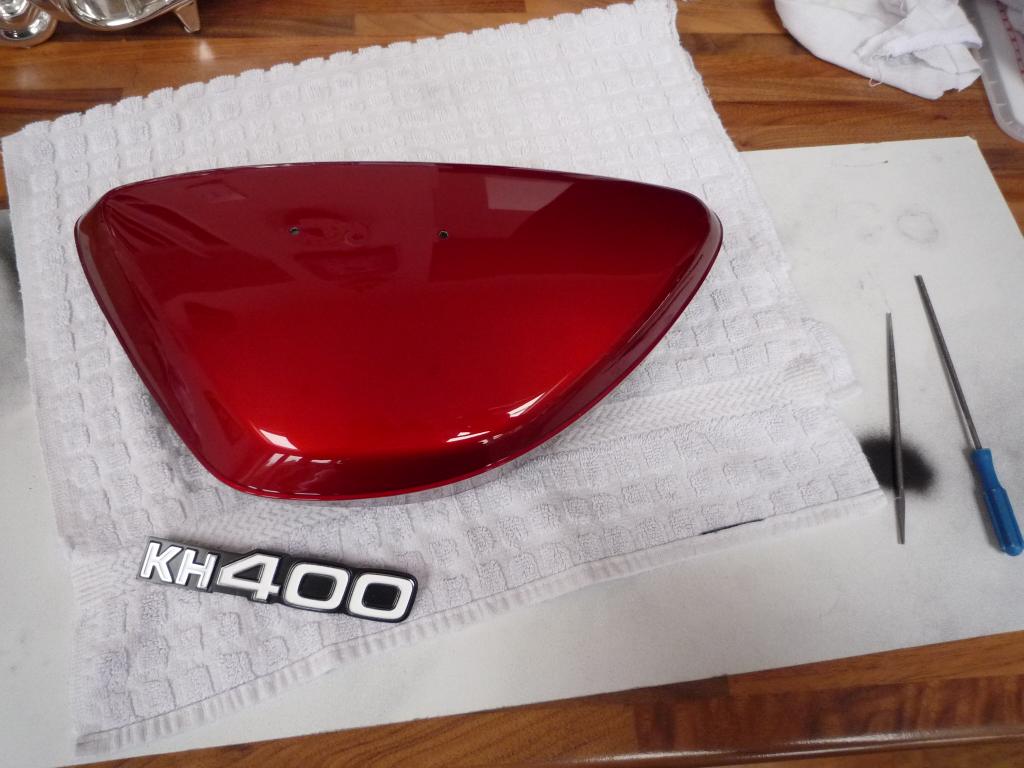
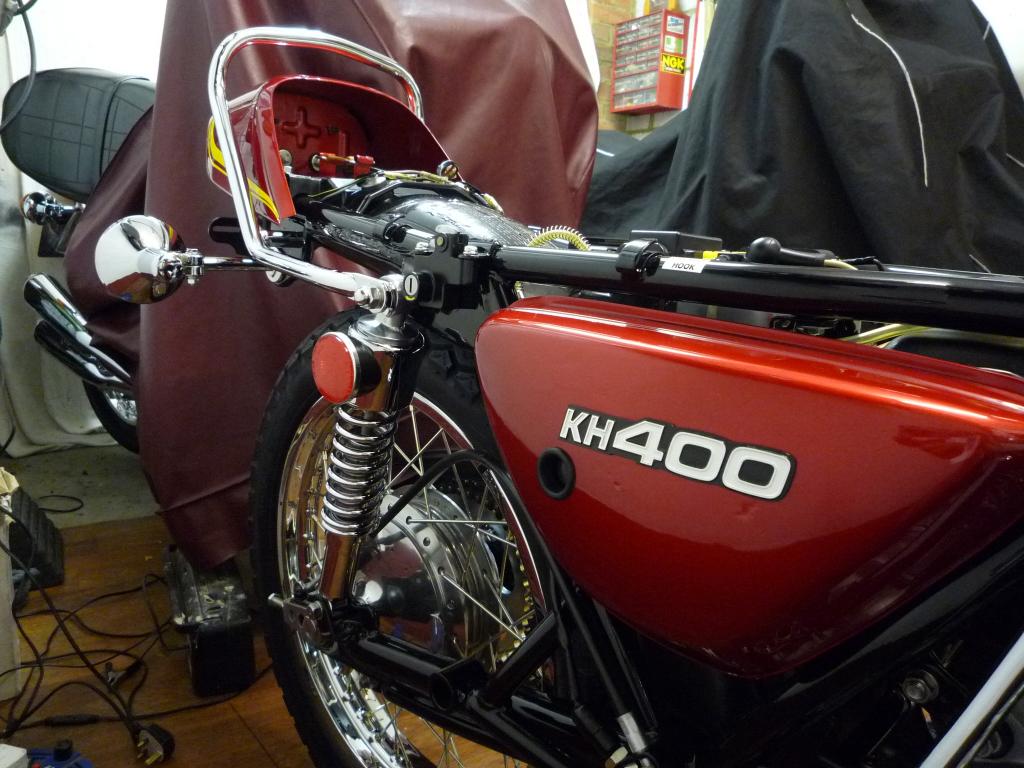
And with progress on the tank I felt happy to
move onto the side panels. With a new pair of badges ready to fit (Thank you
Simon) the first step was to carefully clean out the holes with a needle file,
protecting the paintwork with a cloth just in case of slippage.
Though fitting the badges is a fairly simple task as the new
ones are flat it is best to gently ease and curve them with your hands to match
the contour making sure you don't just bend them in the middle and crack the
paint.
Once you are happy with the shape you can fit the new
retaining clips, I used a small socket to gently press them home.

Then fitted the oil tank cover and grommet and left hand side
panel, tomorrow we may fit the seat.
Smashing......................
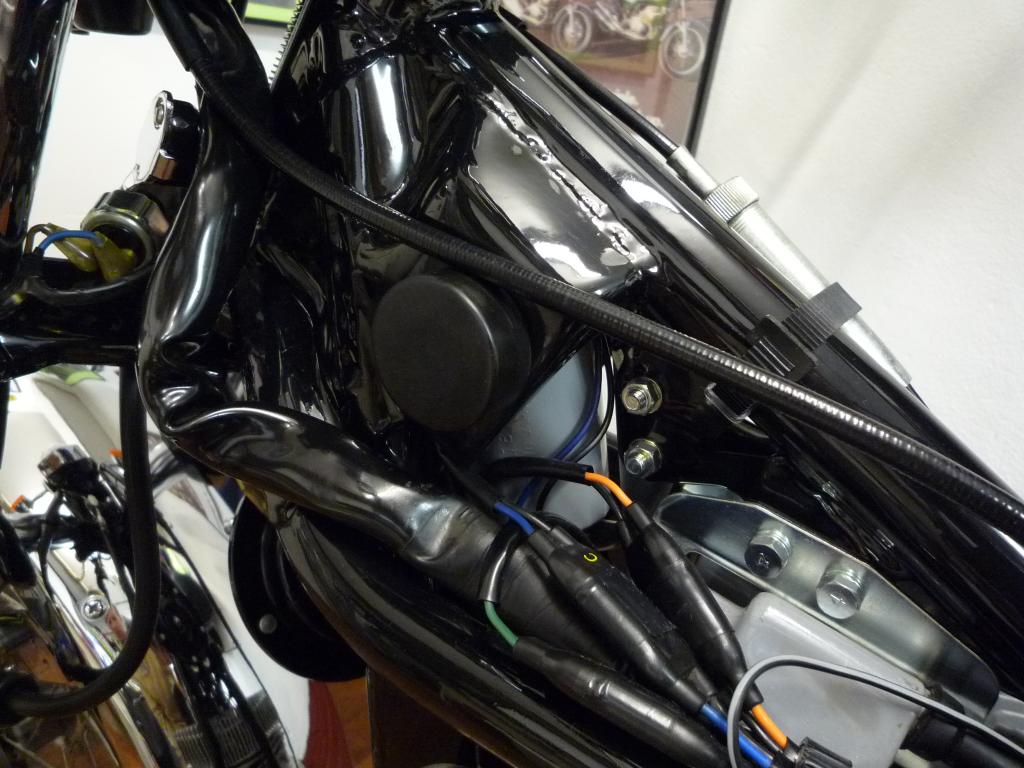
In the meantime the battery
and mat has been fitted and basic electrical checks carried out with everything
working bar the indicator flasher unit which seems reluctant to flash more than
once whilst and only when switching from side to side.
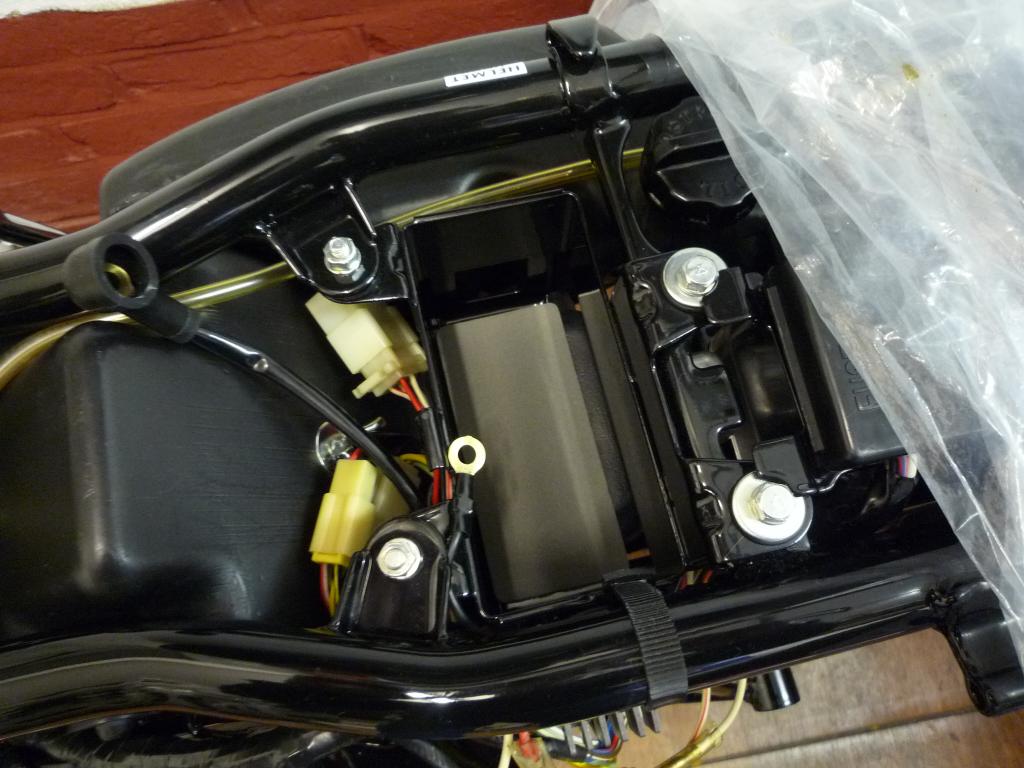
Which after doing a precautionary pre check with the live lead held on
and not bolted down just in case, it was then strapped in and connected up
fully.

And we have signs of life
As mentioned previously everything works as it should do
except the indicator Flasher unit which seems a bit reluctant to wake from its
slumber,...... however today it started to work correctly on the left side and
after checking the voltage output on both sides which were the same I can see no
reason why it should not make a full recovery, especially with the engine
running.
Happy to report we have a spark on all three Plugs
and no spark with the kill switch operated.
Cool
I found and fitted the rear brake switch band.
She's getting there
Well another
missed promised date on the paintwork has prompted yet another emotional
e-mail...................ZZZZZZZZzzzzzzzzzzzzz not impressed near on 6 months
now
Why 
No response so far
hope i haven't upset him or i may never get it back
...............I
really don't like to moan and i do understand that things don't quite clearly
always go to plan and things do take longer sometimes...... BUT it does grate on
me when I am given promises which clearly are not being met.......if its drying
Tell me If your short of labour
Tell me if you have too much work and
can't cope Tell me if you have buggered
it up then Tell me............We are an
understanding bunch I am a reasonable fella so what is the big problem
GRRRrrrrrrrrrrrrrrrrrrrrrrrrrrrrrrrrrr
On the Plus side as i am the eternal Optimist and usually looking on the bright
side of life
 ..........my exhausts are in polishing and may be ready on Friday
.........or will they
..........my exhausts are in polishing and may be ready on Friday
.........or will they

I have to say that this time the paintwork issues have been Unexpectedly
frustrating and for me added a totally Unnecessary trauma to the build.......and
it's not as if I'm fussy or anything
Well to keep it short at the moment I need to find another painter, the tank
did eventually turn up 36 hours into a 24 hours express delivery service
since then it has been an up and down relationship with it.
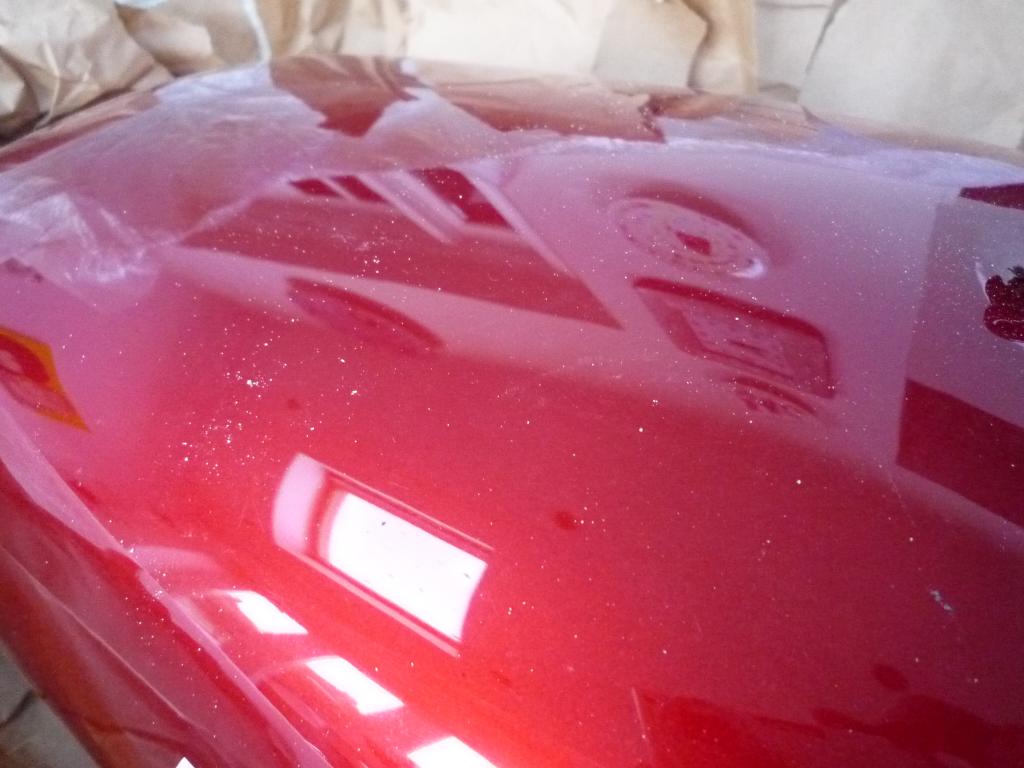
The colour I love and all was going fairly well until I noticed a flaw with it
which if it showed in the sunlight would leave me no option but to have it
repainted. I even fitted the fuel cap and tap.
Its a difficult one as it only shows under certain conditions but it certainly
is not acceptable to me and I know that if I was to show the bike, it would show
up.
As you can imagine being so close to finishing I am pretty fed up, my options
are to keep the set on and run it up for the summer or get it repainted straight
away once i can find a suitable painter.
I have this morning sent a disgruntled e-mail and will await the reply.
On a positive note the pipes are ready and waiting for me................
Well moaning about it is not going to fix it and its not as if it is unusable
but there were "uneducated" errors made from the start with this set and in
trying to put them right they have created there own silly flaws within the
paint scheme.
I am not going to slate them but have made my feelings very clear to them now
and have asked for a full or partial refund for the work. I very much doubt if I
will hear anything back if I do I will be surprised.
After a six month wait which is ridiculous you would have expected a flawless
job, I have a feeling they have become a victim of there own success and are
unable to keep up with the workload.
I will move on and put this one down to experience, its Bl**dy inconvenient but
not the end of the world.
So amidst all the drama behind the
scenes there has not been a lot of progress recently to show but I will continue
with the build as it has been happening as it is all part of the story.
The tank finally turned up from its extended journey much to great relief and
was excitedly unwrapped.

Excitement turned to disappointment with the paint dust
really.
But after a cut and polish things were looking up again and after
finishing off around the filler mouth I carefully fitted the fuel cap and pin.
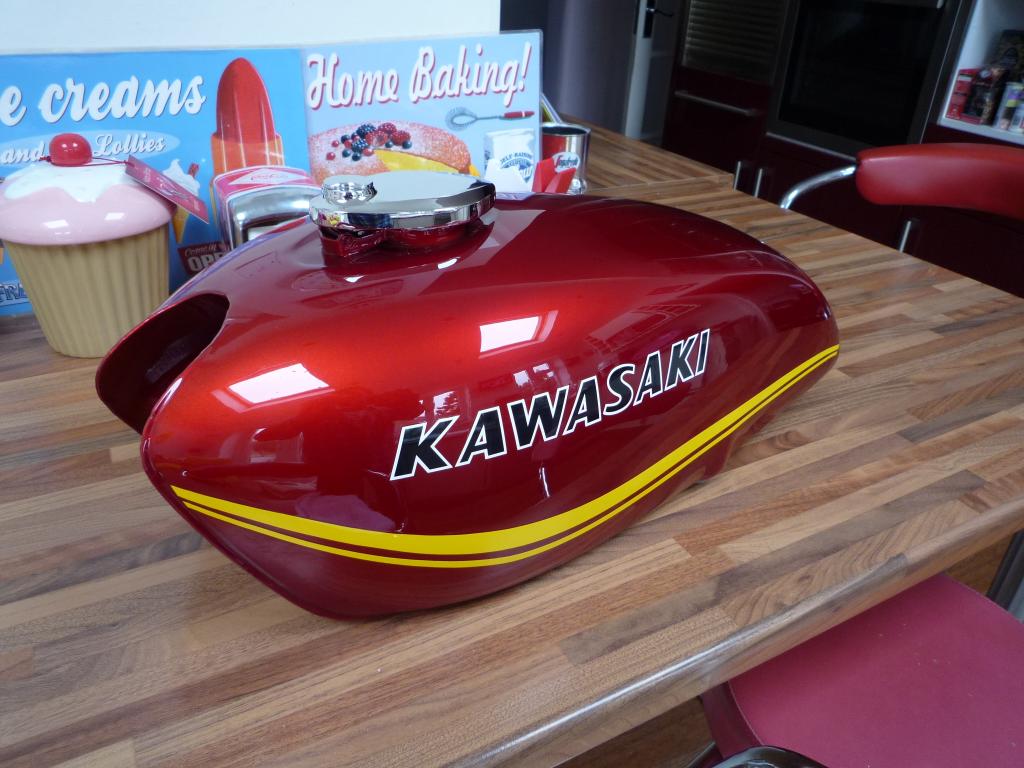
After cutting and polishing it again at least 5 times
I fitted the tank rubbers in preparation for fitting.
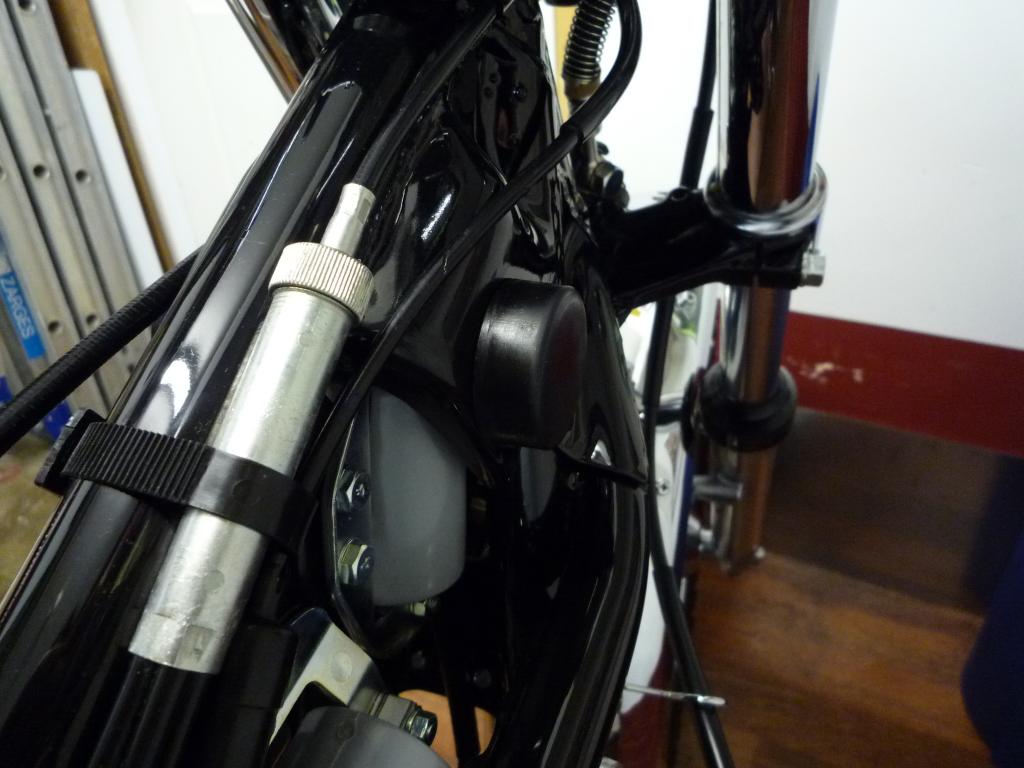
And took a last couple of reference photos of underneath.


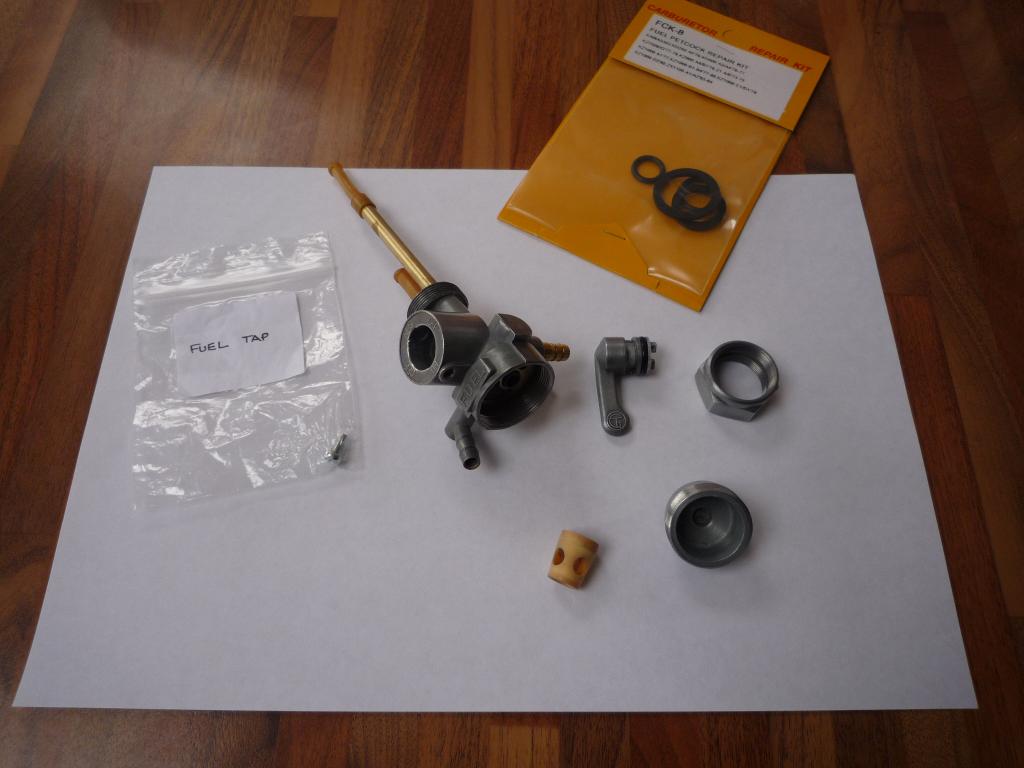
The fuel tap was dug out and serviced with new seals, the
gauze filter is not shown but is already fitted.
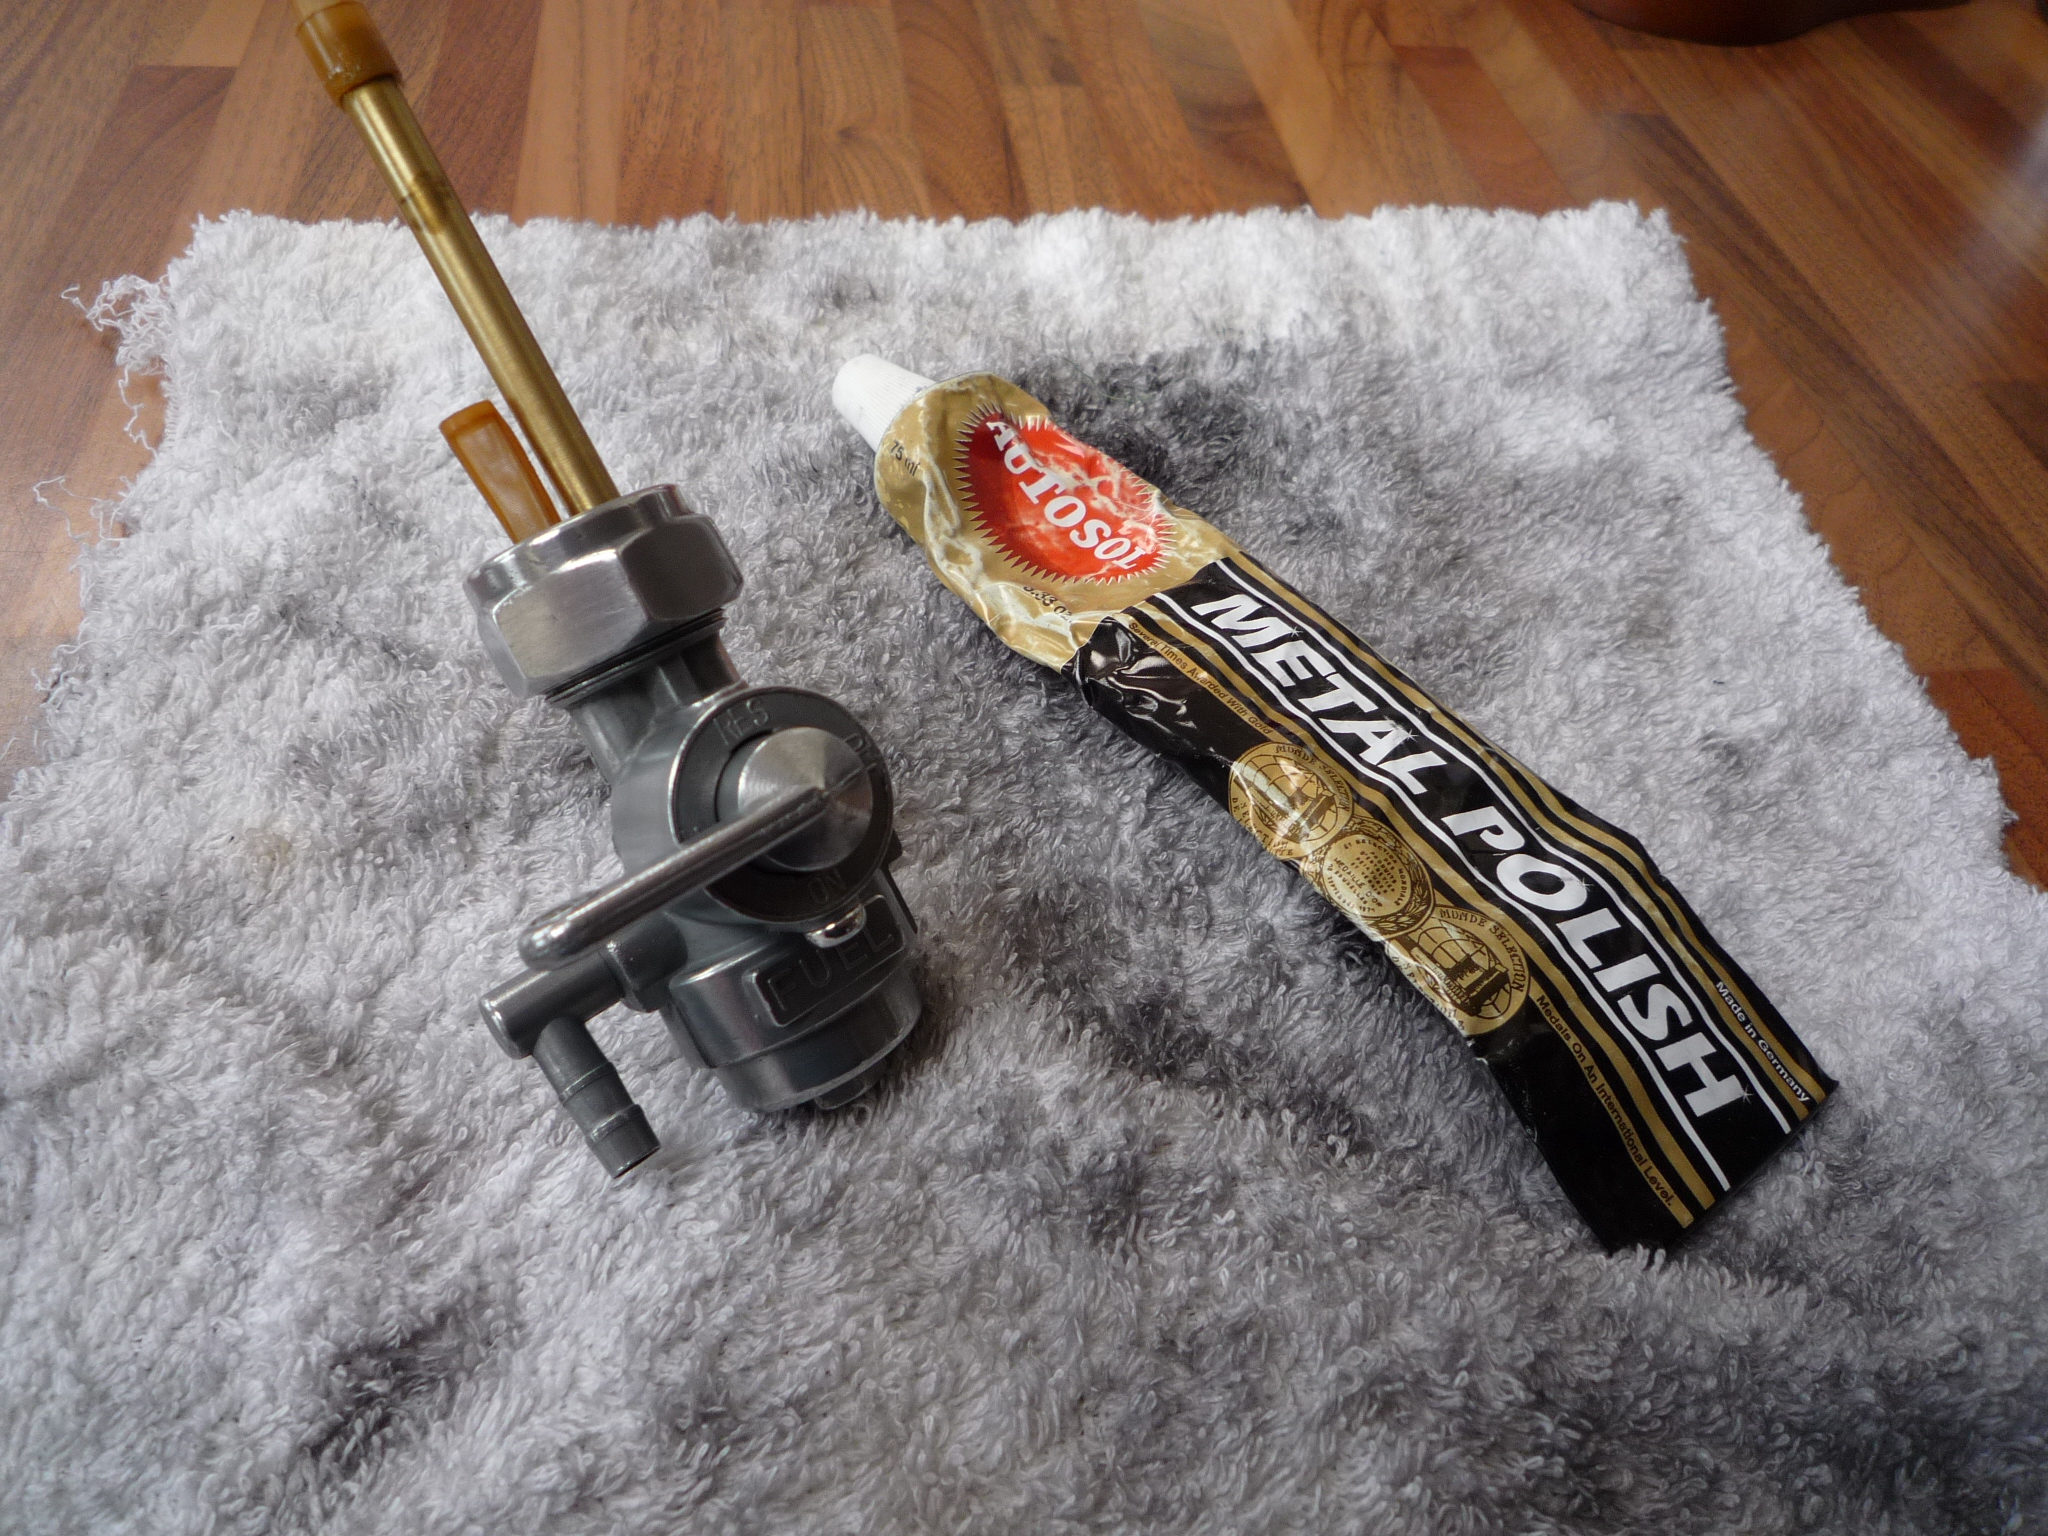
and given a little rub which made me go all arty
there's a lot of detail in a fuel tap you know.
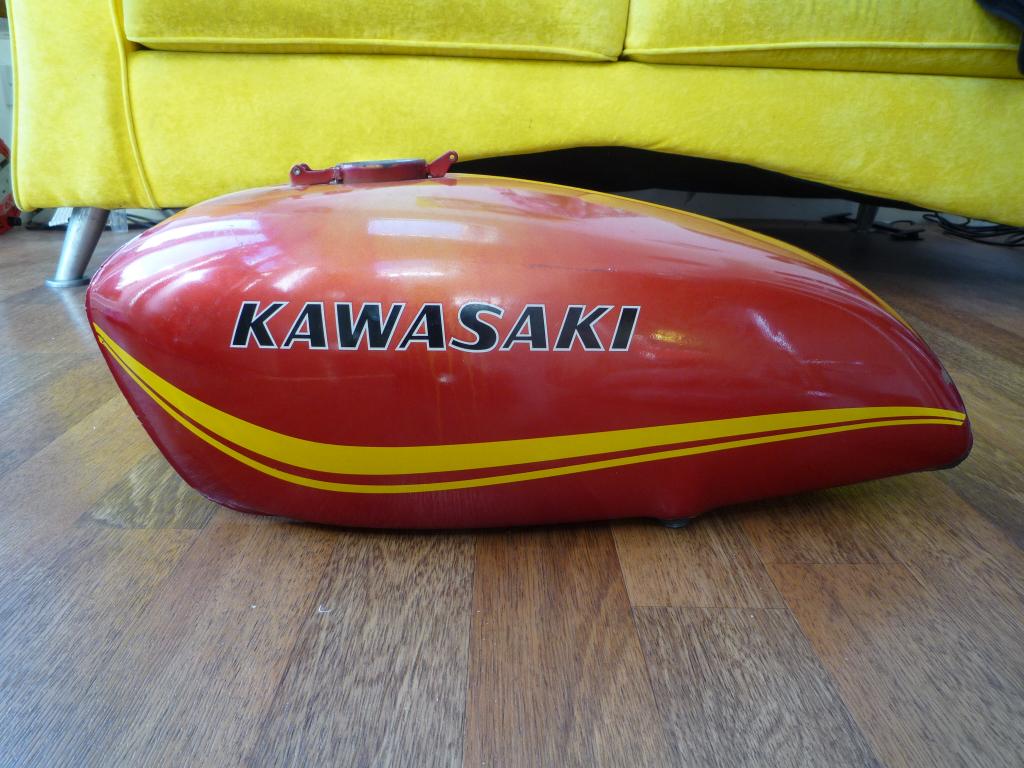
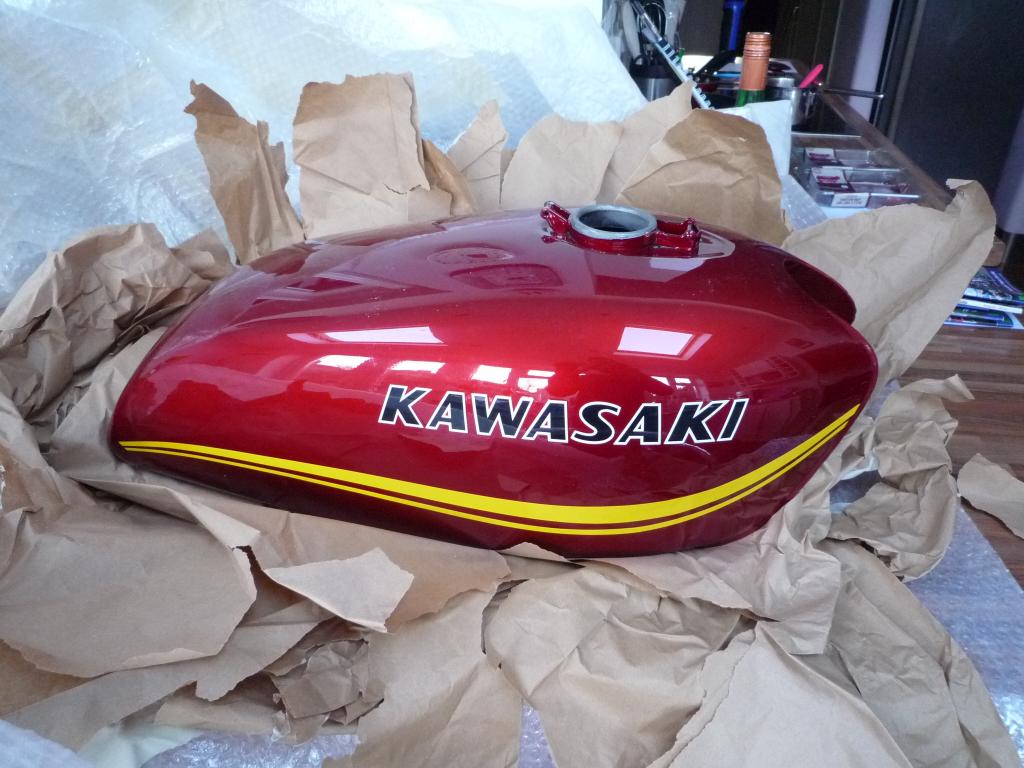
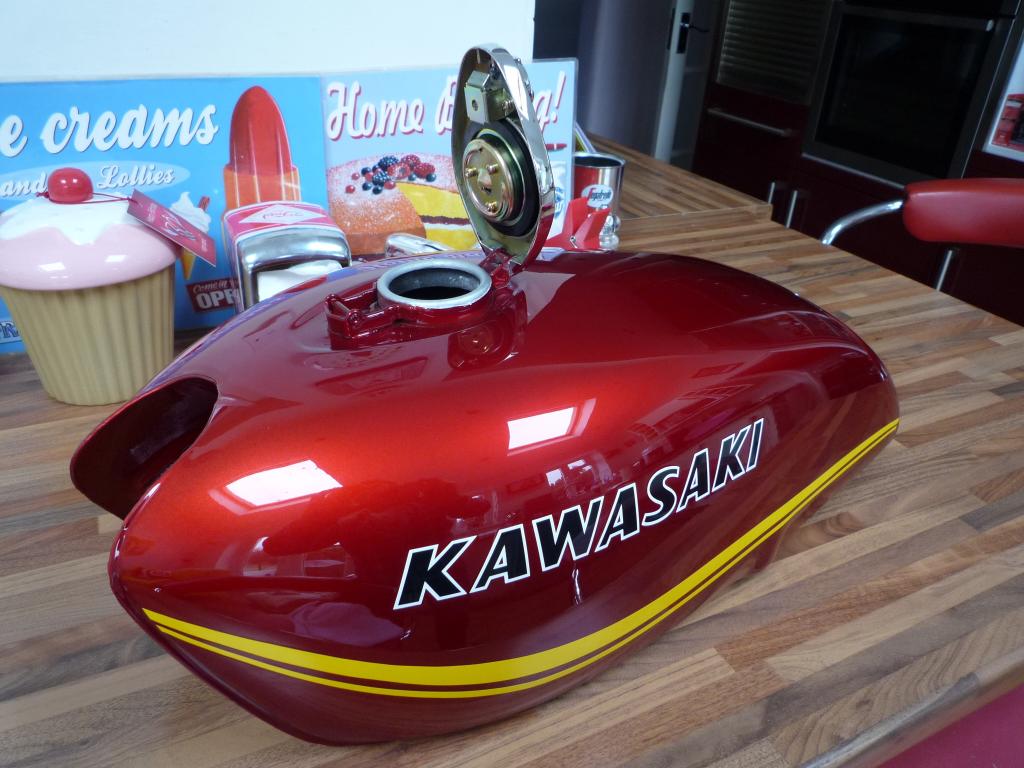
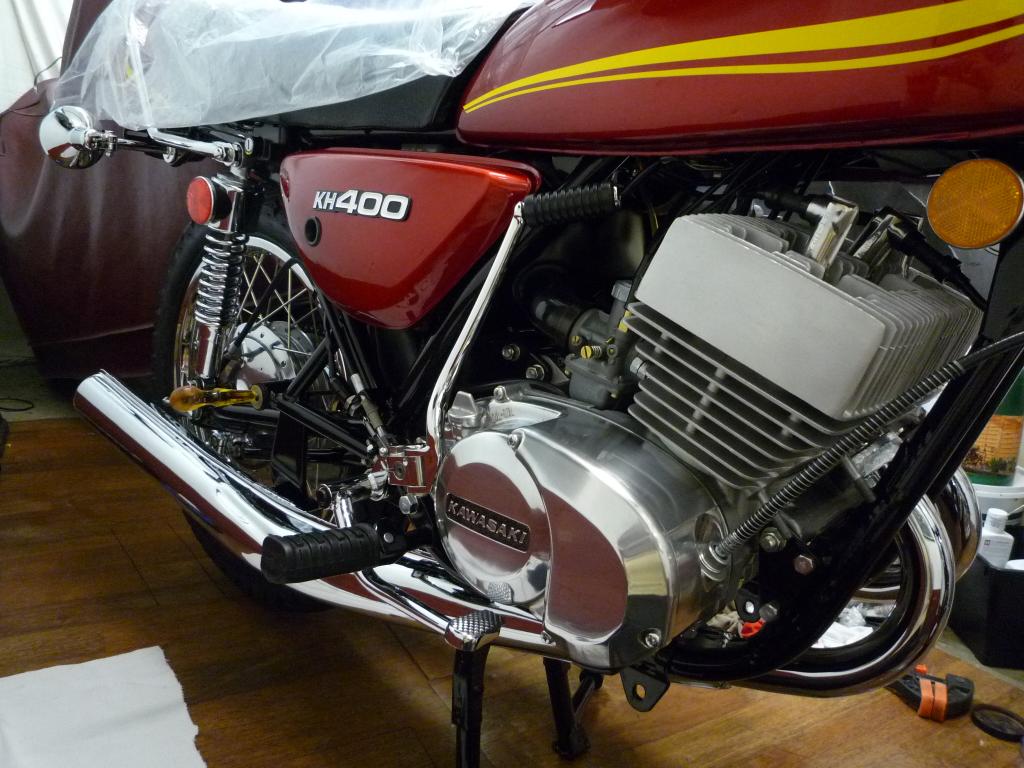
After rinsing out the tank.... as least it was clean inside!!
It was put in place.
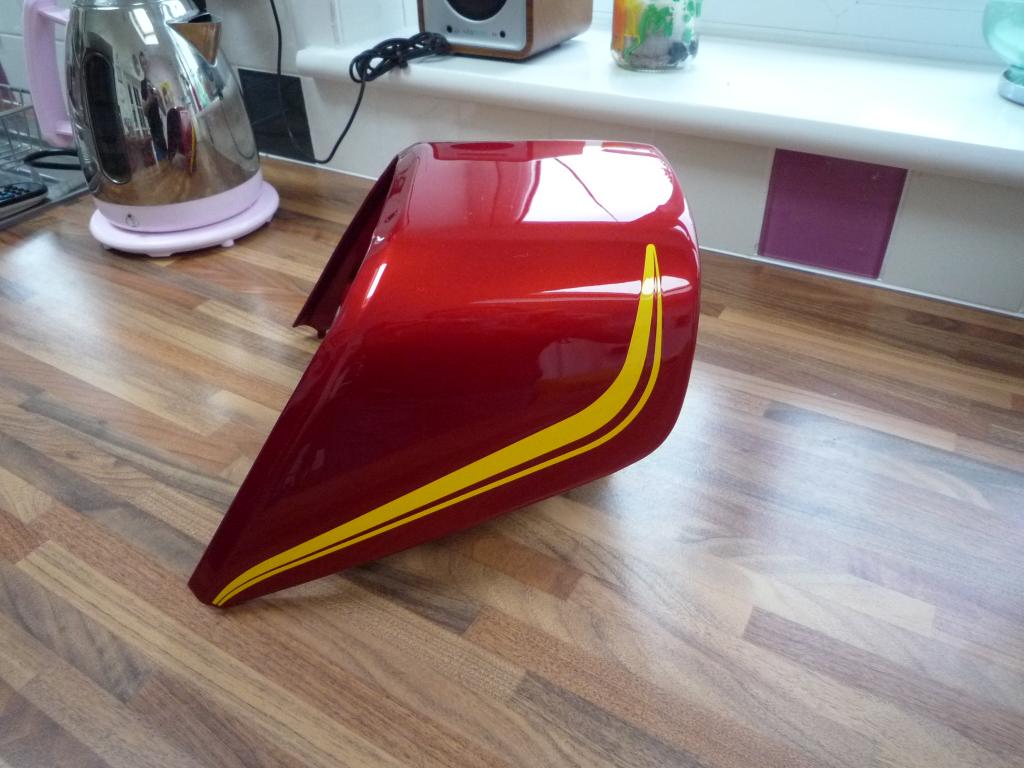
Then it was back for a splash of colour and loving the red
look.

Then it all turned a little sour again
Okay so what has happened
.......During the repaint the first time around the stripes and decals were
wrongly positioned, way out in fact to the original scheme, don't know why but
they were and we have seen it done many times before. But I won't dwell on the
reasons it happened it just did.
The mistake was accepted and remedied over a period of time zzz until I was
happy.
Tank was finished and came back and we cracked on.
As fate would have it whilst I was taking pictures in the garage to post I
picked up a light that was laying behind the bike, again for some reason I
switched it on and as it beamed across the tank it revealed the Ghostly image of
a Headless Horseman ........sorry I couldn't resist it..
...........it revealed the Ghostly image of the Previously Wrongly located
decals
Further checks revealed more of the same with the stripes So that just about did
it for me and has left me now in the difficult position of having a lovely new
paint set which generally looks great but could
look awful in the sunlight.
And worst of all is now I know its there
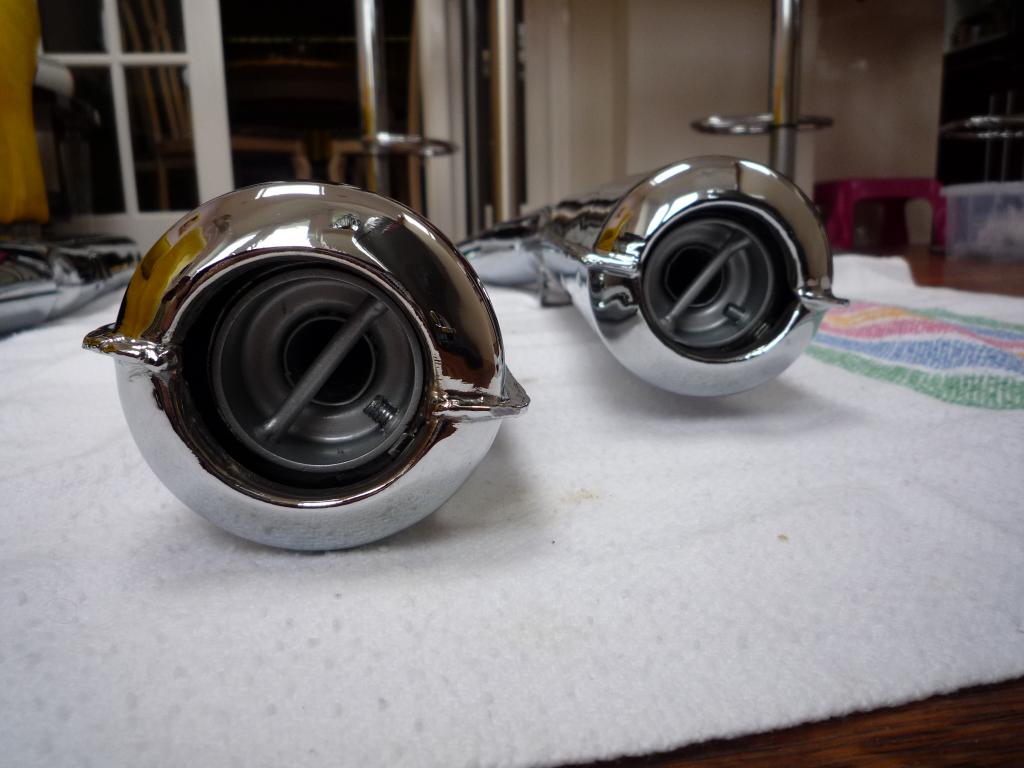
But we
move on and now for some good news, I picked up these from the platers yesterday
morning, here's a sneak preview.
Happy to see the marks beautifully
intact.

The rest of the pipes were unwrapped
and detailed today.

The Baffles were sorted out and fitted.
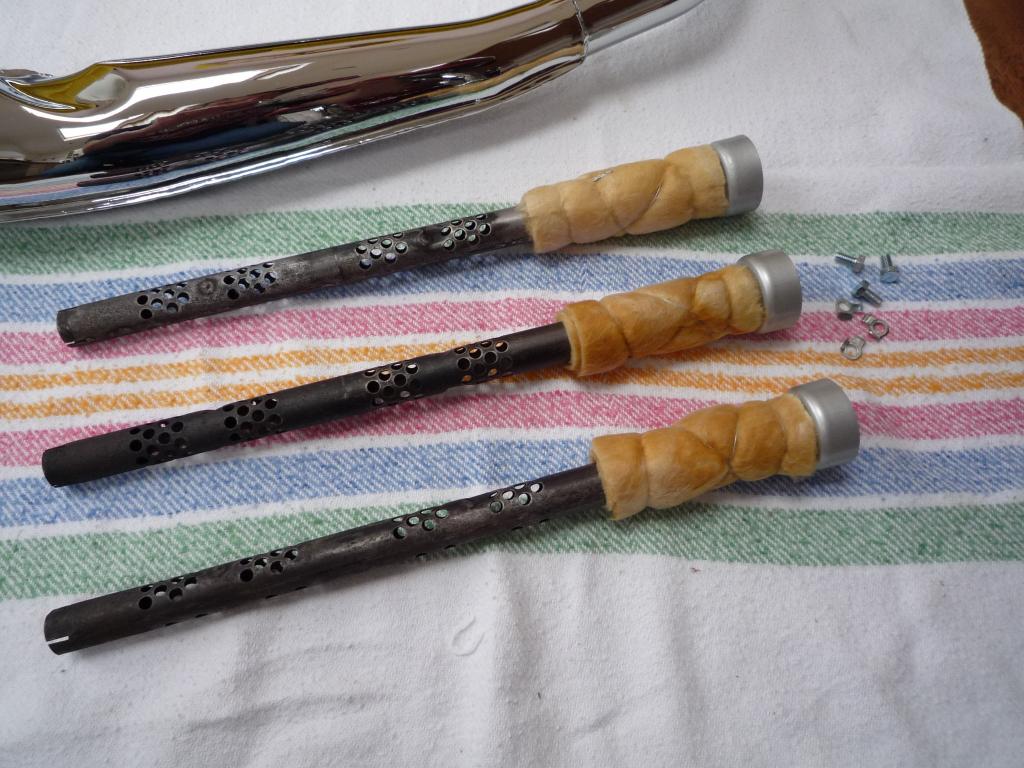
and the first one went on tonight
So moving on, the exhaust clamps and sealing rings were
fitted onto the pipes. And the original rubber mount bushes fitted in place 2
either side of the frame.
After fitting new exhaust gaskets and squeezing the sealing rings into the
clamps, the left pipe went on first followed by the centre one. The mounting
bracket for the centre one had already been bolted into place.

The original pillion footpegs secured the exhausts in place to the frame
hangers.
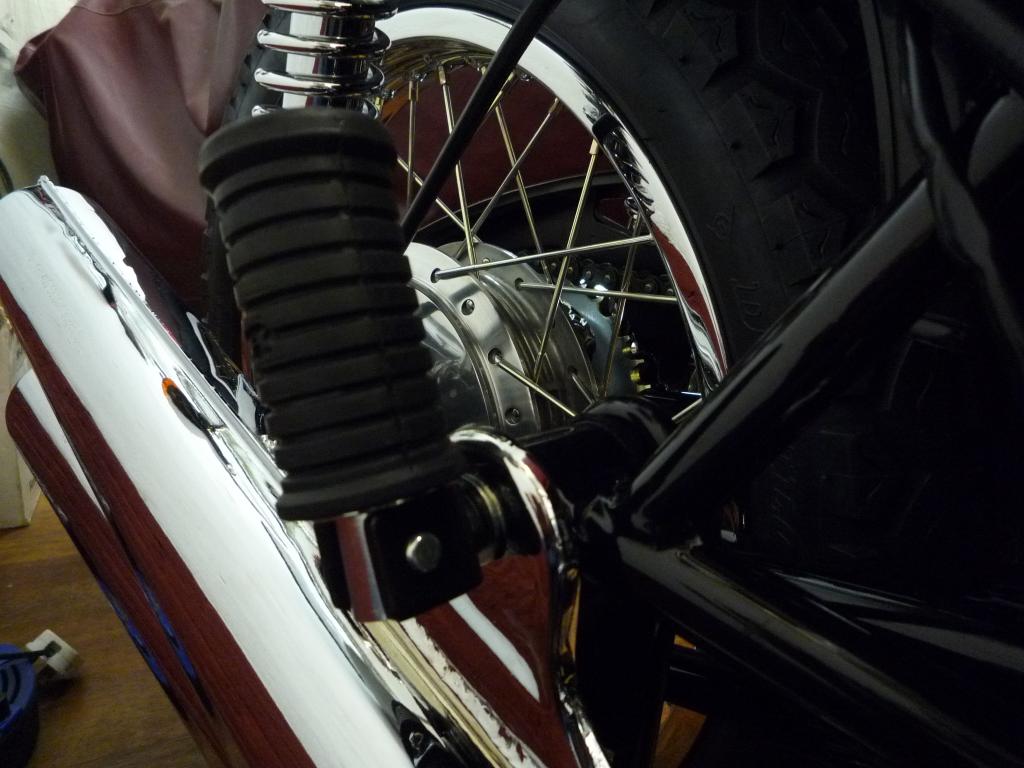
and the front clamps were nipped up.

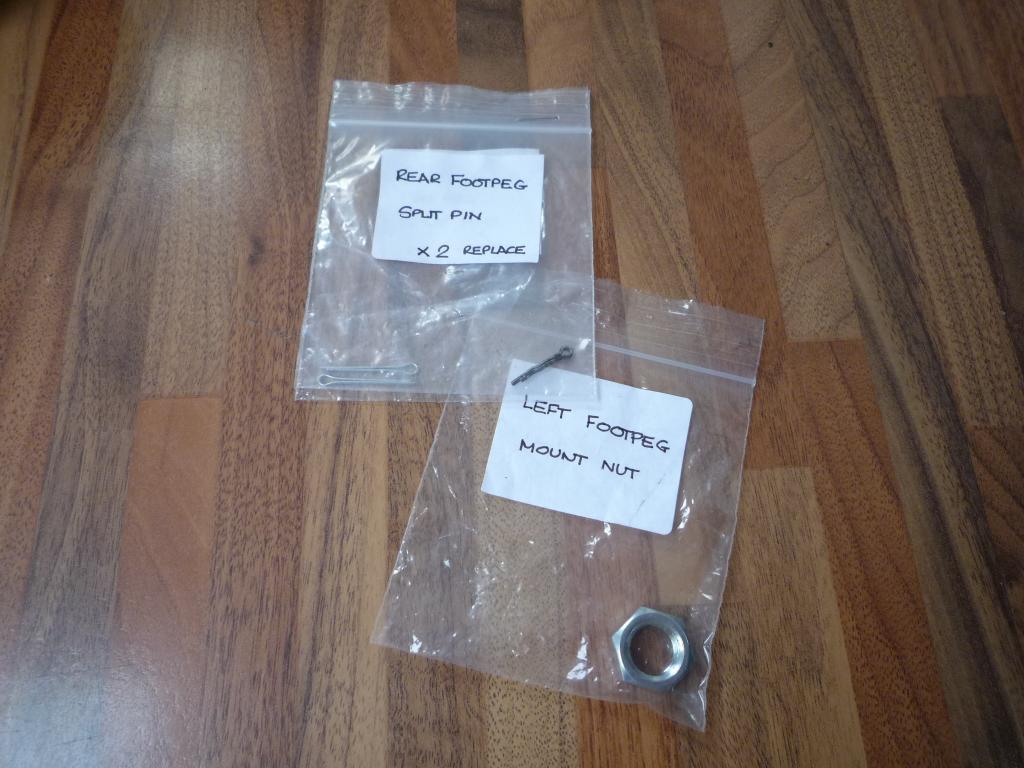
Then we were down to the final few split pins, one for the rear brake cable.

The rear footpegs and front footpeg mount nut.
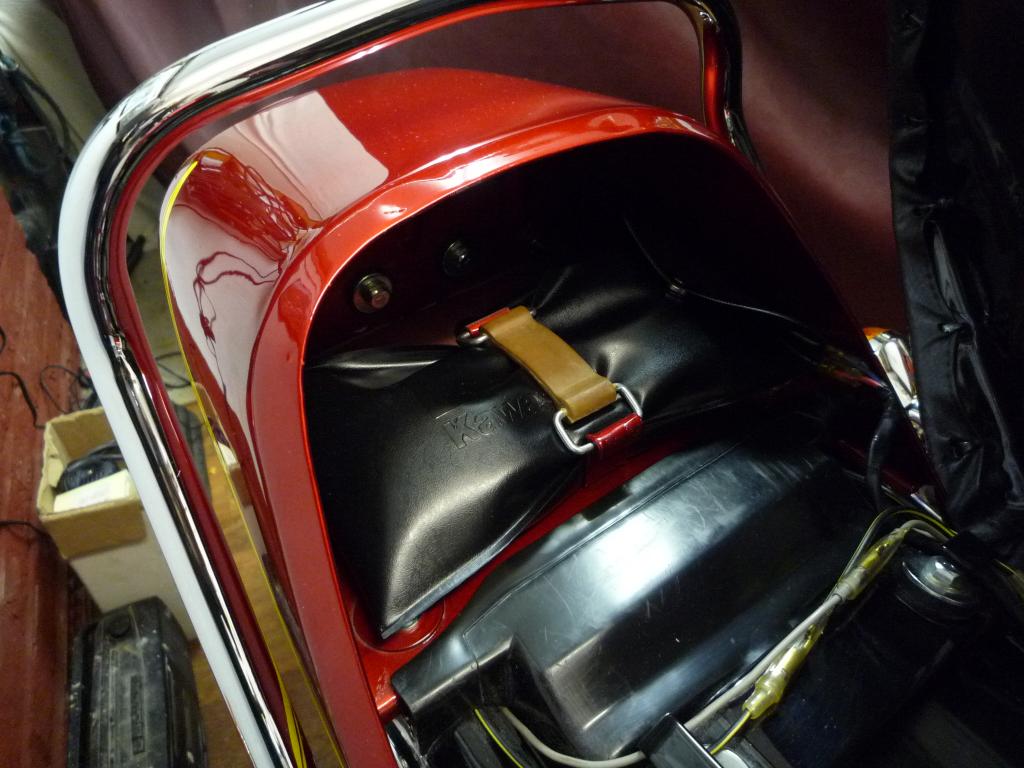
The seat latch lever was fitted and secured along with the toolbag (empty at
present) and retaining strap.
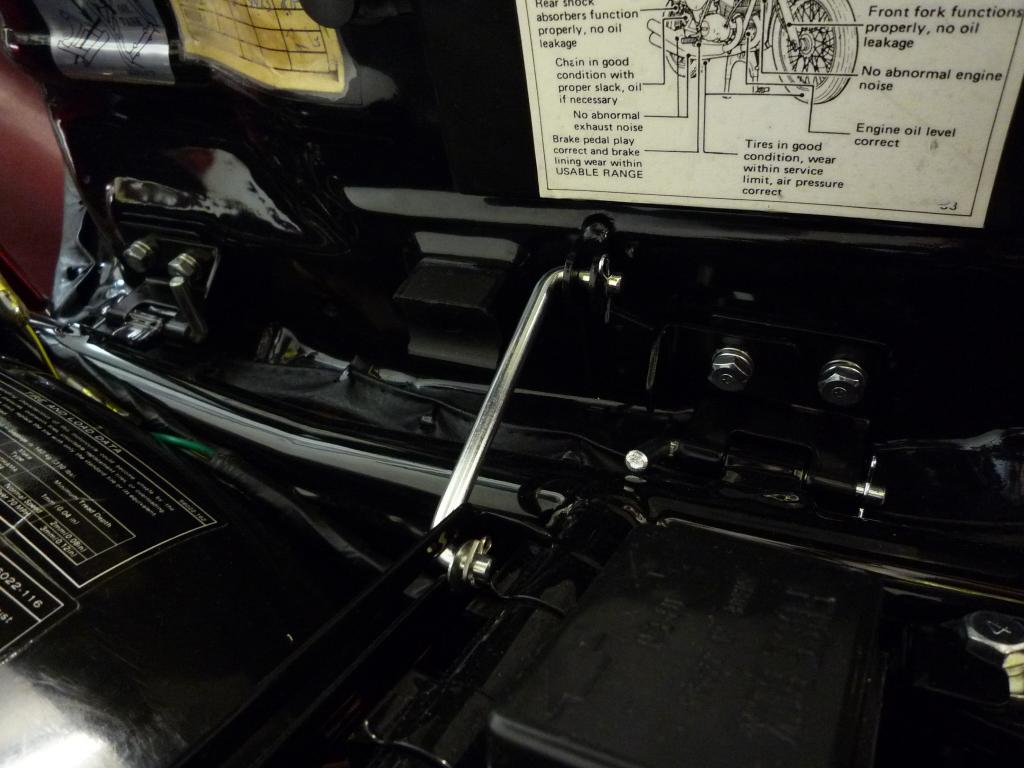
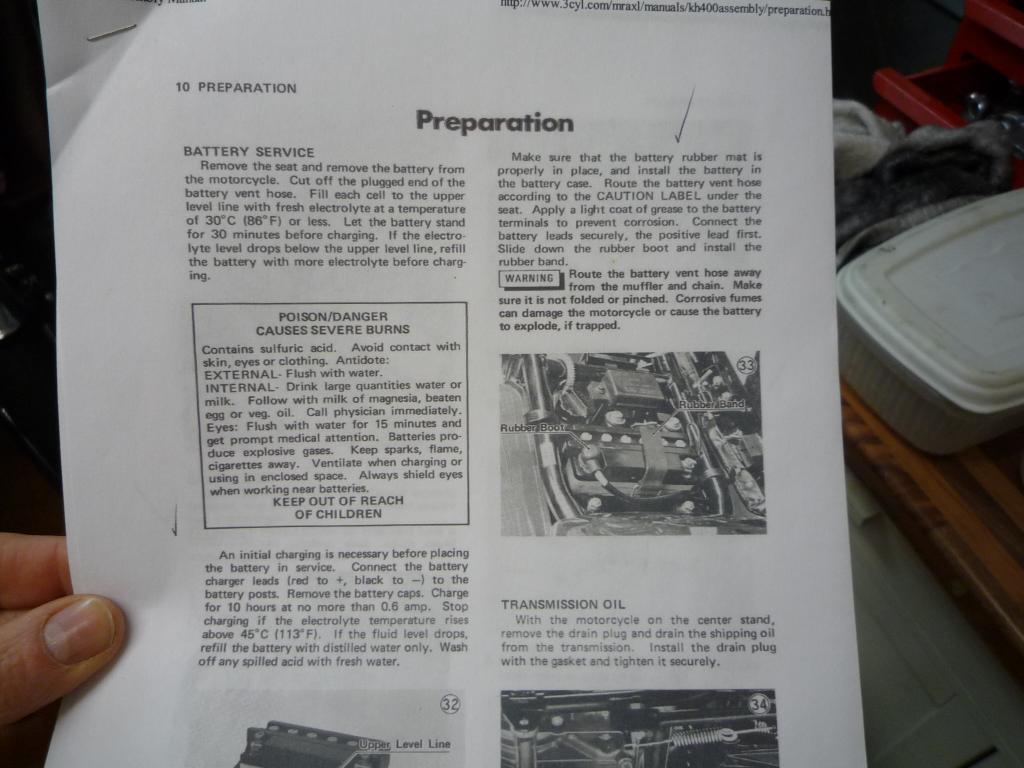
Then in Pre test Preparation I did as they did in the day and followed the KH400
Assembly and preparation manual..... awesome (Thanks mraxl) though I could do
with page 18 as it tells you which fasteners to check are tight before road
testing
I may have to wing that one
So really once I have checked my nuts are tight I guess she is ready to start
wish me luck
So yesterday was D day and time to fire her up for the
first time. With some pre mix added to the tank just to get her going and
settled before the pump took over, I took my first swing on the Kick start, she
gave a little splutter and on the third kick she roared into life.
The tricky part was keeping her running on the choke whilst trying to hold the
pump pulley open enough to bleed the pump and fill the lines, not an easy job on
your own so I shut her off and wired the pulley open until the oil began to
pump. Fired her up again and with the garage filling with smoke (even with the
door open) and the smoke alarm wailing in protest it was happy days and she
sounded great
So any issues?....well only one rather bizarrely .....after pushing her outside
for the first time to have a look at her only to hear a rubbing sound coming
from the back end the sort of noise you get when the wheel is rubbing on the
plastic mudguard. Everything looked clear but the noise was definitely there, so
puzzled by it and it was back inside on the stand to investigate.
The noise was coming from the back wheel and it sounded and felt terrible
nothing for it but to remove it
 With the wheel out and just I removed the brake hub something dropped to the
floor and Bu@#ger me out fell a small slither of split pin!!
With the wheel out and just I removed the brake hub something dropped to the
floor and Bu@#ger me out fell a small slither of split pin!!
How the hell it got in there I don't know but obviously (and I am usually very
careful to catch them) as I snipped one shorter it fired itself into the hub
through the smallest of gaps imaginable and sat there waiting, chance in a
million of it happening but it did,......another valuable lesson learnt
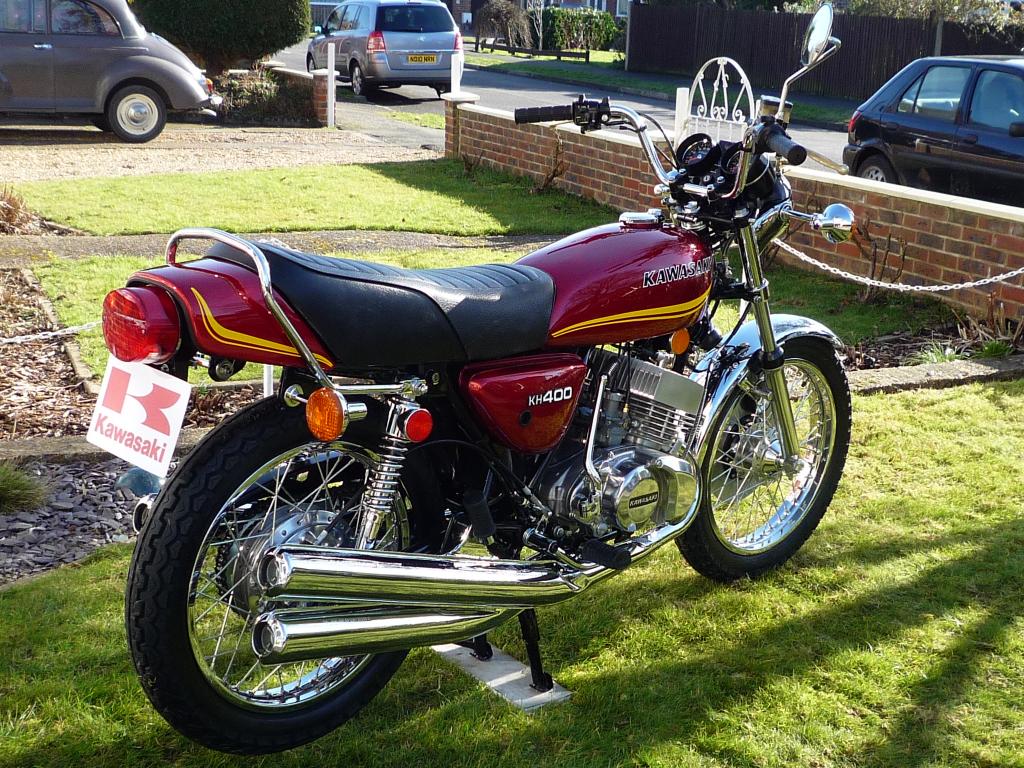
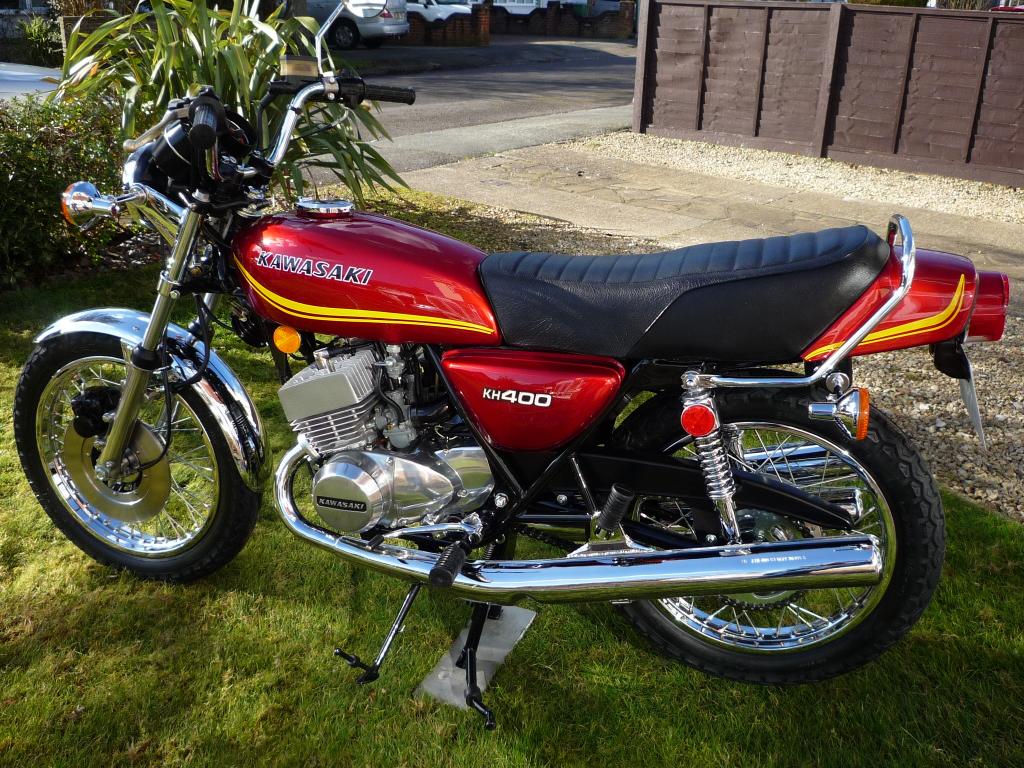
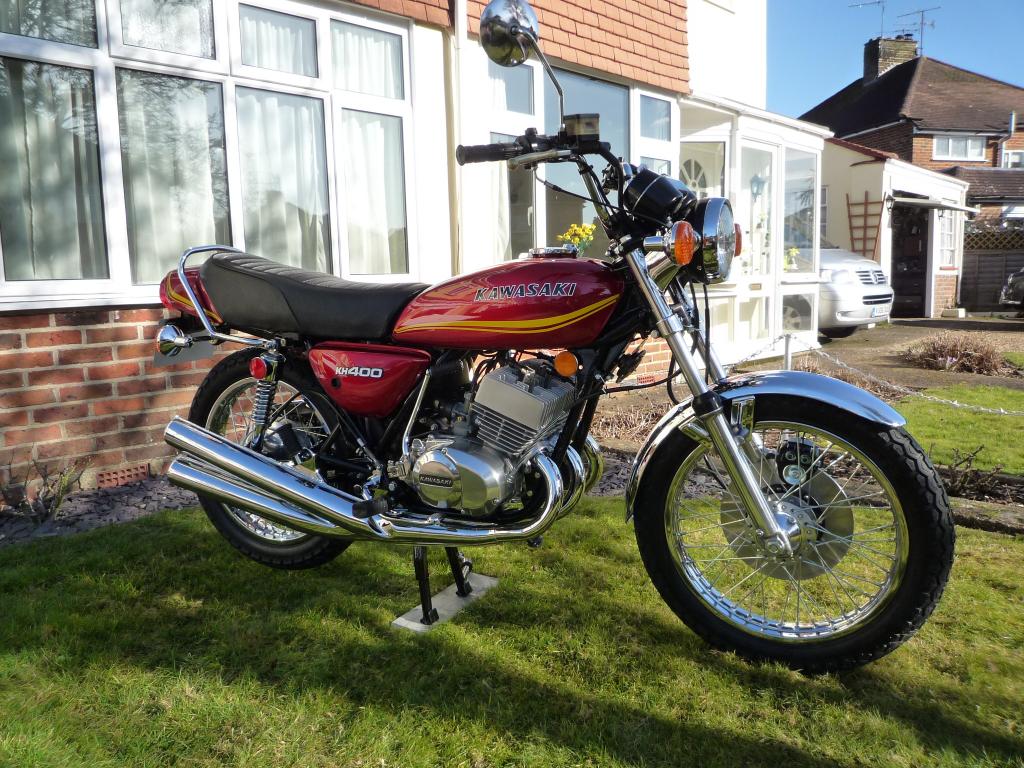
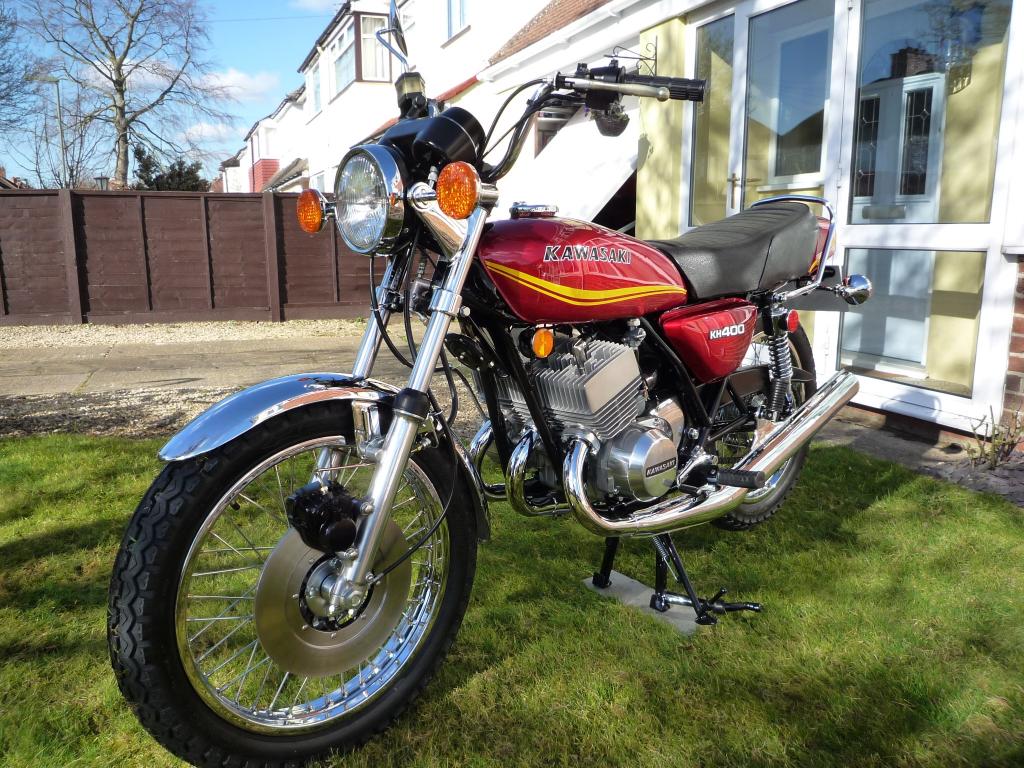
So I guess that's about it for this restoration with just the road test and
paperwork to tidy up and submit now, to get her on the road.
I hope I haven't rattled on too much over the pass few months and gone too over
the top with the pictures, all I can say in my defense is it really has been a
pleasurable build and a knowledgeable one too.
A big THANK YOU for all the support, comments, help and banter along the way,
its been emotional and I am happy but sad its finished.
So until the next one, maybe, possibly who knows.
Here's a few final piccies for the album

Part 1
Part2 Contents